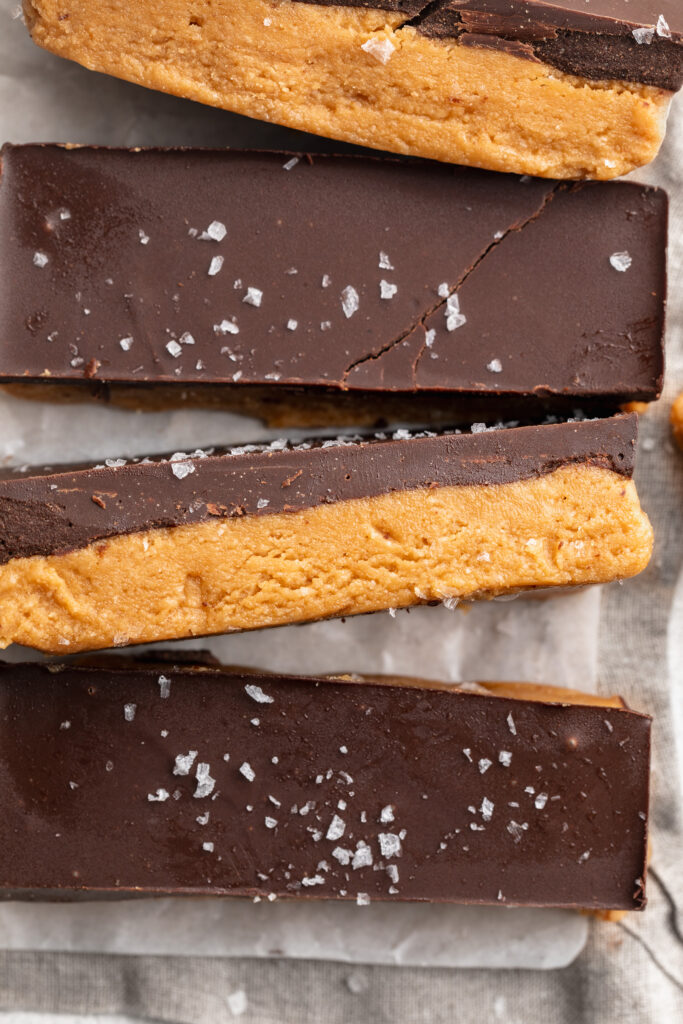
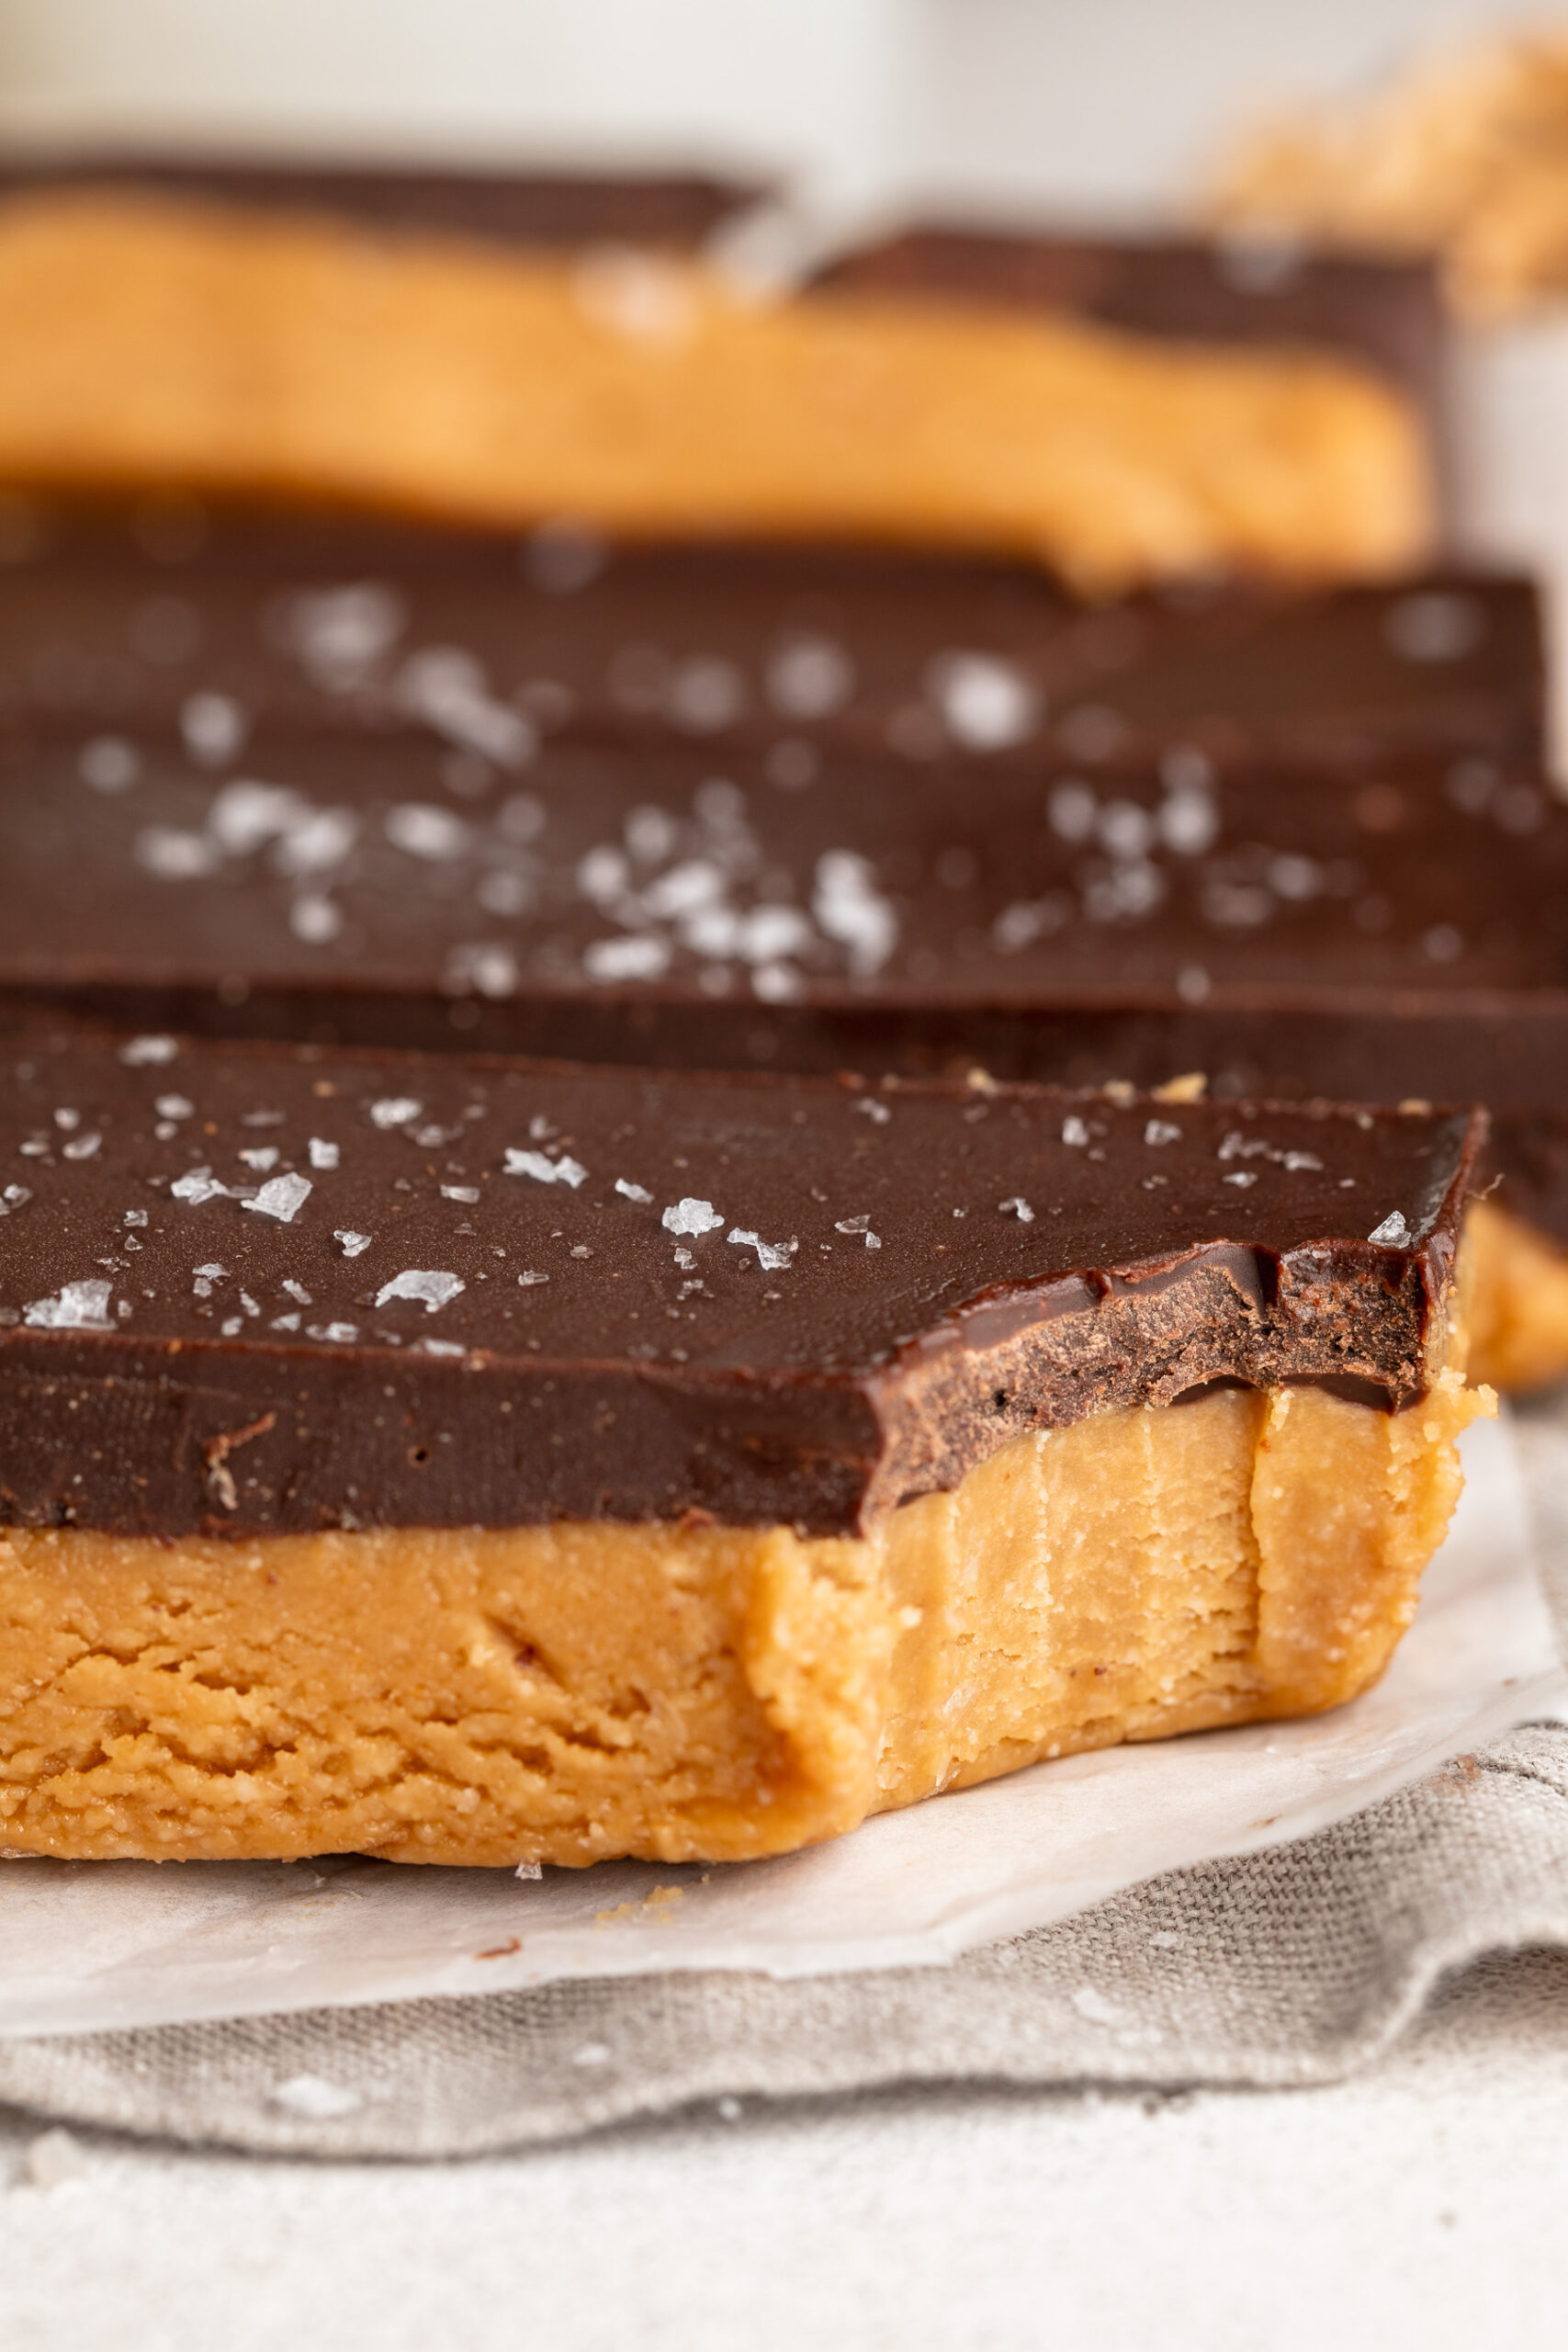
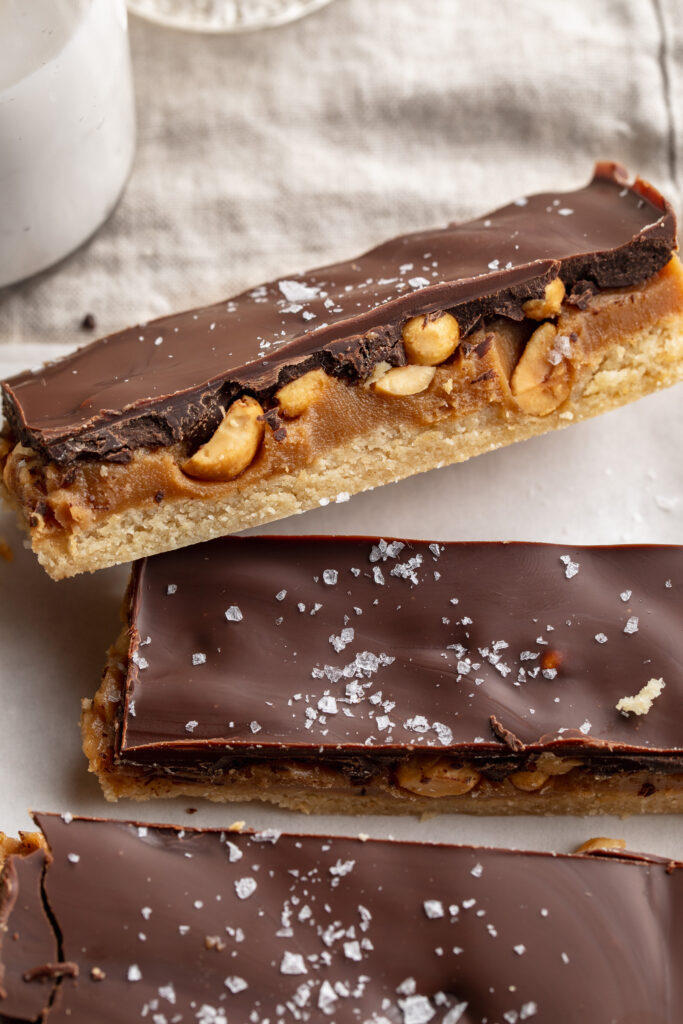
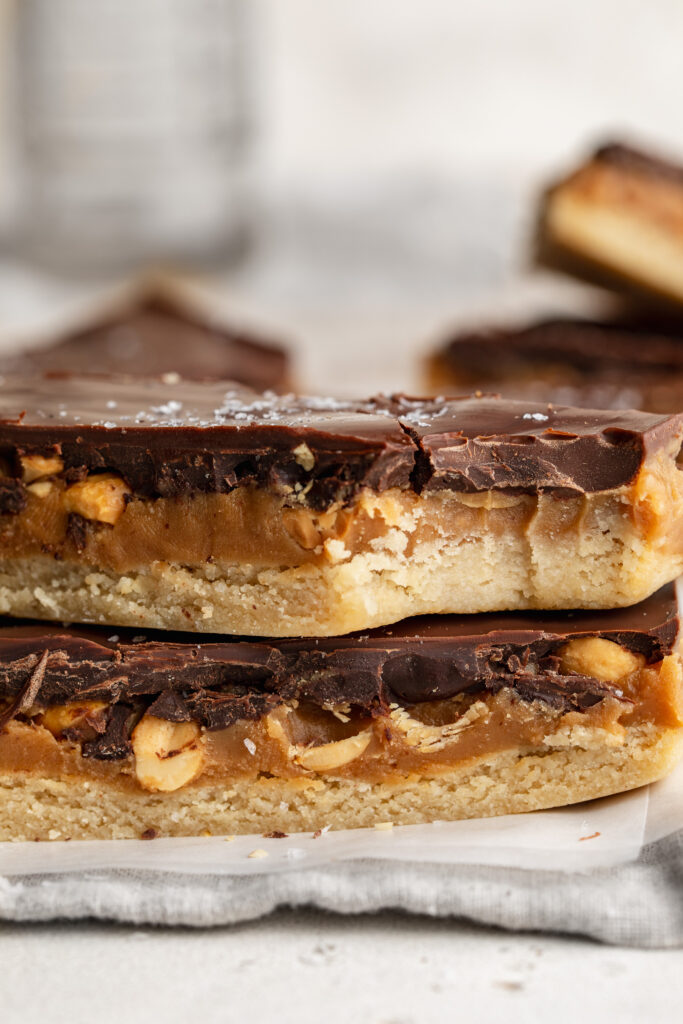
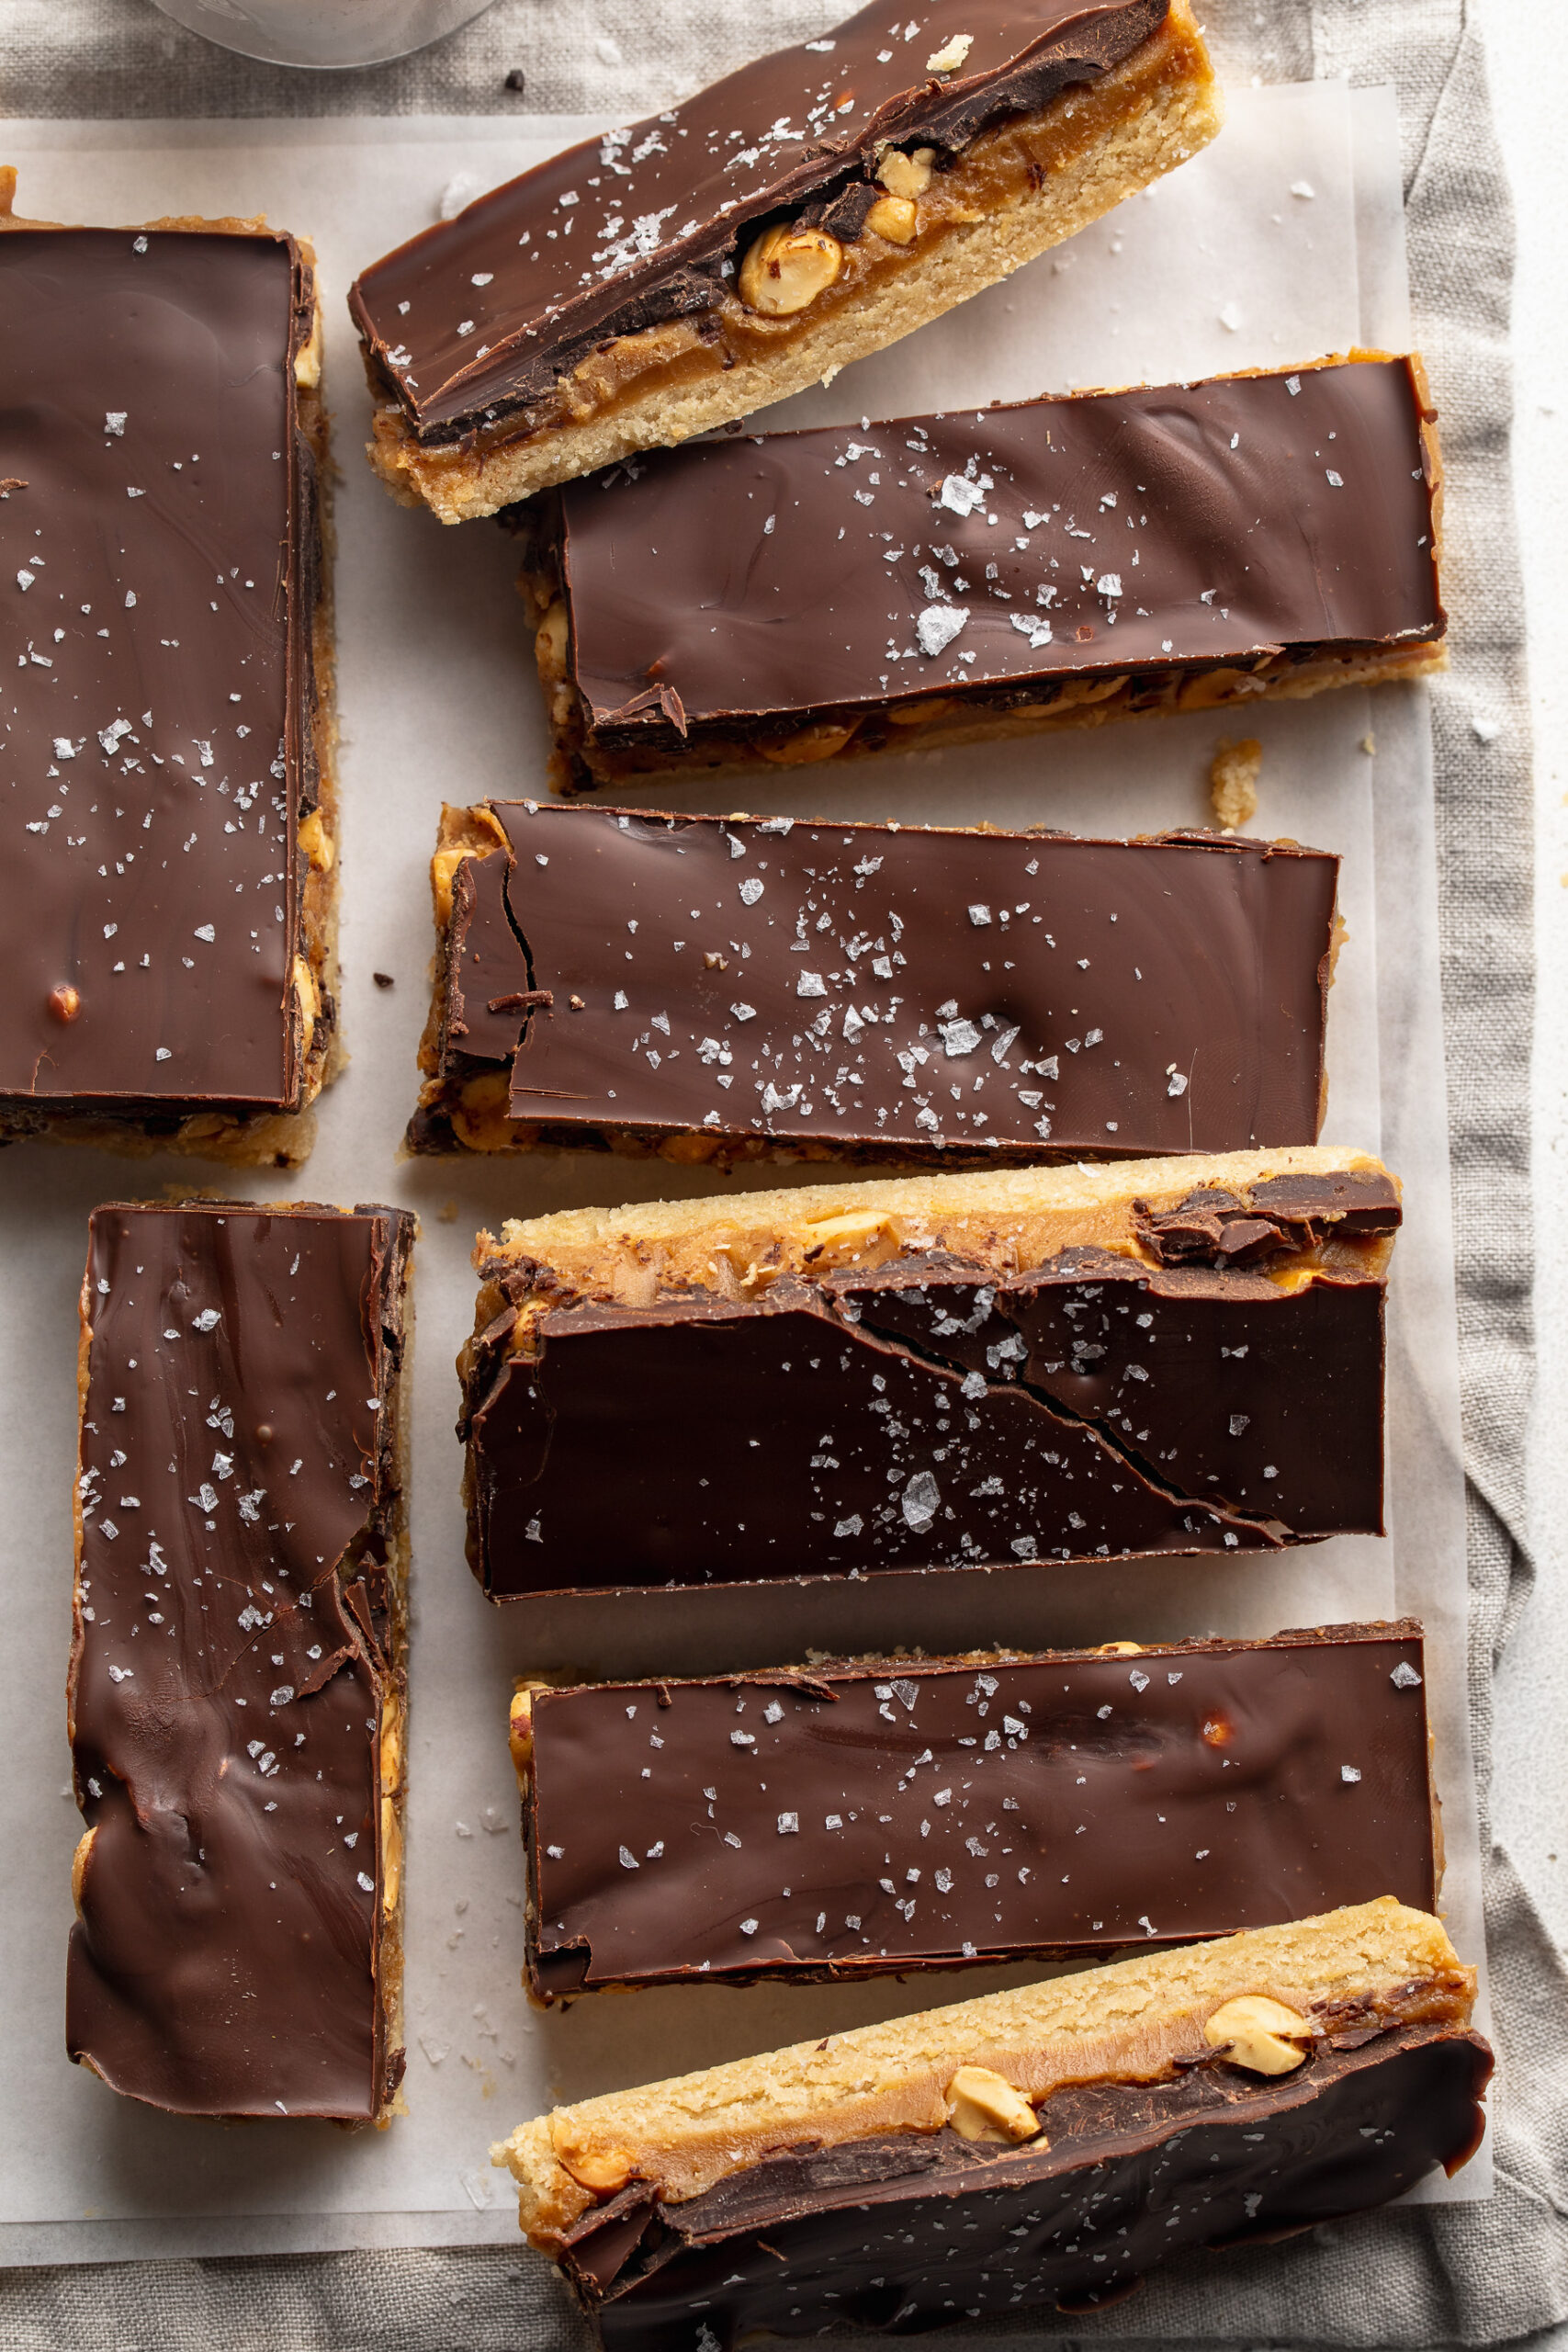
Tag

almond flour

Browsing

It’s finally strawberry season and I’m SO excited to celebrate with this incredible gluten-free strawberry shortcake recipe! There’s just something about this warm spring air (after a VERY long winter) that makes me wanna whip out all the fresh fruit recipes I can think up. I kicked berry season off a couple weeks ago with my 5-ingredient triple berry crisp, then kept the party going with my new healthy strawberry peanut butter cups. And now – this absolutely flawless gluten-free strawberry cake! It’s a light and tender cake topped with a single-ingredient homemade whipped cream and ultra sweet strawberries. This is another one of those gluten-free cake recipes everyone (and I mean everyone) will LOVE!

a slice of gluten-free strawberry shortcake on a plate with whipped cream and strawberries on top.

Why You’ll Love This Gluten-Free Strawberry Shortcake

  • It’s made with just 6 easy-to-find, wholesome ingredients.
  • Fluffy, soft, and sweet with the perfect balance of fresh fruit and homemade whipped cream!
  • Naturally gluten-free, with easy swaps to make it dairy-free or even keto-friendly.

Frequently Asked Questions

How do I store this gluten-free strawberry shortcake?
Store any leftover cake separately from the whipped cream and strawberries in an airtight container at room temperature for up to 2 days. Once topped, store in the fridge for up to 1 day for best texture.

Can I use a different kind of fruit?
Absolutely! Try blueberries, raspberries, peaches, or a mix of berries depending on the season.

What can I substitute for almond flour?
If you need a nut-free option, try oat flour. Note that texture and flavor may vary slightly.

gluten free strawberry shortcake on a table with whipped cream and strawberries on top.

Sam’s Recipe Tips

  • Be sure to beat the eggs and sugar until they’re superrrr airy and fluffy – this gives the cake its light, sponge-like texture.
  • Let the cake cool completely before adding the whipped cream to prevent it from melting!
  • Make the whipped cream just before serving for the fluffiest, creamiest texture.

Adjust This Recipe to Your Dietary Needs

  • Make it Dairy-Free: Use coconut cream or your favorite non-dairy whipped topping in place of heavy whipping cream.
  • Make it Keto: Replace the sugar with a keto-friendly sweetener like monk fruit or erythritol.
the inside cut of gluten free strawberry shortcake.

What Makes This the BEST Gluten-Free Strawberry Shortcake Recipe

This gluten-free strawberry shortcake is soft, simple, and super impressive. It’s a breeze to whip up in under an hour and delivers the perfect combination of sweet cake, whipped cream, and fresh fruit – no one will ever believe it’s gluten-free! Whether you’re hosting brunch or celebrating something special, this shortcake has your back.

gluten-free strawberry shortcake on a table with whipped cream and fresh strawberries on top.
5 from 1 vote

6-Ingredient Gluten Free Strawberry Shortcake

This gluten-free strawberry shortcake is the easy, light, and summery dessert you’ll want to make again and again! With just 6 simple ingredients, it’s fluffy, naturally gluten-free, and topped with a generous layer of whipped cream and sweet, juicy strawberries. It's perfect for birthdays, holidays, or any warm-weather gathering, this shortcake is a no-fuss, totally delicious crowd-pleaser!
Print Pin Rate
Prep Time: 15 minutes
Cook Time: 30 minutes
Total Time: 45 minutes
Servings: 8 servings

Equipment

  • 2 large bowls
  • 1 small bowl

Ingredients

  • 4 large eggs at room temperature
  • 1/2 cup sugar
  • 1 1/2 cups almond flour
  • 1 teaspoon baking powder

For the whipped cream:

  • 1 cup heavy whipping cream

For the strawberries

  • 1 cup fresh strawberries sliced
  • 1 tablespoon sugar

Instructions

  • Preheat oven to 350° Fahrenheit and grease a 6-inch cake pan.
  • Beat together the eggs and sugar with a hand or stand mixer on high speed until pale and thick, about 5 minutes.
  • Add in the almond flour and baking powder. Beat for another 30 seconds to one minute, until batter is just combined.
  • Transfer the batter to your prepared cake pan. Bake the cake 30-35 minutes, or until a toothpick inserted down the center of the cake comes out clean.
  • Remove cake from the pan and transfer it to a wire cooling rack to cool. While the cake cools, add the sliced strawberries and a tablespoon of sugar to a bowl, and stir until the strawberries are coated in sugar. Set the strawberries aside while you make the whipped cream.
  • Pour the heavy whipping cream into a large bowl and use a hand or stand mixer to beat the cream until it’s super light and fluffy and stiff peaks have formed (about 5 minutes).
  • Once the cake has completely cooled, top it with the homemade whipped cream then the strawberries. This cake is best served immediately!

Nutrition

Serving: 1serving | Calories: 200kcal | Carbohydrates: 10g | Protein: 5g | Fat: 16g | Sugar: 6g

Honestly, before this recipe – I did NOT like cottage cheese. And trust me, I really wanted to love it. It’s a great source of protein, nutrients, calcium, etc. but I just could not see past the texture. Which is why in the first step of this healthy cottage cheese cookie dough recipe we blend the cottage cheese with maple syrup until it’s completely smooth. What you’re left with is a silky smooth, ultra creamy, high-protein cookie dough that tastes nothing like cottage cheese! All that to say, if you’re like me and convinced you don’t like cottage cheese… you might want to give this recipe a try, I’m sure it’ll change your mind. 😉

And for more cookie dough recipes, you have to try my 4-Ingredient Healthy Cookie Dough Bark, Cookie Dough Protein Balls, and Cookie Dough Frozen Yogurt Bites next!

Why You’ll Love This Recipe

  • High-Protein & Satisfying: Packed with protein from cottage cheese and protein powder, this treat keeps you full and energized.​
  • Quick & Easy: No baking required – just blend, mix, and enjoy!​
  • Wholesome Ingredients: Made with simple, nutritious ingredients for a healthier treat.​
overhead image of chocolate chip cottage cheese cookie dough in a dish with a spoon.

What Makes This Cottage Cheese Cookie Dough Healthy?

This recipe is a healthier alternative to traditional cookie dough, thanks to its high protein content and use of natural sweeteners. Cottage cheese provides a creamy texture and a good source of protein, while maple syrup offers a natural sweetness without refined sugars. Almond flour adds healthy fats and fiber, making this treat both delicious and nourishing.​

Recipe Substitutions

  • Almond Flour: Swap with oat flour or coconut flour for a nut-free or different flavor profile.​
  • Maple Syrup: Use honey or agave nectar as alternative natural sweeteners.​
  • Chocolate Chips: Replace with cacao nibs or dairy-free chocolate chips to suit your dietary needs!​
cottage cheese cookie dough in a small cup with a spoon.

Adjust This Recipe to Your Dietary Needs

  • Nut-Free: Use oat flour instead of almond flour and ensure chocolate chips are nut-free.​
  • Dairy-Free: Opt for a plant-based yogurt instead of cottage cheese and use dairy-free chocolate chips.​
  • Keto-Friendly: Use sugar-free maple syrup alternatives and low-carb chocolate chips, and consider coconut flour as a low-carb flour option!
overhead image of cottage cheese cookie dough in a small dish.
5 from 1 vote

Cottage Cheese Cookie Dough

This cottage cheese cookie dough recipe is a high-protein, no-bake treat made with just six wholesome ingredients! Blending cottage cheese with maple syrup and vanilla creates a creamy base, which is then combined with almond flour, vanilla protein powder, and chocolate chips for a delicious, edible cookie dough. It's an easy, healthy snack that's perfect for satisfying your sweet tooth while keeping your health on track!
Print Pin Rate
Prep Time: 5 minutes
Total Time: 5 minutes
Servings: 6 servings

Equipment

  • 1 small bowl

Ingredients

  • 1 cup cottage cheese
  • 1/4 cup maple syrup or honey
  • 1 teaspoon vanilla extract optional
  • 1 cup almond flour
  • 1 scoop vanilla protein powder
  • 1/2 cup chocolate chips

Instructions

  • Add the cottage cheese, maple syrup, and vanilla extract to a blender or food processor and blend until completely smooth.
  • Transfer the cottage cheese mixture to a bowl and mix in the almond flour and vanilla protein powder, then fold in the chocolate chips.
  • Serve immediately or store in an airtight container in the fridge for up to 5 days.

Nutrition

Serving: 1serving | Calories: 260kcal | Carbohydrates: 22g | Protein: 12.5g | Fat: 15g | Sugar: 14g

I went on a sort of healthier candy spree last fall with my healthy snickers recipe, 4 ingredient date caramels, and healthy homemade butterfingers. All of which are delicious, but I was missing one of the most popular (and one of my personal faves) candies – peanut butter cups! And honestly, had I known making your own homemade healthy peanut butter cups was this easy, I’d have been making them for yearssss. Just chocolate (I used dark, but use whatever you prefer!), peanut butter, almond flour, coconut oil, and just a touch of maple syrup is all you’ll need for this super easy and no-bake dessert recipe!

healthy strawberry peanut butter cups on a sheet of parchment paper.

Why You’ll Love These Healthy Strawberry Peanut Butter Cups

  • Made with just 5 wholesome ingredients, these peanut butter cups are easy, no-bake, and naturally gluten-free and dairy-free.
  • The creamy peanut butter filling paired with rich dark chocolate and a touch of strawberry makes them a perfectly indulgent yet nourishing treat.
  • Customizable to suit your dietary needs – refined sugar-free, nut-free, or vegan – without compromising flavor.

What Makes This Recipe Healthy?

Unlike traditional peanut butter cups loaded with refined sugars and additives, this recipe uses natural sweeteners like maple syrup or honey. The inclusion of almond flour adds a dose of healthy fats and fiber, while the use of dark chocolate chips provides antioxidants. By choosing unsweetened peanut butter, you control the sweetness and ensure a treat that’s both delicious and nourishing!

close up image of a healthy strawberry peanut butter cup with a bite taken out.

Can I Use a Different Sweetener?

Absolutely! If you prefer a different natural sweetener, options like agave nectar or coconut sugar work well in this recipe. Keep in mind that the sweetness level may vary, so adjust to taste. For a sugar-free version, consider using a monk fruit sweetener or stevia, but be sure to check the conversion rates as they differ from traditional sweeteners.​

Adjust This Recipe to Your Dietary Needs

  • Make it Nut-Free: Replace peanut butter with sunflower seed butter and almond flour with oat flour to eliminate nuts while maintaining texture and flavor.​
  • Make it Dairy-Free: Use dairy-free chocolate chips to ensure the entire recipe remains free from dairy products.​
  • Make it Refined Sugar-Free: Opt for dark chocolate chips sweetened with coconut sugar or stevia, and use maple syrup or honey as your sweetener of choice.​
a healthy strawberry peanut butter cup with a bite taken out.
No ratings yet

Healthy Strawberry Peanut Butter Cups

These healthy strawberry peanut butter cups are a delicious, no-bake treat made with just 5 simple ingredients. Naturally gluten-free and dairy-free, they’re perfect for a quick snack or a better-for-you dessert. Easy to customize and bursting with sweet, chocolatey flavor, they’re the ultimate healthy twist on a classic favorite.
Print Pin Rate
Prep Time: 10 minutes
Chill Time: 18 minutes
Total Time: 28 minutes
Servings: 16 servings

Equipment

  • 2 small bowls
  • 1 mini muffin pan

Ingredients

For the chocolate layer:

  • 1 cup chocolate chips
  • 1 tablespoon coconut oil

For the peanut butter filling:

  • 1/2 cup peanut butter unsweetened
  • 2-3 tablespoons almond flour or 1-2 tablespoons coconut flour
  • 2 tablespoons maple syrup or honey

Instructions

  • Line a mini muffin pan with mini liners.
  • Melt together the chocolate chips and coconut oil in either the microwave or over a double boiler until completely melted and smooth.
  • Once the chocolate is melted, pour about 1 teaspoon of melted chocolate into the bottom of each liner and use a spoon to spread the chocolate around to cover the entire bottom of the liner. Once all liners are lined with chocolate, transfer your muffin pan to the freezer to set and set the remaining melted chocolate aside.
  • While the chocolate sets, add all peanut butter filling ingredients to a bowl and stir together until smooth, slightly thick, and combined.
  • Spoon about 1 teaspoon of the peanut butter filling mixture into the palm of your hands and roll it into a ball, then flatten it slightly to form a disk. Remove the muffin tin from the freezer and place one disk on top of each cup lined with chocolate. Repeat this process until all cups have been filled with peanut butter.
  • Pour 1-2 teaspoons of melted chocolate over each peanut butter cup, making sure you completely cover the peanut butter inside.Once all peanut butter cups are filled with chocolate, transfer the pan back into the freezer for 10-15 minutes or until the chocolate is completely set.Remove the strawberry peanut butter cups from the freezer, transfer to an airtight container and store in the fridge or enjoy right away!

Nutrition

Serving: 1serving | Calories: 120kcal | Carbohydrates: 9g | Protein: 3g | Fat: 8g | Sugar: 6g

Carrot cake is my all-time FAVORITE kind of cake! And a few weeks ago I realized – I’ve made healthy carrot cake cookies, gluten-free carrot cake muffins, and even carrot cake baked oats but I’ve never made an actual carrot CAKE before. I know, I was shocked too. So I found the time and started recipe testing!

I knew my carrot cake had to be a few things – one bowl, gluten-free, and easy to make. I also really wanted to keep this gluten-free cake recipe to taste as close to the real thing as possible. I wasn’t willing to compromise on taste or texture, so after a few (failed) tests I finally did it! The BEST EVER gluten-free (and can be made dairy-free) carrot cake, made in one bowl, and oh-SO delicious.

gluten free and dairy free carrot cake ingredients on a table.

Why You’ll Love This Gluten-Free Carrot Cake

  • Moist and Flavorful: This cake boasts a tender crumb, infused with warm spices and the natural sweetness of carrots.​
  • Simple Ingredients: Crafted with everyday items, making it accessible and easy to prepare.​
  • Versatile and Inclusive: Easily adaptable to various dietary needs without compromising on taste.
gluten free carrot cake with cinnamon cream cheese frosting cut into on a plate.

Sam’s Recipe Tips

  • Room Temperature Ingredients: Ensure eggs and dairy-free alternatives are at room temperature for a smoother batter.​
  • Grating Carrots: Use freshly grated carrots for optimal moisture and flavor.​
  • Frosting Consistency: Adjust the amount of milk in the frosting to achieve your desired thickness.​

Adjust This Recipe to Your Dietary Needs

Make it Dairy-Free: Use non-dairy cream cheese, butter, and milk alternatives in both the cake and frosting.​

Vegan Option: Replace eggs with flax eggs (1 tablespoon ground flaxseed mixed with 3 tablespoons water per egg) and use all dairy-free substitutes.

Make it Nut-Free: Omit the walnuts and ensure all other ingredients are free from cross-contamination.​

close up image of gluten-free carrot cake with cinnamon cream cheese frosting on a plate.

Storage Instructions

  • Refrigeration: Store the frosted cake in an airtight container in the refrigerator for up to one week.​
  • Freezing: For longer storage, freeze unfrosted cake layers wrapped tightly in plastic wrap for up to three months. Thaw and frost before serving.
4.67 from 3 votes

The BEST Gluten-Free and Dairy-Free Carrot Cake with Cinnamon Cream Cheese Frosting

This gluten-free cake is simply heavenly – and made in just one bowl! It's bursting with warm spices, shredded carrots, and topped with a luscious cinnamon cream cheese frosting. This cake is an incredible treat for any occasion!
Print Pin Rate
Prep Time: 15 minutes
Cook Time: 30 minutes
Total Time: 45 minutes
Servings: 9 servings

Equipment

  • 2 large bowls
  • 1 9×9-inch baking pan
  • 1 hand or stand mixer

Ingredients

  • 1 cup brown sugar, or coconut sugar
  • 1/2 cup vegetable oil I used olive oil
  • 1/4 cup milk I used non-dairy almond milk
  • 2 large eggs at room temperature
  • 1 teaspoon vanilla extract
  • 1 1/2 cups gluten-free all purpose flour
  • 1 teaspoon baking powder
  • 1 teaspoon baking soda
  • 2 teaspoons cinnamon
  • 1/2 teaspoon nutmeg
  • 1 1/2 cups grated carrots
  • 1/2 cups walnuts chopped
  • 1/2 cup raisins optional

For the cinnamon cream cheese frosting:

  • 1/2 cup cream cheese, softened (I used non-dairy cream cheese)
  • 1/2 cup butter, softened (I used non-dairy butter)
  • 4 cups powdered sugar
  • 3-4 tablespoons milk I used non-dairy almond milk
  • 2 teaspoons cinnamon
  • 1/4 teaspoon vanilla extract

Instructions

  • Preheat oven to 350° Fahrenheit and line a 9×9-inch baking pan with parchment paper.
  • In a large bowl, whisk together the brown sugar or brown sugar, oil, eggs, and vanilla extract until well combined.
  • Add in the gluten-free all purpose flour, baking powder, baking soda, cinnamon, and nutmeg. Whisk everything together into a smooth batter. Then, add in the shredded carrots and chopped walnuts, and use a spatula to fold those ingredients into the batter.
    gluten-free-carrot-cake-step-02
  • Pour the batter into your prepared baking pan and bake for 30-35 minutes, or until a toothpick inserted down the center of the cake comes out clean.
  • Remove the cake from the oven, let it cool inside the baking pan for 15 minutes then carefully remove the cake from the pan by sliding a sharp knife around the outside edge of the cake. Transfer the cake to a wire cooling rack and let it cool completely before frosting.
  • Once the cake is cool, make the cinnamon cream cheese frosting by adding all frosting ingredients to a large bowl and beating with either a hand or stand mixer until fully combined. Start by using just 3 tablespoons of milk in the frosting, then add an additional tablespoon of milk if the frosting is too thick.
  • Spread the frosting into an even layer over the top of the cooled carrot cake. Either serve cake immediately or cover and store in the fridge for up to 1 week!

Notes

Nutrition info may vary depending on the brand of ingredients used. The above nutrition info was calculated to include the cinnamon cream cheese frosting.

Nutrition

Serving: 1serving | Calories: 312kcal | Carbohydrates: 38g | Protein: 3g | Fat: 17g | Sugar: 26g

Believe it or not, this recipe was my sister’s idea! She actually suggested it over a year ago and at the time, I already had so many cookie recipes on the blog – almond flour chocolate chip cookies, healthy cookie dough bark, and gluten-free edible cookie dough – I sorta just put it on the back burner. Well, fast forward to a few weeks ago when her idea popped back into my head and I was like… ya, a healthy cookie skillet sounds SO good right about now. So I ran to my kitchen and got to work!

I knew my cookie skillet had to be three things – gluten-free, healthier than the rest, and DELICIOUS. And let me tell ya, this recipe checks every one of those boxes! Made with almond flour, coconut oil, and a dash of maple syrup, it’s surprisingly healthy but just as good as any other cookie recipe. It’s also super easy to make in just one bowl with 8 simple ingredients!

Why You’ll Love This Healthy Cookie Skillet

  • Simple & Delicious: This gooey, chocolatey cookie skillet is made in just one bowl with 8 simple ingredients.
  • Healthier Than Traditional Cookies: Made with almond flour, coconut oil, and maple syrup, this recipe is gluten-free, paleo, and naturally sweetened.
  • Diet-Friendly & Versatile: Easy to customize for nut-free, keto, or vegan diets with simple ingredient swaps.

Recipe Substitutions & Variations

Flour Alternatives:

  • All-Purpose Flour: Swap the almond flour for an equal amount of all-purpose flour if you’re not concerned about gluten-free or paleo.
  • Coconut Flour: Use 1/4 cup coconut flour in place of the almond flour for a lower-carb version.

Nut Butter Swaps:

  • Use peanut butter for a classic flavor or cashew butter for extra creaminess.
  • For nut-free, opt for sunflower seed butter.

Mix-In Ideas:

  • Chopped nuts (walnuts, pecans, or almonds) for added crunch.
  • Unsweetened shredded coconut for extra texture and flavor.
  • Flaky sea salt sprinkled on top before baking for a sweet-salty contrast.
Overhead close up image of healthy cookie skillet with a scoop of vanilla ice cream on top.

What Makes This Recipe Healthy?

  • Gluten-Free & Paleo: Made with almond flour and coconut oil, this skillet cookie is grain-free and dairy-free.
  • Naturally Sweetened: Maple syrup is used instead of refined sugar, making it a healthier dessert option.
  • Wholesome Fats & Protein: Almond butter and coconut oil provide healthy fats, while the egg adds protein.

Adjust This Recipe to Your Dietary Needs

Make It Nut-Free: Swap almond butter with sunflower seed butter and use all-purpose flour instead of almond flour.

Make It Keto: Replace maple syrup with monk fruit syrup or another keto-friendly sweetener and use sugar-free chocolate chips.

Make It Vegan: Use a flax egg (1 tablespoon ground flaxseed + 3 tablespoons water) instead of a regular egg and choose dairy-free chocolate chips.

Close up image of healthy cookie skillet with a spoon.

Storage Instructions

  • Fridge: Store leftovers in an airtight container in the fridge for up to 5 days.
  • Freezer: Freeze individual portions for up to 3 months. Thaw in the fridge or reheat in the microwave before serving.

More Healthy Desserts You’ll Love

overhead image of healthy gluten-free cookie skillet with a scoop of vanilla ice cream on top.
No ratings yet

Healthy Gluten-Free Cookie Skillet

Treat yourself to this healthy cookie skillet made with almond flour, coconut oil, and maple syrup! It’s gluten-free, paleo, and naturally sweetened, making it a wholesome choice for any sweet tooth. Plus, it comes together in one bowl with just 8 simple ingredients!
Print Pin Rate
Prep Time: 3 minutes
Cook Time: 18 minutes
Total Time: 21 minutes
Servings: 6 servings

Equipment

  • 1 large bowl
  • 1 8-inch skillet

Ingredients

  • 1/2 cup unsweetened creamy almond butter or any nut/seed butter
  • 1/4 cup melted coconut oil
  • 3 tablespoons maple syrup
  • 1 egg at room temperature
  • 1 teaspoon vanilla extract
  • 1 cup almond flour
  • 1/2 teaspoon baking soda
  • 1/2 cup chocolate chips

Instructions

  • Preheat oven to 350° Fahrenheit and lightly grease an 8-inch skillet.
  • In a large bowl, whisk together the almond butter, melted coconut oil, maple syrup, egg, and vanilla extract.
  • Add in the almond flour and baking soda, then mix until the batter is completely combined.
  • Stir in the chocolate chips, then transfer the batter to your greased skillet. Bake for 20-25 minutes, or until just set in the center, then remove and let cool slightly before serving.

Nutrition

Serving: 1serving | Calories: 340kcal | Carbohydrates: 19g | Protein: 8g | Fat: 28g | Sugar: 11g