Tag

cream cheese

Browsing

Classic cheesecake is one of my all-time favorite desserts – but it’s not exactly a weeknight kind of treat. Enter: these cottage cheese cheesecake bars. Same creamy, tangy, silky filling. Same buttery graham cracker crust. But lighter, higher in protein, and made with just 6 simple ingredients that come together in one blender! If you’ve been following along for a while, you already know that blended cottage cheese can do some seriously magical things – just like in my 3-Ingredient Cottage Cheese Ice Cream and 6-Ingredient Cottage Cheese Cookie Dough. This recipe is more of the same magic, and I promise you can’t taste the cottage cheese!

The texture is smooth, creamy, and genuinely so similar to the real thing. I’ve served these to people who would never voluntarily eat cottage cheese, and every single one of them went back for seconds. They taste just like classic cheesecake, but with significantly more protein and fewer calories per bar. This is the kind of healthy dessert that everyone will LOVE!

Why You’ll Love These Cottage Cheese Cheesecake Bars

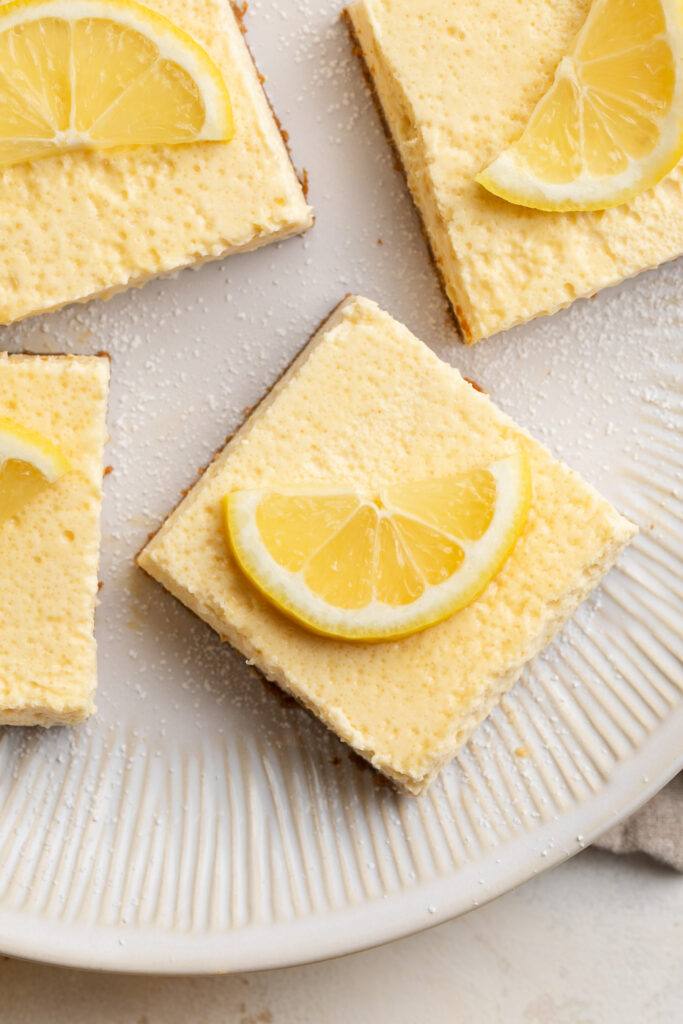
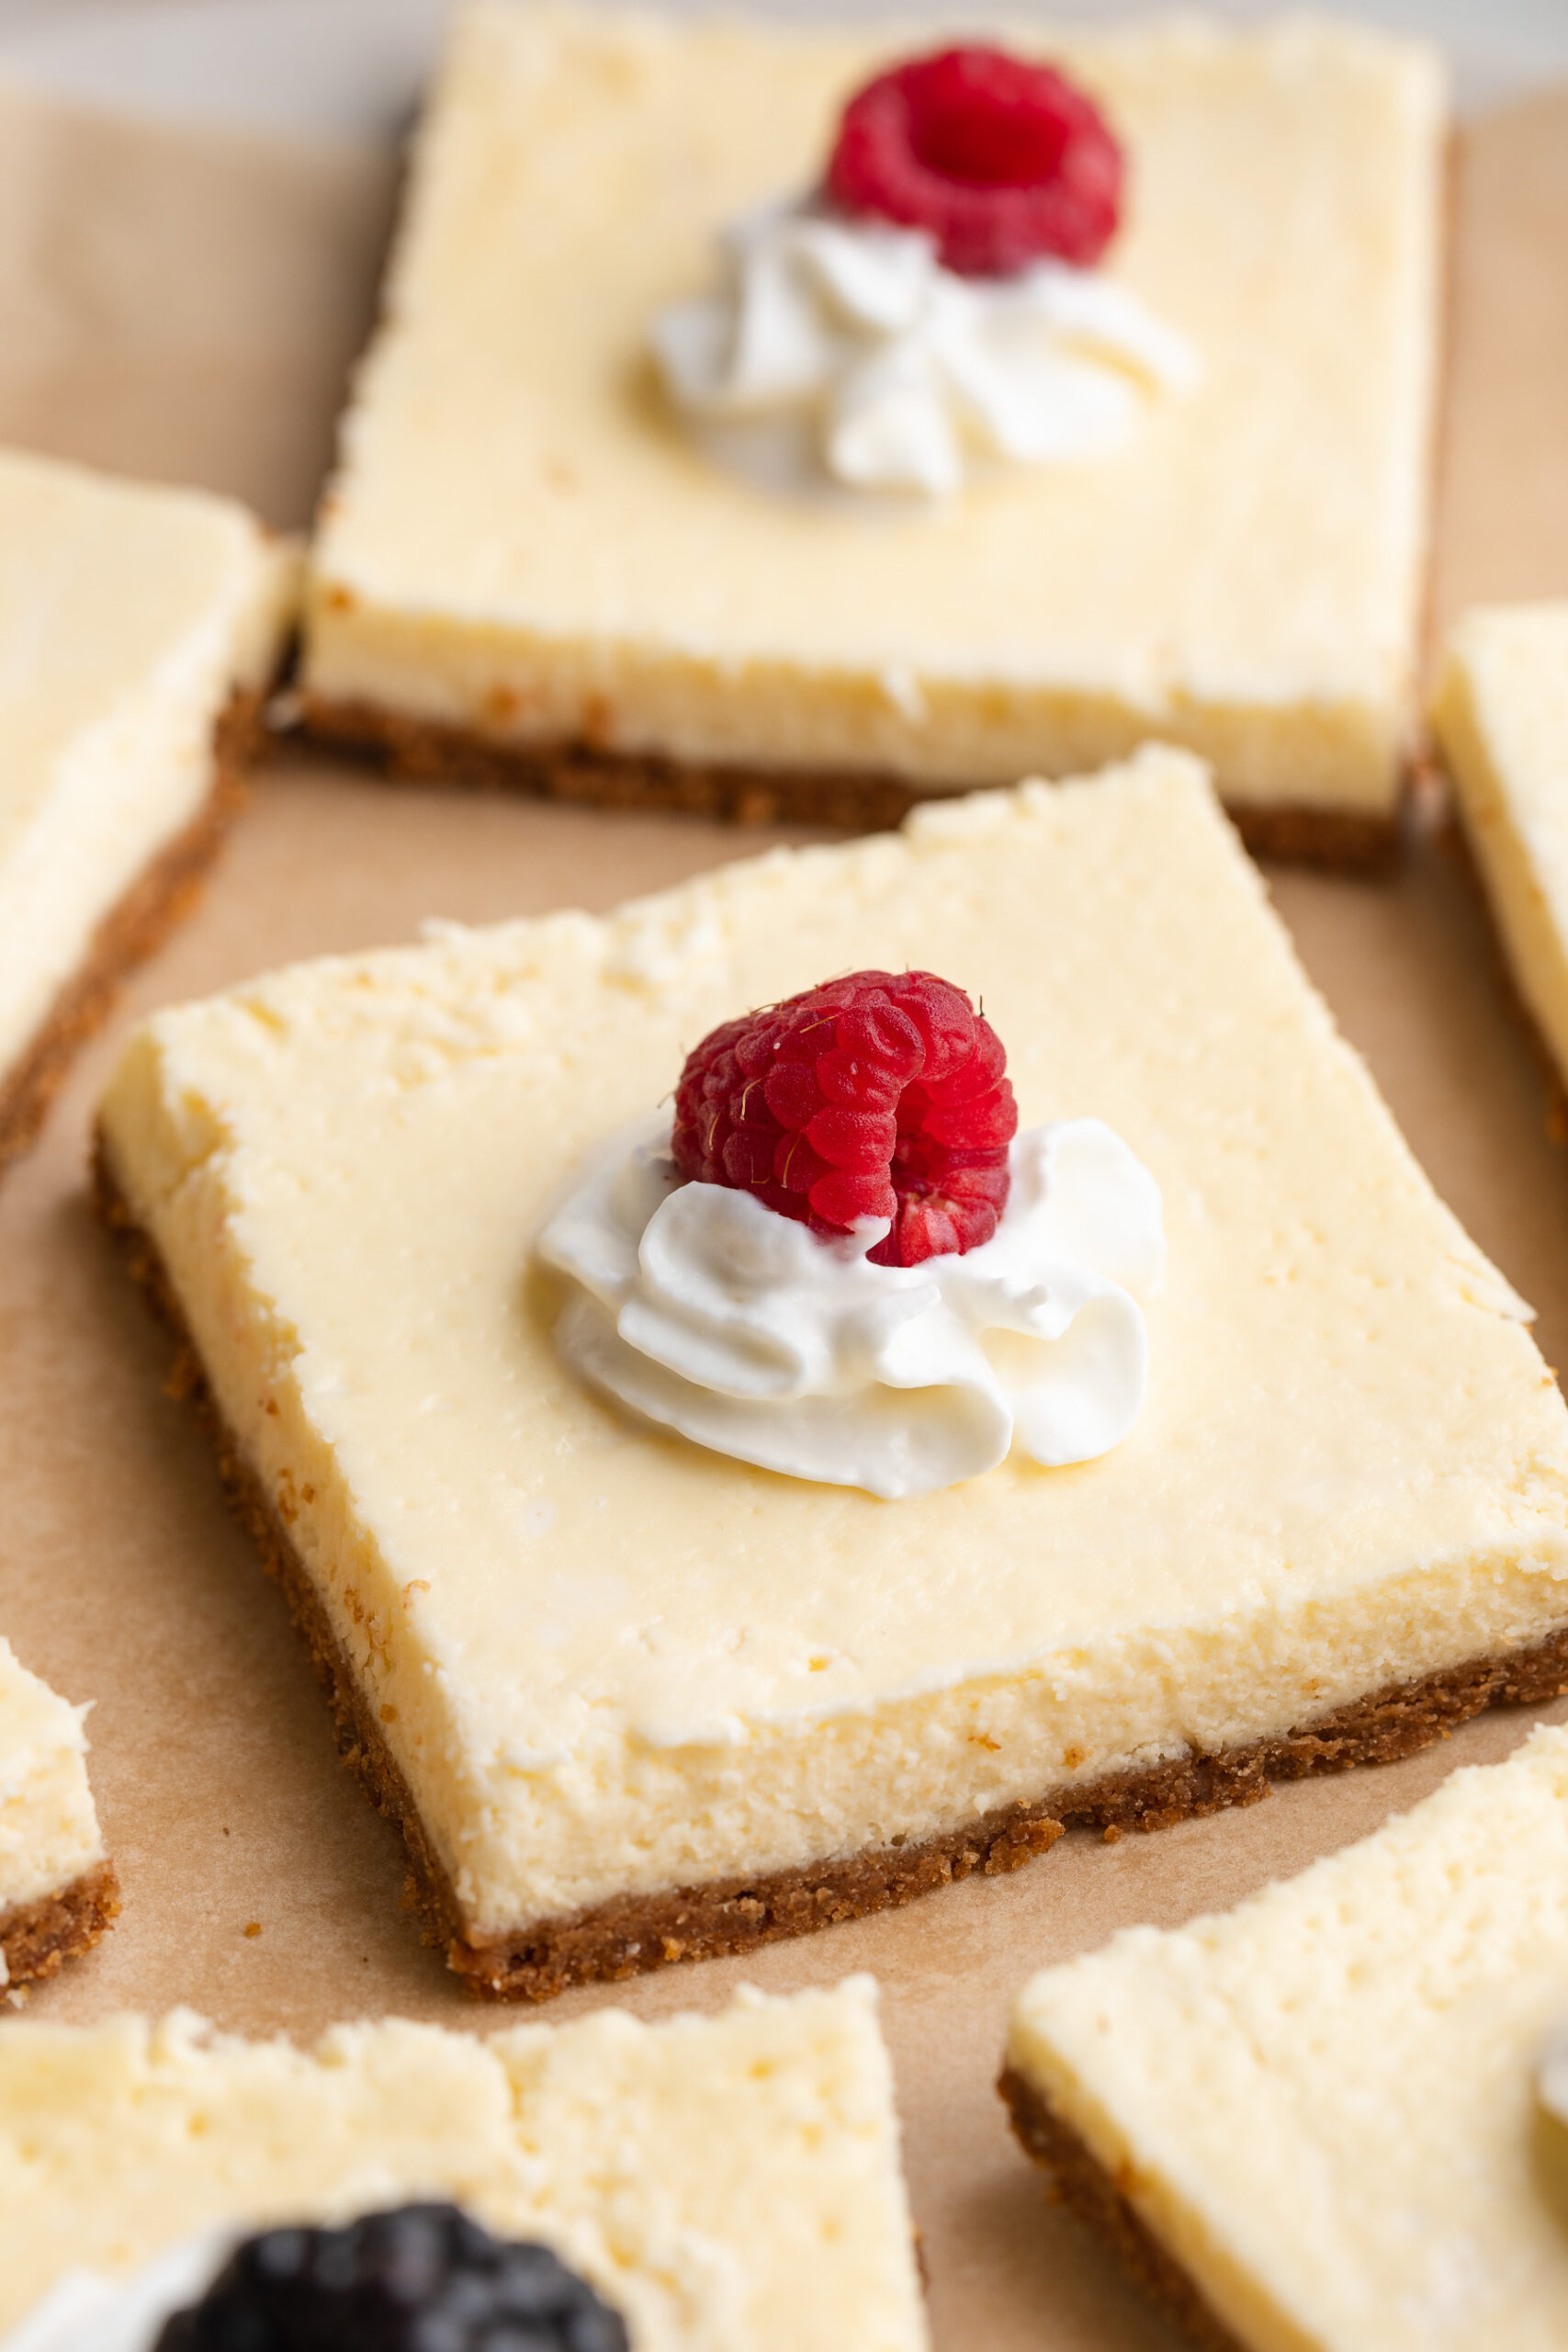
  • Tastes just like the real thing. Creamy, tangy, perfectly sweet, and sitting on a buttery graham cracker crust, these bars check every single cheesecake box. You would truly never guess they’re made with cottage cheese!
  • Lighter and higher in protein than classic cheesecake. Traditional cheesecake is made tons of cream cheese. This version swaps most of that for cottage cheese, which is naturally lower in calories and higher in protein.
  • Just 6 ingredients. Graham cracker crumbs, butter, cream cheese, cottage cheese, eggs, sugar, and vanilla. That’s it – no sour cream, no heavy cream, no complicated cheesecake technique required!
  • Super easy to make. The filling comes together in a blender in about 60 seconds. No mixer, no water bath required (though I do recommend it — see Sam’s Tips!), no complicated steps.
  • Great for making ahead. Like all good cheesecake, these bars are actually better the next day after a full night in the fridge. Make them the day before you need them and they’ll be ready to go by morning!
cottage cheese cheesecake bars on a plate.

Frequently Asked Questions

What kind of cottage cheese did you use?

I used Daisy 4% Milk Fat Cottage Cheese, and it’s my top recommendation for this recipe. The higher the milk fat percentage, the creamier and richer your cheesecake filling will be. Low-fat (2%) cottage cheese also works and still produces a delicious result – it’ll just be slightly less rich. Any brand of cottage cheese will work here, but if you can find a full-fat variety, go for it!

Can I make these gluten-free?

Absolutely! Simply swap the graham cracker crumbs for a gluten-free alternative. Gluten-free graham crackers (like Simple Mills Sweet Thins), gluten-free vanilla wafers, or a mix of almond flour and a little maple syrup and coconut oil (pressed into the pan and baked for 10 minutes) all make excellent gluten-free crusts. The filling itself is already naturally gluten-free!

How do I store these cottage cheese cheesecake bars?

Store the bars in an airtight container in the refrigerator for up to 5 days. These also freeze well – wrap individual bars in plastic wrap and store in a zip-lock freezer bag for up to 2 months. Thaw overnight in the fridge before serving. For the best texture and flavor, always serve cold straight from the fridge.

Sam’s Recipe Tips

  • Blend the filling until completely, completely smooth. Any remaining curds from the cottage cheese will bake into the filling and affect the final texture. Blend on high for a full 60 seconds, scraping down the sides as needed. A high-speed blender gives the best results.
  • Use the parchment paper overhang to lift cleanly. Line your pan so the parchment hangs over all four sides. Once the bars are fully chilled, lifting the whole slab out before slicing gives you the cleanest, most beautiful cuts.
  • Bake in a water bath to prevent cracks. Because this filling contains eggs and cream cheese, it can crack on top if it bakes too quickly or unevenly. To prevent this, place your 8×8 pan inside a larger roasting pan and fill the roasting pan with about 1 inch of hot water before baking. The steam keeps the heat gentle and even, giving you a perfectly smooth, crack-free top.
  • Don’t skip the chill time. These bars need a full 3 hours in the fridge (overnight is even better!) to fully set and develop their best flavor and texture. Cutting into them while warm or under-chilled will result in a soft, messy bar that falls apart.
  • Wipe your knife between cuts. For the cleanest, most bakery-worthy squares, dip your knife in hot water and wipe dry between each slice. It makes a huge difference in how the final bars look!
close up image of a cottage cheese cheesecake bar with whipped cream and a raspberry on top.
5 from 1 vote

6-Ingredient Cottage Cheese Cheesecake Bars

These cottage cheese cheesecake bars are creamy, tangy, and perfectly sweet – made with just 6 simple ingredients! Lighter and higher in protein than traditional cheesecake, they sit on a buttery graham cracker crust and bake up silky smooth every single time. If you're looking for an easy cottage cheese cheesecake recipe that actually tastes like the real thing, this is it!
Print Pin Rate
Prep Time: 10 minutes
Cook Time: 30 minutes
Total Time: 40 minutes
Servings: 9 servings

Equipment

  • 1 9×9-inch baking pan
  • 1 food processor or high speed blender

Ingredients

For the graham cracker crust:

  • 1 cup graham cracker crumbs or cookie crumbs
  • 3 tablespoons melted butter or coconut oil

For the cheesecake filling:

  • 1 1/2 cups cottage cheese
  • 1/2 cup cream cheese softened at room temperature
  • 2 large eggs at room temperature
  • 1/4 cup cane sugar
  • 1 teaspoon vanilla extract optional, but recommended

Instructions

  • Preheat oven to 325° Fahrenheit and line a 9×9-inch baking pan with parchment paper, then lightly grease the inside.
  • Make the crust by mixing together the graham cracker or cookie crumbs and melted butter or coconut oil in a bowl, then press the mixture into the bottom of your prepared baking pan. Bake the crust for 10 minutes.
  • While the crust bakes, make the filling by adding all filling ingredients to a blender and blend until smooth. Pour the filling over the crust, then bake for 25-30 minutes or until the bars are just set in the middle. (See Notes below on how to bake in a water bath to avoid any cracks).
  • Remove the bars from the oven and leave them to cool at room temperature for 1 hour, then transfer them in the fridge to chill for at least 3 hours (or overnight).
  • Once the bars have chilled, remove them from the pan and cut into squares. Enjoy the cheesecake bars right away, or store them in an airtight container in the fridge for up to 5 days!

Notes

  • Use full-fat (4%) cottage cheese for the creamiest, richest result.
  • Blend the filling completely smooth — no curds remaining.
  • Water bath (prevents cracking): Place the 8×8 pan inside a larger roasting pan with 1 inch of hot water before baking.
  • Do not skip the chill time — bars need at least 3 hours to fully set.
  • Freeze individual bars for up to 2 months; thaw overnight in the fridge.

Nutrition

Serving: 1bar | Calories: 180kcal | Carbohydrates: 16g | Protein: 7g | Fat: 10g | Sugar: 10g

Bright, creamy, perfectly tart, and perfectly sweet – these healthy lemon bars are everything you want a lemon bar to be, but made with better-for-you ingredients! The filling is silky smooth, tangy from fresh lemon juice, and naturally sweetened with maple syrup. And the secret high-protein ingredient? Cottage cheese! I know, I know – but trust me on this one. Just like my Cottage Cheese Cookie Dough and Cottage Cheese Ice Cream, once it’s blended you’ll never know it’s there! What you’re left with is a luscious, custardy lemon bar perfect for Easter, Mother’s Day brunch, or your next spring party. 🥰

Why You’ll Love These Healthy Lemon Bars

  • Higher in protein. Thanks to the cottage cheese and cream cheese in the filling, these bars pack in more protein than your average lemon bar — making them a genuinely satisfying treat, not just a dessert.
  • Perfectly sweetened. Maple syrup does all the work here, delivering just the right level of sweetness without any refined sugar. The fresh lemon juice keeps it beautifully balanced — bright and tangy, never cloying.
  • Super easy to make. A quick blitz in the blender for the filling, a simple 2-ingredient crust, and the oven does the rest. No double boiler, no tempering eggs, no complicated steps.
  • A dessert everyone will love. These lemon bars taste like the real thing — maybe even better! Creamy, tangy, buttery, and bright. They’re crowd-pleasing in the best possible way.
  • Great for any occasion! Easter, Mother’s Day, spring brunch, summer cookouts, or just because — these bars are always the right call.
  • Made with real, wholesome ingredients. No refined sugar, no artificial anything. Just simple ingredients that come together into something really, truly delicious.
overhead image of a healthy cottage cheese lemon bar on a plate with a lemon slice on top.

Recipe Variations and Substitutions

  • Crust: Graham crackers are the classic choice, but vanilla wafers, digestive biscuits, or gluten-free cookies all work wonderfully. For a grain-free option, use 1 cup almond flour mixed with 2 tablespoons melted coconut oil and 1 tablespoon maple syrup – press and bake as directed.
  • Butter or Coconut Oil: Either works for the crust. Butter gives a richer, more buttery flavor; coconut oil is a great dairy-free swap.
  • Cottage Cheese: Full-fat cottage cheese gives the creamiest result. If you can’t have dairy, a thick, plain dairy-free yogurt (like coconut yogurt) can be used in a pinch, though the texture will be slightly different.
  • Cream Cheese: Dairy-free cream cheese works great as a 1:1 swap for a fully dairy-free filling.
  • Maple Syrup: Honey works as a direct swap. If you’d like a slightly less sweet bar, start with ¼ cup and taste before adding more.
  • Lemon Juice: This recipe is specifically written for lemon, but lime juice works beautifully for a healthy lime bar variation! Start with the same amount and adjust to taste.

Sam’s Recipe Tips

  • Bake in a water bath to avoid cracks. Because this filling contains eggs and cream cheese (similar to a cheesecake), it can crack on top if it bakes too quickly or unevenly. To prevent this, place your 8×8 baking pan inside a larger roasting pan and fill the roasting pan with about an inch of hot water before putting it in the oven. The steam keeps the heat gentle and even, giving you a perfectly smooth, crack-free top every time.
  • Fresh lemon juice is best, but bottled works in a pinch. Fresh lemon juice gives you that vibrant, bright, sunshine-y flavor that makes lemon bars so irresistible. You’ll need about 3–4 lemons for ½ cup of juice.
  • Blend the filling until completely smooth. Any lumps from the cottage cheese or cream cheese will bake into the filling, so take an extra 30 seconds to make sure your blender has done its job fully. A high-speed blender gives the best results.
  • Don’t skip the chill time. I know it’s hard to wait, but lemon bars need that fridge time to fully set and develop their best flavor and texture. Three hours is the minimum — overnight is even better. Cutting them while they’re still warm will result in a runny, messy bar.
  • Use the parchment paper overhang to lift. Line your pan so the parchment paper hangs over all four sides. This makes it incredibly easy to lift the whole slab out cleanly before cutting.
  • Clean your knife between cuts. For the neatest, most beautiful squares, wipe your knife with a damp cloth between each cut. It makes a huge difference in how the final bars look!
  • Freeze for later. These lemon bars freeze well! Wrap individual squares in plastic wrap and freeze for up to 2 months. Thaw in the fridge overnight before serving.
close up image of a healthy cottage cheese lemon bar on a plate with a lemon slice on top.
5 from 1 vote

Healthy Cottage Cheese Lemon Bars

These healthy lemon bars are creamy, perfectly tart, and naturally sweetened with maple syrup – made with a secret ingredient (cottage cheese!) that keeps them higher in protein and silky smooth without any refined sugar. Built on a buttery graham cracker crust and baked to custardy perfection. These healthy lemon bars taste just as indulgent as the classic version but with healthier ingredients.
Print Pin Rate
Prep Time: 10 minutes
Cook Time: 25 minutes
Chill Time: 1 hour
Total Time: 3 hours 35 minutes
Servings: 9 servings

Equipment

  • 1 9×9-inch baking pan
  • 1 food processor or high speed blender

Ingredients

For the crust:

  • 1 cup graham cracker or cookie crumbs
  • 3 tablespoons melted butter or coconut oil

For the lemon filling:

  • 1/2 cup (4 ounces) cream cheese softened at room temperature
  • 1 cup cottage cheese
  • 4 large eggs at room temperature
  • 1/2 cup lemon juice (fresh is best!)
  • 1/3 cup maple syrup

Instructions

  • Preheat oven to 325° Fahrenheit and line a 8×8-inch baking pan with parchment paper, then lightly grease the inside.
  • Make the crust by mixing together the graham cracker or cookie crumbs and melted butter or coconut oil in a bowl, then press the mixture into the bottom of your prepared baking pan. Bake the crust for 10 minutes.
  • While the crust bakes, make the filling by adding all filling ingredients to a blender and blend until smooth. Pour the filling over the crust, then bake for 25-30 minutes or until the bars are just set in the middle. (See Notes below on how to bake in a water bath to avoid any cracks).
  • Remove the bars from the oven and leave them to cool at room temperature for 1 hour, then transfer them in the fridge to chill for at least 3 hours (or overnight).
  • Once the bars have chilled, remove them from the pan and cut into squares. Enjoy the lemon bars right away, or store them in an airtight container in the fridge for up to 5 days!

Notes

  • Blend the filling until completely smooth for the best texture.
  • Do not skip the chill time — the bars need at least 3 hours to fully set.
  • Top with a dusting of powdered sugar or fresh lemon zest before serving for a beautiful finish.
  • Water bath (optional, prevents cracking): Place your 8×8 pan inside a larger roasting pan and fill the roasting pan with about 1 inch of hot water before placing in the oven. The steam creates gentle, even heat that prevents the filling from cracking on top.

Nutrition

Serving: 1serving | Calories: 210kcal | Carbohydrates: 18g | Protein: 8g | Fat: 12g | Sugar: 13g

Carrot cake for breakfast? Yes plz! These carrot cake baked oats have all the warm, cozy flavors of your favorite spring dessert – cinnamon, nutmeg, sweet grated carrots, crunchy walnuts – baked into a hearty, high-protein breakfast that you can meal prep on Sunday and enjoy all week long. And the Greek yogurt cream cheese frosting takes this recipe over the top!

What I love most about this recipe, besides the fact that it genuinely tastes like carrot cake, is how totally easy it is! Simply whisk, stir, bake, and that’s it. No mixer, no complicated steps, just one bowl and one baking dish standing between you and the best breakfast of your week! If you’re already a fan of my Meal Prep Protein Pancakes or my High-Protein Breakfast Biscuits, you’re going to absolutely love this one.

Why You’ll Love These Carrot Cake Baked Oats

  • Tastes just like carrot cake! Warm cinnamon and nutmeg, sweet shredded carrots, chewy raisins, crunchy walnuts, and that dreamy cream cheese frosting – every bite hits exactly like the real thing.
  • High in protein and fiber. Between the Greek yogurt in the batter, the eggs, and the fiber-packed oats and carrots, this is a breakfast that will actually keep you full and energized all morning long.
  • Perfect for meal prep. This recipe makes 9 generous squares. Bake it Sunday, store it in the fridge, and you’ve got a grab-and-go breakfast ready for the entire week – no reheating required if you enjoy it cold!
  • Super easy to make. One large bowl, one baking dish, a quick whisk and stir, and the oven does the rest. Start to finish, you’re looking at under an hour with minimal work.
  • Naturally sweetened. Maple syrup and the natural sweetness of the carrots and raisins do all the work here – no refined sugar needed!
overhead image of carrot cakes baked oats square on a plate with greek yogurt cream cheese frosting on top.

Recipe Variations and Substitutions

  • Milk: Any milk works here – dairy or non-dairy. Oat milk, almond milk, and coconut milk are all great options if you want to keep this dairy-free.
  • Greek Yogurt: Plain full-fat Greek yogurt gives the best texture and the most protein. You can swap for a dairy-free yogurt (coconut or cashew-based work well) if needed – just note the bake may come out slightly softer.
  • Maple Syrup: Honey works as a 1:1 swap. If you’d like to reduce the sweetness further, know that the carrots and raisins contribute natural sweetness, so you can comfortably cut the maple syrup back to 3 tablespoons.
  • Walnuts: Pecans are a delicious swap and give an even more classic carrot cake flavor. You can also leave the nuts out entirely for a nut-free version.
  • Raisins: These are totally optional! If you’re not a raisin fan, leave them out – the baked oats are just as delicious without them. Alternatively, try swapping them for dried pineapple or dried cranberries.
  • Frosting: If you’re short on time, a simple dollop of plain Greek yogurt on top works beautifully and still adds that creamy, tangy element that makes carrot cake so good. For a fully dairy-free frosting, use a thick coconut yogurt and dairy-free cream cheese.

Sam’s Recipe Tips

  • Grate your own carrots. Pre-shredded matchstick carrots from the store work in a pinch, but freshly grated carrots are finer, softer, and blend into the oats much more beautifully. A box grater takes just a couple of minutes and makes a real difference in the final texture.
  • Let it cool completely before frosting. I know it’s tempting to frost straight out of the oven, but if the baked oats are still warm, the frosting will melt and slide right off. Patience pays off here – let them cool fully, then frost generously.
  • Meal prep tip: store the frosting separately. If you’re making this for the week, cut the oats into squares and store them unfrosted in an airtight container in the fridge. Keep the frosting in a separate container and add a dollop to each square right before eating. This keeps everything fresh and prevents the oats from getting soggy.
  • Room temperature eggs matter. Cold eggs can cause the batter to look curdled or uneven. Pull them out of the fridge 20–30 minutes before you start, and your batter will come together much more smoothly.
  • Don’t overbake. The oats are done when the top looks set and a toothpick inserted into the center comes out clean. Overbaking can dry them out, so start checking at the 40-minute mark.
  • Freeze for later. These carrot cake baked oats freeze beautifully! Let them cool completely, cut into individual squares, and freeze in a single layer. Once frozen, transfer to an airtight bag or container. They’ll keep for up to 2 months – just microwave in 30-second intervals until warmed through.
carrot cakes baked oats square on a plate with greek yogurt cream cheese frosting on top.
No ratings yet

Healthy Carrot Cake Baked Oats with Greek Yogurt Cream Cheese Frosting

These carrot cake baked oats are a high-protein, meal prep-friendly breakfast that tastes just like your favorite spring dessert – warm cinnamon and nutmeg, sweet grated carrots, crunchy walnuts, and a dreamy Greek yogurt cream cheese frosting on top. Made in just one bowl with simple, wholesome ingredients, this easy recipe comes together in under an hour and makes 9 generous squares to last you the whole week! If you're looking for a healthy carrot cake baked oats recipe that's as nourishing as it is delicious, ya gotta give this one a try.
Print Pin Rate
Prep Time: 10 minutes
Cook Time: 40 minutes
Total Time: 50 minutes
Servings: 9 servings

Equipment

  • 1 9×9-inch baking pan
  • 2 large bowls
  • 1 hand or stand mixer

Ingredients

  • 1 cup milk
  • 1 cup Greek yogurt
  • 2 eggs at room temperature
  • 1/4 cup maple syrup
  • 1 teaspoon vanilla extract
  • 2 cups rolled oats
  • 2 teaspoons cinnamon
  • 1/2 teaspoon nutmeg
  • 1 cup grated carrots
  • 1/2 cup chopped walnuts
  • 1/2 cup raisins optional

For the frosting:

  • 1 cup Greek yogurt
  • 1/2 cup (4 ounces) cream cheese softened, at room temperature
  • 3-4 tablespoons maple syrup or honey
  • 1 teaspoon vanilla extract

Instructions

  • Preheat oven to 350° Fahrenheit and lightly grease the inside of a 9×9-inch baking dish.
  • Whisk together the milk, Greek yogurt, eggs, maple syrup, and vanilla extract in a large bowl.
  • Add in the rolled oats, cinnamon, nutmeg, carrots, walnuts, and raisins to the bowl and stir until everything is completely combined.
  • Pour the oat mixture into your prepared baking dish and bake for 40-45 minutes, or until the top is set and the oats are cooked through.
  • Remove the baked oats from the oven and let them cool completely. While the oats cool, make the frosting by adding the Greek yogurt, cream cheese, maple syrup, and vanilla extract to a bowl and use either a hand or stand mixer to whisk it together until light and fluffy.
  • Once the oats are completely cool, top with the frosting, cut into squares, and enjoy! Or, store the frosting separately, cut the oats into squares and store for an easy meal prep breakfast. Right before eating, top one serving of baked oats with a big dollop of frosting.

Nutrition

Serving: 1serving | Calories: 280kcal | Carbohydrates: 32g | Protein: 14g | Fat: 11g | Fiber: 3g | Sugar: 15g

If I’m completely honest, I’ve never been much of a cheesecake fan. When it comes to dessert, I prefer either my 4-ingredient protein brownies or healthy banana bread mug cake. However, my husband loves cheesecake. And in the spirit of it being the month of “love” (or whatever) I thought I’d make a little something just for him. Well, let me tell ya – this healthy cheesecake turned out SO good, I ate half of it. Now I don’t know what that says about me, or the kind of wife I am… but what I do know is that his cheesecake is DELICIOUS! And lucky for me/anyone who tries it, it’s also the easiest cheesecake you’ll ever make. So make this for your significant other, a friend, family member, or literally just yourself – I won’t judge!

5 ingredient healthy cheesecake slice on a plate with a fork.

What Makes This Cheesecake Healthy?

  • Made with protein-rich Greek yogurt
  • Naturally sweetened with maple syrup
  • NO refined sugar
  • Gluten-free
  • High protein dessert (10g+ per slice!)
  • Minimal ingredients, no crust required

Frequently Asked Questions

What kind of cream cheese should I use?

Full-fat cream cheese gives the richest texture, but reduced-fat cream cheese also works well. Use block-style cream cheese, not whipped.

Can I use a sugar-free sweetener?

Yes. Any liquid sugar-free sweetener can be used in place of maple syrup. Adjust to taste depending on sweetness level.

How do I store this healthy cheesecake?

Store slices in an airtight container in the refrigerator for up to 5 days. You can also freeze individual slices for up to 2 months and thaw in the fridge overnight.

Can I add a healthy cheesecake crust to this recipe?

Yes! You can absolutely add a crust if you prefer a more traditional cheesecake. A simple crust made from crushed graham crackers (or gluten-free graham crackers) mixed with melted butter works great – just press it into the pan and bake for 8–10 minutes before adding the filling. Let the crust cool slightly, then pour in the cheesecake batter and bake as directed.

Sam’s Recipe Tips

  • Blend until completely smooth for the creamiest texture!
  • Don’t overbake – the center should still have a slight jiggle.
  • Chill the cheesecake fully before slicing for nice and clean slices.
  • Add fresh berries or a drizzle of nut butter before serving – YUM!
  • For extra vanilla flavor, use vanilla bean paste.
5 ingredient healthy cheesecake slice on a plate with whipped cream and a strawberry on top.
5 from 2 votes

5-Ingredient Healthy Cheesecake

This healthy cheesecake is creamy, high in protein, and made with just 5 simple ingredients! It’s gluten-free, refined sugar-free, and each slice contains over 10 grams of protein. Perfect for a lighter dessert, this easy cheesecake delivers classic flavor with better-for-you ingredients!
Print Pin Rate
Prep Time: 5 minutes
Cook Time: 45 minutes
Total Time: 50 minutes
Servings: 8 servings

Equipment

  • 1 food processor or high speed blender
  • 1 8-inch springform pan

Ingredients

  • 2 cups plain Greek yogurt
  • 1 cup cream cheese
  • 4 eggs
  • 1/4 cup maple syrup or any liquid sweetener
  • 1 teaspoon vanilla extract or vanilla bean paste

Instructions

  • Preheat oven to 350° Fahrenheit and line the bottom of a 8-inch springform pan or baking dish with parchment paper and lightly grease the sides.
  • Add all ingredients to a blender and blend until completely smooth.
  • Pour the mixture into the pan, then bake for 45-50 minutes or until the cheesecake is just set in the middle.
  • Remove the pan from the oven and let the cheesecake cool at room temperature for 1 hour, then transfer it to the fridge to set for at least 2 hours. Remove the cheesecake from the fridge, then slice and serve!

Nutrition

Serving: 1serving | Calories: 230kcal | Carbohydrates: 7g | Protein: 11g | Fat: 17g | Sugar: 6g

My love for cinnamon rolls runs deep. But so does my desire for a dessert recipe that packs in extra protein! Like my protein hostess cupcakes, protein banana bread, or most famously, my protein chocolate chip cookies. It always feels like cheating when I can enjoy a sweet treat while sneaking extra protein into my day. And these protein cinnamon rolls are the ultimate version of that! They’re just as delicious and indulgent as a classic cinnamon roll, but with 10 grams of protein a piece and a gluten-free option, too. And because no cinnamon roll is complete without some type of cream cheese frosting, I topped these with a protein Greek yogurt cream cheese frosting that seriously takes ’em over the top!

overhead image of protein cinnamon rolls with greek yogurt frosting on top.

Why You’ll Love These Protein Cinnamon Rolls

  • Only six core ingredients for the dough – no complicated steps or long rise times required!
  • Each roll delivers around 10 grams of protein thanks to the Greek yogurt and protein-rich base.
  • Perfect for breakfast or dessert – soft, indulgent, but also balanced for macro-minded eaters.

Frequently Asked Questions

How much protein does each cinnamon roll have?
About 10 g per roll when split into eight or nine servings, thanks to the Greek yogurt and protein-enhanced dough.

Can I replace the sugar with a sugar-free sweetener?
Yes – use a granulated monk fruit or erythritol blend in place of the sugar for a lower-sugar version (just check how your dough handles the change).

How do I store these cinnamon rolls?
Keep in an airtight container in the fridge for up to 3 days; warm gently before serving. You can also freeze un-iced rolls, then add the icing after reheating.

overhead image of protein cinnamon rolls with greek yogurt frosting on top.

Sam’s Recipe Tips

  • Use room-temperature yogurt for smoother mixing and fluffier frosting.
  • If the dough seems too dry, add 1–2 tablespoons extra Greek yogurt – the goal is a workable ball.
  • Roll the dough to a rectangle before spreading the butter and sugar-cinnamon mixture for even swirls.
  • Let the rolls cool slightly before icing so the glaze doesn’t melt into puddles.
protein cinnamon rolls with greek yogurt cream cheese frosting on top.
No ratings yet

6-Ingredient Protein Cinnamon Rolls with Greek Yogurt Frosting

These Protein Cinnamon Rolls are soft, fluffy, and secretly packed with 10 grams of protein per roll! With only 6 ingredients, they’re an easy, healthy twist on your favorite breakfast treat – no yeast or rising required. Perfect for meal prep, brunch, or a cozy weekend bake, these cinnamon rolls are gluten-free, high-protein, and absolutely delicious!
Print Pin Rate
Prep Time: 10 minutes
Cook Time: 30 minutes
Total Time: 40 minutes
Servings: 8 servings

Equipment

  • 1 large bowl
  • 1 9×4-inch loaf pan

Ingredients

  • 3 cups all purpose flour I used gluten-free all purpose flour
  • 2 teaspoons baking powder
  • 1 1/2 cups plain Greek yogurt plus more if needed
  • 1/4 cup butter softened
  • 1/2 cup plus 2 tablespoons sugar divided, or your favorite sugar-free sweetener
  • 1 tablespoon cinnamon

For the frosting:

  • 1/2 cup plain Greek yogurt
  • 1/4 cup cream cheese softened
  • 2 tablespoons maple syrup
  • 1/2 teaspoon vanilla extract

Instructions

  • Preheat oven to 350° Fahrenheit and lightly grease a 9×4-inch loaf pan.
  • Add the all purpose flour, plain Greek yogurt, and 2 tablespoons of sugar to a large bowl. Mix together until a dough forms. If the dough seems dry, add an additional 1-2 tablespoons of Greek yogurt. The dough might seem dry, but just use enough Greek yogurt until it can be formed into a ball (you’ll have to get your hands dirty here!).
  • Lightly flour a kitchen surface and roll the dough out into a 9×13-inch rectangle. Spread the softened butter on top of the dough, then sprinkle the dough evenly with ½ cup sugar and the cinnamon.
  • Carefully take the long end of the dough and roll it into a tight log. Slice the log into 8-9 cinnamon rolls, each about 2 inches thick.
  • Then, place the cinnamon rolls into your prepared baking pan and bake for 30-35 minutes, or until lightly golden brown on top.
  • Remove the protein cinnamon rolls from the oven and let them cool for a few minutes while you make the frosting.
  • Add all frosting ingredients to a bowl and use either a hand or stand mixer to whip everything together until smooth. Top the cooled cinnamon rolls with the protein frosting and enjoy!

Nutrition

Serving: 1serving | Calories: 350kcal | Carbohydrates: 50g | Protein: 10g | Fat: 8g | Fiber: 2g | Sugar: 15g