Tag

ginger

Browsing

My focus this holiday season has been on creating family traditions. With the recent arrival of my second baby, I’ve fallen in love with the idea of creating family recipes that will hopefully last us generations – like the gluten-free cinnamon rolls I plan on making every Christmas morning and the gluten-free Christmas cookies we’ll bake for family and friends.

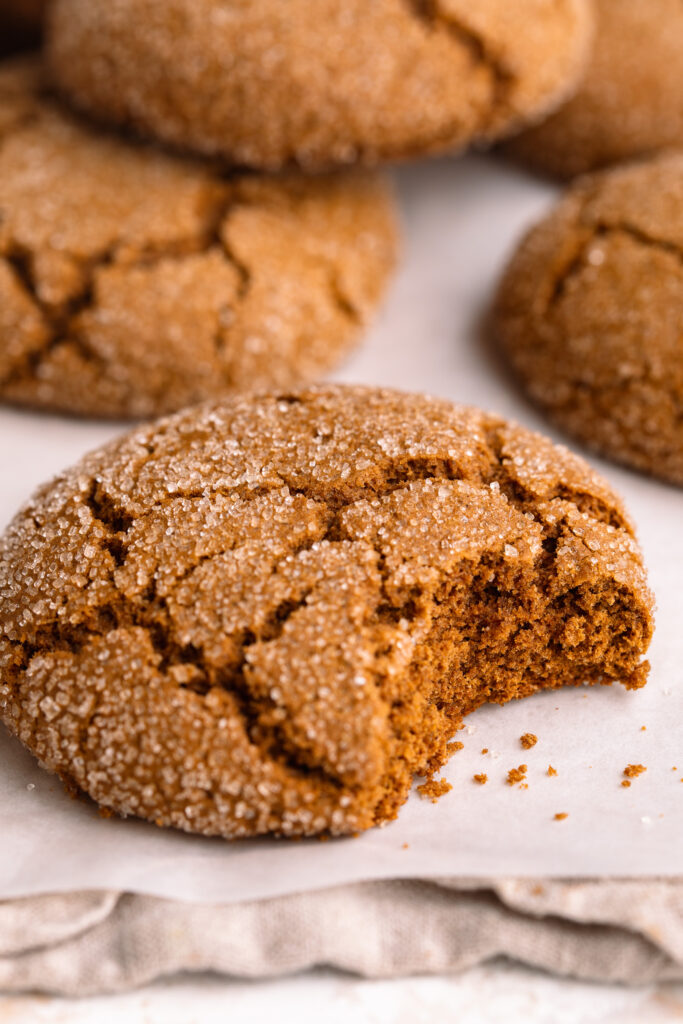
These gluten-free molasses cookies are classic and totally timeless – yet easy to make in just one-bowl, NO chilling required! It’s these minor tweaks I made over rounds of recipe testing that I hope one day even my great grandkids will appreciate. I also baked these cookies with my toddler last week, and it passed the kid-friendly test with flying colors! He loved rolling the cookies in sugar, and I loved that I only had one bowl to clean. 🙂 Win, win!

a gluten-free molasses cookie with a bite taken out.

What Makes These the BEST Gluten-Free Molasses Cookies

These gluten-free molasses cookies check every box:

  • Soft, chewy, and perfectly spiced like classic bakery-style molasses cookies
  • Made in one bowl with easy pantry-staple ingredients
  • No chilling required—meaning cookies in under 20 minutes
  • Naturally gluten-free, and easily dairy-free/vegan with simple swaps
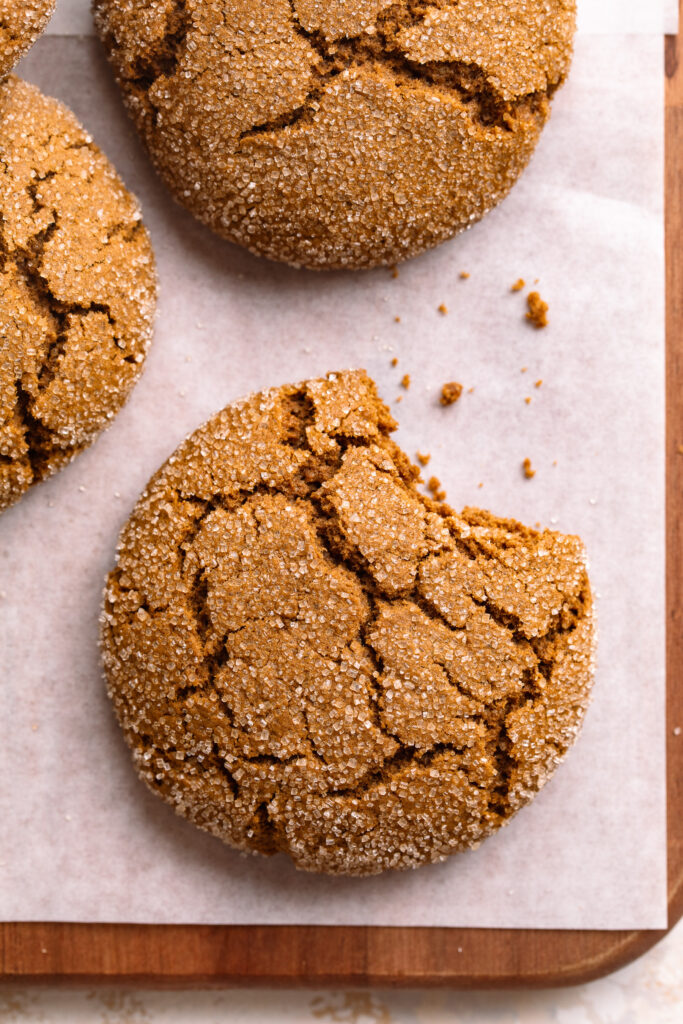
  • Perfect crackly tops thanks to rolling the dough in sugar
  • A reliable dough that doesn’t spread too much and bakes evenly every time

If you’ve been looking for a gluten-free molasses cookie that tastes exactly like the real thing, this is the recipe you’ll keep forever!

Key Ingredients & Substitutions

  • Molasses: I recommend using unsulphured molasses and avoiding blackstrap molasses – it’s more bitter and a little too thick for this cookie recipe.
  • Gluten-Free Flour: A high-quality gluten-free all-purpose flour with xanthan gum works best. I love and recommend either the King Arthur Gluten-Free Flour or Bob’s Red Mill 1:1 Gluten-Free Flour. If your blend does not contain xanthan gum, add ½ teaspoon.
  • Butter: To make these cookies dairy-free, swap the butter for vegan butter sticks or softened coconut oil.
  • Spices: The spice blend of ginger, cinnamon, nutmeg, and cloves gives these cookies their classic “gingersnap meets molasses cookie” flavor. Adjust ginger for more or less spice!
one gluten-free molasses cookie with a bite taken out.

Frequently Asked Questions

How do I store these gluten-free molasses cookies?

Store in an airtight container at room temperature for 4–5 days. They also freeze beautifully – store baked cookies in a freezer-safe bag for up to 3 months, thawing on the counter before enjoying.

Can I make them dairy-free?

Yes! Replace the butter with vegan butter or softened coconut oil. The texture remains soft and chewy.

How do I also make these cookies vegan?

Yes – simply use vegan butter and replace the egg with a flax egg (1 tbsp flax meal + 2.5 tbsp water). Bake time remains the same!

Sam’s Baking Tips

  • Don’t skimp on the spices! Molasses cookies need a strong spice profile.
  • Avoid over-mixing once the flour is added to keep the cookies chewy and tender.
  • Roll in sugar for that perfect crackly top and bakery-style finish!
  • Use a cookie scoop for evenly sized cookies that bake uniformly.

Why You’ll Love This Recipe

These gluten-free molasses cookies are soft, chewy, perfectly spiced, made in one bowl, and require no chilling—a holiday win! They taste just like the classic version, and no one will ever guess they’re gluten-free or dairy-free.

overhead image of gluten-free molasses cookies on a table.
No ratings yet

One-Bowl Gluten-Free Molasses Cookies (no chilling required!)

These soft and chewy gluten-free molasses cookies are packed with warm holiday spices and made in just one bowl – no chilling required! They bake up with perfectly crackled tops, rich molasses flavor, and a tender, melt-in-your-mouth texture no one will believe is gluten-free. The perfect easy Christmas cookie that’s also dairy-free friendly and ideal for gifting, parties, or cozy winter baking!
Print Pin Rate
Prep Time: 10 minutes
Cook Time: 10 minutes
Total Time: 20 minutes
Servings: 24 cookies

Equipment

  • 2 large cookie sheets
  • 1 large bowl

Ingredients

  • 6 tablespoons butter softened (or non-dairy butter)
  • 1/2 cup brown sugar or coconut sugar for a healthier option
  • 1/3 cup molasses
  • 1 egg at room temperature
  • 2 teaspoons vanilla extract
  • 1 3/4 cups gluten-free all purpose flour
  • 1 teaspoon baking soda
  • 1/2 teaspoon salt
  • 2 teaspoons ground ginger
  • 1 teaspoon cinnamon
  • 1/2 teaspoon nutmeg
  • 1/4 teaspoon ground cloves

Optional:

  • 1/4 cup granulated sugar for coating the cookies

Instructions

  • Preheat oven to 350° Fahrenheit and line a large cookie sheet with parchment paper.
  • Beat butter and brown sugar together in a large bowl with either a hand or stand mixer, until light and fluffy. Add in molasses, egg, and vanilla extract and beat again until combined.
  • Add in the gluten-free flour, baking soda, salt, ginger, cinnamon, nutmeg, and cloves. Mix again just until a dough forms – careful not to over-mix the cookie dough!
  • Scoop 2 tablespoon-sized balls of dough, roll the dough between the palm of your hands to form a smooth ball, then roll the ball in sugar before placing it on your prepared baking sheet.
  • Lightly press down each cookie just a little to flatten it, then bake the cookies for about 10-12 minutes. Remove the cookie from the oven and transfer to a wire cooling rack to cool completely before serving or storing.

Nutrition

Serving: 1cookie | Calories: 90kcal | Carbohydrates: 14g | Protein: 0.5g | Fat: 3g | Sugar: 7g

As I enter my first cold and flu season as a mom, I’m doing everything I can to boost my family’s immune system! While my son (currently 9 months old) can’t have these immunity shots quite yet, my husband and I each take a shot a day to… keep the doctor away. Sorry, I had to!

These immunity shots are jam-packed with antioxidants to help strengthen your immune system. A combination of fresh ginger, turmeric, and citrus create a powerhouse to help ward off colds. Also, the addition of black pepper helps to activate the turmeric, leading to even more anti-inflammatory benefits.

They’re tangy, spicy, incredibly potent, but work some serious magic to keep my family healthy. If you also want to avoid getting sick this cold and flu season, I highly recommend you whip up a batch too!

homemade immunity shot being poured into a glass.

What You’ll Need to Make this Immunity Shots Recipe

Fresh Ginger: Ginger is renowned for its anti-inflammatory and antioxidant properties. It aids digestion, soothes sore throats, and provides a zesty kick to our immunity shots. And in case you have leftover fresh ginger after making this recipe, use it to make these healthy teriyaki chicken bowls. Eating an overall healthy diet also works wonders for building a strong immune system!

Fresh Turmeric Root: Curcumin, the active compound in turmeric, is a superhero in the anti-inflammatory world! It’s a natural immune booster, assisting the body in fighting off infections and promoting overall well-being.

Lemons: Packed with vitamin C, lemons contribute to collagen production, which is crucial for skin health. They also support the immune system and add a refreshing citrusy flavor to the shots.

Oranges: Another vitamin C powerhouse, oranges help stimulate the production of white blood cells, enhancing the immune system’s defense mechanism against illnesses. Because of its cold-fighthing benefits, I aim to eat as much vitamin C as possible this time of year. One of my favorite ways to enjoy citrus fruits is in this citrus salad recipe – seriously so good!

Black Pepper: Piperine, found in black pepper, enhances the absorption of curcumin from turmeric. This dynamic duo ensures you get the most out of the turmeric’s immune-boosting properties.

homemade immunity shots with lemon, orange, fresh ginger, and fresh turmeric on the side.

What are the Health Benefits of Immunity Shots?

  • The combination of fresh ginger, turmeric, lemons, and oranges provides a powerful boost to the immune system! These ingredients are rich in antioxidants and vitamins, supporting the body’s defense against infections and illnesses.
  • Ginger and turmeric, with their anti-inflammatory properties, help reduce inflammation in the body. Chronic inflammation is linked to various health issues, and incorporating these shots into your daily routine may contribute to overall well-being.
  • Lemons and oranges are excellent sources of vitamin C, essential for collagen production, skin health, and a robust immune response. Regular consumption of these immunity shots ensures a steady intake of this vital nutrient, promoting optimal health!

Tips and Tricks

Play with Ratios: Adjust the quantities of ginger, turmeric, and citrus to suit your taste preferences. If you enjoy a more zesty kick, add an extra squeeze of lemon or orange.

Storage Savvy: To ensure your shots stay fresh, store the juice in an airtight container in the fridge. Use dark glass containers to protect the ingredients from light, maintaining their potency.

Prep Ahead: Consider prepping larger batches and freezing the juice in ice cube trays. Pop out a cube whenever you need a quick immunity boost – it’s a time-saving trick for those hectic days.

Homemade immunity shots with fresh lemon, orange, ginger, and turmeric on the side.
5 from 3 votes

Homemade Ginger and Turmeric Immunity Shots

These immunity shots are packed with antioxidants to help strengthen your immune system! They’re the easiest, most natural way to help prevent getting sick during cold and flu season. Fresh ginger and turmeric, plenty of citrus, and black pepper make for a tangy, spicy, and potent immunity shot. Enjoy once a day for optimal results!
Print Pin Rate
Prep Time: 5 minutes
Total Time: 5 minutes
Servings: 10 servings

Ingredients

  • 1/4 cup fresh ginger, chopped
  • 1/4 cup fresh turmeric root, chopped
  • 2 lemons, peeled and chopped
  • 2 oranges, peeled and chopped
  • 1 teaspoon black pepper
  • 2 cups water

Instructions

  • Add all ingredients to a blender and blend on high for 1-2 minutes.
  • Place a fine mesh strainer over a bowl or pitcher and pour the liquid through the strainer, and use a spoon to stir the liquid around in the strainer to separate the pulp from the juice.
  • Discard the pulp in the strainer, then pour the juice into an airtight container and store it in the fridge for up to 2 weeks.
  • When ready to drink, pour 2 ounces into a glass and drink quickly (like a shot!).

Nutrition

Calories: 300kcal

These summer rolls are loaded with fresh, crunchy vegetables and served with a savory peanut sauce! In just 20 minutes you’ll have a fun and healthy lunch or snack.

overhead image of peanut dipping sauce on a serving platter with sesame seeds on the side.

What are Summer Rolls?

Summer rolls are a traditional Vietnamese side dish. They’re an assortment of vegetables wrapped in rice paper. Think of them like a sushi roll, but instead of rice and seaweed, you just wrap everything up in a thin sheet of rice paper.

Summer rolls are most commonly served (and best served) with a side of savory peanut dipping sauce. The peanut sauce is honestly my favorite part. I could drink that stuff straight up. Creamy peanut putter, soy sauce, and fresh ginger come together in the most incredible, flavorful way possible! Dipping these summer rolls loaded with crisp, fresh veggies into luscious peanut sauce is nothing short of a dream come true. Guys, you gotta give this recipe a try. They’re vegan, gluten-free, and dairy-free!

summer rolls being dipped into peanut sauce.

What You Need To Make Summer Rolls with Peanut Sauce

Rice Wrappers – You’d be surprised by how easy rice wrappers are to find! I often locate them in the ethnic/asian aisle of my grocery store. And if all else fails, I can always find them at my local asian markets. If you’re not familiar with rice wrappers, they look sort of like a thinner tortilla. When you remove them from their packaging you’ll find that they’re dry and stiff. Though they simply need a bit of water to help rehydrate them for this recipe. Try not to overthink the process, follow the steps in the recipe below to prepare your rice wrappers.

Tofu – Tofu is an incredible source of protein and contains all nine essential amino acids! It also just sort of takes on the taste of whatever else you’re eating it with. In this case, the tofu soaks up the peanut sauce, which is DELICIOUS. Not only is tofu super easy to come by these days, but it’s super cheap too.

Peanut Butter – To me, peanut butter is typically only ever associated with sweet recipes. Though we turn the tables here by adding savory ingredients such as soy sauce and rice vinegar to create this peanut butter-based sauce. I prefer creamy peanut butter for a smoother sauce, though chunky works too. Just please, whatever you do, make sure the peanut butter you use has NO added sugar! Any sugar in the peanut butter would completely throw off the balance of flavors in this delicious sauce.

summer roll sliced in half on a plate, with cucumber, carrots, and tofu inside.

Adjust This Recipe

  • Make it Nut-Free: For a nut-free sauce, replace the peanut butter with tahini.
  • Add Shrimp: Make my shrimp spring rolls recipe instead!
  • The types and amounts of vegetables and herbs are simply suggestions – you can swap or remove anything you like!
summer rolls with peanut dipping sauce on a plate.
5 from 1 vote

Summer Rolls with Peanut Dipping Sauce

These summer rolls are loaded with fresh, crunchy vegetables and served with a savory peanut sauce! In just 20 minutes you’ll have a fun and healthy lunch or snack.
Print Pin Rate
Prep Time: 20 minutes
Total Time: 20 minutes
Servings: 6 servings

Ingredients

  • 12 spring roll rice wrappers
  • 14 ounces extra firm tofu, sliced into about 12 sticks
  • 1 cup julienned carrots
  • 2 cups julienned cucumber
  • 1 cup napa cabbage, thinly sliced
  • 1/4 cup fresh mint, chopped
  • 1/4 cup fresh cilantro, chopped
  • 1/4 cup green onion, sliced

For the peanut sauce:

  • 1/2 cup creamy peanut butter
  • 2 tablespoons soy sauce
  • 2 tablespoons rice vinegar
  • 1 tablespoon toasted sesame oil, optional
  • 1 garlic clove, grated
  • 1 tablespoon fresh ginger, grated
  • 2-3 tablespoons warm water

Instructions

  • Fill a shallow bowl with warm water, submerge one sheet of rice wrapper in water for about 5 seconds then transfer to a clean, damp dish towel.
  • Place filling in the center of wrapper and fold the end closest to you over the filling, then tuck sides in and towards the center, finish rolling to create a sealed summer roll. Repeat with remaining rice wrappers.
  • Make the sauce by adding all ingredients to a bowl and whisking until completely smooth.
  • Serve summer rolls with peanut dipping sauce and enjoy!

Notes

  • Change up the filling ingredients however you’d like, use up whatever leftover fresh veggies you have on-hand!
  • Nutrition

    Calories: 300kcal

    More Healthy Vegan Recipes You’ll Love

    Fun and delicious shrimp spring rolls with an irresistibly good peanut dipping sauce! These spring rolls are an easy and exciting way to pack veggies into your diet – they’re super healthy and tasty.

    overhead image of shrimp spring rolls on a plate with peanut sauce on the side.

    What You’ll Need to Make Shrimp Spring Rolls with Peanut Sauce

    Spring Rolls Rice Wrappers – These light little rice-based wraps are what hold these spring rolls together! I’ve had lots of luck finding these at my local grocery store, in the ethnic food aisle. However, if you can’t seem to track these thin rice sheets down, I recommend ordering these on Amazon. Leftover rice wrappers? Try making my summer rolls recipe next!

    Cooked Shrimp – Buy pre-cooked shrimp, or quickly boil it yourself before adding to your shrimp spring rolls. The only thing to note here is that you must remove the tails from your shrimp for this recipe! Removing the tails can happen either before or after cooking – it makes no difference.

    Fresh Mint and Cilantro – These Asian-inspired rolls taste extra fresh thanks to a few sprigs of fresh mint and cilantro! I highly recommend adding fresh herbs to your rolls. Though if you don’t like cilantro, or don’t like mint, simply swap it out for a different fresh herb.

    Peanut Butter – Unsweetened creamy peanut butter is the base to our peanut sauce. However, if you don’t like peanut butter, you can use cashew butter instead. Or, for a nut-free version, try tahini!

    Soy Sauce – Found in most Asian recipes, soy sauce adds the perfect savory component to this dish. However, you can certainly swap out the soy sauce for tamari or coconut aminos if that’s more your thing.

    shrimp spring rolls on a plate with peanut sauce and fresh limes on the side.

    Tips on Handling Rice Wrappers

    • Submerge one rice wrapper at a time in the water! If you attempt more than one, they’ll stick together and you won’t be able to separate them.
    • Don’t leave the rice wrapper in the water for too long. Just 5 seconds submerged in a shallow bowl of warm water will do the trick. Leaving the wrapper to soak for too long will make it too soft and difficult to handle.
    • Place each rice wrapper (one at a time) on a damp paper towel or dish cloth before filling and rolling. The wrapper will lift easily off the damp cloth, making rolling a breeze. If you place the rice wrapper on a kitchen counter or cutting board, it’ll stick and be a nightmare to remove!
    shrimp spring rolls being dipped into peanut sauce.

    Adjust This Recipe to Your Dietary Needs

    Make it Vegan: For vegan spring rolls, use extra firm tofu cut into strips in place of the cooked shrimp!

    Make it Gluten-Free: The only non gluten-free ingredient in this recipe is the soy sauce. Therefore, use tamari instead, which tastes just like soy sauce but is 100% gluten-free!

    close-up overhead image of shrimp spring rolls on a plate with peanut sauce.
    No ratings yet

    Shrimp Spring Rolls with Peanut Sauce

    Fun and delicious shrimp spring rolls with an irresistibly good peanut dipping sauce! These spring rolls are an easy and exciting way to pack veggies into your diet – they’re super healthy and tasty.
    Print Pin Rate
    Prep Time: 20 minutes
    Total Time: 20 minutes
    Servings: 4 servings

    Ingredients

    • 12 spring roll rice wrappers
    • 1-2 pounds cooked shrimp, shells and tails removed
    • 3 large carrots, peeled and sliced into matchsticks
    • 2 medium red bell peppers, seeded and sliced into matchsticks
    • 1 English cucumber, sliced into matchsticks
    • 1/2 cup fresh mint leaves
    • 1/2 cup fresh cilantro leaves

    For the peanut sauce:

    • 1/2 cup creamy peanut butter, unsweetened
    • 2 tablespoons soy sauce
    • 2 tablespoons rice vinegar
    • 1 tablespoon toasted sesame oil
    • 1 garlic clove, grated or finely minced
    • 1-inch piece fresh ginger, peeled and grated or finely minced
    • 2-3 tablespoons warm water

    Instructions

    • Fill a shallow bowl with warm water. Submerge one sheet of rice wrapper in water for 5 seconds, then transfer to a clean, damp dish towel.
    • Place 2-3 shrimp, a small handful of vegetables, and a few fresh mint and cilantro leaves in the center of the wrapper. Then, fold the end closest to you over the filling, tuck sides in and towards the center, and finish rolling to create a sealed spring roll. Repeat this process with remaining rice wrappers.
    • Make the sauce by adding all ingredients to a bowl and whisking to combine.
    • Serve shrimp spring rolls with peanut dipping sauce on the side.

    Nutrition

    Calories: 300kcal

    These healthy teriyaki chicken rice bowls come together in under 20 minutes! Fresh ginger, garlic, tamari to make it gluten-free, and honey to naturally sweeten things up. Ditch the takeout this week, and make this healthier recipe instead!

    close-up image of healthy teriyaki chicken

    What You’ll Need to Make Healthy Teriyaki Chicken Rice Bowls

    Chicken Breast: Boneless and skinless chicken breasts, cut into bite-sized pieces cooks in just a matter of minutes! However, feel free to use any piece/cut of chicken you’d like. Or, if you’re feeling adventurous, replace the chicken with salmon or tofu – the possibilities are endless!

    Ginger: Fresh, grated ginger adds tons of delicious fresh flavor to our healthy teriyaki chicken. I usually purchase a bunch of fresh ginger (it’s pretty cheap!) and store it in my freezer until I need to use it. But if you can’t find fresh ginger, feel free to use just 1 teaspoon of dried ground ginger in its place.

    Tamari: What is tamari? Tamari is simply gluten-free soy sauce. It tastes exactly the same as soy sauce, but is 100% gluten-free. It’s safe for people who suffer from celiac disease or a gluten intolerance! However, if you’re fine with gluten, go ahead and use soy sauce in this recipe instead.

    Honey: A refined sugar-free sweetener to help balance this teriyaki sauce! You won’t notice the difference between this honey-sweetened sauce and the sauce you’d order at a restaurant.

    healthy teriyaki chicken rice bowls with sliced green onion on top.

    Tips and Tricks

    • I served my healthy teriyaki chicken over white rice with a side of steamed broccoli, but feel free to serve yours with whatever you’d like! Brown rice, quinoa, or even cauliflower rice make a great base to these bowls. Also, any steamed veggie will pair perfectly with this meal!
    • The chicken cooks pretty quickly in this recipe, thanks to it being cut into such small pieces. Therefore, keep an eye on it and be careful not to overcook the chicken. It should only take a few minutes to cook through!

    Adjust This Recipe to Your Dietary Needs

    • Make it Gluten-Free: Use tamari instead of soy sauce, which is 100% gluten-free.
    • Make it Vegan/Vegetarian: Replace the chicken with pressed and cubed tofu, and the honey with maple syrup!
    • Make it Paleo: To make a paleo teriyaki chicken, simply replace the honey with maple syrup and use coconut aminos instead of soy sauce – it’s that easy! Also, serve over cauliflower rice or with extra steamed veggies, instead of white rice.
    overhead image of healthy teriyaki chicken rice bowls with rice and broccoli.
    4.37 from 19 votes

    Healthy Teriyaki Chicken Rice Bowls

    These healthy teriyaki chicken rice bowls come together in under 20 minutes! Fresh ginger, garlic, tamari to make it gluten-free, and honey to naturally sweeten things up. Ditch the takeout this week, and make this healthier recipe instead!
    Print Pin Rate
    Prep Time: 5 minutes
    Cook Time: 15 minutes
    Total Time: 20 minutes
    Servings: 4 servings

    Ingredients

    • 1 pound chicken breast, cut into 1-inch pieces
    • 1 tablespoons avocado oil
    • pinch of salt
    • 1-inch piece fresh ginger, peeled and grated
    • 3 garlic cloves, minced
    • 1/4 cup tamari, or soy sauce
    • 1 tablespoons lemon juice
    • 1 teaspoon sesame oil, optional
    • 2 tablespoons honey
    • 1 tablespoon corn starch
    • 3 tablespoons water

    For serving:

    • 2 cups cooked rice
    • 1 crown broccoli, steamed
    • sliced green onions
    • sesame seeds

    Instructions

    • Heat olive oil in a large pan over medium heat, add in the chicken and sprinkle with salt. Cook chicken for 2-3 minutes per side or until cooked through. Transfer to a bowl and set aside.
    • Reduce heat to low, add in the ginger and garlic, cook for 1 minute or until fragrant. Add in the tamari or soy sauce, lemon juice, sesame oil, and honey, mix together. 
    • In a separate bowl, whisk together the cornstarch and water until the cornstarch has dissolved. Transfer corn starch and water to the sauce along with the cooked chicken. 
    • Stir until sauce thickens, about 3-4 minutes. Divide between four bowls with rice and broccoli, then top with sliced green onions and sesame seeds.

    Notes

  • Storage: Store the rice and vegetables in a separate container than the teriyaki chicken. Place them both in airtight containers in the fridge for up to 3 days. 
  • Nutrition

    Calories: 300kcal

    OTHER HEALTHY RECIPES YOU’LL LOVE