Tag

Holiday

Browsing

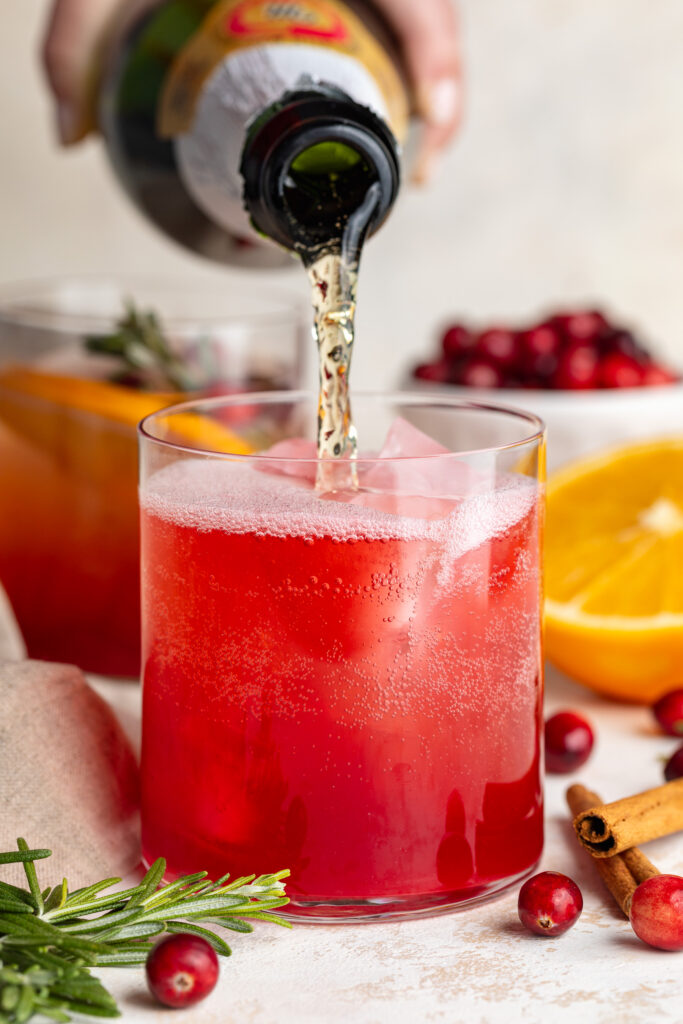
My Mom is the cocktail queen! It all started a few years ago with her famous lime daiquiri recipe, then last summer with Mom’s watermelon palomas. So this year I asked if she had any good non-alcoholic mocktail recipes she’d be willing to share with us. And what did she come up with, you ask? This perfectly sweet, slightly spiced, and bubbly non-alcoholic Christmas punch. Perfect if you’re trying to cut back on alcohol this holiday season, or need a fun mocktail recipe even the kids can enjoy! It’s seriously so good, we plan on making it for family and friends all holiday season long. Mom will bring the mocktails, and I’ll bring the gluten-free Christmas desserts! Cheers!

two glasses of non-alcoholic christmas punch on a table.

Why You’ll Love This Non-Alcoholic Christmas Punch 🎄

  • Family-friendly and kid-approved – Everyone can enjoy it, and the flavors are festive without being too sweet.
  • Elevated flavor – The homemade spiced simple syrup adds warm ginger, cinnamon, and clove notes that taste way more special than store-bought punch!
  • Easy to make ahead – The syrup lasts up to a month in the fridge, so you can whip up a mocktail in seconds all holiday season long.
  • Perfect for holiday parties – It looks stunning in a glass with fresh cranberries and orange slices floating on top.
  • Can be made alcoholic if needed – Just swap the sparkling cider for champagne or prosecco!

How to Make Spiced Simple Syrup 🍂

This homemade spiced syrup is what sets this mocktail apart – it infuses your drink with warm holiday flavor without needing any specialty ingredients.

  1. Add sliced ginger, cinnamon sticks, peppercorns, cloves, and water to a small saucepan. Bring to a boil, then reduce heat and simmer for 20 minutes until reduced by half.
  2. Add in the sugar and stir until fully dissolved.
  3. Strain the syrup into a heatproof jar (like this one), chill, and store in the fridge for up to 1 month.

It’s simple, cozy, and makes your whole kitchen smell like Christmas!

pouring sparkling apple cider into non-alcoholic christmas punch.

Frequently Asked Questions

What is Christmas Punch?

Christmas Punch is a festive holiday drink traditionally made with fruit juices, sparkling soda or cider, and sometimes alcohol. This version is non-alcoholic and made with a homemade spiced syrup for a warm, cozy holiday twist.

How do I make this Christmas Punch alcoholic?

Just replace the sparkling apple cider with champagne, prosecco, or a dry sparkling wine. You can also add 1 ounce of vodka, rum, or bourbon per serving.

Can I use store-bought simple syrup in this recipe?

You can, but the flavor won’t be nearly as rich or spiced. If using store-bought, add a pinch of cinnamon or a dash of ginger to mimic the homemade version.

Mom’s Recipe Tips 🍾

  • Make the syrup ahead of time so assembling each drink takes less than a minute.
  • Use crushed ice to keep the drink extra cold and refreshing.
  • Add garnishes! Fresh cranberries, orange slices, and rosemary sprigs make it look incredibly festive.
  • Taste and adjust – add more syrup for sweetness, or extra cranberry juice for a more tart mocktail.

This Non-Alcoholic Christmas Punch is easy, fun, festive, and absolutely perfect for kids and adults alike. You’ll want to make a double batch!

close up image of non-alcoholic christmas punch in a glass.
No ratings yet

Non-Alcoholic Christmas Punch

This festive Non-Alcoholic Christmas Punch is the perfect holiday mocktail – refreshing, beautifully spiced, and loved by both kids and adults. Made with a cozy homemade spiced simple syrup, it tastes like Christmas in a cup and comes together in just minutes. And the best part? It’s my mom’s go-to holiday punch, and it’s a new family favorite!
Print Pin Rate
Prep Time: 5 minutes
Cook Time: 20 minutes
Total Time: 25 minutes
Servings: 1 serving

Equipment

  • 1 small saucepan
  • 1 cocktail glass

Ingredients

For the spiced simple syrup:

  • 4 slices fresh ginger
  • 2 3-inch cinnamon sticks
  • 4 whole black peppercorns
  • 4 whole cloves
  • 3/4 cup sugar
  • 1 1/2 cups water

For the Christmas punch:

  • 1 1/2 ounces cranberry juice
  • 1/2 ounce orange juice
  • 1/2 ounce spiced simple syrup
  • sparkling apple cider or champagne

Instructions

For the spiced simple syrup:

  • In small saucepan over medium heat bring all ingredients except sugar to boil. Reduce heat to medium and simmer until reduced by half (about 20 mins).
  • Add sugar and stir until dissolved. Remove from heat and cool. Strain through fine-mesh sieve into a heatproof container. Can be made up to 1 month ahead, store in the refrigerator.

For the Christmas punch:

  • In a glass, combine the cranberry juice, orange juice, and 1/2 ounce of simple syrup then stir to combine.
  • Add ice to the glass, then fill it the rest of the way with sparkling apple cider (or champagne to make it alcoholic!). Garnish with orange slices and fresh cranberries.

My focus this holiday season has been on creating family traditions. With the recent arrival of my second baby, I’ve fallen in love with the idea of creating family recipes that will hopefully last us generations – like the gluten-free cinnamon rolls I plan on making every Christmas morning and the gluten-free Christmas cookies we’ll bake for family and friends.

These gluten-free molasses cookies are classic and totally timeless – yet easy to make in just one-bowl, NO chilling required! It’s these minor tweaks I made over rounds of recipe testing that I hope one day even my great grandkids will appreciate. I also baked these cookies with my toddler last week, and it passed the kid-friendly test with flying colors! He loved rolling the cookies in sugar, and I loved that I only had one bowl to clean. 🙂 Win, win!

a gluten-free molasses cookie with a bite taken out.

What Makes These the BEST Gluten-Free Molasses Cookies

These gluten-free molasses cookies check every box:

  • Soft, chewy, and perfectly spiced like classic bakery-style molasses cookies
  • Made in one bowl with easy pantry-staple ingredients
  • No chilling required—meaning cookies in under 20 minutes
  • Naturally gluten-free, and easily dairy-free/vegan with simple swaps
  • Perfect crackly tops thanks to rolling the dough in sugar
  • A reliable dough that doesn’t spread too much and bakes evenly every time

If you’ve been looking for a gluten-free molasses cookie that tastes exactly like the real thing, this is the recipe you’ll keep forever!

Key Ingredients & Substitutions

  • Molasses: I recommend using unsulphured molasses and avoiding blackstrap molasses – it’s more bitter and a little too thick for this cookie recipe.
  • Gluten-Free Flour: A high-quality gluten-free all-purpose flour with xanthan gum works best. I love and recommend either the King Arthur Gluten-Free Flour or Bob’s Red Mill 1:1 Gluten-Free Flour. If your blend does not contain xanthan gum, add ½ teaspoon.
  • Butter: To make these cookies dairy-free, swap the butter for vegan butter sticks or softened coconut oil.
  • Spices: The spice blend of ginger, cinnamon, nutmeg, and cloves gives these cookies their classic “gingersnap meets molasses cookie” flavor. Adjust ginger for more or less spice!
one gluten-free molasses cookie with a bite taken out.

Frequently Asked Questions

How do I store these gluten-free molasses cookies?

Store in an airtight container at room temperature for 4–5 days. They also freeze beautifully – store baked cookies in a freezer-safe bag for up to 3 months, thawing on the counter before enjoying.

Can I make them dairy-free?

Yes! Replace the butter with vegan butter or softened coconut oil. The texture remains soft and chewy.

How do I also make these cookies vegan?

Yes – simply use vegan butter and replace the egg with a flax egg (1 tbsp flax meal + 2.5 tbsp water). Bake time remains the same!

Sam’s Baking Tips

  • Don’t skimp on the spices! Molasses cookies need a strong spice profile.
  • Avoid over-mixing once the flour is added to keep the cookies chewy and tender.
  • Roll in sugar for that perfect crackly top and bakery-style finish!
  • Use a cookie scoop for evenly sized cookies that bake uniformly.

Why You’ll Love This Recipe

These gluten-free molasses cookies are soft, chewy, perfectly spiced, made in one bowl, and require no chilling—a holiday win! They taste just like the classic version, and no one will ever guess they’re gluten-free or dairy-free.

overhead image of gluten-free molasses cookies on a table.
No ratings yet

One-Bowl Gluten-Free Molasses Cookies (no chilling required!)

These soft and chewy gluten-free molasses cookies are packed with warm holiday spices and made in just one bowl – no chilling required! They bake up with perfectly crackled tops, rich molasses flavor, and a tender, melt-in-your-mouth texture no one will believe is gluten-free. The perfect easy Christmas cookie that’s also dairy-free friendly and ideal for gifting, parties, or cozy winter baking!
Print Pin Rate
Prep Time: 10 minutes
Cook Time: 10 minutes
Total Time: 20 minutes
Servings: 24 cookies

Equipment

  • 2 large cookie sheets
  • 1 large bowl

Ingredients

  • 6 tablespoons butter softened (or non-dairy butter)
  • 1/2 cup brown sugar or coconut sugar for a healthier option
  • 1/3 cup molasses
  • 1 egg at room temperature
  • 2 teaspoons vanilla extract
  • 1 3/4 cups gluten-free all purpose flour
  • 1 teaspoon baking soda
  • 1/2 teaspoon salt
  • 2 teaspoons ground ginger
  • 1 teaspoon cinnamon
  • 1/2 teaspoon nutmeg
  • 1/4 teaspoon ground cloves

Optional:

  • 1/4 cup granulated sugar for coating the cookies

Instructions

  • Preheat oven to 350° Fahrenheit and line a large cookie sheet with parchment paper.
  • Beat butter and brown sugar together in a large bowl with either a hand or stand mixer, until light and fluffy. Add in molasses, egg, and vanilla extract and beat again until combined.
  • Add in the gluten-free flour, baking soda, salt, ginger, cinnamon, nutmeg, and cloves. Mix again just until a dough forms – careful not to over-mix the cookie dough!
  • Scoop 2 tablespoon-sized balls of dough, roll the dough between the palm of your hands to form a smooth ball, then roll the ball in sugar before placing it on your prepared baking sheet.
  • Lightly press down each cookie just a little to flatten it, then bake the cookies for about 10-12 minutes. Remove the cookie from the oven and transfer to a wire cooling rack to cool completely before serving or storing.

Nutrition

Serving: 1cookie | Calories: 90kcal | Carbohydrates: 14g | Protein: 0.5g | Fat: 3g | Sugar: 7g

Every thanksgiving my mom makes the most incredible dinner rolls. They’re soft, fluffy, and the perfect addition to any holiday plate. There’s just one problem – they’re not gluten-free or dairy-free. And now that I’ve assumed a gluten-free diet and my sister is completely dairy-free, that old dinner roll recipe just won’t work for us anymore. Which is why I developed these gluten-free dinner rolls with a dairy-free option. They’re equally as soft and fluffy as the kind my mom used to make, and no one even noticed the difference! I’m not going to lie, I went into developing this recipe with caution – not sure if I could actually make a gluten-free dinner roll that tasted just like the real thing. So you can imagine my surprise when I actually did it! A dinner roll that is entirely gluten-free, and even dairy-free, that everyone can enjoy. 🙂

overhead image of gluten-free dinner rolls in a baking dish with dairy-free butter brushed on top.

Why You’ll Love These Gluten-Free Dinner Rolls

  • They’re surprisingly easy to make even though they use yeast; no complicated techniques required.
  • The dough yields rolls with golden crust and soft, tender insides – just like you remember from regular bread.
  • With a non-dairy swap for milk & butter, you can make them dairy-free and allergy-friendly — many bloggers highlight this flexibility.
  • They’re perfect for the holidays or any meal where you want warm bread on the table that everyone can enjoy.

Frequently Asked Questions

Can I make these gluten-free dinner rolls dairy-free too?
Yes – simply swap the milk for a non-dairy variety (like coconut or almond milk) and use vegan butter or this buttery-flavored coconut oil instead of regular butter!
Do I have to use gluten-free bread flour?
It’s highly recommended to use a gluten-free bread flour or blend designed for yeast baking; standard gluten-free all-purpose flours may lack structure and rise. I recommend the King Arthur Gluten-Free Bread Flour available on Amazon.
Can I make these without eggs?
Yes, though egg-free versions may result in slightly different texture. I’d recommend an egg replacer, like this one from Bob’s Red Mill, over flax or chia “eggs.”

close up image of gluten-free dinner rolls in a baking dish.

Sam’s Recipe Tips

  • Warm your milk precisely to 110° F before adding yeast – too hot and you’ll kill the yeast; too cold and it won’t activate.
  • Let the dough rise in a warm, draft-free spot for about one hour until it’s puffed and slightly set.
  • Use a cookie scoop or ⅓-cup measure to form each roll for even sizes and consistent baking.
  • Brush the rolls with melted butter (or non-dairy butter) right after baking for soft tops and rich flavor.
  • These rolls freeze well – just let them cool fully, then store in freezer-safe bags; re-warm before serving.

How to Store These Gluten-Free Dinner Rolls

These gluten-free dinner rolls stay soft and fluffy for up to 3 days when stored properly. Once cooled completely, place them in an airtight container at room temperature (the container must be airtight, any air will dry them out!). For longer storage, freeze the rolls in a sealed freezer bag for up to 2 months – just reheat them in the oven at 300°F for 8–10 minutes before serving to restore that fresh-baked texture.

The inside of a gluten-free dinner roll in a pan.
5 from 1 vote

Soft and Fluffy Gluten-Free Dinner Rolls

These Gluten-Free Dinner Rolls are soft, fluffy, and taste just like the real thing – no one will ever guess they’re gluten-free! Made with simple ingredients and an easy, one-bowl method, they’re perfect for holidays, family dinners, or weeknight comfort meals. Plus, with a dairy-free option included, everyone at your table can enjoy warm, homemade dinner rolls fresh from the oven!
Print Pin Rate
Prep Time: 20 minutes
Cook Time: 30 minutes
Rising Time: 1 hour
Total Time: 1 hour 50 minutes
Servings: 9 servings

Equipment

  • 1 small bowl
  • 1 electric mixer
  • 1 9×9-inch baking pan

Ingredients

  • 1 1/4 cups warm milk 110 degrees Fahreneheit or non-dairy coconut milk
  • 2 1/4 teaspoons active dry yeast
  • 1/4 cup honey
  • 1/4 cup butter, melted or non-dairy butter/buttery flavor coconut oil
  • 3 cups gluten-free bread flour
  • 2 teaspoons baking powder
  • 1/2 teaspoon salt
  • 1 egg plus 1 egg yolk at room temperature
  • 2 tablespoons butter, melted or non-dairy butter/buttery flavor coconut oil

Instructions

  • Start by warming your milk in a medium bowl to about 110° Fahrenheit. Do this in either the microwave for about 30-40 seconds, or over low heat on the stove for 2 minutes.
  • Once milk is warm, add the active dry yeast, honey, and melted butter. Give it a gentle whisk to combine, then let that sit for a couple minutes while you continue on with the recipe.
  • To the bowl of an electric mixer fitted with the dough hook attachment, add the gluten-free bread flour, baking powder, and salt. Turn the mixer on low until the dry ingredients are combined.
  • With the electric mixer running on medium speed, slowly add the milk mixture into the flour mixture. Once the wet and dry ingredients are almost completely combined, add in the egg and egg yolk. Continue mixing to incorporate the eggs into the dough.
  • Once the eggs are incorporated, turn the mixer on high speed and mix the dough for 3-5 minutes, until the dough is smooth and can be easily formed into a ball.
  • Using a large cookie scoop or 1/3 cup measuring cup, scoop the dough into 9 balls and gently roll each ball between your palms until smooth all the way around. If the dough is sticking to your hands, lightly wet your hands with warm water before rolling.
  • Then, place the dinner rolls in a greased 9×9-inch baking dish and tightly cover the dish with plastic wrap. Place the rolls in a warm place (by a window, in a proving drawer, in the oven with the light on, etc) to rise for about 1 hour.
  • After the hour is up, remove the plastic wrap from the baking dish and preheat your oven to 350° Fahrenheit. Once the oven is hot, bake the dinner rolls for 25-30 minutes or until they’re golden brown on top. Remove the rolls from the oven and brush each roll with melted butter, then let them cool before serving.

Nutrition

Serving: 1serving | Calories: 300kcal | Carbohydrates: 45g | Protein: 5g | Fat: 10g | Fiber: 2g | Sugar: 10g

Thanksgiving dessert should be indulgent, cozy, and full of fall flavor – even when it’s gluten-free! Whether you’re hosting guests with dietary restrictions or just looking to lighten things up without sacrificing taste, these gluten-free Thanksgiving desserts are easy to make, totally delicious, and guaranteed to put a smile on everyone’s face!

overhead image of a healthy gluten-free pecan pie bar.

6-Ingredient Healthy Gluten-Free Pecan Pie Bars

All the gooey, nutty sweetness of classic pecan pie — without the gluten, refined sugar, or complicated prep. These bars are rich, buttery, and perfectly chewy, made with just six wholesome ingredients.

gluten-free cornbread with milk on the side.

One-Bowl Gluten-Free Cornbread with Honey Butter

This cornbread is soft, slightly sweet, and made in one bowl for minimal cleanup. It’s the perfect side or dessert companion for Thanksgiving, especially when paired with a delicious honey butter!

Gluten-Free Cinnamon Sugar Apple Cake

Warm, spiced apples meet a soft, fluffy crumb in this gluten-free apple cake that tastes like fall in every bite. The cinnamon sugar topping gives it that irresistibly delicious finish.

healthy pumpkin muffins on a table with a small pumpkin.

Healthy One-Bowl Gluten-Free Pumpkin Muffins

Moist, fluffy, and perfectly spiced, these pumpkin muffins are a healthier twist on a seasonal favorite. They’re gluten-free, dairy-free, and naturally sweetened with maple syrup — perfect for breakfast or dessert.

gluten free apple crisp in a baking dish with a spoon and two scoops of ice cream on top.

Healthy Gluten-Free Apple Crisp

Crispy, golden oat topping meets tender, cinnamon-coated apples in this better-for-you apple crisp. It’s cozy, comforting, and best served warm with a scoop of dairy-free ice cream.

Overhead image of gluten-free cinnamon rolls in a baking dish with cream cheese frosting on top.

The BEST Fluffy Gluten-Free Cinnamon Rolls

Soft, gooey, and topped with a rich glaze, these gluten-free cinnamon rolls will fool even the biggest gluten lovers! They’re surprisingly easy to make and make the perfect Thanksgiving morning treat.

christmas crack pieces on a baking sheet with milk on the side

4-Ingredient Gluten-Free and Dairy-Free Christmas Crack

This festive, crunchy, and perfectly sweet “Christmas Crack” is made with gluten-free crackers, dairy-free chocolate, and a caramel-like coconut sugar topping. It’s addictively delicious and makes a great make-ahead dessert or edible gift.

From gooey pecan pie bars to cozy apple crisp, these gluten-free Thanksgiving desserts prove that you don’t have to compromise flavor to enjoy your favorite holiday sweets. Whether you’re baking for a crowd or just treating yourself, every recipe here is simple, wholesome, and absolutely irresistible – because everyone deserves a sweet ending to their Thanksgiving feast!

Why You’ll Love This Recipe

  • Sweet and Salty Perfection: The combination of salty pretzels, rich toffee, and creamy chocolate creates the ultimate flavor balance.
  • Simple Ingredients: With only 5 pantry staples, this recipe is both accessible and fuss-free.
  • Customizable: Switch up the toppings or pretzel shapes to match your preferences or dietary needs.
a piece of chocolate toffee pretzel bark with flaky sea salt on top.

What You’ll Need to Make Chocolate Toffee Pretzel Bark

Here’s a breakdown of the ingredients and why they shine in this recipe:

  • Mini Pretzels: Provide a salty, crunchy base for the bark. Use gluten-free pretzels to make the recipe gluten-free friendly. I used the Snyder’s Gluten-Free Mini Pretzels and they worked perfectly in this recipe!
  • Coconut Sugar: A natural sweetener that adds deep caramel notes to the toffee while being a healthier alternative to white sugar. I buy my coconut sugar in bulk on Amazon because I use it in so many of my recipes!
  • Butter (or Non-Dairy Butter): The fat needed to create the toffee layer. Use vegan butter for a dairy-free option. I recommend Miyoko’s vegan butter in this recipe.
  • Chocolate Chips: Melted chocolate ties everything together. Opt for dairy-free chocolate chips to keep the recipe vegan. I used Guittard’s Extra Dark Chocolate Chips for a more intense chocolate flavor. YUM!
  • Flaky Salt (optional): A sprinkle of flaky salt enhances the sweet-and-salty flavor profile and adds a touch of elegance.

How to Make Pretzel Bark

  1. Prepare the Base: Preheat your oven to 400°F and line a baking sheet with aluminum foil. Arrange pretzels in a single, even layer across the baking sheet.
  2. Make the Toffee: In a small saucepan, melt the butter and coconut sugar over medium heat, stirring often. Once melted, continue to cook for 4-5 minutes until the mixture is dark brown and bubbling. Remove from heat and whisk in vanilla extract.
  3. Pour Over Pretzels: Slowly pour the toffee over the pretzels, ensuring an even coating. Bake for 5 minutes until the toffee sets.
  4. Add Chocolate Layer: Melt the chocolate chips in the microwave or over a double boiler. Remove the pretzels from the oven, let cool for 1-2 minutes, then spread the melted chocolate over the toffee layer.
  5. Cool and Set: Allow the bark to cool at room temperature for 30 minutes, then transfer to the fridge for 6 hours or freezer for 3 hours. Once fully set, remove the bark from the pan, peel away the foil, and break into pieces.
chocolate toffee pretzel bark on a baking sheet.

Adjust This Recipe to Your Dietary Needs

Make it Vegan: Use dairy-free butter and vegan chocolate chips.

Make it Gluten-Free: Use gluten-free pretzels.

Make it Dairy-Free: Substitute non-dairy butter and chocolate chips.

Storage Tips

  • Store the bark in an airtight container in the fridge for up to 2 weeks or the freezer for up to 2 months.
  • Keep the pieces layered with parchment paper to prevent them from sticking together.
a stack of chocolate toffee pretzel bark on a plate.
No ratings yet

Chocolate Toffee Pretzel Bark (gluten-free & dairy-free!)

This chocolate toffee pretzel bark combines crunchy pretzels, rich caramelized toffee, and smooth chocolate for a sweet-and-salty treat that’s impossible to resist. This recipe is gluten-free, dairy-free, and vegan-friendly, sweetened with coconut sugar, and made with just five simple ingredients. Whether you’re making it for the holidays, gifting it to a friend, or enjoying it yourself, this quick and easy bark is sure to impress!
Print Pin Rate
Prep Time: 5 minutes
Cook Time: 10 minutes
Chilling Time: 4 hours
Total Time: 4 hours 15 minutes
Servings: 24 servings

Equipment

  • 1 9×13-inch baking sheet
  • 1 small saucepan

Ingredients

  • 3 cups mini pretzels I used gluten-free pretzels
  • 1 cup butter I used non-dairy butter
  • 1 cup coconut sugar or brown sugar
  • 1 teaspoon vanilla extract optional, but recommended
  • 2 cups chocolate chips
  • Flaky salt for topping

Instructions

  • Preheat oven to 400° Fahrenheit and line a large baking sheet with aluminum foil. Arrange the pretzels in an even layer on the baking sheet.
  • Melt butter and sugar in a small saucepan over medium heat, stirring frequently. Once the butter has melted, cook the toffee for another 4-5 minutes, stirring constantly until dark brown and bubbling.
  • Remove from the heat, whisk in the vanilla extract then immediately slowly and evenly pour the toffee over the pretzels. Place the pretzels and toffee in the oven and bake for 5 minutes.
  • While the bark bakes, melt the chocolate in the microwave or over a double boiler until completely smooth. Remove the pretzels and caramel from the oven, let them cool for 1-2 minutes or until no longer bubbling, then slowly pour the melted chocolate over top of the toffee and gently spread into an even layer.
  • Leave the chocolate toffee pretzels bark to cool at room temperature for about 30 minutes, then transfer to either the fridge for 6 hours or the freezer for 3 hours. Remove the bark from the pan, peel away the foil, and break into large chunks.

Notes

The nutritional info for this recipe was calculated using gluten-free pretzels, non-dairy butter, coconut sugar, and extra dark chocolate chips.

Nutrition

Serving: 1serving | Calories: 230kcal | Carbohydrates: 29g | Protein: 1.8g | Fat: 10.3g | Sugar: 17.3g