Tag

lemon

Browsing

Bright, creamy, perfectly tart, and perfectly sweet – these healthy lemon bars are everything you want a lemon bar to be, but made with better-for-you ingredients! The filling is silky smooth, tangy from fresh lemon juice, and naturally sweetened with maple syrup. And the secret high-protein ingredient? Cottage cheese! I know, I know – but trust me on this one. Just like my Cottage Cheese Cookie Dough and Cottage Cheese Ice Cream, once it’s blended you’ll never know it’s there! What you’re left with is a luscious, custardy lemon bar perfect for Easter, Mother’s Day brunch, or your next spring party. 🥰

Why You’ll Love These Healthy Lemon Bars

  • Higher in protein. Thanks to the cottage cheese and cream cheese in the filling, these bars pack in more protein than your average lemon bar — making them a genuinely satisfying treat, not just a dessert.
  • Perfectly sweetened. Maple syrup does all the work here, delivering just the right level of sweetness without any refined sugar. The fresh lemon juice keeps it beautifully balanced — bright and tangy, never cloying.
  • Super easy to make. A quick blitz in the blender for the filling, a simple 2-ingredient crust, and the oven does the rest. No double boiler, no tempering eggs, no complicated steps.
  • A dessert everyone will love. These lemon bars taste like the real thing — maybe even better! Creamy, tangy, buttery, and bright. They’re crowd-pleasing in the best possible way.
  • Great for any occasion! Easter, Mother’s Day, spring brunch, summer cookouts, or just because — these bars are always the right call.
  • Made with real, wholesome ingredients. No refined sugar, no artificial anything. Just simple ingredients that come together into something really, truly delicious.
overhead image of a healthy cottage cheese lemon bar on a plate with a lemon slice on top.

Recipe Variations and Substitutions

  • Crust: Graham crackers are the classic choice, but vanilla wafers, digestive biscuits, or gluten-free cookies all work wonderfully. For a grain-free option, use 1 cup almond flour mixed with 2 tablespoons melted coconut oil and 1 tablespoon maple syrup – press and bake as directed.
  • Butter or Coconut Oil: Either works for the crust. Butter gives a richer, more buttery flavor; coconut oil is a great dairy-free swap.
  • Cottage Cheese: Full-fat cottage cheese gives the creamiest result. If you can’t have dairy, a thick, plain dairy-free yogurt (like coconut yogurt) can be used in a pinch, though the texture will be slightly different.
  • Cream Cheese: Dairy-free cream cheese works great as a 1:1 swap for a fully dairy-free filling.
  • Maple Syrup: Honey works as a direct swap. If you’d like a slightly less sweet bar, start with ¼ cup and taste before adding more.
  • Lemon Juice: This recipe is specifically written for lemon, but lime juice works beautifully for a healthy lime bar variation! Start with the same amount and adjust to taste.

Sam’s Recipe Tips

  • Bake in a water bath to avoid cracks. Because this filling contains eggs and cream cheese (similar to a cheesecake), it can crack on top if it bakes too quickly or unevenly. To prevent this, place your 8×8 baking pan inside a larger roasting pan and fill the roasting pan with about an inch of hot water before putting it in the oven. The steam keeps the heat gentle and even, giving you a perfectly smooth, crack-free top every time.
  • Fresh lemon juice is best, but bottled works in a pinch. Fresh lemon juice gives you that vibrant, bright, sunshine-y flavor that makes lemon bars so irresistible. You’ll need about 3–4 lemons for ½ cup of juice.
  • Blend the filling until completely smooth. Any lumps from the cottage cheese or cream cheese will bake into the filling, so take an extra 30 seconds to make sure your blender has done its job fully. A high-speed blender gives the best results.
  • Don’t skip the chill time. I know it’s hard to wait, but lemon bars need that fridge time to fully set and develop their best flavor and texture. Three hours is the minimum — overnight is even better. Cutting them while they’re still warm will result in a runny, messy bar.
  • Use the parchment paper overhang to lift. Line your pan so the parchment paper hangs over all four sides. This makes it incredibly easy to lift the whole slab out cleanly before cutting.
  • Clean your knife between cuts. For the neatest, most beautiful squares, wipe your knife with a damp cloth between each cut. It makes a huge difference in how the final bars look!
  • Freeze for later. These lemon bars freeze well! Wrap individual squares in plastic wrap and freeze for up to 2 months. Thaw in the fridge overnight before serving.
close up image of a healthy cottage cheese lemon bar on a plate with a lemon slice on top.
No ratings yet

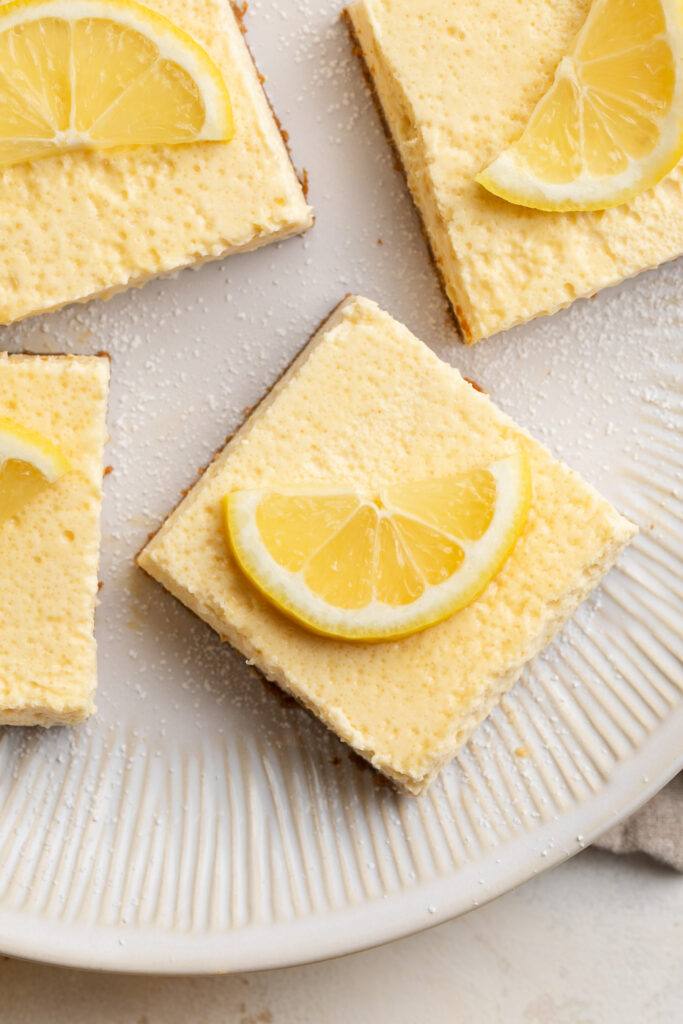
Healthy Cottage Cheese Lemon Bars

These healthy lemon bars are creamy, perfectly tart, and naturally sweetened with maple syrup – made with a secret ingredient (cottage cheese!) that keeps them higher in protein and silky smooth without any refined sugar. Built on a buttery graham cracker crust and baked to custardy perfection. These healthy lemon bars taste just as indulgent as the classic version but with healthier ingredients.
Print Pin Rate
Prep Time: 10 minutes
Cook Time: 25 minutes
Chill Time: 1 hour
Total Time: 3 hours 35 minutes
Servings: 9 servings

Equipment

  • 1 9×9-inch baking pan
  • 1 food processor or high speed blender

Ingredients

For the crust:

  • 1 cup graham cracker or cookie crumbs
  • 3 tablespoons melted butter or coconut oil

For the lemon filling:

  • 1/2 cup (4 ounces) cream cheese softened at room temperature
  • 1 cup cottage cheese
  • 4 large eggs at room temperature
  • 1/2 cup lemon juice (fresh is best!)
  • 1/3 cup maple syrup

Instructions

  • Preheat oven to 325° Fahrenheit and line a 8×8-inch baking pan with parchment paper, then lightly grease the inside.
  • Make the crust by mixing together the graham cracker or cookie crumbs and melted butter or coconut oil in a bowl, then press the mixture into the bottom of your prepared baking pan. Bake the crust for 10 minutes.
  • While the crust bakes, make the filling by adding all filling ingredients to a blender and blend until smooth. Pour the filling over the crust, then bake for 25-30 minutes or until the bars are just set in the middle. (See Notes below on how to bake in a water bath to avoid any cracks).
  • Remove the bars from the oven and leave them to cool at room temperature for 1 hour, then transfer them in the fridge to chill for at least 3 hours (or overnight).
  • Once the bars have chilled, remove them from the pan and cut into squares. Enjoy the lemon bars right away, or store them in an airtight container in the fridge for up to 5 days!

Notes

  • Blend the filling until completely smooth for the best texture.
  • Do not skip the chill time — the bars need at least 3 hours to fully set.
  • Top with a dusting of powdered sugar or fresh lemon zest before serving for a beautiful finish.
  • Water bath (optional, prevents cracking): Place your 8×8 pan inside a larger roasting pan and fill the roasting pan with about 1 inch of hot water before placing in the oven. The steam creates gentle, even heat that prevents the filling from cracking on top.

Nutrition

Serving: 1serving | Calories: 210kcal | Carbohydrates: 18g | Protein: 8g | Fat: 12g | Sugar: 13g

I’ve seriously struggled to stay hydrated this summer! I spent the first half of the summer very pregnant, not the second half newly postpartum. So when water alone doesn’t do the trick, I love to whip up this homemade gatorade. I make a huge glass of it in the morning, then blend together one of my favorite healthy smoothies – and I head into the day feeling fueled and hydrated (despite a total lack of sleep thanks to my newborn – ha!).

What Makes This Homemade Gatorade Better Than Store-Bought

  • It cuts out artificial colors, high fructose corn syrup, and preservatives, giving you a refreshing drink made from wholesome ingredients while providing essential electrolytes.
  • Coconut water acts as a natural base, offering potassium and hydration without added sugars. I like to buy my coconut water in bulk – this is the case I buy on Amazon, totally organic for a great price.
  • You control the sodium with a pinch of high-mineral salt (linking to the one I buy on Amazon HERE) – crucial for electrolyte balance – but can easily tailor it to your health needs!
homemade gatorade in a large mason jar with ice and lime slices

I love sipping my homemade gatorade out of this 32 ounce mason jar (available on amazon!) and always use the Redmond’s Real Salt in this recipe – also available on amazon!

The Importance of Electrolytes

  • Sodium, potassium, magnesium, and calcium are vital for hydration, muscle function, and fluid balance – especially after sweating or exercise.
  • Dietitians note that homemade versions help you stay hydrated and replenish lost electrolytes without the added sugars found in commercial sports drinks.

Switch Up The Flavors of This Homemade Gatorade

Looking for variety? Swap in different flavor profiles with these easy twists:

  • Fruit Boosts: Add fresh watermelon juice, unsweetened cranberry, or tart cherry juice for natural sweetness and flavor.
  • Herbal Infusions: Stir in mint, cucumber, or a slice of ginger for added freshness and digestive support.
  • Sweetener Options: Use maple syrup, agave, or even stevia to control sweetness without compromising taste.
homemade gatorade in a large mason jar with lemons and limes on the side.
No ratings yet

Homemade Lemon-Lime Gatorade

Stay hydrated the healthy way with this refreshing homemade lemon-lime gatorade recipe. Made with coconut water, fresh citrus juice, raw honey, and mineral-rich salt, it’s a clean alternative to store-bought sports drinks. Perfect for post-workout recovery, hot summer days, or anytime you need a natural electrolyte boost!
Print Pin Rate
Prep Time: 1 minute
Total Time: 1 minute
Servings: 1 serving

Equipment

  • 1 large glass

Ingredients

  • 1 cup coconut water
  • 1 cup plain filtered water
  • juice of 1 lemon
  • juice of 1/2 lime
  • 1 tablespoon raw honey or agave
  • 1/4 teaspoon high mineral salt I used Redmond's Real Salt

Instructions

  • Add all ingredients to a large glass and stir to combine, then add in ice and enjoy!

Why You’ll Love This Recipe

This almond flour cake is light, moist, and easy to make. It’s gluten-free, dairy-free, grain-free, and made with wholesome ingredients. You only need one bowl and a few pantry staples to create this delicious, crowd-pleasing dessert!

Can You Use Almond Flour For Cakes?

Yes, absolutely! Almond flour adds texture and flavor, and is loved by those following a paleo diet. Almond flour can be beneficial to someone looking to reduce their carbs, grains and sugar intake. Unlike wheat or rice flour blends, almond flour contains no grains so it won’t lead to a spike blood sugar. And after you make this cake, I highly recommend you use any leftover almond flour to make almond flour chocolate cookies and almond flour brownies – YUM!

gluten-free almond flour cake sliced on a plate.

What You’ll Need To Make Almond Flour Cake

Eggs – Bring your eggs to room temperature before using them in this recipe. Then, crack them into your bowl and beat them until super light and airy. The goal here is to introduce as much air to the eggs as possible, which will result in a lighter and fluffier cake!

Sugar: Adds sweetness and helps create a tender crumb. Feel free to substitute with coconut sugar for a refined sugar-free option.

Almond Flour – I recommend the Bob’s Red Mill Super Fine Almond Flour for this grain-free recipe. The more finely ground the almond flour is, the lighter your cake will be. However, if you can’t find an almond flour labeled “super fine,” don’t worry – many are ground finely enough to work in this recipe. Also, avoid using almond meal, it’s heavier and will result in a more dense cake.

Baking Powder: Helps the cake rise and adds fluffiness!

Lemon Zest – Let’s call is the secret ingredient! A pinch of lemon zest gives this almond flour cake a hint of tangy, citrus-y freshness. Without out, the cake tastes great, but with it, the cake tastes incredible. So if you’re looking to take this gluten-free dessert recipe up a notch, don’t forget the lemon zest.

overhead image of almond flour cake on a plate.

How to Make Almond Flour Cake

  1. Preheat your oven to 350°F and grease an 8-inch cake pan.Beat eggs and sugar until pale and thick (about 5 minutes).
  2. Add almond flour, baking powder, and lemon zest. Beat until just combined.
  3. Pour batter into the pan and top with sliced almonds if using.
  4. Bake for 30-35 minutes or until a toothpick inserted into the center comes out clean.
  5. Let cool completely before serving.

Sam’s Recipe Tips

  • Beat the eggs for a full 5 minutes, no less! Beating the eggs until pale and thick is hands-down the most important part of this recipe. No matter how tempting it may be, don’t cut this step short!
  • For easy removal, I recommend baking this almond flour cake in a spring-form pan. Once done baking, gently run a butter knife along the inside edge of the pan to unstick it from the sides. Then, release the sides of the spring-form pan and list away the sides revealing your perfect cake!
  • Top this gluten-free cake however you’d like! I finished mine off with a generous dollop of coconut white cream and some fresh berries. This cake would also taste great with your favorite frosting, or a simple sprinkling of powdered sugar!
  • If you like cinnamon, try adding a teaspoon of cinnamon to the batter.

Storage Instructions

Store any leftover cake in an airtight container at room temperature for up to 2 days, or in the refrigerator for up to 5 days. You can also freeze the cake for up to 3 months—just thaw it at room temperature before serving.

gluten-free almond flour cake sliced on a plate with powdered sugar on top.
4.15 from 7 votes

Perfect Almond Flour Cake

Perfectly light and fluffy almond flour cake! A totally irresistible dessert that’s grain-free, gluten-free, and dairy-free. This simple cake comes together in one bowl, with only a handful of simple ingredients.
Print Pin Rate
Prep Time: 30 minutes
Cook Time: 40 minutes
Total Time: 1 hour 10 minutes
Servings: 8 servings

Ingredients

  • 4 large eggs, at room temperature
  • 1/2 cup sugar
  • 1 1/2 cups almond flour
  • 1 teaspoon baking powder
  • 2 teaspoons lemon zest optional, but recommended
  • 1/4 cup sliced almonds optional, for topping

Instructions

  • Preheat oven to 350° Fahrenheit and grease an 8-inch cake pan.
  • Beat together the eggs and sugar with either a hand or stand mixer on high speed until pale and thick, about 5 minutes.
  • Add in the almond flour, lemon zest (if using) and baking powder. Beat for another 30 seconds to one minute, until batter is just combined.
  • Transfer the batter to your prepared cake pan and if you'd like, top with an even layer of sliced almonds (for extra crunch and decoration). Bake the cake 30-35 minutes, or until a toothpick inserted down the center of the cake comes out clean.
  • Remove cake from the pan and let cool completely before garnishing and serving.

Nutrition

Serving: 1serving | Calories: 200kcal | Carbohydrates: 17g | Protein: 7.5g | Fat: 13g | Sugar: 13g

As I enter my first cold and flu season as a mom, I’m doing everything I can to boost my family’s immune system! While my son (currently 9 months old) can’t have these immunity shots quite yet, my husband and I each take a shot a day to… keep the doctor away. Sorry, I had to!

These immunity shots are jam-packed with antioxidants to help strengthen your immune system. A combination of fresh ginger, turmeric, and citrus create a powerhouse to help ward off colds. Also, the addition of black pepper helps to activate the turmeric, leading to even more anti-inflammatory benefits.

They’re tangy, spicy, incredibly potent, but work some serious magic to keep my family healthy. If you also want to avoid getting sick this cold and flu season, I highly recommend you whip up a batch too!

homemade immunity shot being poured into a glass.

What You’ll Need to Make this Immunity Shots Recipe

Fresh Ginger: Ginger is renowned for its anti-inflammatory and antioxidant properties. It aids digestion, soothes sore throats, and provides a zesty kick to our immunity shots. And in case you have leftover fresh ginger after making this recipe, use it to make these healthy teriyaki chicken bowls. Eating an overall healthy diet also works wonders for building a strong immune system!

Fresh Turmeric Root: Curcumin, the active compound in turmeric, is a superhero in the anti-inflammatory world! It’s a natural immune booster, assisting the body in fighting off infections and promoting overall well-being.

Lemons: Packed with vitamin C, lemons contribute to collagen production, which is crucial for skin health. They also support the immune system and add a refreshing citrusy flavor to the shots.

Oranges: Another vitamin C powerhouse, oranges help stimulate the production of white blood cells, enhancing the immune system’s defense mechanism against illnesses. Because of its cold-fighthing benefits, I aim to eat as much vitamin C as possible this time of year. One of my favorite ways to enjoy citrus fruits is in this citrus salad recipe – seriously so good!

Black Pepper: Piperine, found in black pepper, enhances the absorption of curcumin from turmeric. This dynamic duo ensures you get the most out of the turmeric’s immune-boosting properties.

homemade immunity shots with lemon, orange, fresh ginger, and fresh turmeric on the side.

What are the Health Benefits of Immunity Shots?

  • The combination of fresh ginger, turmeric, lemons, and oranges provides a powerful boost to the immune system! These ingredients are rich in antioxidants and vitamins, supporting the body’s defense against infections and illnesses.
  • Ginger and turmeric, with their anti-inflammatory properties, help reduce inflammation in the body. Chronic inflammation is linked to various health issues, and incorporating these shots into your daily routine may contribute to overall well-being.
  • Lemons and oranges are excellent sources of vitamin C, essential for collagen production, skin health, and a robust immune response. Regular consumption of these immunity shots ensures a steady intake of this vital nutrient, promoting optimal health!

Tips and Tricks

Play with Ratios: Adjust the quantities of ginger, turmeric, and citrus to suit your taste preferences. If you enjoy a more zesty kick, add an extra squeeze of lemon or orange.

Storage Savvy: To ensure your shots stay fresh, store the juice in an airtight container in the fridge. Use dark glass containers to protect the ingredients from light, maintaining their potency.

Prep Ahead: Consider prepping larger batches and freezing the juice in ice cube trays. Pop out a cube whenever you need a quick immunity boost – it’s a time-saving trick for those hectic days.

Homemade immunity shots with fresh lemon, orange, ginger, and turmeric on the side.
5 from 3 votes

Homemade Ginger and Turmeric Immunity Shots

These immunity shots are packed with antioxidants to help strengthen your immune system! They’re the easiest, most natural way to help prevent getting sick during cold and flu season. Fresh ginger and turmeric, plenty of citrus, and black pepper make for a tangy, spicy, and potent immunity shot. Enjoy once a day for optimal results!
Print Pin Rate
Prep Time: 5 minutes
Total Time: 5 minutes
Servings: 10 servings

Ingredients

  • 1/4 cup fresh ginger, chopped
  • 1/4 cup fresh turmeric root, chopped
  • 2 lemons, peeled and chopped
  • 2 oranges, peeled and chopped
  • 1 teaspoon black pepper
  • 2 cups water

Instructions

  • Add all ingredients to a blender and blend on high for 1-2 minutes.
  • Place a fine mesh strainer over a bowl or pitcher and pour the liquid through the strainer, and use a spoon to stir the liquid around in the strainer to separate the pulp from the juice.
  • Discard the pulp in the strainer, then pour the juice into an airtight container and store it in the fridge for up to 2 weeks.
  • When ready to drink, pour 2 ounces into a glass and drink quickly (like a shot!).

Nutrition

Calories: 300kcal

Fresh and flavorful mediterranean quinoa salad! This simple salad recipe is loaded with healthy veggies and tossed in a simple lemon dressing. Quinoa, chickpeas, olives, sundried tomatoes, basil, and feta – what’s not to love?!

close-up image of mediterranean quinoa salad in a bowl.

What You’ll Need to Make Mediterranean Quinoa Salad

Quinoa – Start with 2 cups of cooked red or white quinoa (I used white quinoa) for this recipe. To cook quinoa, simply rinse 1 cup of dry quinoa, then add to a small saucepan with 2 cups of water and a pinch of salt. Bring the quinoa to a boil, then reduce to a simmer and cover with a lid. Simmer quinoa for about 15 minutes, or until all liquid has been absorbed. Once cooked, let cool to room temperature before adding to this salad!

Chickpeas – A can of chickpeas adds some extra protein to this grain salad. However, if you don’t like chickpeas, you can leave them out. Or, feel free to swap out the chickpeas with your favorite white bean – canneloni beans or navy beans would also taste great!

Kalamata Olives – This classic mediterranean ingredient adds tons of delicious flavor to this quinoa salad! Either buy pitted kalamata olives, or slice and pit them yourself for this recipe.

Feta – Another staple ingredient in many mediterranean recipes! Feta cheese is deliciously creamy and salty, and takes this salad recipe to the next level. Though if feta’s not your thing, you can leave it out or replace if with your favorite soft white cheese.

mediterranean quinoa salad ingredients separated in a bowl.

Tips and Tricks

  • This salad is great for meal prep! You can fully prep and store this salad in the fridge for up to 4 days. The flavors will only intensify as it sits.
  • Feel free to change up this salad however you’d like! Not a fan of one of the ingredients? Either leave it out or replace it with whatever you prefer. This mediterranean quinoa salad is super easy to customize and make your own.
  • Love this recipe? Try this very similar Jennifer Aniston salad next!
mediterranean quinoa salad in a bowl with a glass of water on the side.

Adjust This Recipe to Your Dietary Needs

Make it Gluten-Free: Surprise! This mediterranean quinoa salad is already gluten-free! Quinoa is a naturally gluten-free grain.

Make it Vegan/Dairy-Free: Simply leave out the feta, or swap it out for your favorite non-dairy feta – I love this Violife Vegan Feta.

close-up overhead image of mediterranean quinoa salad in a bowl.
5 from 2 votes

Mediterranean Quinoa Salad

Fresh and flavorful mediterranean quinoa salad! This simple salad recipe is loaded with healthy veggies and tossed in a simple lemon dressing. Quinoa, chickpeas, olives, sundried tomatoes, basil, and feta – what’s not to love?!
Print Pin Rate
Prep Time: 15 minutes
Total Time: 15 minutes
Servings: 4 servings

Ingredients

  • 2 cups cooked quinoa
  • 1 (15.5 ounce) can chickpeas, drained and rinsed
  • 1/2 English cucumber, chopped
  • 1 bell pepper, chopped
  • 1/2 red onion, chopped
  • 1/2 cup kalamata olives, pitted and sliced in half
  • 1/2 cup sun-dried tomatoes, finely chopped
  • 1/2 cup fresh basil, finely chopped
  • 1/3 cup crumbled feta

For the lemon dressing:

  • 1/2 cup olive oil
  • 1/4 cup lemon juice
  • 1 teaspoon dried oregano
  • 1/2 teaspoon salt
  • 1/4 teaspoon black pepper

Instructions

  • Add the quinoa, chickpeas, cucumber, bell pepper, red onion, kalamata olive, sun-dried tomatoes, basil, and feta to a large bowl.
    mediterranean quinoa salad step 1
  • In a separate small bowl, whisk together the olive oil, lemon juice, dried oregano, salt, and black pepper until combined.
  • Pour the dressing over the salad and toss to combine. Enjoy immediately or store in an airtight container in the fridge for up to 4 days.

Nutrition

Calories: 300kcal