Ideal for lunchbox treats, post-workout energy, or whenever you’re craving a little something sweet.
What Makes This Recipe Healthy?
Medjool dates provide natural sweetness, fiber, and potassium without added sugar!
Rolled oats and peanut butter add sustained energy through complex carbs, healthy fats, and protein.
This recipe is naturally gluten-free, dairy-free, and refined sugar-free – yet taste like dessert!
Recipe Variations and Substitutions
Nut-Free: Swap in unsweetened sunflower or tahini instead of peanut butter.
Lower-Sugar: Use dark or sugar-free mini chocolate chips, or omit them entirely.
Flavor Swaps: Stir in cinnamon, cocoa powder, or shredded coconut for added depth.
Frequently Asked Questions
Can I use almond flour instead of oats? Yes! Almond flour—or any nut flour—works for a richer, low-carb version.
Will these hold together without rolling? They’ll firm up in the fridge or freezer, but rolling helps ensure they stay bite-sized.
How long do they last? Keep them refrigerated up to 2 weeks or freeze for up to 3 months for easy snacking!
5 from 2 votes
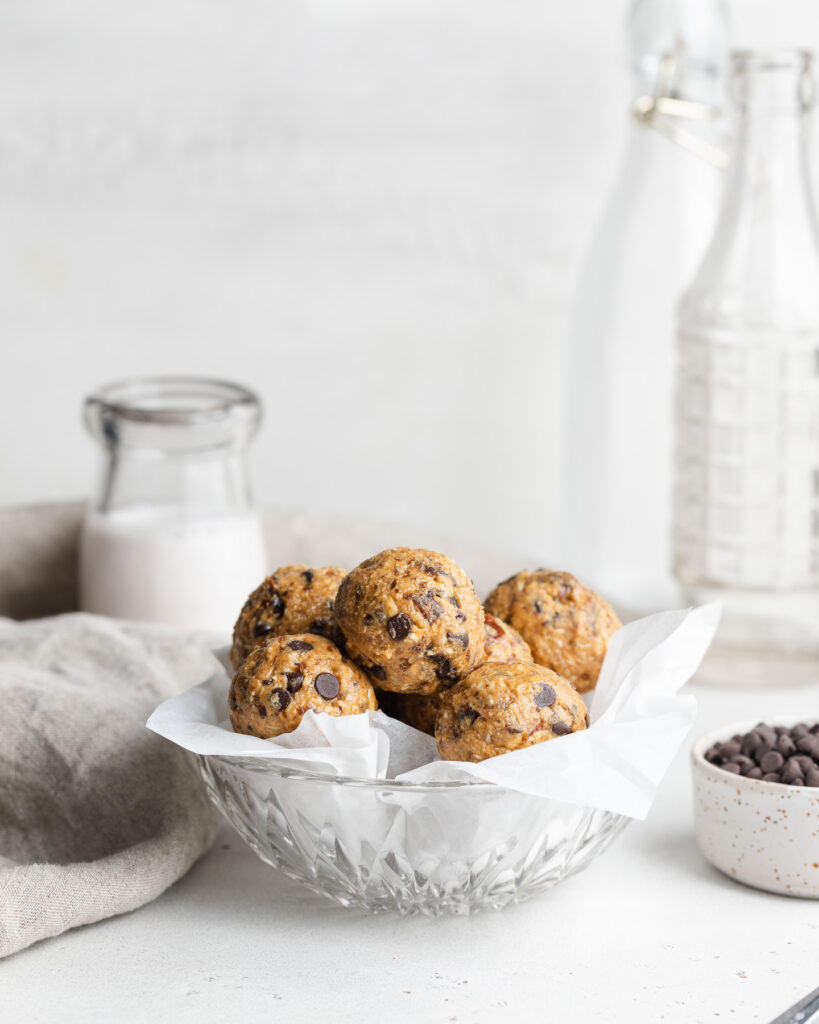
5-Ingredient Healthy Cookie Dough Date Bites
Healthy 5-ingredient cookie dough date bites! They’re vegan, gluten-free, sugar-free, and totally delicious. Whip up a batch of these healthy snacks in just a few minutes!
1/4cupchocolate chips (I recommend mini chocolate chips!)
Instructions
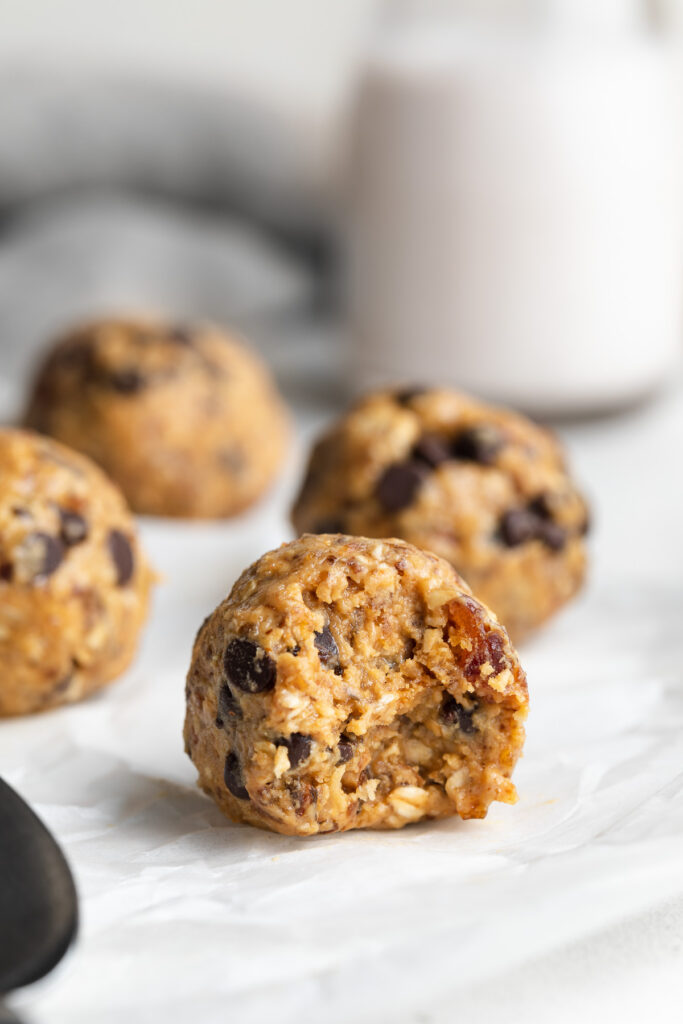
Add all ingredients except chocolate chips to a food processor and pulse until a dough forms. All ingredients should be very finely chopped, and mixture will appear crumbly but should stick together when pressed between your fingers.
Add in chocolate chips and give just 2 or 3 pulses to incorporate.
Use a cookie scoop to scoop mixture, then roll between your palms into balls. Place on a parchment-lined plate and refrigerate for 2 weeks or freeze for up to 3 months.
I knew my carrot cake had to be a few things – one bowl, gluten-free, and easy to make. I also really wanted to keep this gluten-free cake recipe to taste as close to the real thing as possible. I wasn’t willing to compromise on taste or texture, so after a few (failed) tests I finally did it! The BEST EVER gluten-free (and can be made dairy-free) carrot cake, made in one bowl, and oh-SO delicious.
Why You’ll Love This Gluten-Free Carrot Cake
Moist and Flavorful: This cake boasts a tender crumb, infused with warm spices and the natural sweetness of carrots.
Simple Ingredients: Crafted with everyday items, making it accessible and easy to prepare.
Versatile and Inclusive: Easily adaptable to various dietary needs without compromising on taste.
Sam’s Recipe Tips
Room Temperature Ingredients: Ensure eggs and dairy-free alternatives are at room temperature for a smoother batter.
Grating Carrots: Use freshly grated carrots for optimal moisture and flavor.
Frosting Consistency: Adjust the amount of milk in the frosting to achieve your desired thickness.
Adjust This Recipe to Your Dietary Needs
Make it Dairy-Free: Use non-dairy cream cheese, butter, and milk alternatives in both the cake and frosting.
Vegan Option: Replace eggs with flax eggs (1 tablespoon ground flaxseed mixed with 3 tablespoons water per egg) and use all dairy-free substitutes.
Make it Nut-Free: Omit the walnuts and ensure all other ingredients are free from cross-contamination.
Storage Instructions
Refrigeration: Store the frosted cake in an airtight container in the refrigerator for up to one week.
Freezing: For longer storage, freeze unfrosted cake layers wrapped tightly in plastic wrap for up to three months. Thaw and frost before serving.
4.67 from 3 votes
The BEST Gluten-Free and Dairy-Free Carrot Cake with Cinnamon Cream Cheese Frosting
This gluten-free cake is simply heavenly – and made in just one bowl! It's bursting with warm spices, shredded carrots, and topped with a luscious cinnamon cream cheese frosting. This cake is an incredible treat for any occasion!
1/2cupcream cheese, softened (I used non-dairy cream cheese)
1/2cupbutter, softened (I used non-dairy butter)
4cupspowdered sugar
3-4tablespoonsmilk I used non-dairy almond milk
2teaspoonscinnamon
1/4teaspoonvanilla extract
Instructions
Preheat oven to 350° Fahrenheit and line a 9×9-inch baking pan with parchment paper.
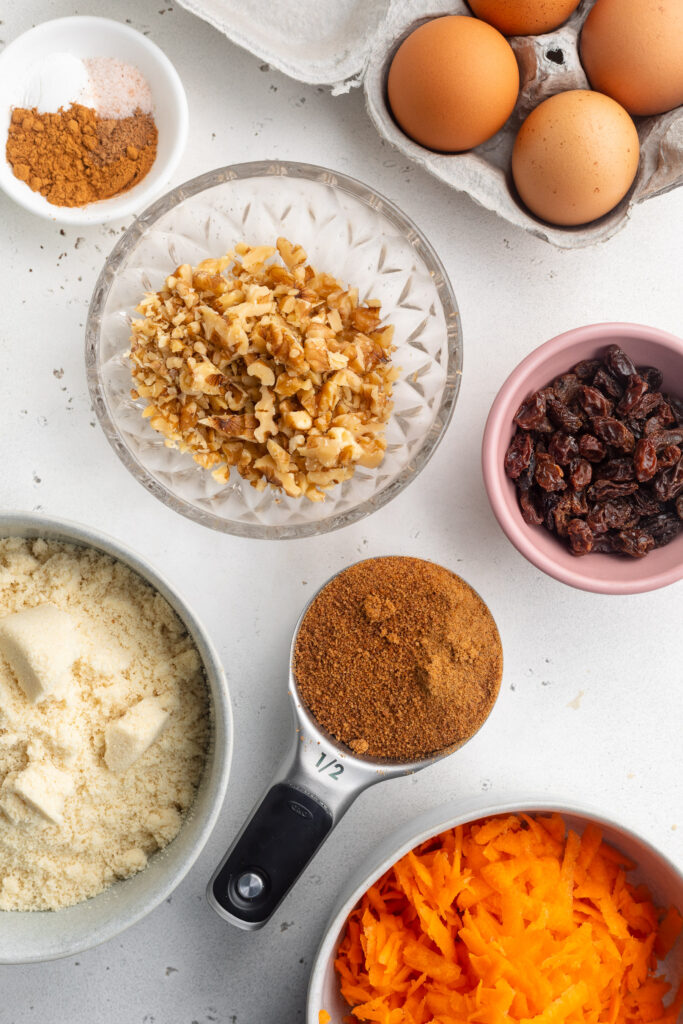
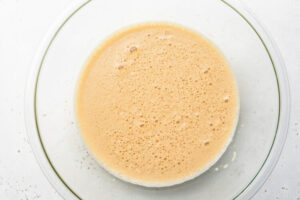
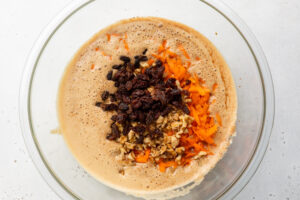
In a large bowl, whisk together the brown sugar or brown sugar, oil, eggs, and vanilla extract until well combined.
Add in the gluten-free all purpose flour, baking powder, baking soda, cinnamon, and nutmeg. Whisk everything together into a smooth batter. Then, add in the shredded carrots and chopped walnuts, and use a spatula to fold those ingredients into the batter.
Pour the batter into your prepared baking pan and bake for 30-35 minutes, or until a toothpick inserted down the center of the cake comes out clean.
Remove the cake from the oven, let it cool inside the baking pan for 15 minutes then carefully remove the cake from the pan by sliding a sharp knife around the outside edge of the cake. Transfer the cake to a wire cooling rack and let it cool completely before frosting.
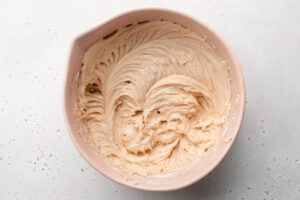
Once the cake is cool, make the cinnamon cream cheese frosting by adding all frosting ingredients to a large bowl and beating with either a hand or stand mixer until fully combined. Start by using just 3 tablespoons of milk in the frosting, then add an additional tablespoon of milk if the frosting is too thick.
Spread the frosting into an even layer over the top of the cooled carrot cake. Either serve cake immediately or cover and store in the fridge for up to 1 week!
Video
Notes
Nutrition info may vary depending on the brand of ingredients used. The above nutrition info was calculated to include the cinnamon cream cheese frosting.
Magic bars were one of my favorite childhood treats! My mom had a few dessert recipes she rotated through – her famous watergate salad was a big one, and 7-layer magic bars were a close second. So when I got hit with this insane craving for magic bars, I looked up a few recipes and was pretty shocked by what I found. Most magic bars are made with tons, and I mean TONS of processed sugar. Though since I’ve basically made it my life’s work to turn our favorite desserts into healthier ones, I knew I had to get working on a healthier magic bar recipe!
This recipe took quite a few tries, but I ultimately perfected it! I used the same almond flour shortbread crust as my healthy pecan pie bars recipe, and riffed off my healthy vegan caramel sauce for a healthier sweetened condensed milk alternative. I then topped these bars with plenty of coconuts, chopped nuts, and of course – chocolate chips! The end result is a bar just as indulgent as the classic magic bars we all know and love, made with healthier ingredients and a fraction of the sugar. I just know you’re gonna LOVE these!
Why You’ll Love This Recipe
Naturally Sweetened – No refined sugar, just maple syrup and coconut cream for a rich, caramel-like sweetness.
Easy & Quick – Simple ingredients, one bowl for the crust, and a short bake time.
Customizable – Easily make them nut-free, keto-friendly, or extra chocolatey!
What Makes These Magic Bars Healthier?
Traditional magic bars are loaded with processed sugars and condensed milk, but this healthier version swaps in:
Almond flour for a grain-free, nutrient-dense crust.
Maple syrup instead of refined sugar.
Coconut cream for a dairy-free caramel alternative.
Dark chocolate chips with minimal added sugar, or opt for a refined sugar-free chocolate chip like these!
Sam’s Recipe Tips
For Extra Firm Bars – Let them chill in the fridge overnight before slicing.
For More Chocolate Flavor – Drizzle melted chocolate over the top before serving.
For a More Caramel-Like Texture – Use cashew butter instead of almond butter.
Adjust This Recipe to Your Dietary Needs
Nut-Free Option – Use sunflower seed butter instead of almond butter and swap the nuts for pumpkin or sunflower seeds.
Keto-Friendly Option – Substitute maple syrup with a keto-friendly syrup and use sugar-free chocolate chips.
Refined Sugar-Free – Stick with pure maple syrup and dark chocolate for a naturally sweet treat!
Storage Instructions
Fridge: Store bars in an airtight container in the refrigerator for up to one week. Freezer: For longer storage, freeze them for up to 3 months and thaw before serving.
5 from 1 vote
Healthy Gluten-Free Magic Bars
These healthy magic bars are a better-for-you twist on the classic 7-layer bars! Made with a buttery almond flour crust, a naturally sweetened caramel layer, crunchy nuts, coconut, and melty dark chocolate, these bars are gluten-free, dairy-free, vegan, and refined sugar-free. They’re the perfect treat for when you’re craving something sweet but still healthier.
1/2cupcoconut cream(the thick white part at the top of a can of full-fat coconut milk)
1/4cupmaple syrup
1/4cupalmond butteror peanut butter
1cupchopped walnutsor pecans
1cupunsweetened shredded coconut
1cupdark chocolate chips
Instructions
Preheat oven to 350° Fahrenheit and line a 9×9-inch baking pan with parchment paper.
Add all shortbread crust ingredients to a large bowl and mix to combine. Then, transfer the crust to your prepared baking pan and press the crust down into an even layer over the base of the baking dish. Bake for 10 minutes or until lightly golden brown around the edges.
Remove the crust from the oven to cool, and while it cools make the caramel by adding the coconut cream, maple syrup, and almond butter to a small saucepan over medium-low heat. Whisk the mixture together and cool for 3-5 minutes, whisking constantly, until the caramel has melted together and slightly thickened.
Remove the saucepan from the heat and allow the caramel to cool slightly, then mix the chopped walnuts or pecans and shredded coconut into the caramel.
Pour the caramel mixture over the cooled crust and spread it into an even layer over the crust. Sprinkle the chocolate chips evenly over the caramel layer (if you’d like, you can then sprinkle an additional 1-2 tablespoons of shredded coconut and chopped walnuts or pecans over the chocolate chips to make the bars a little prettier), then bake the bars for an additional 20 minutes.
Remove the bars from the oven and leave them to cool at room temperature for about 30 minutes, then transfer them to the fridge to completely set for at least one hour. Remove the bars from the fridge, cut into square, and enjoy!
We all need a solid vanilla cupcake recipe in our back pocket when the occasion arises. For me, this occasion my son’s upcoming 2nd birthday party (time flies!). But for you, this could be a birthday party, baby shower, holiday party, or a simple Tuesday night when you’re craving something sweet.
Now you might be wondering, what makes these gluten-free cupcakes the best ever?? Well, for one very simple reason. They taste identical to their non gluten-free counterparts. Meaning, those with celiac disease or a gluten allergy/intolerance can enjoy these perfect vanilla cupcakes with everyone else. So no one will feel left out or dissatisfied!
Why You’ll Love This Recipe
Pantry Staples: This recipe’s ingredients are all items you may have right on hand in your pantry which will make this a super easy vanilla cupcake recipe to put together!
Classic Vanilla Cupcake Taste: This gluten-free cupcake tastes exactly like a classic vanilla cupcake so no need to worry about anyone missing out on this sweet treat!
Versatile and Customizable: Feel free to use dairy-free milk and dairy-free butter for these cupcakes! You can also use egg replacement to make these vegan! If taking this option, I recommend the Earth Balance Vegan Buttery Sticks and Elmhurst Almond Milk. You can also add any cupcake toppings like sprinkles, cupcake jams or toppers to make them special for any birthday or holiday event!
What You’ll Need
All Purpose Gluten-Free Flour: I swear by the Bob’s Red Mill Gluten-Free 1-to-1 Baking Flour for all my gluten-free baking needs. It does a perfect job at keeping your bakes together, and mimicking the taste and texture of regular all purpose flour. Though you can definitely use whatever brand of all purpose gluten-free flour you prefer! I’ve also tried King Arthur and Nature’s Promise gluten-free flour blends, and they work great as well. Make sure your gluten-free flour contains xanthan gum. If not, add 1/2 teaspoon of xanthan gum to the dry ingredients.
Butter: I used non-dairy butter, but any butter will work in this recipe. Salted or unsalted butter won’t make much of a difference either, so use whichever you have on-hand! Just remember to bring it to room temperature first, so that it’s soft.
Sugar: White sugar or cane sugar both work well in these gluten-free vanilla cupcakes. You can try using either coconut sugar or maple sugar in its place for a slightly healthier recipe, though I haven’t had the chance to test these options myself yet.
Eggs: These eggs will be the binder that holds the batter together for these cupcakes. Make sure that they’re room temperature. Room-temperature eggs are important because they’ll ensure that your cupcakes rise and have a nice fluffy texture!
Vanilla Extract: this will add the perfect balance of sweetness and warm vanilla flavor these vanilla cupcakes need.
Milk: Feel free to use your favorite non-dairy milk if you’d like! The milk will also help to make sure your cupcakes have a nice fluffy texture!
How to Make The Best Gluten-Free Vanilla Cupcakes
Prepare your dry and wet ingredients: Whisk together the gluten-free flour, baking powder, baking soda, and salt. In a separate bowl, beat together the butter and sugar with either a hand or stand mixer until fluffy. Beat in one egg at a time, then add the vanilla extract.
Bake Your Cupcakes: Once you’ve slowly combined your wet and dry ingredients into a batter, fill your cupcake liners and bake cupcakes for 18-20 minutes or until a toothpick inserted into the center of a cupcake comes out clean.
Frost Your Cupcakes: Make the frosting by adding all of the frosting ingredients to a large bowl and beating with either a hand or stand mixer until light and fluffy. Once they’ve cooled, decorate with frosting and sprinkles if you’d like!
Pack & Store: Store cupcakes in an airtight container at room temperature for up to 3 days.
Top Tips
Beat the butter and sugar together really well in the third step of this recipe. The goal is to introduce as much air to the mixture as possible. This will result in a lighter and fluffier gluten-free vanilla cupcakes!
Use an ice cream scoop or large cookie scoop to fill your cupcake molds. This simple trick makes filling your vanilla cupcake tin much quicker and easier. This also guarantees even-sized cupcakes that will bake at the exact same rate!
Sub the vanilla frosting for a cream cheese frosting instead! To do this, replace the butter with 1/4 cup butter plus 1/2 cup softened cream cheese. Whip all ingredients together just as you would the vanilla frosting, then spread over your cooled gluten-free vanilla cupcakes.
Adjust This Recipe To Your Dietary Needs
Make it Dairy-Free: Use dairy-free butter and non-dairy milk to make these gluten-free anddairy-free vanilla cupcakes! If taking this option, I recommend the Earth Balance Vegan Buttery Sticks and Elmhurst Almond Milk.
Make it Vegan: For vegan vanilla cupcakes, follow the same modifications as you would for the dairy-free version above. Then, use your favorite vegan egg replacement in place of the eggs – I recommend this one from Bob’s Red Mill.
5 from 3 votes
Best Ever Gluten-Free Vanilla Cupcakes
I don't mean to brag, but these gluten-free vanilla cupcakes are truly the best ever! Perfectly soft, fluffy, sweet, and moist (sorry if that word makes you cringe!). Whip up a batch of these gluten-free cupcakes for your next party as a fun treat even gluten-eaters will love.
Preheat oven to 350° Fahrenheit and line a cupcake pan with cupcake liners.
In a medium bowl, whisk together the gluten-free flour baking powder, baking soda, and salt.
In a large bowl, beat together the butter and sugar with either a hand or stand mixer until fluffy. Beat in one egg at a time, then add in the vanilla extract.
With your mixer on low speed, add 1/3 of the flour mixture into the butter mixture, then about half of the milk. Then, add in another 1/3 of the flour mixture, then the remaining milk, then the remaining flour mixture.
Once batter is fully combined, transfer ¼ cup of batter into each cupcake mold. Bake cupcakes for 18-20 minutes or until a toothpick inserted into the center of a cupcake comes out clean.
Remove cupcakes from oven and transfer to a wire rack to cool completely before frosting.
Make the frosting by adding all frosting ingredients to a large bowl and beating with either a hand or stand mixer until light and fluffy.
Once cupcakes have cooled, decorate with frosting and sprinkles if you’d like.
Video
Notes
Make sure your gluten-free flour contains xanthan gum. If not, add 1/2 teaspoon of xanthan gum to the dry ingredients.Store cupcakes in an airtight container at room temperature for up to 3 days.
This almond flour cake is light, moist, and easy to make. It’s gluten-free, dairy-free, grain-free, and made with wholesome ingredients. You only need one bowl and a few pantry staples to create this delicious, crowd-pleasing dessert!
Can You Use Almond Flour For Cakes?
Yes, absolutely! Almond flour adds texture and flavor, and is loved by those following a paleo diet. Almond flour can be beneficial to someone looking to reduce their carbs, grains and sugar intake. Unlike wheat or rice flour blends, almond flour contains no grains so it won’t lead to a spike blood sugar. And after you make this cake, I highly recommend you use any leftover almond flour to make almond flour chocolate cookies and almond flour brownies – YUM!
What You’ll Need To Make Almond Flour Cake
Eggs – Bring your eggs to room temperature before using them in this recipe. Then, crack them into your bowl and beat them until super light and airy. The goal here is to introduce as much air to the eggs as possible, which will result in a lighter and fluffier cake!
Sugar: Adds sweetness and helps create a tender crumb. Feel free to substitute with coconut sugar for a refined sugar-free option.
Almond Flour – I recommend the Bob’s Red Mill Super Fine Almond Flour for this grain-free recipe. The more finely ground the almond flour is, the lighter your cake will be. However, if you can’t find an almond flour labeled “super fine,” don’t worry – many are ground finely enough to work in this recipe. Also, avoid using almond meal, it’s heavier and will result in a more dense cake.
Baking Powder: Helps the cake rise and adds fluffiness!
Lemon Zest – Let’s call is the secret ingredient! A pinch of lemon zest gives this almond flour cake a hint of tangy, citrus-y freshness. Without out, the cake tastes great, but with it, the cake tastes incredible. So if you’re looking to take this gluten-free dessert recipe up a notch, don’t forget the lemon zest.
How to Make Almond Flour Cake
Preheat your oven to 350°F and grease an 8-inch cake pan.Beat eggs and sugar until pale and thick (about 5 minutes).
Add almond flour, baking powder, and lemon zest. Beat until just combined.
Pour batter into the pan and top with sliced almonds if using.
Bake for 30-35 minutes or until a toothpick inserted into the center comes out clean.
Let cool completely before serving.
Sam’s Recipe Tips
Beat the eggs for a full 5 minutes, no less! Beating the eggs until pale and thick is hands-down the most important part of this recipe. No matter how tempting it may be, don’t cut this step short!
For easy removal, I recommend baking this almond flour cake in a spring-form pan. Once done baking, gently run a butter knife along the inside edge of the pan to unstick it from the sides. Then, release the sides of the spring-form pan and list away the sides revealing your perfect cake!
Top this gluten-free cake however you’d like! I finished mine off with a generous dollop of coconut white cream and some fresh berries. This cake would also taste great with your favorite frosting, or a simple sprinkling of powdered sugar!
If you like cinnamon, try adding a teaspoon of cinnamon to the batter.
Storage Instructions
Store any leftover cake in an airtight container at room temperature for up to 2 days, or in the refrigerator for up to 5 days. You can also freeze the cake for up to 3 months—just thaw it at room temperature before serving.
4.15 from 7 votes
Perfect Almond Flour Cake
Perfectly light and fluffy almond flour cake! A totally irresistible dessert that’s grain-free, gluten-free, and dairy-free. This simple cake comes together in one bowl, with only a handful of simple ingredients.
Preheat oven to 350° Fahrenheit and grease an 8-inch cake pan.
Beat together the eggs and sugar with either a hand or stand mixer on high speed until pale and thick, about 5 minutes.
Add in the almond flour, lemon zest (if using) and baking powder. Beat for another 30 seconds to one minute, until batter is just combined.
Transfer the batter to your prepared cake pan and if you'd like, top with an even layer of sliced almonds (for extra crunch and decoration). Bake the cake 30-35 minutes, or until a toothpick inserted down the center of the cake comes out clean.
Remove cake from the pan and let cool completely before garnishing and serving.