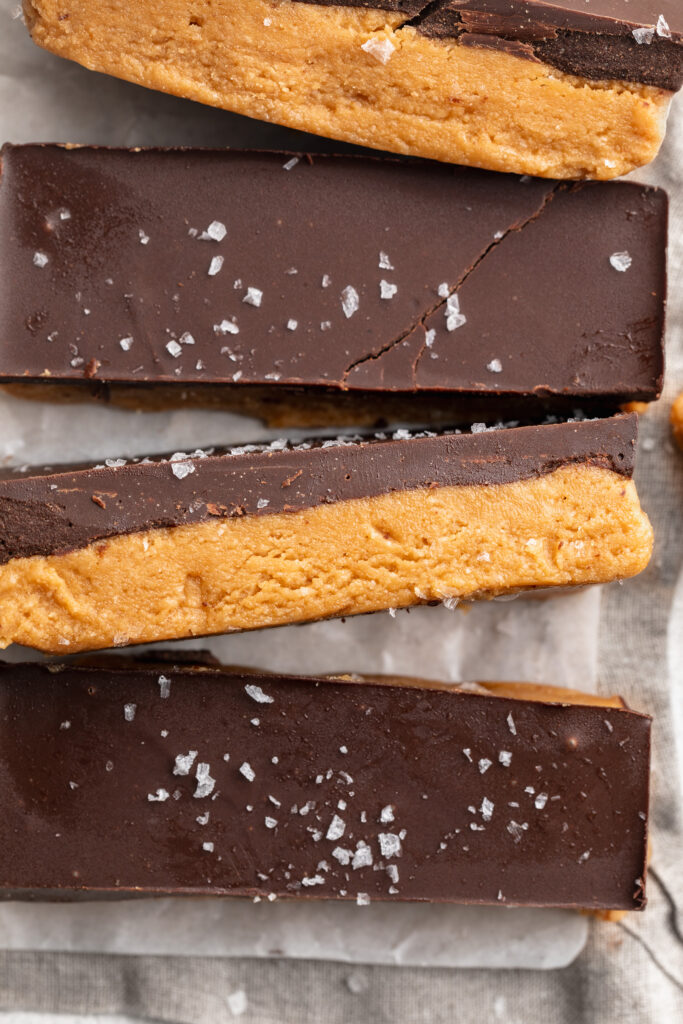
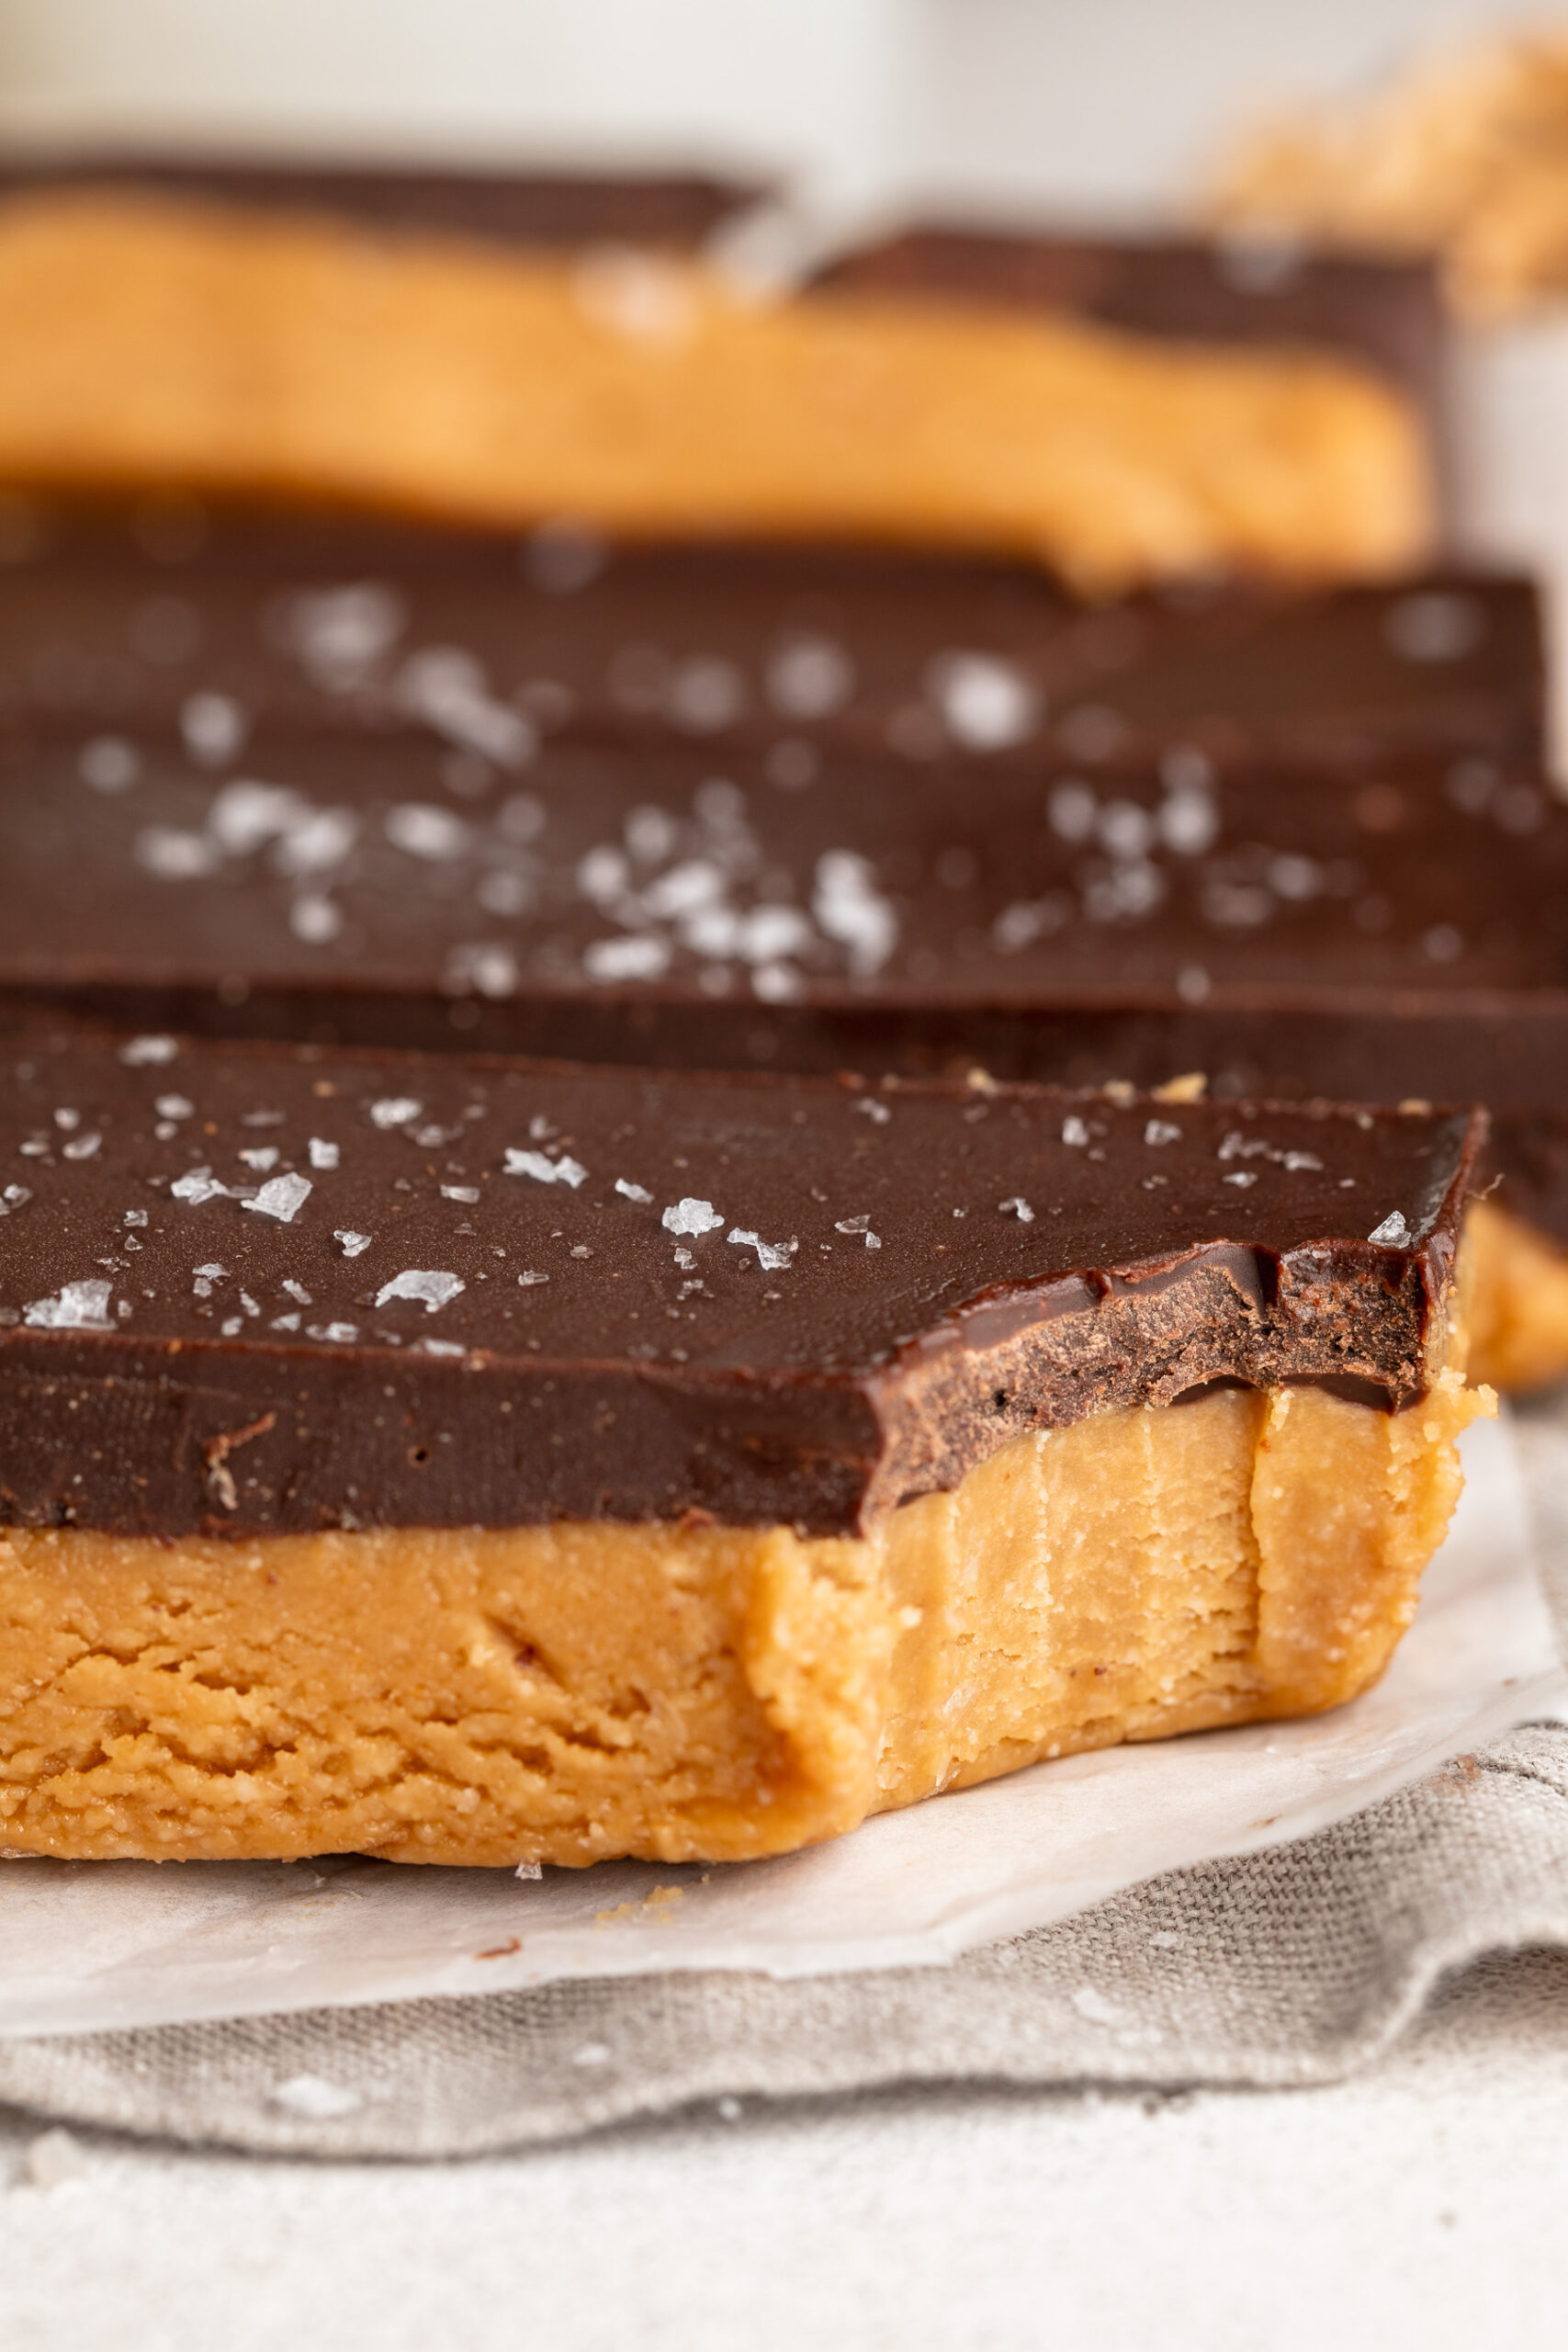
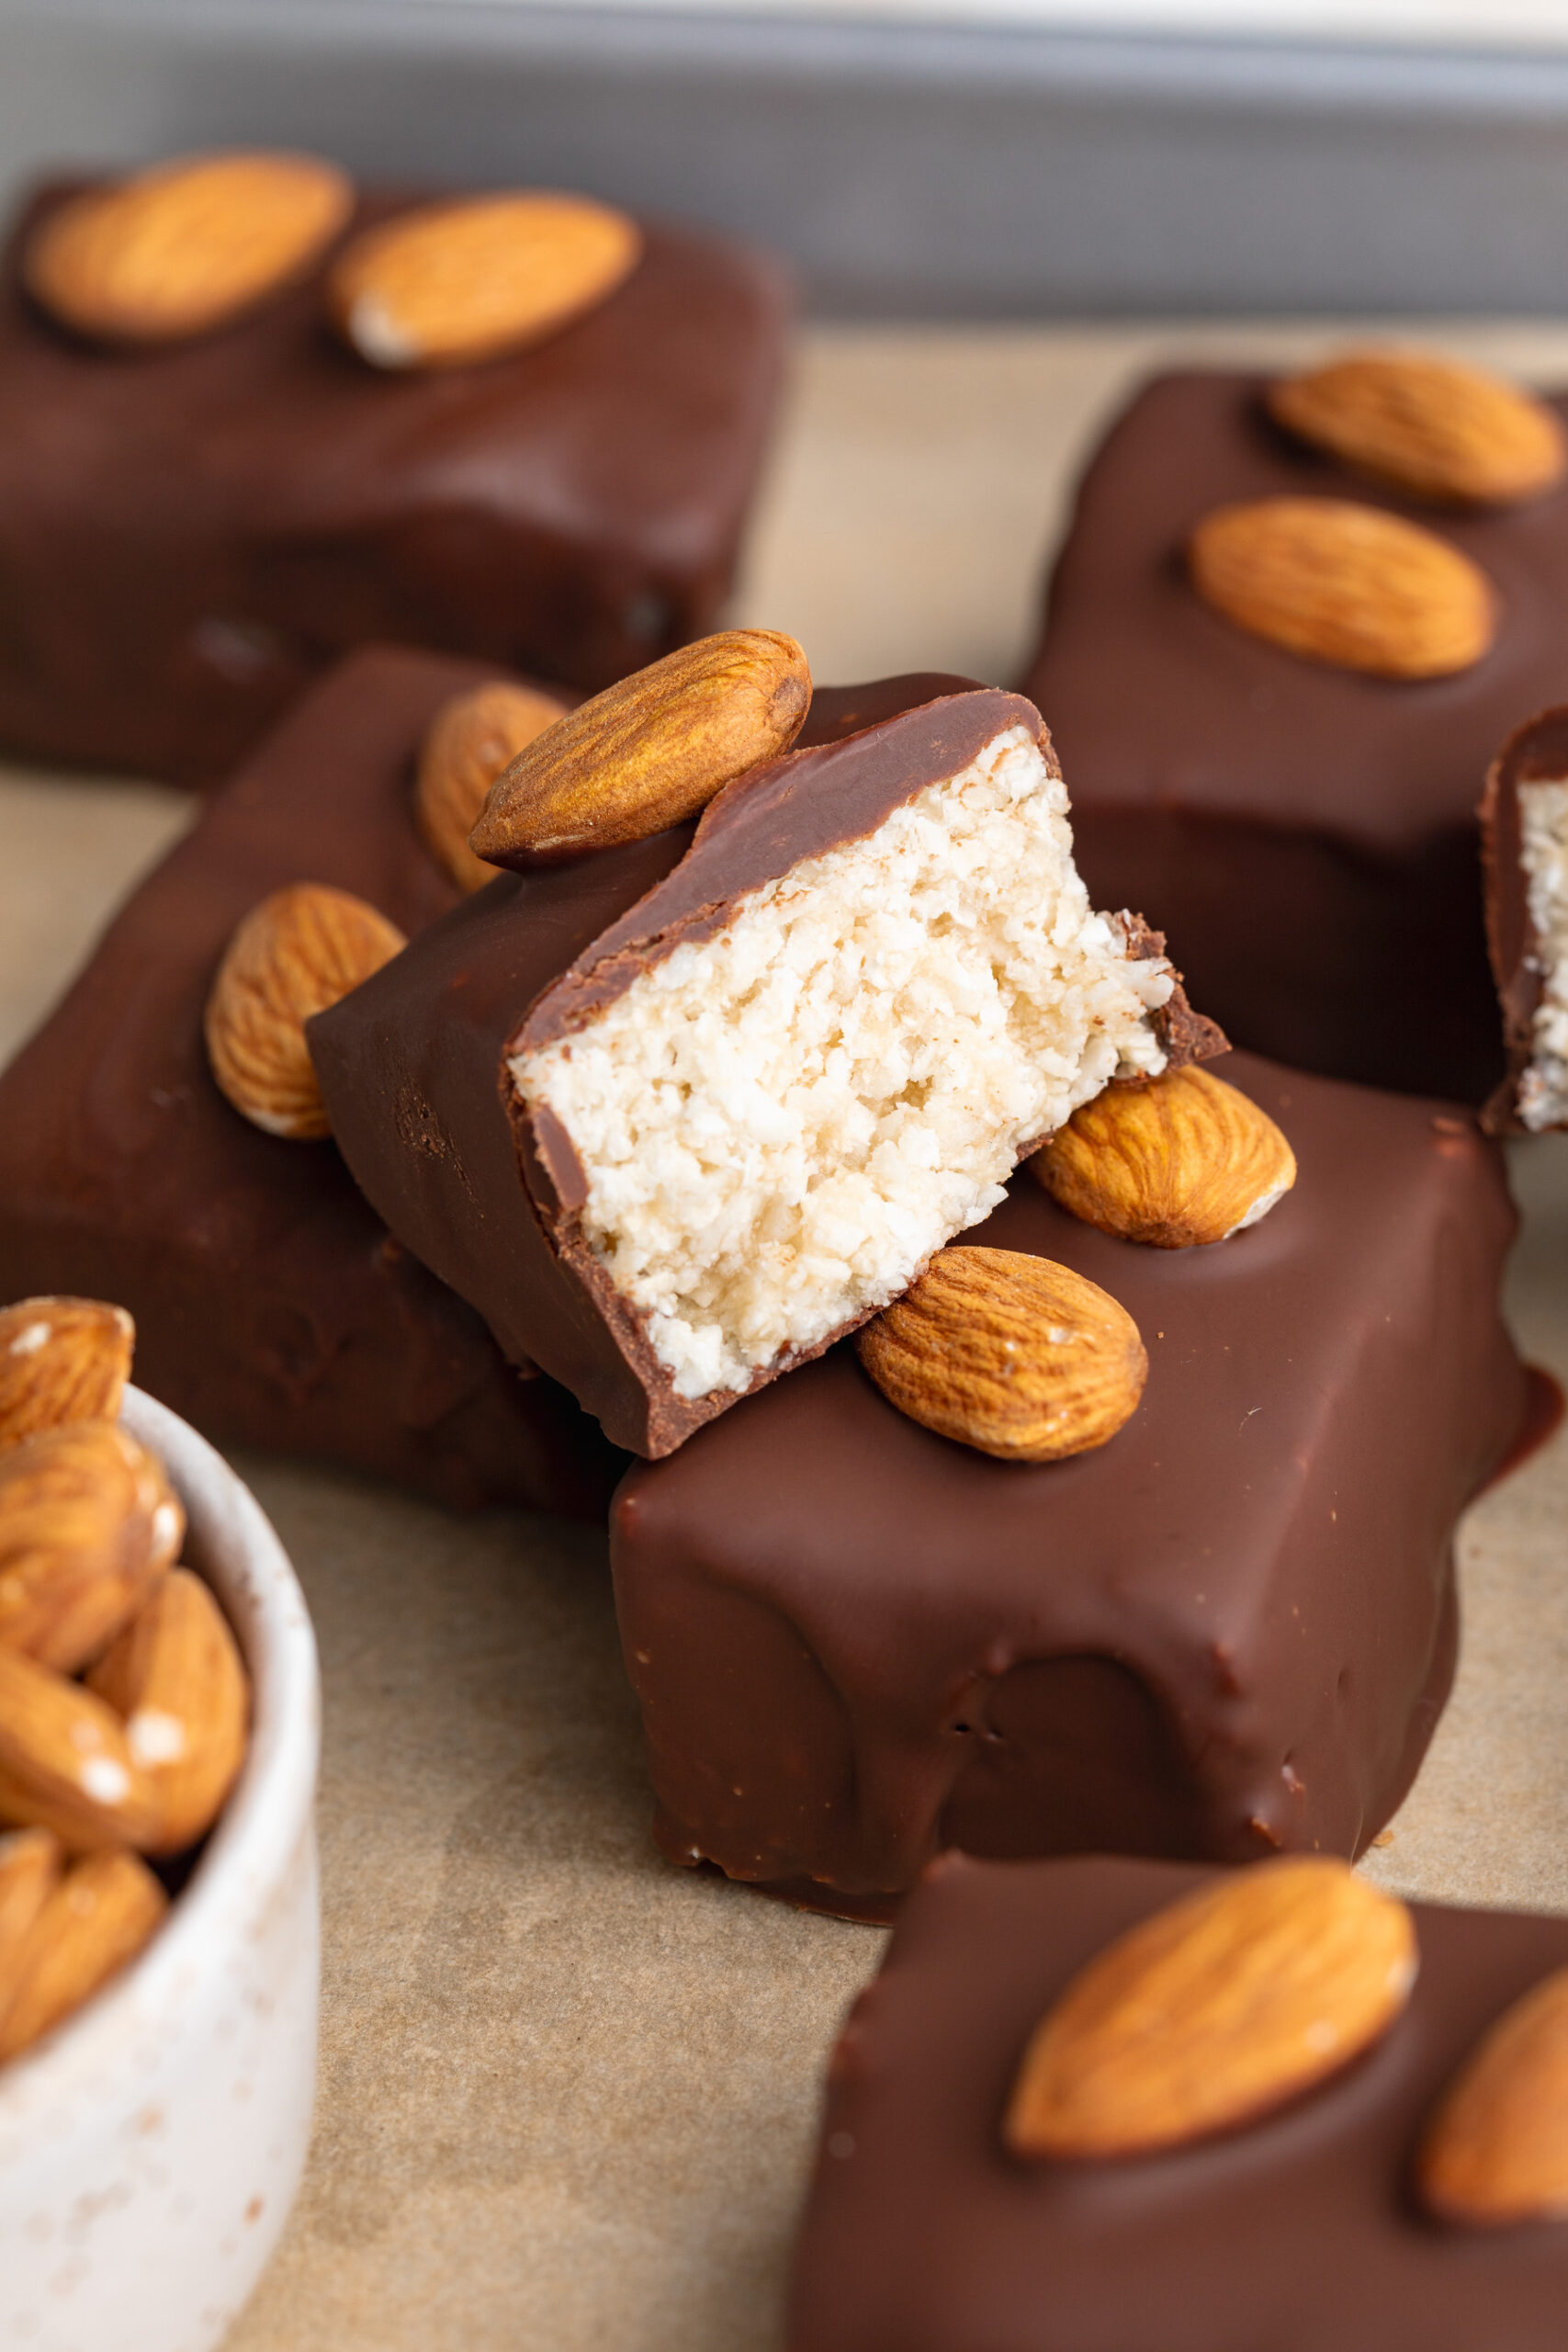
Tag

vegan

Browsing

I’m always trying to find ways to sneak extra protein into my toddler’s diet. He’s a carb lover (who isn’t?!) and while my 6-ingredient protein muffins and healthy chia protein pudding have been a huge hit with him during snack time, I wanted to make sure he gets extra protein in at dinner time too. This high protein pesto pasta is a sneaky way to pack in tons of extra protein without my toddler… or even my husband, noticing! It’s creamy, fresh, totally delicious, and contains almost 20 grams of protein per serving. Now that’s a major Mom win!

high protein pesto pasta in a bowl with a fork.

Why You’ll Love This Protein Pesto

  • Protein-Packed: Each serving delivers a solid protein boost from tofu and cashews – unlike traditional pesto.
  • One-Pot & Quick: Blend the pesto while the pasta cooks for a quick and easy meal!
  • Vegan & Allergy-Friendly: No dairy or gluten, with rich and fresh flavor from plant-based ingredients.
  • Versatile & Customizable: Use pine nuts, add spinach, or swap in different pasta shapes – do what you need to make this meal kid-friendly too!

Frequently Asked Questions

What kind of tofu can I use?
Firm or extra-firm tofu works best for a creamy, rich texture. Silken tofu will result in a thinner sauce.

Can I freeze this protein pesto?
Yes! Store leftovers in an airtight container for up to 3 months. Thaw in the fridge overnight then stir well before reheating.

What can I use instead of cashews?
Pine nuts are traditional, but almonds, walnuts, or sunflower seeds can also add a great flavor and nutty texture.

close up image of high protein pesto pasta twirled around a fork.

Sam’s Recipe Tips

  • Drain tofu thoroughly by pressing it between towels to reduce moisture and enhance creaminess.
  • Use some pasta water to loosen the pesto – it helps it coat the pasta perfectly.
  • Bonus flavor: Add a handful of fresh spinach or arugula to the pesto for extra nutrients.
  • Serve suggestion: Top with cherry tomatoes, olives, or a protein garnish like chickpeas.
overhead image of protein pesto pasta in a skillet with fresh basil on top.
5 from 1 vote

High Protein Pesto Pasta (dairy-free!)

This high-protein vegan pesto pasta is a healthy, dairy-free twist on the classic dish – made with tofu, cashews, and fresh basil for a creamy, satisfying sauce! Packed with plant-based protein and tossed with gluten-free pasta, it’s the perfect quick and nourishing weeknight dinner. With just simple ingredients and bold flavor, this protein pesto is a must-try for healthy eaters and pasta lovers!
Print Pin Rate
Prep Time: 5 minutes
Cook Time: 12 minutes
Total Time: 17 minutes
Servings: 4 servings

Equipment

  • 1 food processor or high speed blender
  • 1 large pot

Ingredients

For the protein pesto:

  • 2 cups fresh basil
  • 1 14-ounce package firm tofu drained
  • 1/2 cup unsalted cashews or pine nuts
  • 1/4 cup olive oil
  • 3 garlic cloves
  • 2-3 tablespoons lemon juice
  • 1 teaspoon salt

For the pasta:

  • 1 12-ounce box pasta I used gluten-free brown rice pasta

Instructions

  • Bring a large pot of water to a boil. Once boiling, add in the pasta and cook according to package instructions.
  • While the pasta cooks, add all protein pesto ingredients to a food processor or blender and pulse until mostly smooth.
  • Once the pasta is al dente, drain the pasta from the water but reserve about one cup of pasta water.
  • Add the drained pasta back into the pot, add in the protein pesto and toss the pasta together. If the sauce is too thick, slowly add in some of that reserved pasta water until the sauce is to your liking.

Nutrition

Serving: 1serving | Calories: 690kcal | Carbohydrates: 80g | Protein: 23g | Fat: 30g | Sugar: 2g

If my healthy edible brownie batter and 4-ingredient date caramels had a baby, it’d be these healthy no-bake brownie balls! They’re rich, fudgy, naturally sweetened with dates, and even include some sneaky protein. And the best part? They’re entirely NO bake! Because let’s face it, this summer’s already been too hot to turn the oven on. I honestly keep a batch of these healthier brownie treats in my fridge at all time for when I need just a little something sweet!

healthy no-bake brownie balls in a small bowl with flaky salt on top.

Why You’ll Love These Healthy Brownie Balls

These no-bake healthy brownie balls are the perfect healthy treat! Whether you’re craving something sweet post-workout or want a better-for-you treat during the day, these bites are loaded with flavor and come together in just minutes. Plus, they’re naturally sweetened with dates, made with wholesome plant-based ingredients, and dipped in chocolate for that irresistible finish!

What Makes This Recipe Healthy?

  • Naturally Sweetened – These brownie balls are sweetened entirely with medjool dates, offering fiber and natural sugars with zero refined sugar.
  • High in Plant-Based Protein – Thanks to chocolate protein powder and almond butter, these bites offer a nice protein boost to keep you satisfied.
  • No Bake + Easy Prep – Just toss the ingredients in a food processor, roll, dip, and chill. That’s it!
  • Allergy-Friendly – They’re gluten-free, dairy-free, and vegan-friendly, depending on your protein powder and chocolate chip choices.
healthy no-bake brownie balls in a small bow, one with a bite taken out.

Frequently Asked Questions

What can I use instead of almond flour?
You can use oat flour as a 1:1 substitute. It keeps the texture soft and fudgy and is also naturally gluten-free!

What kind of protein powder did you use?
I used Aloha Chocolate Plant-Based Protein Powder (use this link for 20% OFF Aloha!). It’s dairy-free, soy-free, and adds a rich chocolate flavor without any artificial ingredients.

How do I store these brownie balls?
Keep them stored in an airtight container in the fridge for up to 1 week, or freeze for longer storage—just let them thaw for a few minutes before enjoying!

Sam’s Recipe Tips

  • Soak your dates if they’re dry or firm. Just 10 minutes in hot water makes them easier to blend.
  • Chill the dough if it’s too soft to roll into balls. Even 10 minutes in the fridge can help.
  • Use parchment paper when dipping the balls in chocolate to avoid sticking and messy cleanup.
  • Add toppings like crushed nuts, flaky sea salt, or shredded coconut to the chocolate coating before it sets for a decorative (and delicious) twist.
close up image of healthy no-bake brownie balls in a bowl, one with a bite taken out.
No ratings yet

Healthy No-Bake Brownie Balls

These no-bake healthy brownie balls are rich, fudgy, and made with just 6 simple ingredients! They’re gluten-free, dairy-free, and naturally sweetened with dates. Keep a batch in the fridge for a delicious and healthy treat anytime!
Print Pin Rate
Prep Time: 10 minutes
Chilling Time: 30 minutes
Servings: 8 brownie balls

Equipment

  • 1 food processor or high speed blender
  • 1 small bowl

Ingredients

For the brownie balls:

  • 1 cup medjool dates pitted
  • 1/4 cup almond flour or oat flour
  • 1/4 cup chocolate protein powder or cocoa powder
  • 1/3 cup almond butter or any nut/seed butter
  • 1/2 teaspoon Vanilla Extract optional but recommended

For the chocolate coating:

  • 1 cup chocolate chips I used extra dark chocolate chips
  • 2 teaspoons coconut oil

Instructions

  • Add all brownie ball ingredients to a food processor and pulse until a dough form.
  • Use a cookie scoop to scoop the mixture, then roll it between palms into a ball. Place the balls on a parchment-lined plate and transfer to the freezer for a few minutes while you make the chocolate coating.
  • Make the chocolate coating by melting together the chocolate chips and coconut oil in either a microwave or over a double boiler until completely smooth.
  • Remove the brownie balls from the freezer, dip each ball into the chocolate until it’s evenly coated, then place them back on the parchment-lined plate. Transfer the chocolate coated brownie balls to the fridge for about 30 minutes, or until the chocolate has hardened. Either enjoy right away or store in the fridge for later.

Nutrition

Serving: 1brownie ball | Calories: 150kcal | Carbohydrates: 20g | Protein: 5g | Fat: 9g | Sugar: 14g

My single serve protein cookie recipe went viral, and one of the most frequently asked questions was “how can I make a whole batch of these?!” So, here ya have it – a big batch protein cookies recipe, with just 6 simple ingredients! These cookies are gluten-free, dairy-free, and easily made vegan (just like the last recipe) but totally indulgent and delicious. Throw this recipe into your weekly meal prep as an easy protein snack or protein-packed dessert!

close up image of a protein cookie with a bite taken out.

Why You’ll Love These Protein Cookies

These cookies are everything you could want in a protein-packed treat – rich, soft, chewy, and naturally sweetened. They’re made with protein powder, creamy peanut butter, and your choice of oat flour or almond flour for a nutritious, allergy-friendly alternative to traditional cookies. Plus, there’s no refined sugar, and they’re so easy to customize – add chocolate chips, skip them, or toss in chopped nuts or dried fruit!

  • Made with just 6 ingredients!
  • Ready in under 20 minutes.
  • Naturally gluten-free, dairy-free, and refined sugar-free.
  • High in protein and perfect for a healthy snack or dessert!

Frequently Asked Questions

Can I use almond flour instead of oat flour?
Yes! Almond flour works beautifully in this recipe and gives the cookies a rich, buttery flavor and tender texture. If you’re looking for nut-free, stick with oat flour.

What kind of protein powder did you use?
I used the Be Well By Kelly Vanilla Grass-Fed Beef Protein Powder, which is non-dairy and great for baking. You can use your favorite protein powder – just make sure it’s unsweetened or mildly sweetened for best results.

Can I make these protein cookies sugar-free?
Absolutely! Swap out the maple syrup for a sugar-free alternative like monk fruit syrup or a few drops of liquid stevia. Just note that texture and sweetness may vary slightly depending on your swap.

overhead image of protein cookies on a table.

Sam’s Recipe Tips

  • For best texture, make sure your peanut butter is smooth and runny – not thick or dry.
  • Don’t over-bake! The cookies firm up as they cool, so remove them once they’re lightly golden at the edges.
  • Add-ins like chia seeds, flaxseed, or chopped nuts can boost nutrition even further.

Storing and Freezing Tips

Store these cookies in an airtight container at room temperature for up to 3 days, or in the fridge for up to 1 week. They also freeze beautifully – just pop them in a freezer-safe bag or container and store for up to 2 months. Let them thaw at room temp or warm slightly before enjoying.

More Protein-Packed Recipes You’ll Love

overhead image of a protein cookie cut in half.
No ratings yet

The BEST Protein Cookies (one-bowl!)

Soft, chewy, and loaded with protein, these best ever protein cookies are made with just 6 simple ingredients you likely already have at home! They come together in under 20 minutes, are totally gluten-free, dairy-free, and packed with wholesome fuel to satisfy your sweet tooth and power your day!
Print Pin Rate
Prep Time: 5 minutes
Cook Time: 12 minutes
Total Time: 17 minutes
Servings: 8 cookies

Equipment

  • 1 large baking sheet
  • 1 large bowl

Ingredients

  • 1 1/2 cups oat flour or almond flour
  • 1/3 cup non-dairy milk
  • 1/2 cup vanilla or unflavored protein powder
  • 1/2 cup creamy peanut butter unsweetened
  • 1/4 cup maple syrup or your preferred liquid sweetener
  • 1/2 cup chocolate chips optional

Instructions

  • Preheat oven to 350° Fahrenheit and line a cookie sheet with parchment paper.
  • Add all ingredients except chocolate chips to a large bowl and mix until fully combined. Then, fold in the chocolate chips, if using.
  • Scoop 2-tablespoon sized balls of cookie dough onto the cookie sheet, spacing each cookie a few inches apart. Once all cookies are scooped, gently press the top of each cookie to slightly flatten it.
  • Bake for 12-15 minutes, or until cookies are lightly golden brown around the edges then remove from the oven and let cool before serving or storing.

Notes

Nutrition info includes the chocolate chips.

Nutrition

Serving: 1cookie | Calories: 250kcal | Carbohydrates: 23g | Protein: 15g | Fat: 13g | Sugar: 10g

My toddler recently decided that he loves rice cakes. So I’ve been keeping them stocked for him, and have even snacked on a few myself. However, rice cakes are pretty boring… so I wanted to think of a way to dress ’em up a bit! I thought back to my 4-ingredient healthy snickers and my smashed date with peanut butter, and came up with the idea for these 4-ingredient healthy snickers rice cakes. I gave one a try last week and immediately knew you guys would LOVE them too! So I got to work on writing up the recipe and sharing it with you all. 🙂

healthy snickers rice cakes with chopped peanuts on top.

Why You’ll Love These Healthy Snickers Rice Cakes

  • They taste just like a Snickers bar – but are made with real, wholesome ingredients.
  • Completely no-bake and ready in minutes!
  • Naturally gluten-free, dairy-free, and refined sugar-free.
  • Perfect for a quick afternoon pick-me-up or post-dinner dessert!

What Makes This Recipe Healthy

These healthy snickers rice cakes skip the processed ingredients and refined sugars found in traditional candy bars. Medjool dates provide natural caramel-like sweetness and fiber. Peanut butter adds healthy fats and protein to keep you satisfied. And using dairy-free chocolate chips keeps the recipe vegan and allergy-friendly. Plus, the rice cakes offer a crunchy base with fewer calories than most traditional desserts.

overhead image of a healthy snickers rice cake.

Sam’s Recipe Tips

  • Use fresh, soft Medjool dates for the best caramel-like texture. If your dates are a bit dry, soak them in warm water for 5–10 minutes first.
  • Choose natural peanut butter with no added sugar or oil for a cleaner treat.
  • For extra crunch, sprinkle crushed peanuts or sea salt on top before the chocolate sets.

Storage

Store your snickers rice cakes in an airtight container in the refrigerator for up to 1 week. You can also freeze them for longer storage—just let them thaw at room temperature for 5–10 minutes before eating.

Frequently Asked Questions

Can I use almond butter instead of peanut butter?
Yes! Almond butter, cashew butter, or even sunflower seed butter will work well in this recipe.

Can I make these nut-free?
Swap the peanut butter for sunflower seed butter and ensure your chocolate is allergy-safe.

What type of chocolate should I use?
Use dairy-free dark chocolate chips or chopped dark chocolate bars for a rich, clean flavor.

a healthy snicker rice cake broken in half.
No ratings yet

4-Ingredient Healthy Snickers Rice Cakes

These 4-ingredient Healthy Snickers Rice Cakes are gluten-free, dairy-free, and made with wholesome ingredients like Medjool dates, peanut butter, and melted chocolate. They’re the perfect no-bake snack that tastes just like your favorite candy bar!
Print Pin Rate
Prep Time: 3 minutes
Total Time: 5 minutes
Servings: 6 servings

Ingredients

  • 6 rice cakes
  • 12 medjool dates
  • 1/2 cup crunchy peanut butter
  • 1 cup melted chocolate chips

Instructions

  • Open up each date, remove the pit, then gently open up the date and press the inside half of the date onto the rice cake.Repeat this with one more date for a total of two dates pressed into each rice cake.
  • Then, spread a thin layer of peanut butter onto each rice cake (on top of the pressed dates).
  • Arrange all rice cakes on a baking sheet and pour/drizzle chocolate over each rice cake to seal in the dates and peanut butter.
  • Transfer the rice cakes to the fridge to harden for at least 30 minutes, then enjoy right away or store in the fridge for later!

Nutrition

Serving: 1rice cake | Calories: 400kcal | Carbohydrates: 60g | Protein: 9.5g | Fat: 22g | Sugar: 18g

This healthy milkshake recipe has permanently cemented my spot as best wife ever. My husband is a huge ice cream guy, but he’ll admit – too much ice cream hurts his stomach. I often make him my no-churn vegan vanilla ice cream, and sometimes even my 2-ingredient healthy pineapple ice cream, but those take a bit more time. So this healthy milkshake is basically his way of enjoying an ice cream treat without any ice cream and in a matter of minutes! Just ice, milk (I use almond milk to keep it dairy-free), cocoa powder, and maple syrup is all you’ll need for this frosty treat. It’s even totally banana-free, because while I love banana, one of the most frequent comments on any banana-forward recipe I post is “I don’t like banana” or “what can I use instead of banana?” So, here ya have it – a healthy creamy and perfectly sweet chocolate milkshake with NO banana!

healthy milkshake in a glass with whipped cream on top.

Why You’ll Love This Healthy Milkshake

  • Only 4 simple ingredients, no unecessary additives.
  • Dairy‑free and naturally sweet, no banana – yet indulgently chocolatey!
  • Low‑calorie & flexible – customizable for keto, vegan, or paleo diets.

What Makes This Recipe Healthy

  • Made with unsweetened almond milk, reducing calories and sugar vs. regular milk.
  • Unsweetened cocoa delivers rich flavor plus antioxidants without extra fat .
  • Optional sweeteners let you control sweetness and caloric intake – use maple syrup, honey, stevia, or allulose .

Frequently Asked Questions

Can I make this sugar‑free?
Yes! Swap maple syrup for stevia, monk fruit, or allulose for a keto‑friendly version (around 100–150 cal).

What other sweeteners work besides maple syrup?
Honey, agave, dates, or even unsweetened applesauce can work – just adjust the quantity to your taste!

Can I add frozen banana?
Absolutely! Adding banana creates a thicker, fruitier smoothie; leave it out if you want a pure chocolate flavor.

healthy milkshake in a glass with whipped cream and a strawberry on top.

Sam’s Recipe Tips

  • Start with 2 Tbsp maple syrup, then adjust after tasting.
  • Add more ice if you prefer a frosty shake, or 1/2 a frozen banana for a creamier milkshake.
  • Freeze leftover milkshake in ice cube trays for future shakes!

Flavor Variations

  • Vanilla Milkshake: Omit cocoa powder. Add 1 teaspoon vanilla extract. Optional: add 1–2 tablespoons plain Greek yogurt or coconut cream for extra richness.
  • Strawberry Milkshake: Omit cocoa powder. Add ½ cup frozen strawberries before blending. Optional: a squeeze of lemon for brightness.
  • Mint Chocolate Milkshake: add a few drops of peppermint extract and top with a fresh mint leaf.
  • Peanut Butter Swirl Milkshake: blend in 1 Tbsp natural nut butter for a peanut butter-chocolate twist.
  • Mocha Milkshake: replace half of the almond milk with black coffee or espresso for a caffeine kick!
healthy milkshake in a glass with whipped cream and a strawberry on top.
5 from 1 vote

4-Ingredient Healthy Milkshake (no banana!)

This healthy milkshake recipe is creamy, dairy-free, and made with just 4 simple ingredients – no banana or ice cream required! Choose from chocolate, vanilla, or strawberry for a naturally sweetened treat you can blend in under 2 minutes. It’s the perfect quick and refreshing dessert or snack that’s vegan, gluten-free, and totally customizable!
Print Pin Rate
Prep Time: 5 minutes
Total Time: 5 minutes
Servings: 1 serving

Equipment

  • 1 blender

Ingredients

  • 1 cup ice cubes
  • 1/2 cup milk I used unsweetened almond milk
  • 1-2 tablespoons maple syrup
  • 2 tablespoons unsweetened cocoa powder

Instructions

  • Add all ingredients to a blender and blend until smooth, then pour into a glass and enjoy!

Nutrition

Serving: 1milkshake | Calories: 90kcal | Carbohydrates: 20g | Protein: 2.5g | Fat: 2.8g | Sugar: 12g