Tag

5 minutes

Browsing

I LOVE a single serve dessert! My go-to is usually either my single serve gluten-free cinnamon roll, or if I need some extra protein I’ll quickly throw together a single serve protein cookie. But lately, I’ve been alllll about this 3-ingredient peanut butter mug cake. I love that I can take it straight out of the microwave and onto the couch with me, and enjoy it warm (!!!) while I binge whatever show I’m watching that week. I typically enjoy it all on its own, but if I’m feeling crazy I’ll add a scoop of vanilla ice cream, a drizzle of chocolate, or even a handful of sprinkles! Please, have fun with this recipe, and most importantly – ENJOY!

Why You’ll Love This Recipe

  • Fast and Easy: Ready in under 5 minutes, this mug cake is perfect for a quick snack or dessert.
  • Simple Ingredients: Only 3 pantry staples are needed, making it budget-friendly and accessible.
  • Customizable: Add mix-ins or toppings to make it your own while still keeping it simple.

What You’ll Need to Make Peanut Butter Mug Cake

Egg: The egg acts as a binder, giving the mug cake its structure and fluffy texture. I wouldn’t recommend trying to replace the egg with something else, since it’s vital to holding this mug cake together.

Peanut Butter: Adds richness, a nutty flavor, and protein to the cake. Use creamy or natural peanut butter for best results. However, if you can’t have peanut butter use any nut, seed, or granola butter in its place!

Sugar: Sweetens the mug cake. Adjust the quantity based on your taste preference or use alternatives like coconut sugar for a refined sugar-free option!

3 ingredient peanut butter mug cake on a tea towel.

Here’s a link to the microwave-safe mug I used – on Amazon!

How to Make Peanut Butter Mug Cake

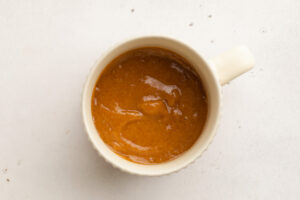
  1. Start by cracking an egg into a microwave-safe mug.
  2. Add the peanut butter and sugar, then mix well until smooth and lump-free.
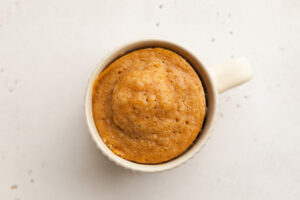
  3. Microwave for 1 minute. Check the texture; if it’s undercooked, microwave for an additional 10 seconds.
  4. Allow to cool slightly, then enjoy it straight from the mug!

Topping/Mix-In Options

  • Chocolate Chips: Sprinkle a few on top before microwaving for a melty chocolate finish.
  • Banana Slices: Add a natural sweetness and pair perfectly with peanut butter.
  • Crushed Nuts: For extra crunch, sprinkle chopped peanuts or almonds on top.
  • Drizzles: Drizzle with honey, maple syrup, or melted chocolate after cooking.

Sam’s Recipe Tips

  • Microwave Timing: All microwaves vary in power. Start with 1 minute, then check and add time in 10-second increments if needed.
  • Texture: For a gooier center, slightly undercook the cake by a few seconds.
  • Peanut Butter: Natural peanut butter may result in a slightly denser texture but works perfectly. Stir well before using to incorporate the oils.
close up image of 3 ingredient peanut butter mug cake with a spoon.

Why This Recipe Stands Out

This mug cake is:

It’s a perfect quick dessert or snack that’s as easy as it is delicious!

3 ingredient peanut butter mug cake with extra peanut butter on top.
5 from 1 vote

3-Ingredient Peanut Butter Mug Cake

This 3-ingredient peanut butter mug cake is the ultimate quick and easy dessert, ready in just 5 minutes! Made with simple pantry staples, it’s naturally gluten-free, dairy-free, and customizable with your favorite toppings – perfect for satisfying your sweet tooth anytime.
Print Pin Rate
Prep Time: 3 minutes
Cook Time: 1 minute
Total Time: 4 minutes
Servings: 1 serving

Equipment

  • 1 microwave-safe mug

Ingredients

  • 1 large egg
  • 3 tablespoons creamy peanut butter unsweetened
  • 1-2 tablespoons sugar depending on how sweet you'd like it

Instructions

  • Add all ingredients to a microwave-safe mug and mix together until fully combined and smooth.
    3-Ingredient-Peanut-Butter-Mug-Cake-Step-1
  • Microwave the mug cake for 1 minute, then remove from the microwave and let cool for at least a few minutes before eating (it will be VERY hot!).
    3-Ingredient-Peanut-Butter-Mug-Cake-Step-2

Nutrition

Serving: 1mug cake | Calories: 400kcal | Carbohydrates: 24g | Protein: 18g | Fat: 29g | Sugar: 16g

Cool and refreshing Asian cucumber salad! Full of flavor, and easy to throw together in a few simple steps. The perfect side dish or healthy lunch recipe.

overhead image of asian cucumber salad on a plate with a spoon

What You’ll Need To Make Asian Cucumber Salad

Mini Cucumbers – Six mini seedless cucumbers are the star of this recipe. I cut mine into fun little spirals for my salad, but you can simply slice them instead. If slicing, I recommend a mandolin to help slice the cucumbers as thin as possible.

Fresh Ginger – Fresh ginger goes a long way in this Asian cucumber salad! Start by cutting about a 1-inch piece from a knob of whole ginger. Then, peel your ginger with either a spoon or a vegetable peeler. Once peeled, run the ginger along a microplane or the fine side of a box grater.

Rice Vinegar – For a hint of acidity, rice vinegar tastes best. However, if you don’t have any, feel free to use white wine vinegar or apple cider vinegar in its place.

Sriracha – While optional, I recommend a tiny drop of sriracha to round out the flavors in this recipe. For a mild version, start with just 1/2 teaspoon. Or, for a spicy Asian cucumber salad, add upwards of 1-2 teaspoons.

close-up image of asian cucumber salad on a plate

How to Cut Cucumbers

  1. Cut 1/4-inch of each end of a mini cucumber.
  2. Place two chopsticks on either side of the cucumber.
  3. Then, make thin (about 1/8-inch) diagonal cuts along the cucumber, stopping when your knife hits the chopsticks.
  4. Flip cucumber over and make the same exact cuts, in the same direction, on the other side.
  5. Lastly, cut each the cucumber in half, then add them to a bowl for this recipe!

Adjust This Recipe To Your Dietary Needs

Make it Gluten-Free: For a 100% gluten-free Asian cucumber salad, use tamari in place of the soy sauce. Tamari tastes just like soy sauce, but unlike soy sauce, is certified gluten-free!

Make it Vegan: Use maple syrup in place of the honey for a completely vegan side dish.

Asian Cucumber Salad

3 from 42 votes
Recipe by Samantha Course: SidesCuisine: AsianDifficulty: Easy
Servings

4

servings
Prep time

5

minutes
Cooking time

0

minutes
Total time

5

minutes

Cool and refreshing Asian cucumber salad! Full of flavor, and easy to throw together in a few simple steps. The perfect side dish or healthy lunch recipe.

Ingredients

  • 6 mini cucumbers, spiralized (see Notes) or thinly sliced

  • 1 teaspoon salt

  • 1-inch piece fresh ginger, peeled and grated

  • 1 garlic clove, peeled and grated

  • 2 tablespoons rice vinegar

  • 1 tablespoon honey or maple syrup

  • 1 tablespoon soy sauce

  • 1 teaspoon sesame oil

  • 1 teaspoon sriracha, optional

  • 3 scallions, thinly sliced

  • pinch of sesame seeds

Directions

  • Place cucumber in a large bowl and sprinkle with salt, then let sit for 10-15 minutes while you make the dressing.
  • Whisk together the ginger, garlic, rice vinegar, honey, soy sauce, maple syrup, and sriracha in a small bowl.
  • Check on the cucumbers, and drain the water that’s gathered at the bottom of the bowl.
  • Add dressing, scallions, and sesame seeds to the cucumbers and toss to coat. Either serve immediately or let marinate in the fridge for a few hours.

Notes

  • How to Cut “Spiralized” Cucumber: Cut off each end of a cucumber, then place two chopsticks on either long side of the cucumber. Then, make thin diagonal cuts along the cucumber, stopping when your knife hits the chopsticks. Flip cucumber over and make the same cuts on the other side. Last, slice each cucumber in half, now they’re ready for this recipe!

Did you make this recipe?

Share it and tag @samdoesherbest on Instagram!

Like this recipe?

Follow us @samdoesherbest on Pinterest

My Mom’s famous watergate salad recipe will blow your mind! A pistachio whipped cream base, with plenty of chopped fruit and mini marshmallows. I grew up on this best EVER no-bake dessert, my favorite for summer parties or barbecues!

overhead image of watergate salad in a glass with a cherry on top

What You’ll Need To Make Watergate Salad

Pistachio Pudding Mix – Any brand of pistachio pudding mix will taste delicious in this pistachio-flavored dessert! Use whatever you can find, whether that’s instant, low-sugar, etc.

Whipped Cream – For a dairy-free version, sub regular whipped cream for coconut whipped cream in this no-bake dessert recipe. I went the dairy-free route this time and used a tub of So Delicious Coconut Whipped Cream in my watergate salad. This is the only tweak I made from my Mom’s original recipe!

Fruit Cocktail – I think the fruit cocktail is my favorite part of this entire recipe. Chunks of peaches, pears, grapes, pineapple, and cherries swirled into the pistachio whipped cream base. My sister and I used to fight over who got the most cherries in their serving of watergate salad growing up. If ya ask me, those fruit cocktail cans never have enough maraschino cherries in ’em!

Crushed Pineapple – Crushed pineapple, sometimes labeled as “pineapple tidbits,” give this dessert its perfect texture. Smooth, creamy, light, and fluffy with just a little something to bite down on! If you can’t find crushed pineapple, you can finely chop up a can of cut pineapple instead.

Mini Marshmallows – My Mom always made her watergate salad with these rainbow mini marshmallows, but I couldn’t find any near me so I used the classic white mini marshmallows instead. The rainbow kind contribute a bit more fruity flavor, but the classic kind are just as delicious! Feel free to use whichever you prefer, or have on-hand.

one glass of watergate salad with chopped pistachios and a cherry on top.

Adjust This Recipe To Your Dietary Needs

Make it Vegan – Make this watergate salad vegan by using a tub of coconut whipped cream, and vegan mini marshmallows. I tested this recipe with these Dandie’s Vegan Marshmallows and couldn’t even taste the difference!

Mom’s FAMOUS Watergate Salad

5 from 3 votes
Recipe by Samantha Course: DessertDifficulty: Easy
Servings

12

servings
Prep time

5

minutes
Cooking time

0

minutes
Total time

5

minutes

My Mom’s famous watergate salad recipe will blow your mind! A pistachio whipped cream base, with plenty of chopped fruit and mini marshmallows. I grew up on this best EVER no-bake dessert, my favorite for summer parties or barbecues!

Ingredients

  • 1 (3.4 ounce) box pistachio pudding mix

  • 1 (9 ounce) tub whipped cream, or coconut whipped cream to make it dairy-free

  • 1 (15 ounce) can fruit cocktail, drained

  • 1 (20 ounce) can crushed pineapple, drained

  • 2 cups mini marshmallows

Directions

  • Mix together pistachio pudding mix and whipped cream in a large bowl until fully combined.
  • Add in drained fruit cocktail, crushed pineapple, and mini marshmallows. Leave to set in fridge for at least one hour, then serve cold.

Recipe Video

Did you make this recipe?

Share it and tag @samdoesherbest on Instagram!

Like this recipe?

Follow us @samdoesherbest on Pinterest

The healthiest raw cookie dough you’ll ever eat, made from chickpeas! Lightly sweetened with maple syrup, and loaded with extra chocolate chips. This chickpea cookie dough is vegan, gluten-free, super healthy, and totally delicious.

overhead image of scoops of chickpea cookie dough with extra chocolate chips

What You’ll Need To Make Chickpea Cookie Dough

Chickpeas – An entire can of chickpeas is the base to this healthy cookie dough recipe! Drain and rinse your chickpeas well before adding them to the blender. And for a smoother cookie dough, remove the skins off your chickpeas.

Nut or Seed Butter – I used almond butter, but any nut or seed butter will work in this recipe. Peanut butter, cashew butter, or even sunflower seed butter! Though whichever nut/seed butter you use, make sure it’s unsweetened.

Maple Syrup – This unrefined sweetener add sweetness, but keeps this vegan dessert recipe extra healthy. Though if you’d like, you can use honey, agave nectar, or even date syrup instead.

chickpea cookie dough inside a cookie scoop

Tips and Tricks

  • This chickpea cookie dough is high in plant-based protein! However, if you’d like to add even more protein, throw in a scoop of your favorite vanilla plant-based protein powder. I recommend the Aloha Vanilla Protein Powder, it’s not too sweet and won’t throw off the flavor of this healthy dessert recipe.
  • Enjoy it however you’d like! By the spoonful, over ice cream, as breakfast, a snack, or dessert.
  • Taste and adjust the flavor of this edible cookie dough however you’d like. For more sweetness, add in a touch more maple syrup. Or, for a thicker consistency, blend in an extra tablespoons of almond flour.
chickpea cookie dough in a jar with a spoon

Adjust This Recipe To Your Dietary Needs

Make it Nut-Free: For a nut-free version of this chickpea cookie dough, replace the almond flour with 3 tablespoons of coconut flour, and use sunflower seed butter.

Make it Sugar-Free: For an entirely sugar-free healthy dessert, use your favorite sugar-free liquid sweetener in place of the maple syrup. Also, replace the chocolate chips with cacao nibs!

Chickpea Cookie Dough

0 from 0 votes
Recipe by Samantha Course: Snacks, DessertDifficulty: Easy
Servings

4

servings
Prep time

5

minutes
Cooking time

0

minutes
Total time

5

minutes

The healthiest raw cookie dough you’ll ever eat, made from chickpeas! Lightly sweetened with maple syrup, and loaded with extra chocolate chips. This chickpea cookie dough is vegan, gluten-free, super healthy, and totally delicious.

Ingredients

  • 1 (15-ounce) can chickpeas, drained and rinsed

  • 1/4 cup nut or seed butter, I used almond butter

  • 1/4 cup almond flour, see Notes for nut-free option

  • 3 tablespoons maple syrup

  • 1 tablespoon non-dairy milk, unsweetened

  • 1 teaspoon vanilla extract

  • pinch of salt

  • 1/4 cup chocolate chips

Directions

  • Add all ingredients except chocolate chips to a food processor or high-speed blender, then pulse until super smooth.
  • Fold in chocolate chips and enjoy!

Recipe Video

Notes

  • Make it Nut-Free: Replace the almond flour with 3 tablespoons of coconut flour.

Did you make this recipe?

Share it and tag @samdoesherbest on Instagram!

Like this recipe?

Follow us @samdoesherbest on Pinterest

This avocado salad is BURSTING with fresh herbs and vegetables! Perfectly ripe avocado, juicy tomatoes, crisp cucumber, and tangy red onion tossed in fresh lemon juice and olive oil. This super quick and easy salad recipe comes together in one bowl, and in under 5 minutes!

super close-up image of avocado salad

What You’ll Need To Make Avocado Salad

Avocados – Duh! The main ingredient, the stars of this show, are two perfectly ripe large avocados. How can you tell when an avocado is ripe? Give it a gentle squeeze, and if the skin feels firm but gives a little, then your avocado’s ripe and ready to use in this salad! However, if your avocado feels especially hard and doesn’t give at all when squeezed, then it’s not ripe and should be left at room temperature overnight to ripen.

Lemon Juice – A squeeze of fresh lemon juice gives this salad a nice touch of acidity and brightness! The lemon juice also helps to preserve the freshness of the vegetables in this dish. Though if you don’t have any lemon juice, a touch of apple cider vinegar will work too.

Fresh Herbs – Use any kind of fresh herb you’d like! I used fresh basil and OMG it was delicious. But I’ve also made this plant-based meal with fresh cilantro and fresh parsley, both of which were just as tasty.

Salt – I swear by lightly salting avocado, no matter what dish it’s in. A tiny pinch of salt brings out the rich, creamy, almost buttery taste in avocado. And if you don’t already have some, I highly recommend investing in some flaky sea salt. For this salad recipe, wait until the very end to add the salt. Salt, while enhancing flavor, will also turn the avocado brown. Therefore, to keep your avocado salad looking as bright and fresh as possible, salt the salad right before serving!

avocado salad in a bowl with serving utensils.

Tips and Tricks

  • If you’d like to prep this recipe ahead of time, then prep all ingredients except the avocado. Once avocado is removed from its skin and exposed to air, it’ll brown pretty quickly. This browning doesn’t mean the avocado’s gone bad, and won’t at all affect the taste, though it simply won’t look as pretty. Therefore, chop and prep all other herbs and veggies, then toss in the avocado and salt right before serving to keep it looking vibrant and fresh!
  • Enjoy this avocado salad as-is, or add in your favorite plant-based protein for a heartier meal. A can of drained beans, a cup of lentils, or some crispy cubed tofu would all go perfectly in this salad! Though if not vegan, feel free to serve this salad as a side dish to roast chicken, pan-seared salmon, or really any main course.
  • Store leftover avocado salad in an airtight container. Though before securing the lid, press a piece of plastic wrap over the veggies so that it comes into contact with the top of the salad. This’ll help prevent the avocado from turning brown, and lock in freshness for up to three days!
overhead image of avocado salad in a bowl with lemon on the side

This Avocado Salad Is…

Fresh Avocado Salad (ready in 5 minutes!)

0 from 0 votes
Recipe by Samantha Course: SaladsDifficulty: Easy
Servings

4

servings
Prep time

5

minutes
Cooking time

0

minutes
Total time

5

minutes

This avocado salad is BURSTING with fresh herbs and vegetables! Perfectly ripe avocado, juicy tomatoes, crisp cucumber, and tangy red onion tossed in fresh lemon juice and olive oil. This super quick and easy salad recipe comes together in one bowl, and in under 5 minutes!

Ingredients

  • 2 large avocados, diced

  • 1 cup grape tomatoes, halved

  • 1/2 red onion, thinly sliced

  • 1/2 English cucumber, sliced

  • 2 tablespoons lemon juice

  • 1 tablespoon olive oil

  • 1/4 cup fresh chopped herbs, such as cilantro, parsley, and/or basil

  • big pinch of salt

  • fresh cracked black pepper, to taste

Directions

  • Add all ingredients except salt and black pepper to a large bowl and toss to combine.
  • Just before serving, sprinkle in salt and black pepper, then eat immediately.

Recipe Video

Did you make this recipe?

Share it and tag @samdoesherbest on Instagram!

Like this recipe?

Follow us @samdoesherbest on Pinterest