Tag

cream cheese

Browsing

Carrot cake is my all-time FAVORITE kind of cake! And a few weeks ago I realized – I’ve made healthy carrot cake cookies, gluten-free carrot cake muffins, and even carrot cake baked oats but I’ve never made an actual carrot CAKE before. I know, I was shocked too. So I found the time and started recipe testing!

I knew my carrot cake had to be a few things – one bowl, gluten-free, and easy to make. I also really wanted to keep this gluten-free cake recipe to taste as close to the real thing as possible. I wasn’t willing to compromise on taste or texture, so after a few (failed) tests I finally did it! The BEST EVER gluten-free (and can be made dairy-free) carrot cake, made in one bowl, and oh-SO delicious.

gluten free and dairy free carrot cake ingredients on a table.

Why You’ll Love This Gluten-Free Carrot Cake

  • Moist and Flavorful: This cake boasts a tender crumb, infused with warm spices and the natural sweetness of carrots.​
  • Simple Ingredients: Crafted with everyday items, making it accessible and easy to prepare.​
  • Versatile and Inclusive: Easily adaptable to various dietary needs without compromising on taste.
gluten free carrot cake with cinnamon cream cheese frosting cut into on a plate.

Sam’s Recipe Tips

  • Room Temperature Ingredients: Ensure eggs and dairy-free alternatives are at room temperature for a smoother batter.​
  • Grating Carrots: Use freshly grated carrots for optimal moisture and flavor.​
  • Frosting Consistency: Adjust the amount of milk in the frosting to achieve your desired thickness.​

Adjust This Recipe to Your Dietary Needs

Make it Dairy-Free: Use non-dairy cream cheese, butter, and milk alternatives in both the cake and frosting.​

Vegan Option: Replace eggs with flax eggs (1 tablespoon ground flaxseed mixed with 3 tablespoons water per egg) and use all dairy-free substitutes.

Make it Nut-Free: Omit the walnuts and ensure all other ingredients are free from cross-contamination.​

close up image of gluten-free carrot cake with cinnamon cream cheese frosting on a plate.

Storage Instructions

  • Refrigeration: Store the frosted cake in an airtight container in the refrigerator for up to one week.​
  • Freezing: For longer storage, freeze unfrosted cake layers wrapped tightly in plastic wrap for up to three months. Thaw and frost before serving.
4.67 from 3 votes

The BEST Gluten-Free and Dairy-Free Carrot Cake with Cinnamon Cream Cheese Frosting

This gluten-free cake is simply heavenly – and made in just one bowl! It's bursting with warm spices, shredded carrots, and topped with a luscious cinnamon cream cheese frosting. This cake is an incredible treat for any occasion!
Print Pin Rate
Prep Time: 15 minutes
Cook Time: 30 minutes
Total Time: 45 minutes
Servings: 9 servings

Equipment

  • 2 large bowls
  • 1 9×9-inch baking pan
  • 1 hand or stand mixer
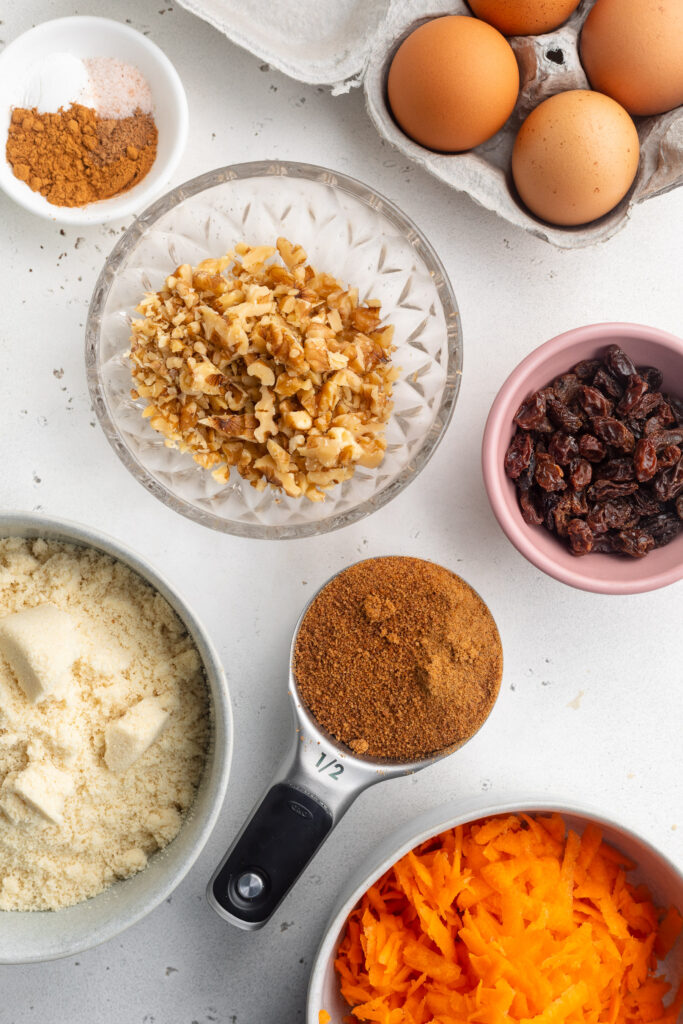
Ingredients

  • 1 cup brown sugar, or coconut sugar
  • 1/2 cup vegetable oil I used olive oil
  • 1/4 cup milk I used non-dairy almond milk
  • 2 large eggs at room temperature
  • 1 teaspoon vanilla extract
  • 1 1/2 cups gluten-free all purpose flour
  • 1 teaspoon baking powder
  • 1 teaspoon baking soda
  • 2 teaspoons cinnamon
  • 1/2 teaspoon nutmeg
  • 1 1/2 cups grated carrots
  • 1/2 cups walnuts chopped
  • 1/2 cup raisins optional

For the cinnamon cream cheese frosting:

  • 1/2 cup cream cheese, softened (I used non-dairy cream cheese)
  • 1/2 cup butter, softened (I used non-dairy butter)
  • 4 cups powdered sugar
  • 3-4 tablespoons milk I used non-dairy almond milk
  • 2 teaspoons cinnamon
  • 1/4 teaspoon vanilla extract

Instructions

  • Preheat oven to 350° Fahrenheit and line a 9×9-inch baking pan with parchment paper.
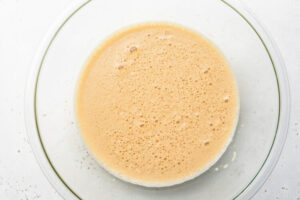
  • In a large bowl, whisk together the brown sugar or brown sugar, oil, eggs, and vanilla extract until well combined.
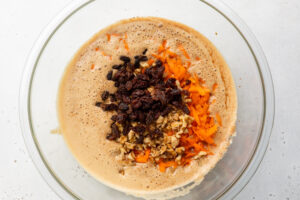
  • Add in the gluten-free all purpose flour, baking powder, baking soda, cinnamon, and nutmeg. Whisk everything together into a smooth batter. Then, add in the shredded carrots and chopped walnuts, and use a spatula to fold those ingredients into the batter.
    gluten-free-carrot-cake-step-02
  • Pour the batter into your prepared baking pan and bake for 30-35 minutes, or until a toothpick inserted down the center of the cake comes out clean.
  • Remove the cake from the oven, let it cool inside the baking pan for 15 minutes then carefully remove the cake from the pan by sliding a sharp knife around the outside edge of the cake. Transfer the cake to a wire cooling rack and let it cool completely before frosting.
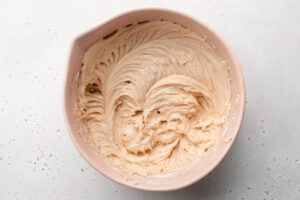
  • Once the cake is cool, make the cinnamon cream cheese frosting by adding all frosting ingredients to a large bowl and beating with either a hand or stand mixer until fully combined. Start by using just 3 tablespoons of milk in the frosting, then add an additional tablespoon of milk if the frosting is too thick.
  • Spread the frosting into an even layer over the top of the cooled carrot cake. Either serve cake immediately or cover and store in the fridge for up to 1 week!

Notes

Nutrition info may vary depending on the brand of ingredients used. The above nutrition info was calculated to include the cinnamon cream cheese frosting.

Nutrition

Serving: 1serving | Calories: 312kcal | Carbohydrates: 38g | Protein: 3g | Fat: 17g | Sugar: 26g

Fancy, but super easy stuffed dates with cream cheese, pistachios, and a drizzle of honey! A perfect no-bake appetizer or snack that comes together in just a few minutes. They’re gluten-free with a dairy-free and vegan option!

honey being drizzled over stuffed dates.

What You’ll Need to Make Stuffed Dates

Medjool Dates – Soft and sticky medjool dates are naturally sweet and totally delicious! I enjoy medjool dates completely on their own, but stuffed with cream cheese, pistachios, and honey take them over the top. You can either buy dates with the pits removed, or buy whole dates and remove the pits yourself before eating.

Cream Cheese – Either cream cheese or goat cheese will work great in this recipe. Both are soft, creamy, and perfectly tangy. A scoop of soft cheese helps to balance out the sweetness of these stuffed dates.

Pistachios – A sprinkling of chopped pistachios contribute the perfect crunch to this dish! Without it, these dates are all one texture, and lack variety. Therefore, for an exciting appetizer, add some chopped pistachios, or your favorite chopped nut to the top of these stuffed dates.

Honey – The finishing touch to this fancy-tasting app is a drizzle of honey. After we’ve added in all our savory components, it’s always nice to round out the dish with an extra bit of sweetness.

Flaky Salt – I seriously put this Maldon flaky sea salt on everything! It instantly elevates any dish, and makes it taste like you spent hours on it, when in reality these stuffed dates come together in under 5 minutes.

stuffed dates on a plate.

Tips and Tricks

  • If your dates are too hard/dried out, zap them in the microwave for about 20 seconds. This’ll heat them up just enough to help them open with ease!
  • Prep these dates ahead of your next dinner party or potluck! If prepping more than an hour in advance, I recommend leaving the pistachios and honey off your stuffed dates until right before serving. Leaving them to sit for too long could cause the pistachios to go soft and soggy.
  • Feel free to totally customize this recipe and make it your own! Use any soft cheese you’d like, and any chopped nut you’d like. Have fun with this appetizer, and don’t overcomplicate it!
close-up image of stuffed dates on a plate.

Adjust this Recipe to Your Dietary Needs

Make it Dairy-Free: For a dairy-free version, stuff these dates with your favorite non-dairy cream cheese instead.

Make it Vegan: Make these stuffed dates vegan by taking the dairy-free option above, and replacing the honey with a drizzle of maple syrup!

Stuffed Dates with Cream Cheese, Pistachios, and Honey

4 from 43 votes
Recipe by Samantha Course: AppetizersDifficulty: Easy
Servings

12

servings
Prep time

5

minutes
Cooking time

0

minutes
Total time

5

minutes

Fancy, but super easy stuffed dates with cream cheese, pistachios, and a drizzle of honey! A perfect no-bake appetizer or snack that comes together in just a few minutes.

Ingredients

  • 12 medjool dates, pits removed and sliced open

  • 4 ounces cream cheese (or goat cheese)

  • 1/4 cup chopped pistachios

  • honey, for drizzling

  • pinch of flaky salt

Directions

  • Fill the cavity of each date with a couple teaspoons of cream cheese.
  • Press chopped pistachios into the cream cheese on top of each date.
  • Arrange stuffed dates on a serving plate, drizzle with honey, then sprinkle with a pinch of flaky salt.

Did you make this recipe?

Share it and tag @samdoesherbest on Instagram!

Like this recipe?

Follow us @samdoesherbest on Pinterest

Soft and perfectly sweet carrot cake cookies with a cream cheese icing! Gluten-free, dairy-free, and naturally sweetened with maple syrup. These healthy carrot cake cookies are the perfect springtime (or anytime) treat!

Healthy gluten-free carrot cake cookies on a baking sheet.

What You’ll Need to Make Carrot Cake Cookies

Oat Flour – Either homemade or store-bought oat flour will work in this cookie recipe! Oat flour replaces all purpose flour, making these cookies gluten-free.

Almond Butter – Smooth and unsweetened almond butter helps hold these cookies together. If you don’t have almond butter, you can use any other nut or seed butter you’d like. Cashew butter would make a great substitute here!

Maple Syrup – These healthy carrot cake cookies are naturally sweetened with maple syrup. The maple adds a touch of flavor, and the perfect amount of sweetness.

Shredded Carrots – Wash and peel about three large carrots, then run them down a box grater to make shredded carrots. Or, to make things even easier, simply buy pre-shredded carrots from the store for this dessert recipe!

Overhead image of healthy gluten-free carrot cake cookies on a baking sheet.

Tips and Tricks

  • Gently flatten each carrot cake cookie before baking. If you skip this step, they’ll bake up like round little balls. Therefore, for a more classic flat-looking cookie, give them a gentle press right before putting in the oven.
  • Allow your cookies to cool completely before icing! If the cookies are still too warm when iced, the cream cheese icing will melt and slide right off. (I’ve learned from my mistakes here – ha!)
  • These cookies are best stored in an airtight container at room temperature for up to 3 days. However, if you live in a warm client/are baking these in the summer – it’s best to store them in the fridge instead. If the cookies with cream cheese icing are left in too warm of an environment, the icing may melt and spoil.
close up image of a healthy gluten-free carrot cake cookie with a bite taken out.

Adjust This Recipe to Your Dietary Needs

Make it Dairy-Free: While the cookies themselves are already dairy-free, make a dairy-free cream cheese icing by subbing your favorite non-dairy cream cheese, butter, and milk.

Make it Vegan: For vegan carrot cake cookies, replace the egg with a flax egg, and take the dairy-free icing option above!

Close-up overhead image of carrot cake cookies on a baking sheet.
5 from 3 votes

Carrot Cake Cookies

Soft and perfectly sweet carrot cake cookies with a cream cheese icing! Gluten-free, dairy-free, and naturally sweetened with maple syrup. These healthy carrot cake cookies are the perfect springtime (or anytime) treat!
Print Pin Rate
Prep Time: 15 minutes
Cook Time: 12 minutes
Total Time: 27 minutes
Servings: 24 cookies

Equipment

  • 1 large bowl
  • 1 medium bowl
  • 1 large baking sheet

Ingredients

For the dry ingredients:

  • 1 cup rolled oats
  • 1 cup oat flour made by pulsing rolled oats in a blender until ground into a flour
  • 1/2 cup almond flour
  • 1 teaspoon baking soda
  • 1 1/2 teaspoons cinnamon
  • 1/4 teaspoon nutmeg
  • 1/4 teaspoon salt

For the wet ingredients:

  • 1/2 cup almond butter unsweetened
  • 1/2 cup maple syrup
  • 1/4 cup coconut oil melted (or butter)
  • 1 teaspoon vanilla extract
  • 1 egg at room temperature
  • 1 cup shredded carrots
  • 1/4 cup chopped walnuts or pecans unsalted
  • 1/4 cup raisins

For the cream cheese icing:

  • 1/4 cup cream cheese softened (I used non-dairy cream cheese)
  • 3 tablespoons butter softened (I used non-dairy butter)
  • 1 1/2 cups powdered sugar
  • 2-3 tablespoons milk (I used non-dairy milk)
  • 1/4 teaspoon vanilla extract

Instructions

  • Preheat oven to 350° Fahrenheit and line a baking sheet with parchment paper.
  • Add all dry ingredients to a large bowl and whisk to combine.
  • Then, in a separate bowl, add all the wet ingredients except the carrots, walnuts, and raisins, and whisk to combine.
  • Pour the wet ingredients into the dry ingredients and use mix until fully combined. Then, fold in the carrots, walnuts, and raisins.
  • Scoop tablespoon-sized balls of cookie dough onto your prepared baking sheet and slightly flatten each ball with the palm of your hand.
  • Bake for 10-12 minutes, or until golden brown around the edges. Then, transfer to a wire cooling rack to cool completely.
  • While cookies cool, make the cream cheese icing by adding all ingredients to a bowl and whisking until smooth and well-combined. Then, spread or pipe cream cheese icing on top of each cooled cookie.

Notes

Nutrition info is for one cookie out of 24 cookies and does not include the cream cheese icing.
  • These cookies are best stored in an airtight container at room temperature for up to 3 days. However, if you live in a warm client/are baking these in the summer – it’s best to store them in the fridge instead.

Nutrition

Serving: 1serving | Calories: 119kcal | Carbohydrates: 12g | Protein: 3g | Fat: 6g | Sugar: 5g

Perfect carrot cake muffins, made healthy! Gluten-free, dairy-free, and refined sugar-free, yet oh-SO delicious. These healthy carrot cake muffins come together in just one bowl, in about 30 minutes!

What You’ll Need to Make Healthy Carrot Cake Muffins

Oat Flour – You can either buy pre-ground oat flour, or simply grind oats into a flour yourself. I always make my oat flour myself because it’s cheaper, and super easy. To do this, place rolled oats into a blender and blend until a flour forms, and no large oats pieces remain.

Apple Sauce – If you don’t have any apple sauce, feel free to use 1/2 cup of mashed banana instead! Though if you do use apple sauce, please make sure it’s unflavored and unsweetened for this recipe.

Maple Syrup – These refined sugar-free carrot cake muffins are naturally sweetened with maple syrup. I love the flavor of maple syrup in these muffins, you won’t even miss the sugar. However, if you don’t have any maple syrup, you can use an equal amount of honey instead!

healthy carrot cake muffins with cream cheese icing on top and milk on the side.

Tips and Tricks

  • Avoid over-mixing the muffin batter! If you mix too much, your muffins will turn out tough, instead of soft and tender. Therefore, mix all ingredients until just combined, then stop.
  • Let these healthy carrot cake muffins cool completely before icing. I know it’s tempting to ice and eat these delicious little muffins right away. But if they’re too hot when iced, the icing will melt and slide right off. So practice some self-control, and leave them to cool for at least 20 minutes first!
  • These muffins are best stored at room temperature, in an airtight container, for up to three days. However, if you live in a warm climate (or are baking these in the summer), you may want to consider storing them in the fridge. If stored in a very warm place, the cream cheese icing may spoil.

Adjust This Recipe to Your Dietary Needs

Make it Vegan: While I haven’t tested this option myself just yet, you should be able to make these vegan carrot cake muffins by substituting the eggs for flax eggs! Or, use this Bob’s Red Mill Egg Replacer in place of the eggs in this recipe.

Healthy Carrot Cake Muffins with Cream Cheese Icing

5 from 2 votes
Recipe by Samantha Course: Snacks, DessertDifficulty: Medium
Servings

12

muffins
Prep time

10

minutes
Cooking time

20

minutes
Total time

30

minutes

Perfect carrot cake muffins, made healthy! Gluten-free, dairy-free, and refined sugar-free, yet oh-SO delicious. These healthy carrot cake muffins come together in just one bowl, in about 30 minutes!

Ingredients

  • 2 eggs

  • 1/2 cup apple sauce, unsweetened

  • 1/2 cup maple syrup

  • 1/4 cup milk, I used non-dairy milk

  • 1 teaspoon vanilla extract

  • 2 cups oat flour

  • 1 teaspoon cinnamon

  • 1 teaspoon baking powder

  • 1/2 teaspoon baking soda

  • 1/4 teaspoon nutmeg

  • 1/4 teaspoon salt

  • 1 cup shredded carrots

  • 1/4 cup chopped walnuts or pecans

  • 1/4 cup raisins

  • For the cream cheese icing:
  • 1/4 cup softened cream cheese, I used non-dairy cream cheese

  • 3 tablespoons softened butter, I used non-dairy butter

  • 2 cups powdered sugar

  • 2-3 tablespoons milk, I used non-dairy milk

  • 1/4 teaspoon vanilla extract

Directions

  • Preheat oven to 350° Fahrenheit and line a muffin tin with muffin liners.
  • In a large bowl, mix together the eggs, apple sauce, maple syrup, milk, and vanilla extract.
  • Add in the oat flour, cinnamon, baking powder, baking soda, nutmeg, and salt. Mix until everything is just combined.
  • Then, fold in the shredded carrots, chopped walnuts, and raisins until evenly distributed throughout the batter.
  • Bake muffins for 20-25 minutes, or until a toothpick inserted down the center of one muffin comes out clean. Remove muffins from oven and transfer to a wire cooling rack to cool completely.
  • While muffins cool, make the cream cheese icing by adding all ingredients to a bowl and whisking until smooth and well-combined. Then, spread or pipe cream cheese icing on top of each cooled muffin.

Recipe Video

Did you make this recipe?

Share it and tag @samdoesherbest on Instagram!

Like this recipe?

Follow us @samdoesherbest on Pinterest

Quick and easy white chicken chili made in the Instant Pot! Full of flavor, and deliciously creamy. Whip up this Instant Pot white chicken chili in under 30 minutes!

close-up overhead image of Instant Pot white chicken chili with cilantro and avocado on top

What You’ll Need to Make Instant Pot White Chicken Chili

Chicken – Duh! Two boneless and skinless chicken breasts are the main characters of this show. However, if you don’t have chicken breasts, you can certainly use one to two pounds of any chicken part. Boneless and skinless chicken thighs would work great in this chili recipe, too!

White Beans – A can of drained and rinsed white beans make for a heartier soup. They cook up perfectly soft and creamy in the Instant Pot, and absorb a ton of flavor. Any kind of white bean will work too! I used cannellini beans, but navy, great northern, or even lima beans would taste just as delicious.

Jalapeño – One jalapeño adds loads of flavor, but very (and I mean VERY) little spice! If you’re worried about any spice, use just half a jalapeño instead. Or, if you’re like me, and loooove spice – use two or three whole jalapeños in this Instant Pot white chicken chili recipe!

Cream Cheese – Melt some cream cheese into the pot for an ultra creamy, and velvety smooth soup! Cream cheese also adds a slight bit of tanginess to this chili, which is just to-die-for.

Instant Pot white chicken chili in a bowl with lime wedges on the side.

Tips and Tricks

  • Serve this easy weeknight meal however you’d like! I love mine with fresh avocado, cilantro, a squeeze of lime juice, and tortilla chips. And not just any tortilla chips, but these Siete Grain-Free Tortilla Chips – yum!
  • If the cream cheese and sour cream won’t melt in the last step, then turn your Instant Pot back on to the sauté setting. This’ll heat the pot up and help melt the creams!
  • Store leftover Instant Pot white chicken chili in an airtight container in the fridge for up to four days. Or, to enjoy weeks later, freeze this chili for up to three months! To reheat, simply transfer to the fridge for a few hours, then reheat in a pot until warm throughout.
close-up image of Instant Pot white chicken chili in a bowl with avocado and cilantro on top.

Adjust This Recipe to Your Dietary Needs

Make it Vegan/Vegetarian: For a fully vegan or vegetarian white chili recipe, then replace the chicken with an additional can of white beans. Also, sub the chicken broth for vegetables broth – it’s that easy!

Make it Dairy-Free: Use your favorite dairy-free cream cheese and dairy-free sour cream in this Instant Pot white chicken chili. Or, replace both of those things with a can of full-fat coconut milk, just as creamy and delicious!

Instant Pot White Chicken Chili

0 from 0 votes
Recipe by Samantha Course: MainDifficulty: Easy
Servings

4

servings
Prep time

5

minutes
Cooking time

20

minutes
Total time

25

minutes

Quick and easy white chicken chili made in the Instant Pot! Full of flavor, and deliciously creamy. Whip up this Instant Pot white chicken chili in under 30 minutes!

Ingredients

  • 2 tablespoons olive oil

  • 1 yellow onion, chopped

  • 4 garlic cloves, minced

  • 1 jalapeño, seeded and chopped

  • 1 teaspoon cumin

  • 1 teaspoon paprika

  • 1/2 teaspoon chili powder

  • 1/2 teaspoon salt

  • 1/4 teaspoon black pepper

  • 1 (15-ounce) can white beans, drained and rinsed

  • 2 boneless and skinless chicken breasts

  • 1 (4-ounce) can diced green chiles, undrained

  • 1 quart chicken broth

  • 1/2 cup sour cream or unsweetened plain Greek yogurt

  • 1/4 cup cream cheese

  • 1/2 cup fresh cilantro, chopped

  • For serving:
  • Tortilla chips

  • Additional fresh cilantro

  • Lime wedges

  • Avocado, sliced

Directions

  • Turn Instant Pot to sauté setting and add in olive oil. Once oil is hot, add in the onion, garlic, and jalapeno. Sauté for 2-3 minutes or until veggies are tender.
  • Add the cumin, paprika, chili powder, salt, and black pepper, then cook for just 1 minute.
  • Add in the drained beans, chicken breast, diced green chiles, and chicken broth (in that order). Secure the lid and cook on high pressure for 15 minutes, then manually release the steam.
  • Remove chicken from Instant Pot and shred with two forks before adding back into the pot. While chili is still hot, add in the sour cream, cream cheese, and fresh cilantro then stir to combine. Serve warm with tortilla chips, additional cilantro, fresh avocado, and lime wedges.

Recipe Video

Did you make this recipe?

Share it and tag @samdoesherbest on Instagram!

Like this recipe?

Follow us @samdoesherbest on Pinterest