Tag

dinner

Browsing

In need of a quick and easy dinner recipe, ready in under 30 minutes? Look no further than these Instant Pot Shredded Chicken Tacos! They’re loaded with delicious flavor, and ready to be topped with whatever your heart desires. Salsa, shredded lettuce, cheese, avocado, guacamole – the possibilities are endless!

two instant pot shredded chicken tacos on a plate with fresh cilantro on the side

What You’ll Need

Instant Pot – I was definitely very late to the Instant Pot game. I only just purchased my Instant Pot about 6 months ago, but man do I already LOVE it. I have an 8 quart Instant Pot, and it’s truly the perfect size for either big batch meals or a quick dinner for two. Two pounds of chicken takes only 12 minutes to fully cook in an Instant Pot or pressure cooker. I set my pot to the “Meat” setting to cook, but depending on your pot, your same setting may be labeled as “Poultry” instead. Once the 12 minutes is up, press the steam release button on the lid of your Instant Pot to manually release the pressure before removing the lid. Then, remove the chicken from the pot, shred it, before placing it back into the pot to absorb that delicious sauce!

Chicken Breasts – Boneless, skinless chicken breasts are ideal for this shredded chicken recipe. They’re perfectly lean, and a blank canvas for the seasonings in this dish.

Taco Seasoning – One packet of taco seasoning contains all the flavor we need for this recipe! I love the Siete Mild Taco Seasoning, but really any brand will work. I especially enjoy using pre-packaged taco seasoning since it has all the spices we’d want in this taco recipe. This single ingredient makes our entire meal so much quicker and easier to make!

Top Tips

  • Reserve any leftover sauce in the Instant Pot and spoon it over your tacos! All of the flavor in this dish comes from the sauce our chicken is cooked in. Therefore, use every last bit of it – trust me, it’s delicious!
  • Serve this taco-seasoned Instant Pot shredded chicken over rice or a salad instead. I love turning this flavorful Mexican-inspired chicken into a taco salad or burrito bowl for a new, and exciting meal. This is also a great way to use up any leftover chicken!
instant pot shredded chicken on a plate with limes and cilantro on the side

Adjust This Recipe To Your Dietary Needs

Make it Gluten-Free: Ensure the taco seasoning you’re using is gluten-free, since some contain all purpose flour! Also, serve these Instant Pot shredded chicken tacos over corn tortillas, or Siete Grain-Free Tortillas for a completely gluten-free meal.

Make it Vegan: For Instant Pot vegan tacos, replace the chicken with one cup of dried lentils! Cook your lentils with the taco seasoning, vegetable broth, and fire roasted tomatoes at high pressure for 15 minutes. The lentils will soak up so much delicious flavor!

Make it Paleo/Whole30: Use a paleo-compliant taco seasoning such as Siete Taco Seasoning, then serve your shredded chicken over lettuce wraps to turn this into a super healthy, low-carb lunch or dinner.

4-Ingredient Instant Pot Shredded Chicken Tacos

0 from 0 votes
Recipe by Samantha Course: MainDifficulty: Easy
Servings

4

servings
Prep time

5

minutes
Cooking time

12

minutes
Total time

17

minutes

In need of a quick and easy dinner recipe, ready in under 30 minutes? Look no further than these Instant Pot Shredded Chicken Tacos! They’re loaded with delicious flavor, and ready to be topped with whatever your heart desires. Salsa, shredded lettuce, cheese, avocado, guacamole – the possibilities are endless!

Ingredients

  • For the Instant Pot shredded chicken:
  • 2 pounds boneless skinless chicken breasts

  • 1 (1-ounce) packet taco seasoning

  • 1 cup chicken or vegetable broth

  • 1 (15-ounce) can fire roasted diced tomatoes, undrained

  • For the tacos:
  • corn or flour tortillas

  • salsa

  • avocado

  • cilantro

  • slice jalapeño

  • limes

Directions

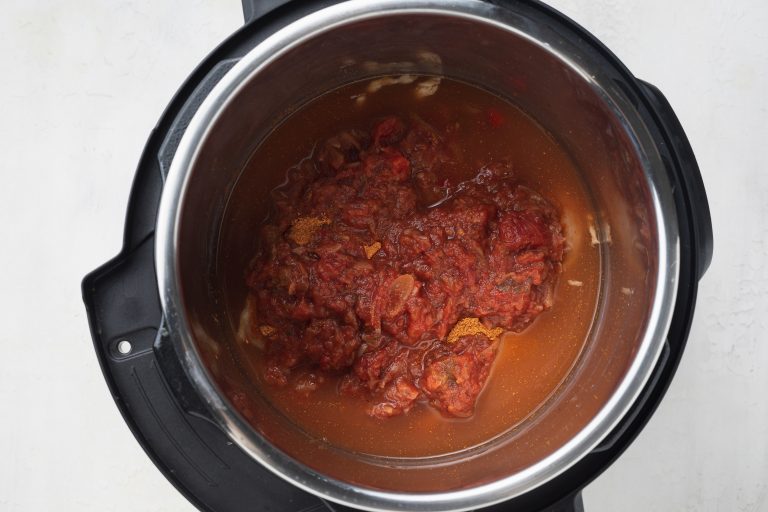
  • Place chicken breasts in Instant Pot, then pour in broth. Sprinkle with the taco seasoning, then add in diced tomatoes.
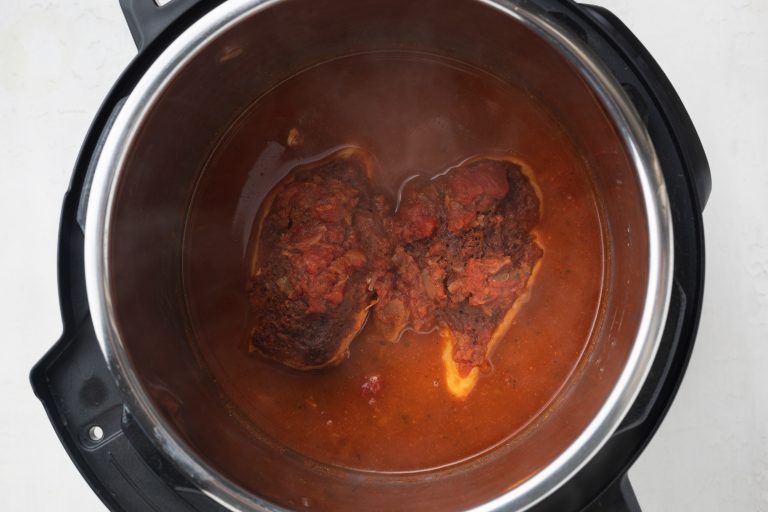
  • Set to Poultry/Meat for 12 minutes, then manually release steam before removing lid.
  • Remove chicken breasts from Instant Pot and shred with two forks. Place shredded chicken back into Instant Pot and stir to mix in with the sauce.
  • Fill tortillas with shredded chicken and any toppings you’d like.

Did you make this recipe?

Share it and tag @samdoesherbest on Instagram!

Like this recipe?

Follow us @samdoesherbest on Pinterest

This kung pao tofu will quickly become one of your favorite dinner recipes! One pan and 15 minutes is all you need for this intensely flavorful meal. This kung pao tofu is also entirely vegan, plant-based, and gluten-free!

kung pao tofu on a plate over rice, with sesame seeds on top

What You’ll Need

Extra Firm Tofu – Extra firm tofu is the key to getting it super crispy! It will hold its shapes once cut and cooked, forming these little golden brown nuggets of perfection. Tofu is also the perfect blank canvas to really any recipe! It has very little flavor on its own, but absorbs all the flavors it’s paired with. The tofu in this recipe soaks up all of our delicious kung pao sauce, making it just incredible!

Red and Green Bell Peppers – Two bell peppers give this dish incredible color and brightness! Start by removing the core and any seeds from each pepper. Then, chop them into similarly-sized pieces. Stir fry the bell peppers for only a couple of minutes in the fourth step of this recipe. The goal is to get them tender, while still maintaining their bite.

Unsalted Cashews or Peanuts – You’ll find either cashews or peanuts in most kung pao recipes. They, too, give this overall dish the perfect crunchy texture that pairs beautifully with our smooth and tangy sauce. However, if you don’t like nuts, you can simply leave them out of your kung pao tofu.

kung pao tofu in a pan

Top Tips

  • Oil your pan well before frying up the tofu. If not enough oil is used, your tofu might stick to the pan – losing that delicious outer, crisp coating!
  • For an even saucier vegetable stir fry, double the sauce recipe! This kung pao tofu sauce is seriously so good, you’ll practically want to drink it. So don’t skimp on the sauce, and make as much as you’d like!
  • Feel free to turn this into a kung pao chicken recipe instead! To do this, simply replace the tofu with 2-inch cubes of chicken and cook them in the second step until fully cooked through. Then, use your chicken just as you would the tofu in the remainder of the recipe.
close-up image of kung pao tofu on a plate over rice

Adjust This Recipe To Your Dietary Needs

  • Make it Gluten-Free: To ensure this recipe is completely gluten-free, use tamari instead of soy sauce. Tamari is the gluten-free equivalent to soy sauce and tastes exactly the same!
  • Make it Nut-Free: For a nut-free version, simple leave out the cashews or peanuts in this recipe. But if you’d still like that nutty flavor, you can add in a couple tablespoons of sesame seeds instead.

One-Pan Kung Pao Tofu

4 from 6 votes
Recipe by Samantha Course: MainDifficulty: Easy
Servings

4

servings
Prep time

5

minutes
Cooking time

10

minutes
Total time

15

minutes

This kung pao tofu will quickly become one of your favorite dinner recipes! One pan and 15 minutes is all you need for this intensely flavorful meal. This kung pao tofu is also entirely vegan, plant-based, and gluten-free!

Ingredients

  • For the tofu:
  • 14 ounces extra firm tofu, cut into cubes

  • 2 tablespoons cornstarch

  • 2 tablespoons sesame oil or avocado oil

  • For the veggies:
  • 3 garlic cloves, minced

  • 2-inch piece ginger, grated

  • 3 scallions, sliced (white and green parts separated)

  • 1 red bell pepper, chopped

  • 1 green bell pepper, chopped

  • 1 cup raw unsalted cashews or peanuts

  • For the sauce:
  • 1/4 cup vegetable broth

  • 3 tablespoons soy sauce, use Tamari for gluten-free

  • 1 tablespoon rice vinegar, or white wine vinegar

  • 1 tablespoon brown sugar

  • 2 teaspoons corn starch

  • 1 teaspoon sriracha

  • 1 teaspoon sesame oil

Directions

  • Place cubed tofu in a bowl with cornstarch and toss to evenly coat.
  • Heat sesame oil in a large pan over medium-high heat, then fry tofu in a single layer for 2-3 minutes per side or until golden brown. Remove cooked tofu and set aside.
  • Add garlic, ginger, and white parts of scallions to pan and cook for 2-3 minutes or until fragrant.
  • Add in red and green bell peppers, sauté for 2-3 minutes then place tofu back into pan along with green parts of scallions and cashews or peanuts.
  • Whisk together all sauce ingredients in a bowl, then pour into pan and reduce heat to a simmer. Simmer until sauce has thickened then serve over rice.

Did you make this recipe?

Share it and tag @samdoesherbest on Instagram!

Like this recipe?

Follow us @samdoesherbest on Pinterest

Perfectly seared salmon in a creamy sun dried tomato sauce, ready in under 30 minutes! This simple weeknight meal requires just one skillet and comes together in a flash. The perfect recipe when you’re craving seared salmon, with lots of delicious flavor!

creamy sun dried tomato skillet salmon recipe in a skillet with fresh parsley and lemon slices on top

Main Ingredients

Salmon Fillets – I used and recommend Atlantic salmon for this recipe. Atlantic salmon is buttery, flaky, and totally delicious. It’s pretty common, and shouldn’t be hard to find at your local grocery store or seafood counter. Sockeye is another very common type salmon, and will work in this recipe, but won’t cook up nearly as tender as Atlantic salmon. Sockeye salmon is quite lean, with a meatier consistency and a stronger fish flavor. Though feel free to use your favorite type of salmon in this dish!

Sun Dried Tomato Oil – Sun dried tomato oil is simply the oil found in a jar of sun dried tomatoes. Some sun dried tomatoes are sold dry and in bags, but for this recipe, you’ll want to get the jarred kind! That luscious oil the tomatoes are packed in is loaded with incredible flavor. However, if you can’t find sun dried tomatoes packed in oil, you can simply replace the sun dried tomato oil with a more mild olive or avocado oil.

White Wine – Any dry white wine will work in this salmon recipe! I used an extra dry Pinot Grigio and had perfect results. Though any white wine with either “dry” and/or “crisp” in the description will taste great. My favorite part of cooking with wine, is getting to pair a glass of it with my finished dish – yum!

Unsweetened Creamer – I used my dairy-free coffee creamer to make the sauce extra thick and velvety smooth. Though any cream/creamer will work here, just as long as it’s unflavored and unsweetened. If you’re not dairy-free, feel free to use heavy cream or whole milk instead.

Top Tips

  • Serve up this simple one-pan salmon recipe any way you’d like! I enjoyed mine over some brown rice and OMG it was delicious. I even used the ready-to-eat microwaveable brown rice to make this easy dinner recipe even easier to make!
  • If you have a cast-iron skillet, use it! Cast-iron does an incredible job at circulating heat and will create an irresistible golden crust on your salmon fillets. Though if you don’t have a cast-iron skillet, my recommendations are (in order) a stainless steel, ceramic, or non-stick skillet instead.
  • Love the idea of a creamy sun dried tomato sauce, but don’t love salmon? Simply turn this salmon recipe into a one-pan chicken recipe! To do this, replace the salmon fillets with four thinly sliced chicken breasts. Cook them just as you would the salmon, only increasing the cook time to ensure the chicken is completely cooked through.

Adjust This Recipe To Your Dietary Needs

Make it Dairy Free – Either use my dairy-free coffee creamer like I did, or 1/2 a cup of full-fat coconut milk in place of the creamer!

Make it Non-Alcoholic – For a wine-free version, simply sub the white wine for 1/2 cup of chicken or vegetable broth, plus 1 tablespoon of lemon juice. The broth will add flavor, while the lemon juice brightens things up!

Creamy Sun Dried Tomato Skillet Salmon Recipe

5 from 1 vote
Recipe by Samantha Course: MainCuisine: ItalianDifficulty: Intermediate
Servings

4

servings
Prep time

5

minutes
Cooking time

15

minutes
Total time

20

minutes

Perfectly seared salmon in a creamy sun dried tomato sauce, ready in under 30 minutes! This simple weeknight meal requires just one skillet and comes together in a flash. The perfect recipe when you’re craving seared salmon, with lots of delicious flavor!

Ingredients

  • 4 salmon fillets, about 8 ounces each

  • salt and pepper, to taste

  • 2 tablespoons sun dried tomato oil, see Notes

  • 1/2 cup sun dried tomatoes, sliced

  • 1 shallot, chopped

  • 6 garlic cloves, minced

  • 1/2 cup dry white wine

  • 1/2 cup unsweetened creamer I used my homemade non-dairy coffee creamer

  • 2 cups baby spinach

  • fresh parsley or basil, for serving

Directions

  • Pat salmon fillets dry with a paper towel then evenly season with salt and pepper.
  • Heat sun dried tomato oil in a large skillet over medium-high heat, place salmon fillets in skillet with the skin-side facing up. Cook salmon for about 5 minutes, then flip and cook for 2-3 minutes or until cooked to your liking. Remove salmon from skillet and set aside.
  • Reduce heat to medium and add shallots, cook until soft, about 3 minutes. Add in sun dried tomatoes and garlic, cook for another 2-3 minutes.
  • Pour in white wine and simmer for 3 minutes or until the liquid has slightly reduce. Pour in creamer and baby spinach, cook until spinach has wilted.
  • Nestle salmon fillets back into skillet, spoon sauce over each fillet and simmer until warm – about 2 minutes.

Notes

  • Sun Dried Tomato Oil: Sun dried tomato oil is simply the oil from a jar of sun dried tomatoes. If your sun dried tomatoes didn’t come packed in oil, use olive oil or avocado oil instead.

Did you make this recipe?

Share it and tag @samdoesherbest on Instagram!

Like this recipe?

Follow us @samdoesherbest on Pinterest

Other Salmon Recipes You’ll Love

This pork stir fry requires just one pan and 20 minutes to make! It’s loaded with crisp, fresh vegetables and finished off with a savory sauce.

pork stir fry in a pan with tongs and lime wedges on the side

I don’t know about you, but I could always use more one-pan, 20 minute meals in my life! This is literally one of my favorite recipes to throw together after a long day when I don’t feel like cooking but also don’t feel like ordering/waiting for takeout.

What You Need To Make Pork Stir Fry

Boneless Pork Chops – The key here is slicing the pork chops against the grain. By slicing against the grain, we cut through the meat fibers making the pork much more tender and easier to chew. However, feel free to slice the pork into whatever sizes you’d like. I prefer about 1/4-inch slices of pork in my stir fry, but even smaller/thinner slices would taste great too! Just remember – the smaller the pieces, the faster they’ll cook. So keep an eye on the meat and remove it from the pan as soon as it’s cooked through.

Rice Noodles – There are an extensive variety of rice noodles out there and almost all will work in this easy recipe. I used pad thai rice noodles since they were the easiest to find and I enjoy their heartier texture. Though I’ve also made this stir fry with vermicelli rice noodles and with buckwheat noodles and both versions were delicious!

Fresh Ginger – Just one teaspoon of fresh grated ginger goes a long way in the sauce for this pork stir fry. I know fresh ginger isn’t a staple in most peoples homes, but I promise it will take all your stir fry/Asian sauces to the next level! The next time you’re at the store, pick up a knob of fresh ginger in the produce section. Once home, store it in the freezer to make it last longer. Fresh ginger is also a great and tasty addition to most teas, broths, and the occasional dessert!

Adjust This Recipe To Your Diet

Make it a Chicken Stir Fry: Simply substitute one pound of boneless skinless chicken breasts for the pork in this recipe.

Make it Paleo: To make this a paleo pork stir fry, replace the rice noodles with zucchini noodles, sugar with coconut sugar, and the corn starch with arrowroot starch!

Make it Vegan/Vegetarian: You can easily remove the meat from this recipe and either increase the amount of mushrooms or fry up some tofu to up the protein of this stir fry. Also, use vegetable broth instead of chicken broth for the sauce.

Tips For Making Pork Stir Fry

  • Keep the skillet at medium-high heat when cooking the veggies. The goal here is to very quickly sauté the vegetables and doing so at higher heat will help them maintain their delightful crunch!
  • Stir together the sauce for this pork stir fry in a bowl until all of the corn starch has dissolved. If any corn starch clumps are left behind, you risk having a lumpy sauce!
  • Get creative and make this recipe your own! I love throwing in whatever veggies I have in my fridge that are on the verge of going bad. This easy pork stir fry is the best way to use up leftover and/or your favorite produce!

Pork Stir Fry (Gluten-Free)

0 from 0 votes
Recipe by Samantha Russo Course: MainCuisine: AsianDifficulty: Easy
Servings

4

servings
Prep time

5

minutes
Cooking time

15

minutes
Total time

20

minutes

This pork stir fry requires just one pan and 20 minutes to make! It’s loaded with crisp, fresh vegetables and finished off with a savory sauce.

Ingredients

  • For the stir fry:
  • 1 tablespoon avocado or vegetable oil

  • 1 pound boneless pork chops, sliced into 1/4-inch thick strips against the grain

  • 1/2 cup shredded carrots

  • 1 cup snow peas

  • 3 green onions, chopped

  • 1 1/2 cups mushrooms, sliced

  • 8 ounces rice noodles, cooked according to package instructions

  • For the sauce:
  • 1 cup chicken broth

  • 1/4 cup soy sauce

  • 2 tablespoons rice vinegar

  • 2 tablespoons corn starch

  • 1 tablespoon sesame oil

  • 1 tablespoon sugar, see Notes

  • 1 teaspoon grated ginger

Directions

  • Heat oil in a large skillet over medium-high heat, then add in the pork chops and a pinch of salt. Cook for 3 minutes or until cooked through, then remove from skillet and set aside.
  • Add in the carrots, snow peas, red bell pepper, green onions, and mushrooms – quickly sauté for 1-2 minutes.
  • Mix all sauce ingredients together in a bowl then add into the skillet along with the cooked pork.
  • Reduce heat to low and simmer until sauce has thickened, then add in the cooked noodles and toss to coat in the sauce.

Recipe Video

Notes

  • Sugar: You can use white sugar, coconut sugar, honey, or maple syrup!

Did you make this recipe?

Share it and tag @samdoesherbest on Instagram!

Like this recipe?

Follow us @samdoesherbest on Pinterest

More Quick and Easy Dinner Recipes

This dairy-free clam chowder is irresistibly creamy, without any actual cream! This easy one-pot recipe is loaded with clams and restaurant-quality flavor.

a bowl of dairy-free clam chowder with a spoon in it

Clam chowder was one of those dishes that I quit cold-turkey when I went dairy-free. It was by no means easy, but it had to be done. Dairy-free clam chowder simply doesn’t exist on a menu anywhere (at least that I’m aware of). To me, and all my other non-dairy friends out there, I feel sorry for us!

I grew up in New England, and creamy clam chowders were a major part of my summer diet. Everywhere I went, if clam chowder was on the menu – I was ordering a cup! I was such a big chowder-enthusiast that at one point I participated in a clam chowder contest. I was a taste-tester by the way, as this was looooong before my recipe developer/food blogger days. So I guess, yes, you could say I’m a bit of a clam chowder aficionado of sorts. I don’t mean to brag, but like, you get it. Therefore, I’d say I’m a bit (ok more than a bit *hair flip*) qualified to be providing you with this dairy-free clam chowder recipe today.

Plenty of clams, chunks of tender potatoes, and a handful of fresh herbs are enveloped in a creamy chowder base. This dairy-free clam chowder tastes incredible with a sprinkling of fresh parsley and crushed gluten-free crackers on top – YUM!

What You Need To Make Dairy-Free Clam Chowder

Bacon – Consider this our secret ingredient! Bacon adds the perfect savory, almost smokey flavor to this recipe. You’ll start by crisping up the bacon in your pot. Then, removing the bacon and cooking the rest of the dish in the pot with its delicious rendered fat. You can either enjoy the bacon separately, or crumble it on top of your finished chowder. I personally love the latter and enjoy coming across little pieces of bacon throughout my dairy-free clam chowder.

Clam Juice – If you’ve never made clam chowder before, you’re probably not familiar with clam juice. I mean, clam chowder is the only reason I’ve ever purchased clam juice in my life. Don’t let the sound of this ingredient fool you, it contributes a subtle briny flavor to this recipe. If you can’t find clam juice, you can use an additional cup of chicken stock instead.

Canned Clams – These are surprisingly easy to find at most grocery stores! You can use either chopped or whole clams in this chowder. The kind you’d order at a restaurant most often contain chopped clams. However, I think both taste equally as great in this dairy-free clam chowder recipe.

Adjust This Recipe To Your Diet

  • Make it Paleo: Use arrowroot starch instead of cornstarch for a paleo clam chowder.
  • Make it Whole30: Similar to paleo, use arrowroot starch instead of corn starch and make sure that your dairy-free milk is Whole30 compliant!

Dairy-Free Clam Chowder

0 from 0 votes
Recipe by Samantha Russo Course: MainCuisine: New EnglandDifficulty: Intermediate
Servings

6

servings
Cooking time

30

minutes
Total time

30

minutes

This dairy-free clam chowder is irresistibly creamy, without any actual cream! This easy one-pot recipe is loaded with clams and restaurant-quality flavor.

Ingredients

  • 4 slices bacon

  • 2 celery stalks, chopped

  • 1 yellow onion, chopped

  • 1 garlic clove, minced

  • 4 tablespoons corn starch, see Notes

  • 1 cup chicken stock

  • 1 (8 ounce) bottle clam juice

  • 3 yellow potatoes, peeled and cubed

  • 1 sprig fresh thyme, see Notes

  • 1/2 teaspoon salt

  • 1 bay leaf

  • 3 (6.5 ounce) cans whole or chopped clams

  • 1 cup dairy-free milk

  • Fresh chopped parsley, for serving

Directions

  • Cook bacon in a large pot or dutch oven until crispy, then remove and set aside on a paper towel-lined plate.
  • Add chopped celery and onion to the pot and cook over medium heat until soft, about 5 minutes. Then add in the garlic and cook for just 1 minute.
  • Add in the corn starch and mix until well combined, pour in the chicken stock and clam juice, then add in the potatoes, thyme, salt, and bay leaf. Bring to a boil then reduce to a simmer and cook for 15-20 minutes or until potatoes are easily pierced with a fork.
  • Pour in canned clams (with juice) and dairy-free milk, simmer for 3-5 minutes then taste and adjust seasoning as desired. Served with crumbled bacon and fresh parsley.

Recipe Video

Notes

  • Corn Starch: You can use arrowroot starch instead if you’d like.
  • Fresh Thyme: If you don’t have fresh thyme, you can use 1 teaspoon of dried thyme instead.

Did you make this recipe?

Share it and tag @samdoesherbest on Instagram!

Like this recipe?

Follow us @samdoesherbest on Pinterest

Other Dairy-Free Dinner Recipes