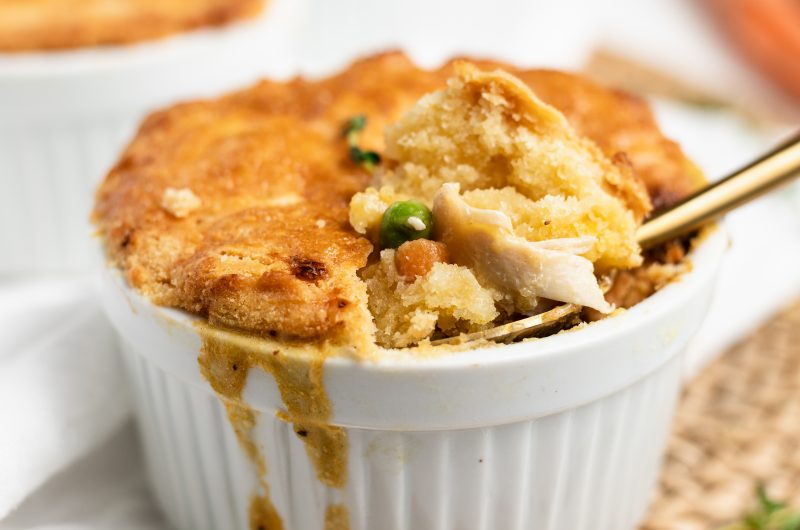
These paleo chicken pot pies are equal parts delicious and adorable! Extremely cozy, rich, and satisfying – this recipe will quickly become one of your favorites. These individual paleo chicken pot pies contain all of the flavor of traditional chicken pot pie, but are much lighter and healthier.

I was super worried about this recipe. It seemed like a bit of a stretch and I just wasn’t too confident that it would work. You guys, not only did it work, but it turned out INCREDIBLE! These paleo chicken pot pies quickly moved to my #1 favorite recipes I’ve ever made, knocking my healthy hot chocolate out of its spot. The crust on these pies is incredibly buttery, without actually containing any butter. The filling is super rich and creamy, without actually containing any cream. I honestly just can’t believe the sorcery of these paleo chicken pot pies! I had heard that miracles exist, but didn’t truly believe it until now.
What You Need To Make Paleo Chicken Pot Pies
Almond Flour – Almond flour creates the base of this paleo chicken pot pie crust. If you don’t already have almond flour and plan on doing more paleo baking, I definitely recommend you buy some. Though be sure to use almond flour, and not almond meal.
Palm Oil Shortening – This is the paleo equivalent to vegetable shortening. Therefore, if you’re not paleo you can use vegetable shortening instead. In my experience, shortening makes the BEST pie crusts – better than butter. Though if you’d like, you can use cold butter instead of shortening.
Arrowroot Starch – This is the paleo equivalent of corn starch! Since we don’t use heavy cream in this recipe, we rely on a thickener, such as arrowroot starch, to thicken up the filling. If you’re not paleo, you can use corn starch instead.
Coconut Milk – I promise your pot pies won’t taste like coconut! This is another ingredient that will help thicken the filling. Coconut milk also makes these paleo chicken pot pies taste super rich and comforting.
Adjust This Recipe To Your Dietary Needs
- Add Dairy: Use 1/3 cup cold unsalted butter instead of palm shortening and 1/2 cup of whole milk instead of coconut milk.
- Make it Vegetarian: Use vegetable broth instead of chicken broth and about 8 ounces of white button mushrooms in place of the chicken in this recipe. If using mushrooms, chop and then add them in with the vegetables in step 5.
Paleo Chicken Pot Pies
Course: MainCuisine: AmericanDifficulty: Intermediate4
servings10
minutes30
minutes40
minutesThese paleo chicken pot pies are equal parts delicious and adorable! Extremely cozy, rich, and satisfying – this recipe will quickly become one of your favorites. These individual paleo chicken pot pies contain all of the flavor of traditional chicken pot pie, but are much lighter and healthier.
Ingredients
- For the pie crust:
1 Cup Almond Flour
1/2 Cup Tapioca Starch
1/4 Teaspoon Baking Powder
1 Teaspoon Salt
1/3 Cup Palm Shortening, see Notes
1 Egg
Cold Water, as needed
- For the filling:
1 Tablespoon Olive oil
1/2 Yellow Onion, chopped
3 Garlic Cloves, minced
1/2 Cup Carrots, chopped
1/2 Cup Celery, chopped
1 Teaspoon Fresh Thyme, see Notes
1 Teaspoon Salt
1/2 Teaspoon Black Pepper
2 Tablespoons Arrowroot Starch, see Notes
1 Cup Chicken Broth
1/2 Cup Full-Fat Coconut Milk, unsweetened
2 Cups Cooked Chicken, cubed
1/2 Cup Peas (fresh or frozen)
- For the egg wash:
1 Egg, whisked
Directions
- Preheat your oven to 400° Fahrenheit.
- Mix together the almond flour, tapioca starch, baking powder, and salt in a bowl.

- Add palm shortening and gently break apart with a fork until mixture is crumbly.
- Fold in the egg and gently mix until a dough forms. If mixture is too dry, add 1 tablespoon of cold water at a time until it forms into a ball.
- Roll dough between two sheets of parchment paper to about 1/4-inch thick, then place in the freezer.
- Heat the olive oil in a large pot or skillet over medium heat. Add the onion, garlic, carrots, celery, thyme, salt, and black pepper. Cook for 5-7 minutes or until vegetables are just barely tender.
- Add in arrowroot starch and cook for 1 minute before adding in the chicken broth and coconut milk. Simmer for 3-4 minutes or until sauce starts to thicken.
- Add in the cooked chicken and frozen peas, mix to combine. Transfer filling to 4 ramekins.
- Remove pie crust from freezer and remove one side of parchment paper. Carefully cut into circles large enough to cover each ramekin. Gently transfer each circle to each ramekin, patching the dough as needed.
- Brush each pot pie with egg wash and cut a 2-inch slit in the center of the crust.
- Place on a baking tray and bake for 20 minutes or until golden brown. Remove from oven and let cool slightly before serving.


Notes
- Palm Shortening: You can use vegetable shortening or cold unsalted butter in place of the palm shortening in this recipe.
- Fresh Thyme: If you can’t get your hands on any fresh thyme, use 1 teaspoon of dried thyme instead.
- Arrowroot Starch: You can use corn starch instead or arrowroot starch in this recipe.
Did you make this recipe?
Share it and tag @samdoesherbest on Instagram!
Like this recipe?
Follow us @samdoesherbest on Pinterest


")


")