")
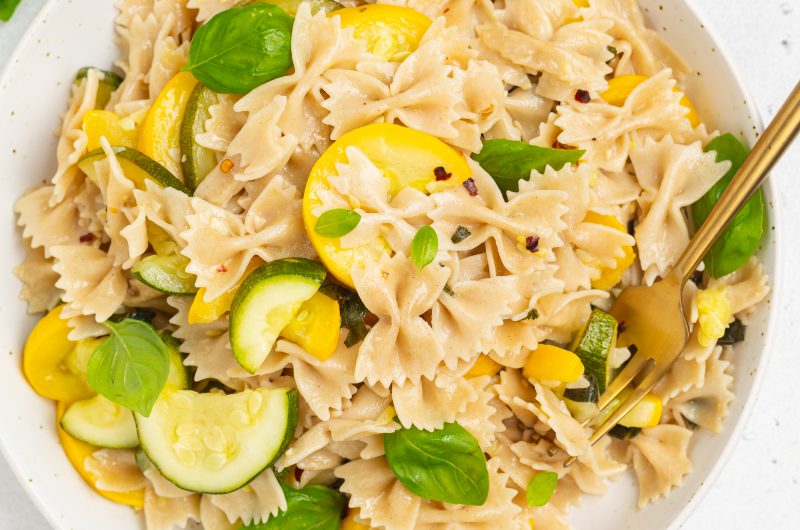
This summer squash pasta is the perfect way to enjoy one of this season’s BEST vegetables! Fresh summer squash is quickly sautéed until perfectly tender then tossed with your favorite pasta. This simple weeknight meal is light, healthy, and comes together in under 20 minutes!

‘Tis the season! If you (like me) feel like you’re drowning in squash this summer, then you NEED to make this recipe. Summer squash peaks in the ….you guessed it – summer! My parents garden is currently being taken over by summer squash and zucchini. They have so much squash at this point that they have no clue what to do with it all! One solution to their problem is sending me home with massive bags of it every time I visit them. And while I still have a few squash sitting in my fridge right now, I was able to use some of them in this delicious pasta recipe!
I don’t know about you, but lately I’ve been a big fan of anything quick and easy when it comes to time spent in the kitchen. Hovering over a hot stove for more than 20 minutes sounds like pure torture in this city heat and humidity. Therefore, I’m on a mission to develop as many no-bake/cook recipes or ready in under 30 minutes recipes as possible! This specific vegan and gluten-free pasta recipe falls into the latter category, and for that reason alone we love it so much.
What You Need To Make Summer Squash Pasta
Summer Squash and/or Zucchini– This recipe is the perfect way to use up any leftover summer squash and/or zucchini in your garden! Simply wash and then slice at least two of them, then throw them in this recipe. If you like your pasta extra squash-y (new word – squashy!) feel free to add an extra squash or two in there. The more, the merrier when it comes to this summer squash pasta!
Pasta – I used Jovial Brown Rice Gluten-Free Farfalle pasta in my dish, however you can use whatever kind of pasta you’d like in this recipe. Rigatoni, orecchiette, ziti, penne, or really any pasta shape would work here. If you’re gluten-free like me, I highly recommend the Jovial pasta as it tastes incredibly similar to the real thing.
Basil – Continuing on with the summer trend, this herb flourishes in the warm weather! Basil really helps pack on the freshness in this simple pasta dish. If you don’t have basil, you can use fresh parsley instead.
Adjust This Recipe To Your Diet
- Add Dairy: Finish this summer squash pasta off with a sprinkling of freshly grated parmesan cheese for a delightful, savory bite!
- Make it Paleo: You can easily make this dish paleo by doubling up on the squash and removing the pasta from this recipe. It’ll be more of a side dish than a main course, but will still taste totally delicious!
Summer Squash Pasta (Vegan, Gluten-Free)
Course: MainCuisine: AmericanDifficulty: Easy4
servings5
minutes15
minutes20
minutesThis summer squash pasta is the perfect way to enjoy one of this season’s BEST vegetables! Fresh summer squash is quickly sautéed until perfectly tender then tossed with your favorite pasta. This simple weeknight meal is light, healthy, and comes together in under 20 minutes!
Ingredients
12 ounces pasta, see Notes
1/4 cup olive oil
5 garlic cloves, minced
2 summer squash and/or zucchini, sliced into 1/4-inch thick slices
1/2 teaspoon salt
1/4 teaspoon red pepper flakes
2 tablespoons lemon juice
1/4 cup fresh basil
Directions
- Cook pasta according to package instructions until al dente.
- Heat olive oil in a large skillet over medium heat, add in the garlic and cook for 1-2 minutes or until fragrant.
- Add in the squash and/or zucchini along with the salt, cook 10-15 minutes, tossing every few minutes.
- Transfer cooked and drained pasta to the skillet along with red pepper flakes and lemon juice, toss everything together.
- Remove from heat, add in basil, and serve immediately.
Recipe Video
Notes
- Pasta: I used gluten-free farfalle pasta in this recipe, though you can use any kind of pasta you’d like!
Did you make this recipe?
Share it and tag @samdoesherbest on Instagram!
Like this recipe?
Follow us @samdoesherbest on Pinterest
")


")