Tag

salt

Browsing

Perfectly soft, sweet, and delicious gluten-free donuts! Finish em’ off with powdered sugar, cinnamon sugar, or a simple glaze for a healthier version of a classic dessert. Made entirely with whole ingredients, these perfect gluten-free donuts are also vegan and refined sugar-free!

a stack of gluten-free donuts covered in powdered sugar.

What You’ll Need To Make Gluten-Free Donuts

Oat Flour – Oat flour bakes up beautifully in this gluten-free recipe. It’s also super cheap and easy to get your hands on! You can either buy oat flour, or make it yourself. To make it yourself, simply pulse rolled oats in a blender until very fine. Once the oats resemble the texture of flour, they’re ready to use in this recipe!

Flax Eggs – This vegan egg substitute is also very quick and easy to make yourself. To make one flax egg, combined one tablespoon of flax meal with three tablespoons of water. Whisk that mixture up and let it sit for at least 10 minutes before adding to your donuts batter. As the flax egg sits, it’ll thicken into a gel-like consistency.

Almond or Peanut Butter – Really any nut or seed butter will work here! I used peanut butter because I personally love the taste. Though almond butter will add little to no nutty flavor. And for a nut-free version, simply use sunflower seed butter instead.

Coconut Sugar – While still sugar, coconut sugar is an unrefined, slightly healthier version of white sugar. It offers up the same amount of sweetness as regular sugar, but less of a blood sugar spike. Also unlike white sugar, coconut sugar contains fiber which helps to slow down the rate at which it metabolizes in our body. If you’ve got a sweet tooth like me, you’re all too familiar with that famous energy spike, then crash from eating processed white sugar. Well, with coconut sugar, you can expect much less of that!

a gluten-free donut in a bowl of powdered sugar.

Tips and Tricks

  • Use a large cookie scoop to transfer your gluten-free donut batter to your donut pan! A cookie scoop allows for a more precise transfer of batter. Also, while I’ve never tried it myself, I’ve heard people have a lot of success with piping batter into the donut pan from a large zip-top bag (similar to how you’d pipe frosting on a cupcake)!
  • No donut pan? No problem! Simply bake these donuts into muffins instead.
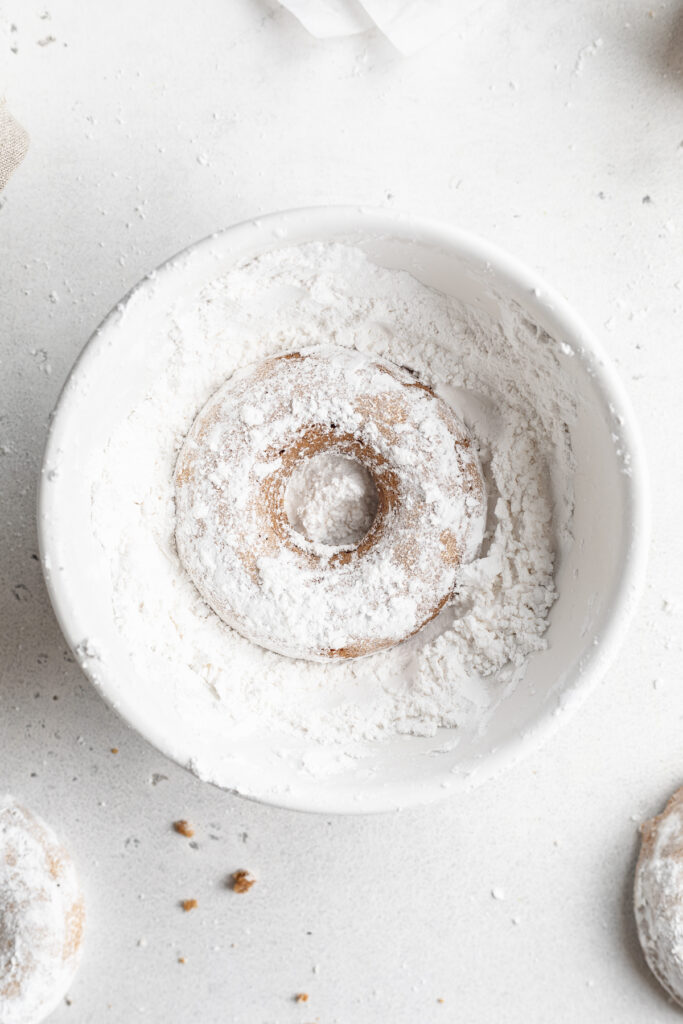
  • Finish these gluten-free donuts off any way you’d like! I went this classic powdered sugar route. Though for a krispy kreme copycat, dunk them in a simple glaze.

Adjust This Recipe To Your Dietary Needs

Make it Nut-Free: For a nut-free donut recipe, replace the peanut butter with sunflower seed butter!

No ratings yet

Healthy Gluten-Free Donuts (One-Bowl!)

Perfectly soft, sweet, and delicious gluten-free donuts! Finish em’ off with powdered sugar, cinnamon sugar, or a simple glaze for a healthier version of a classic dessert. Made entirely with whole ingredients, these perfect gluten-free donuts are also vegan and refined sugar-free!
Print Rate
Prep Time: 5 minutes
Cook Time: 20 minutes
Total Time: 25 minutes
Servings: 24 donuts

Ingredients

  • 1 1/2 cups oat flour
  • 1/2 teaspoon baking soda
  • 1/2 teaspoon baking powder
  • 1/4 teaspoon salt
  • 2 flax eggs, see Notes
  • 1 cup milk, I used non-dairy milk
  • 1/2 cup almond or peanut butter
  • 1/2 cup coconut sugar
  • 1 tablespoon apple cider vinegar
  • 1 teaspoon vanilla extract

Topping options:

  • 1 cup powdered sugar
  • 1 cup coconut sugar + 1 tablespoon cinnamon
  • 1 cup confectioners sugar + 2 tablespoons milk

Instructions

  • Preheat your oven to 350F and grease a donut pan.
  • In a large bowl, mix together the oat flour, baking soda, baking powder, and salt.
  • Form a well in the center of your flour mixture and add in flax eggs, non-dairy milk, almond butter, coconut sugar, apple cider vinegar, and vanilla extract.
  • Slowly whisk the batter starting at the center, slowly moving outward until both wet and dry ingredients are incorporated.
  • Carefully fill your donut molds with the batter, then bake for 20-22 minutes. Once done, pop donuts out of the mold and onto a cooling rack.
  • Once cool, dip in either powdered sugar or cinnamon sugar to coat.

Video

Notes

  • Flax Eggs: To make on flax egg, combine 1 tablespoon of ground flax meal with 3 tablespoons of water and let sit on the counter for 10 minutes to thicken.
  • Store these gluten-free donuts in an airtight container at room temperature where they’ll stay fresh for up to 5 days!
  • Nutrition

    Calories: 300kcal

    Buttery, flaky salmon atop a simply dressed maple dijon salad! This quick and easy recipe yields perfectly seasoned, and cooked salmon every time. A complete meal, loaded with fresh veggies, then finished off with a tangy maple dijon dressing, ready in under 20 minutes!

    close-up overhead image of maple dijon salmon salad on a plate with a fork

    What You’ll Need To Make This Maple Dijon Salmon Salad

    Dijon Mustard – We do NOT use this ingredient sparingly in our maple dijon dressing! An entire 1/4 cup gives this entire meal tons of tangy, delicious flavor. In case you’re not familiar with this French ingredient, dijon mustard is creamier, spicier, and has less vinegar than yellow mustard. It’s a favorite in my home, for everything from sandwiches to salad dressings. It’s among one of the healthiest condiments you can use, with no added-sugar or preservatives!

    Maple Syrup – A touch of maple syrup is necessary to balance out the intensely savory flavors in this salmon salad recipe. And if you don’t have any maple syrup on-hand, you can use an equal amount of honey instead.

    Salmon Fillets – Feel free to use any variety of salmon fillets you’d like! Sockeye salmon and atlantic salmon are the two most common types, and are only slightly different from each other. Sockeye salmon is a bit more lean, and has a stronger fish flavor, while atlantic salmon is fattier, with a more mild flavor. I personally love atlantic salmon for it’s ultra-soft, buttery, and flaky qualities. Though again, you can use any type of salmon fillets you’d like for this lunch or dinner recipe!

    Green Apple – I know, not all of us are fans of fruit in our salads. However, green apple is much more tart than sweet in this salmon salad. Also, remember we have a bit of sweetness in our dressing – so the little bit of natural sweetness from a thinly sliced green apple works to compliment that. If you don’t have any green apples, you can easily leave them out or use a red apple in its place.

    Pecans or Walnuts – I have just one rule when it comes to salads, they all must include a crunchy component. A little bit of crunch goes a long way in rounding out the textures in this dish. Roughly chopped pecans and/or walnuts are a healthy alternative to standard croutons. Loaded with vitamins, minerals, and plenty of healthy fats!

    maple dijon dressing being poured over salmon salad.

    Tips and Tricks

    • Feel free to add or remove any salad ingredients you’d like! Not a fan of nuts? Simple leave them out. Prefer a certain type of lettuce? Then definitely use it! This super simple salad recipe is incredibly easy to customize.
    • For anyone who cooks meat or fish regularly, I highly recommend investing in a kitchen thermometer. This is the thermometer I use on pretty much a daily basis. It’s the easiest way to ensure perfectly cooked salmon every time!
    • This salmon salad can be enjoyed hot or cold! Salmon’s one of those things that tastes delicious at just about any temperature. I often double this recipe for easy grab-and-go lunches all week long – no need to reheat!
    Maple dijon salmon salad on a serving platter.

    Adjust This Recipe To Your Dietary Needs

    Make it Sugar-Free: For an entirely sugar-free recipe, use Lankanto Maple Flavored Syrup in place of the maple syrup.

    Make it Nut-Free: Simply replace the nuts with sunflower seeds to make this a nut-free lunch or dinner recipe.

    5 from 1 vote

    Maple Dijon Salmon Salad

    Buttery, flaky salmon atop a simply dressed maple dijon salad! This quick and easy recipe yields perfectly seasoned, and cooked salmon every time. A complete meal, loaded with fresh veggies, then finished off with a tangy maple dijon dressing, ready in under 20 minutes!
    Print Rate
    Prep Time: 5 minutes
    Cook Time: 12 minutes
    Total Time: 17 minutes
    Servings: 4 servings

    Ingredients

    For the dressing:

    • 1/4 cup olive oil
    • 1/4 cup Dijon mustard
    • 3 tablespoons maple syrup
    • juice from 1 lemon, see Notes
    • 3 garlic cloves, minced
    • 1 teaspoon salt

    For the salmon:

    • 4 salmon fillets, boneless
    • salt and black pepper, to taste

    For the salad:

    • 4 cups lettuce, see Notes
    • 1 cucumber, sliced
    • 1/2 red onion, thinly sliced
    • 1 green apple, thinly sliced
    • 1/2 cup pecans or walnuts, roughly chopped

    Instructions

    • Preheat oven to 400° Fahrenheit.
    • Whisk together all dressing ingredients in a small bowl.
    • Place salmon fillets on a baking sheet and pat dry with a paper towel. Season filets with salt and black pepper, then drizzle half the maple Dijon dressing evenly over top of the salmon.
    • Bake salmon for 10-12 minutes, or until a thermometer inserted into thickest end of the salmon read 125° Fahrenheit.
    • While salmon cooks, place all salad ingredients in a large bowl and toss to combine. Once salmon is done, divide salad between four plates, top each plate with a salmon filet and serve with remaining dressing.

    Notes

  • Lemon Juice: If you don’t have any fresh lemons, you can use 1 tablespoon of apple cider vinegar or white wine vinegar in place of the lemon juice in this recipe.
  • Lettuce: Use any type of lettuce you like, I used mesclun!
  • Nutrition

    Calories: 300kcal

    Irresistibly soft and flaky vegan biscuits! They’re chock-full of gorgeous layers and surprisingly easy to make in under 30 minutes. Top these flawless vegan biscuits off with a simple two-ingredient vegan maple butter for a perfectly sweet touch.

    vegan biscuits on parchment paper with maple butter on the side

    What You’ll Need To Make Vegan Biscuits

    Non-Dairy Milk – Any non-dairy milk will work in this plant-based bread recipe! I used almond milk, but you can definitely use soy, hemp, cashew, or even coconut milk if you’d like.

    Apple Cider Vinegar – Ever notice that tiny bit of tanginess found in most biscuits? Well, that’s the buttermilk speaking. And since we obviously can’t use regular ole’ buttermilk in these vegan biscuits, we make our own vegan version instead. By mixing apple cider vinegar into cold non-dairy milk, then leaving it to sit for a few minutes, we make vegan buttermilk – yup, it’s that easy!

    All Purpose Flour – We wouldn’t have biscuits without flour. Specifically, all purpose flour, which bakes up the best biscuits. I’ve pretty much grown up on the King Arthur Organic Unbleached All Purpose Flour. It’s been a staple in my kitchen for years and has seriously never ever failed me. However, you can definitely replace the all purpose flour for gluten-free 1:1 baking flour if you’d like.

    Vegan Butter – I use and love the Earth Balance Vegan Buttery Sticks for all my vegan baking needs. Unlike most baking recipes which call for softened butter, we actually want super cold butter for these biscuits. Therefore, leave your vegan butter in the fridge until the second you need to use it. You can even pop it in the freezer for a couple minutes to get it extra cold!

    a stack of vegan biscuits on a table

    Tips and Tricks

    • Don’t overmix the dough! An overmixed dough will bake up tough and chewy, instead of soft and flaky. So once all ingredients are incorporated, stop mixing and move on to shaping.
    • No biscuit cutter? No problem! I used a metal cocktail shaker in place of a biscuit cutter for this bakery-style recipe. Really any round object will work to cut biscuits.
    • If not a maple butter fan, top these vegan biscuits with any spread you’d like. Some homemade jam, vegan butter, and/or vegan cream cheese would all taste just as delicious!
    vegan biscuits with maple butter on top and a butter knife

    Adjust This Recipe To Your Dietary Needs

    Make it Gluten-Free: For gluten-free vegan biscuits, replace the all purpose flour with 1:1 gluten-free baking flour. I swear by the Bob’s Red Mill Gluten-Free Baking Flour for all my gluten-free baking needs!

    Make it Nut-Free: To ensure these biscuits are completely nut-free, use a nut-free non-dairy milk such as soy or oat milk, and a non-dairy butter without any nuts in it.

    No ratings yet

    Flawless Vegan Biscuits with Maple Butter

    Irresistibly soft and flaky vegan biscuits! They’re chock-full of gorgeous layers and surprisingly easy to make in under 30 minutes. Top these flawless vegan biscuits off with a simple two-ingredient vegan maple butter for a perfectly sweet touch.
    Print Rate
    Prep Time: 10 minutes
    Cook Time: 15 minutes
    Total Time: 25 minutes
    Servings: 10 biscuits

    Ingredients

    • 1/2 cup non-dairy milk
    • 1 tablespoon apple cider vinegar
    • 2 cups all purpose flour
    • 1 tablespoon baking powder
    • 1 tablespoon sugar
    • 1 teaspoon salt
    • 1/2 cup vegan butter, very cold

    For the maple butter:

    • 1/4 cup vegan butter, softened
    • 1 tablespoon maple syrup

    Instructions

    • Preheat oven to 425° Fahrenheit.
    • Whisk together the non-dairy milk and apple cider vinegar in a small bowl, set aside.
    • In a large bowl, mix together the all purpose flour, baking powder, sugar, and salt.
    • Add butter into flour mixture and use either a pastry cutter or fork to “cut” butter into flour until crumbly. (The mixture should resemble coarse sand)
    • Make a well in the center of the flour and slowly pour in the milk and vinegar. Gently stir until a sticky dough forms.
    • Transfer biscuit dough to a floured surface and roll into a 1-inch thick disc. Use a biscuit cutter or something similar to cut biscuits out of dough.
    • Place biscuits on a baking sheet then bake for 12-15 minutes or until slightly golden.
    • White the biscuits bake, make the maple butter by whisking both ingredients together in a small bowl until combined. Spread maple butter over warm vegan biscuits.

    Video

    Nutrition

    Calories: 300kcal

    Melt-in-your-mouth scallops seared in a bit of butter, with garlicky greens and creamy polenta. The perfect light, easy, and delicious elevated dinner recipe!

    holding a plate of this seared scallops recipe with polenta and garlicky greens

    I don’t know about you, but I avoided cooking scallops for yearssss because I simply didn’t know how! Though when I eventually gave these pan-seared scallops a try, I was super impressed. They’re not only easy to make, but come together super fast. Scallops are tiny little things, and therefore only need a few minutes to fully cook. I prefer searing them in a pan with a little bit of butter. This gives them an irresistibly crispy outside, and buttery soft inside. And while pan-searing them is hands down the tastiest way to cook scallops, you can also grill them or cook them in an air fryer.

    two plates of the seared scallops recipe with garlicky greens and polenta

    What You’ll Need For This Scallops Recipe

    Large Sea Scallops – Head to your local seafood counter and pick up a pound of large sea scallops for this recipe! The two most common types of scallops you’ll find are sea scallops and bay scallops. Bay scallops are dislike the sea scallops we use in this dish in that they’re much smaller. Like teeny tiny bite-sized small. While delicious, bay scallops are best fried or baked, instead of seared. So once you’ve got your hands on big boy sea scallops, give them a quick rinse under cold water. Then, pat dry with a paper towel, before seasoning and cooking.

    Fresh Greens – Any and all fresh greens are welcome here! I used a combination of fresh cut curly kale and fresh baby spinach. This is a great dish to use up any leftover green vegetables you might have lying around on the verge of going bad. In fact, the garlicky greens portion of this recipe came about because I had a very sad bunch of kale sitting in my fridge for over a week that I was determined to not let go to waste!

    Polenta – If you’re at all unfamiliar with polenta, it’s simply dry, ground corn. It’s naturally gluten-free with an impressive amount of protein and fiber. Polenta is an extra healthy addition to this already super healthy meal. It’s sold in two different forms – dried, and pre-cooked. Pre-cooked polenta typically comes in a tube and is perfect for frying or baking. And while definitely delicious, we’ll use the pre-cooked kind in a recipe another time! For this scallops recipe, reach for a bag of dried polenta. Then, rehydrate and cook the polenta yourself in water, butter, and salt until thick and irresistibly creamy.

    overhead image of scallops recipe on a plate with white wine on the side

    Tips and Tricks

    • Don’t forget about your polenta! Return to the polenta every 5-10 minutes during the cooking process to give it a quick whisk and ensure no clumps are forming. By keeping a watchful eye on your polenta, you’ll guarantee a perfectly smooth and enjoyable side dish.
    • If unsure whether your scallops are done or not, use a meat thermometer to check their internal temperature. Once a thermometer inserted into one of the scallops reads 125° Fahrenheit, then they’re done cooking and should be removed from the heat. Do everything in your power to avoid overcooked scallops, since those can be tough and chewy.
    • Add or remove any element of this recipe that you’d like! If not a garlicky greens fan, simply swap them out for your favorite sautéed or roasted veggies. Also, if you prefer a different grain such as rice, quinoa, or farro, go ahead and use that instead!
    seared scallops recipe on a plate with white wine on the side

    Adjust This Recipe To Your Dietary Needs

    Make it Dairy-Free: To make this recipe dairy-free, simply use non-dairy butter or replace the butter with equal parts olive oil!

    Make it Gluten-Free: While this scallops recipe is already gluten-free, I’d recommend double-checking the polenta you’re using to ensure that it’s also 100% gluten-free. Polenta is sometimes made in a factory with, or shares equipment with gluten ingredients.

    No ratings yet

    Perfect Seared Scallops with Garlicky Greens and Polenta

    Melt-in-your-mouth scallops seared in a bit of butter, with garlicky greens and creamy polenta. The perfect light, easy, and delicious elevated dinner recipe!
    Print Rate
    Prep Time: 5 minutes
    Cook Time: 30 minutes
    Total Time: 35 minutes
    Servings: 4 servings

    Ingredients

    For the scallops:

    • 1 pound large sea scallops
    • salt and black pepper, to taste
    • 1 tablespoon butter, I used non-dairy butter

    For the greens:

    • 1 tablespoon olive oil
    • 3 garlic cloves, thinly sliced
    • 1 bunch fresh greens (kale, Swiss chard, and/or spinach)
    • 1/2 lemon, juice and zest
    • salt and black pepper, to taste

    For the polenta:

    • 4 cups water
    • 1 cup polenta
    • 1 tablespoon butter, I used non-dairy butter
    • 1 teaspoon salt

    Instructions

    • Make the polenta by boiling the water in a large saucepan over medium-high head. Add in polenta, butter, and salt. Stir constantly for 3 minutes, or until polenta start to thicken.
    • Reduce heat to low and cover with lid, simmer for 30 minutes whisking every 5-10 minutes.
    • While polenta cooks, rinse scallops under cold water, then pat dry with a paper towel. Season both sides of scallops with salt and pepper.
    • Heat butter in a large skillet over medium-high heat, then cook scallops in skillet for about 1-2 minutes per side or until cooked through. Set scallops aside and keep warm.
    • In that same skillet, make the greens by adding in olive oil and garlic. Cook for 1 minute, then add in fresh greens, lemon juice and zest, a pinch of salt, and black pepper.
    • Sauté greens until wilted and tender (about 5 minutes), then serve over polenta with seared scallops on top.

    Nutrition

    Calories: 300kcal

    Deliciously bright and zesty citrus salad with avocado and pistachios! Put this season’s best produce to good use in a fresh and healthy salad. Quick and easy to make in just three steps, and under 10 minutes!

    overhead image of citrus salad on a platter with fresh mint on the side

    What You’ll Need To Make Citrus Salad

    Blood Oranges – While they most certainly add flavor, they just as importantly add a stunning deep red color to this side dish. Less tangy and more tart than most other oranges, blood oranges diversify the overall recipe. However, if you can’t find blood oranges or they’re simply not your thing, feel free to replace them with any other type of orange you’d like.

    Cara Cara or Navel Oranges – I know many people rave about cara cara oranges this time of year, and for obvious reasons – they’re freaking delicious! Though for this citrus salad recipe I used navel oranges, due to the simple fact that they were on sale. And let me tell ya, there wasn’t a thing I’d change about how this plant-based dish turned out.

    Avocado – Peak avocado season is January through March, which coincidentally is also peak citrus season. So I figured, since we’re on a seasonal produce kick over here, why not use as much winter produce in this salad as possible?! And that’s exactly what I did. While not necessary, avocado does add in some healthy fats and mild flavor.

    Pistachios – Every salad needs a good crunch, and this citrus salad is no exception! Unsalted pistachios play perfectly with the other textures in this dish.

    Sherry Vinegar – Either sherry vinegar, apple cider vinegar, or lemon juice would taste delicious in this citrus salad dressing. Feel free to use whichever you have on-hand and/or like the most!

    dressing being poured over citrus salad

    Tips and Tricks

    • Avoid serving this citrus salad right away, and instead leave it to sit for at least 10 minutes before eating. This time will allow the flavors to develop and marinate, making for an even more delicious salad!
    • If not gluten-free, serve this citrus salad with a side of toasted crusty bread! Bread is the perfect pairing to this fresh and bright recipe, and ideal for soaking up that orange and grapefruit juice.
    • You can either peel then segment your citrus fruit, or peel then slice it for this dish. For instructions on how to segment and slice oranges, check out this video I posted!
    close-up image of citrus salad with avocado and pistachios

    Adjust This Recipe To Your Dietary Needs

    Make it Nut-Free: Replace the pistachios with either unsalted sunflower seeds or pumpkin seeds for a nice, nut-free crunch!

    Make it Vegan: This recipe is already almost completely vegan! The only thing that’s not is the honey in the dressing, so to make it 100% vegan, simply replace the honey with maple syrup.

    1 from 1 vote

    Citrus Salad with Avocado and Pistachios

    Deliciously bright and zesty citrus salad with avocado and pistachios! Put this season’s best produce to good use in a fresh and healthy salad. Quick and easy to make in just three steps, and under 10 minutes!
    Print Rate
    Prep Time: 10 minutes
    Total Time: 10 minutes
    Servings: 6 servings

    Ingredients

    • 2 blood oranges, peeled and sliced
    • 2 cara cara or navel oranges, peeled and sliced
    • 1 pink grapefruit, peeled and sliced
    • 1 avocado, sliced
    • 1/2 small red onion, thinly sliced
    • 1/4 cup pistachios, unsalted

    For the citrus salad dressing:

    • 3 tablespoons olive oil
    • 1 tablespoon sherry vinegar, see Notes
    • 1 teaspoon honey, or maple syrup
    • squeeze of fresh lime juice
    • salt and black pepper, to taste

    For serving:

    • fresh mint leaves

    Instructions

    • Assemble all salad ingredients on a large platter.
    • Whisk together all dressing ingredients in a small bowl.
    • Drizzle dressing over salad, garnish with fresh mint leaves and serve immediately or let sit for 10-20 minutes to let flavors marinate.

    Notes

  • Sherry Vinegar: You can use apple cider vinegar or lemon juice in place of sherry vinegar.
  • Nutrition

    Calories: 300kcal