Tag

baked

Browsing

Easy, healthy, and extra delicious Italian stuffed zucchini boats! This low-carb meal comes together in under 30 minutes, with only 5 (!!!) ingredients. The ultimate lazy, yet super healthy dinner recipe.

overhead image of zucchini boats on a plate with white wine on the side.

What You’ll Need to Make Stuffed Zucchini Boats

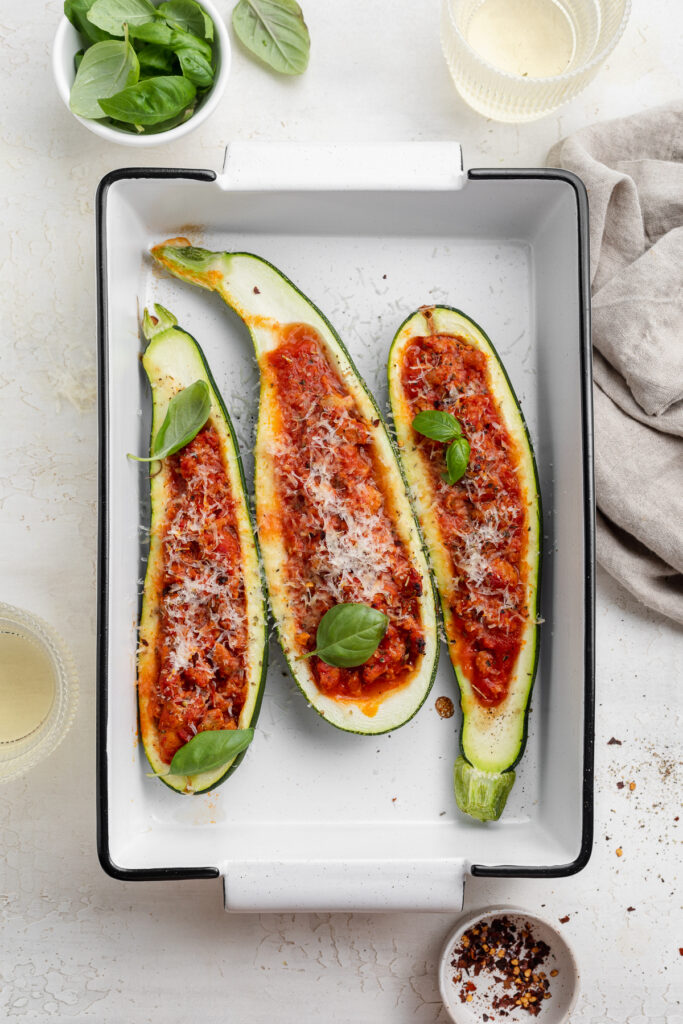
Zucchini – This summer vegetable is super cheap and easy to find! Start by slicing a zucchini in half, then removing the seeds and some of the flesh from inside. You’ll be left with two zucchini “boats,” ready to be filled with our delicious Italian sausage in sauce.

Italian Sausage – Feel free to use whatever kind of Italian sausage you’d like! Though make sure it’s uncooked and removed from its casings before cooking. As it cooks, break the sausage up with a wooden spoon until no longer pink. Italian sausage is packed with herbs and spices, adding even more flavor to this already super flavorful dish.

Marinara Sauce – I use and love Rao’s marinara sauce for when I don’t feel like making it myself. Rao’s is perfectly tangy, has tons of flavor, with just a hint of sweetness. However, you can totally use your favorite jarred marinara sauce for this recipe. Or, if you have some time to spare, go ahead and throw together a homemade sauce to use instead.

Dried Italian Seasoning – The final step before cooking these zucchini boats is sprinkling them with a little bit of dried Italian seasoning. I love the flavor this packs, but it’s totally optional if you’re not feeling up to it or don’t have any on-hand.

overhead image of zucchini boats in a baking dish.

Tips and Tricks

  • Finish off these Italian stuffed zucchini boats with fresh-grated parmesan cheese! It rounds out the Italian flavors in this dish, and make it that much more delicious. Also, who doesn’t love a little bit of cheese?!
  • You can easily prep-then-freeze this dish ahead of time! To do this, follow each step of the recipe, up to cooking it. Then, cover the baking dish with plastic wrap and aluminum foil, before freezing for up to three months. When ready to eat, simply defrost, then bake as instructed.
  • This is a great, healthy meal to prep for a crowd! Simply double or triple the amounts listed in the recipe below, and you can feed a whole army (ok …maybe not an entire army, but you get the point). I love throwing this quick and easy zucchini recipe together for friends and family, it’s a total crowd-favorite!
close-up image of zucchini boat being cut into with a fork.

Adjust This Recipe to Your Dietary Needs

Make it Gluten-Free: These zucchini boats are already gluten-free! However, to be absolutely certain they don’t contain any traces of gluten, check your sausage and marinara sauce packaging to make sure those ingredient are entirely gluten-free.

Make it Dairy-Free: For a dairy-free version of this recipe, replace the parmesan cheese with nutritional yeast!

Make it Vegan: Replace the sausage with your favorite vegan meat substitute, and cook it with an additional teaspoon of dried Italian seasoning. Then, similar to the dairy-free version, top with nutritional yeast instead of parmesan cheese.

Italian Stuffed Zucchini Boats

0 from 0 votes
Recipe by Samantha Course: MainCuisine: ItalianDifficulty: Easy
Servings

4

servings
Prep time

5

minutes
Cooking time

25

minutes
Total time

30

minutes

Easy, healthy, and extra delicious Italian stuffed zucchini boats! This low-carb meal comes together in under 30 minutes, with only 5 (!!!) ingredients. The ultimate lazy, yet super healthy dinner recipe.

Ingredients

  • 2 large zucchini, cut in half lengthwise

  • salt and black pepper, to taste

  • 1 tablespoon avocado oil

  • 1 pound sweet or spicy Italian sausage (casings removed)

  • 1 teaspoon dried Italian seasoning, optional

  • grated parmesan cheese, for serving

Directions

  • Preheat oven to 400° Fahrenheit.
  • Using a spoon, scoop out and remove the seeds and a little bit of the flesh from each zucchini half.
  • Sprinkle zucchini with salt and black pepper, then place inside a large baking dish and set aside.
  • Heat avocado oil in a large skillet over medium heat, then add in the Italian sausage and cook until no longer pink. Break up the meat as it cooks, should take about 5 minutes.
  • Add marinara sauce to the skillet, reduce heat to low and simmer sausage in sauce for 2-3 minutes.
  • Spoon the sauce mixture into the cavity of each zucchini half, then evenly sprinkle with Italian seasoning. Bake for 20-25 minutes or until sauce is bubbly and zucchini is tender. Serve warm with parmesan cheese and fresh basil.

Recipe Video

Did you make this recipe?

Share it and tag @samdoesherbest on Instagram!

Like this recipe?

Follow us @samdoesherbest on Pinterest

Incredibly zesty lemon pepper chicken wings are super quick and easy to make in the comfort of your own home! Bake ’em in the oven or air fryer, then finish off with a simple 4-ingredient lemon pepper sauce. These wings are irresistibly crispy and loaded with delicious flavor!

lemon pepper chicken wings in a bowl with beer and lemon slices on the side

What You’ll Need

Chicken Wings – Pick up 3 pounds of either drums, flats, or a combination of both for this chicken wing recipe. I typically reach for the “party pack” of wings at the grocery store, but honestly anything you can find/prefer will work. Once you unwrap your chicken wings, make sure you pat each wing dry with a paper towel before cooking. Getting the wings as dry as possible will ensure they bake up super crispy in the oven (or air fryer!).

Lemon Pepper Seasoning – You can either purchase a jar of lemon pepper seasoning, or simply make it yourself! I couldn’t find any pre-made seasoning near me, so I quickly threw together a homemade batch of my own. To do this, I cooked lemon peels in the oven at 170° Fahrenheit for 1 hour until super dried out. Then, I added the peels to a blender along with some whole black peppercorns and a pinch of salt. There are plenty of lemon pepper seasoning recipes out their on the internet, so do a little research and follow one that’s easiest for you! Or, of course, just buy lemon pepper seasoning from the store if you’d like.

Top Tips

  • Don’t crowd your baking sheet/rack with chicken wings before baking. Place each wing at least an inch apart to ensure that all sides crisp up evenly!
  • Switch up this lemon pepper chicken wings recipe however you’d like! For a little more spice, add in an extra pinch of freshly cracked black pepper. For extra tang, finish off with an extra squeeze of lemon juice. And for a bit more sweetness, use an additional teaspoon or two of honey!
  • Avoid using frozen chicken wings! If your wings are frozen, thaw them completely in the fridge before baking.

Adjust This Recipe to Your Dietary Needs

  • Make it Dairy-Free: Sub the melted butter in this recipe for non-dairy butter to have a completely dairy-free and delicious appetizer!
  • Make it Paleo: For paleo lemon pepper chicken wings, simply use ghee instead of butter and make your own seasoning by drying out lemon peels in the oven and grinding them with black peppercorns and salt.

How to Cook Chicken Wings in the Air Fryer

  1. Pat chicken wings dry with a paper towel, then add to a bowl along with olive oil, salt and black pepper. Toss to coat wings in oil and seasoning.
  2. Transfer chicken wings to air fryer tray or basket in an even layer (work in batches if necessary), cook at 360° Fahrenheit for 12 minutes. After 12 minutes, flip the wings over then cook for another 12 minutes.
  3. Once all wings are cooked and crispy, toss in your homemade lemon pepper sauce and enjoy!

The Best Baked Lemon Pepper Chicken Wings

5 from 2 votes
Recipe by Samantha Course: AppetizersDifficulty: Easy
Servings

6

servings
Prep time

10

minutes
Cooking time

40

minutes
Total time

50

minutes

Incredibly zesty lemon pepper chicken wings are super quick and easy to make in the comfort of your own home! Bake ’em in the oven or air fryer, then finish off with a simple 4-ingredient lemon pepper sauce. These wings are irresistibly crispy and loaded with delicious flavor!

Ingredients

  • For the wings:
  • 3 pounds chicken wings

  • 2 tablespoons olive oil

  • 1 teaspoon salt

  • 1/2 teaspoon black pepper

  • For the lemon pepper sauce:
  • 1/4 cup melted butter, I used non-dairy

  • 1 1/2 tablespoons lemon pepper seasoning

  • 1 tablespoon honey

  • 2 teaspoons lemon juice

  • chopped parsley, for serving

  • lemons, sliced

Directions

  • Preheat oven to 400° Fahrenheit and line a baking sheet with foil, and top with a wire baking rack.
  • Pat chicken wings dry with a paper towel, then add to a bowl along with olive oil, salt and black pepper. Toss to coat wings in oil and seasoning.
  • Transfer wings to an even layer on the prepared baking sheet with baking rack and bake for 35-40 minutes or until golden brown and crispy.
  • Mix together all lemon pepper sauce ingredients in a large bowl, then once wings are cooked toss them in the sauce until evenly coated.

Did you make this recipe?

Share it and tag @samdoesherbest on Instagram!

Like this recipe?

Follow us @samdoesherbest on Pinterest

Other Easy Apps You’ll Love

Perfectly fluffy and delicious coffee cake muffins made gluten-free, with a dairy-free option as well! They’re irresistibly soft, sweet, and complete with a cinnamon streusel topping. I especially love enjoying a warm gluten-free muffin with my coffee in the morning – there’s no better way to start the day!

three gluten-free coffee cake muffins stacked on top of each other

What You’ll Need For This Recipe

Gluten-Free All Purpose Baking Flour – I use Bob’s Red Mill Gluten Free 1-1 Baking Flour in most of my gluten-free baking recipes. It bakes up beautifully and can pretty much be used as a 1:1 swap for regular all purpose flour! However, you can use any gluten-free all purpose baking flour you’d like. Though when it comes to gluten-free flours, it’s super important to the integrity of your bake that your flour contains xanthan gum. Xanthan gum creates structure and will essentially hold these muffins together. Therefore, if your gluten-free flour doesn’t have xanthan gum, supplement it with 1 teaspoon of xanthan gum in this gluten-free coffee cake muffins recipe.

Butter – Any butter you’d like will work here! Salted, unsalted, and non-dairy butter all bake perfectly in this recipe. When it comes to salted butter, I truly don’t believe any butter has enough salt in it to make any difference in a recipe. So, feel free to use whatever butter you have on hand!

Eggs – Bring your eggs to room temperature before getting started on this delicious breakfast or snack recipe. By doing this, we reduce the risk of the cold eggs re-solidifying the melted butter. It’s also always a great rule-of-thumb to have all ingredients at room temperature before starting on any baked goods recipe!

Top Tips

  • You can freeze leftover gluten-free muffins for up to 3 months! I currently have half my batch in the freezer right now, ensuring they don’t go bad before I have a chance to eat them. Though for muffins you plan on eating right away, simple store them in an airtight container at room temperature for up to 1 week.
  • Avoid over-mixing the batter, as this could result in tough and chewy muffins! Therefore, when folding the wet ingredients into the dry, simply mix until no more flour pockets remain. Once just combined, put down the spatula and head straight into the next step!
  • These muffins are best enjoyed warm! So to warm them up after baking, I recommend either popping them in the microwave for 10-15 seconds, or into the toaster for a couple of minutes. Once warm, they’re irresistibly soft and flufy!

Adjust This Recipe To Your Dietary Needs

Make it Vegan – While I haven’t tried this variation myself yet, you may be able to get away with replacing the eggs in these muffins with a vegan egg substitute. I’ve used the Bob’s Red Mill Vegan Egg Substitute in other recipes, and have almost always found it successful. Flax eggs might work here as well, though expect a slightly more dense gluten-free muffin if going that route.

Cut the Recipe in Half – This recipe makes 24 gluten-free coffee cake muffins, but if that sounds like too much for you, you can easily cut this recipe in half! That’s right, use half of all ingredients listed for just 12 perfect muffins.

Use Regular Flour – Feel free to simply swap the gluten free all purpose flour for regular all purpose flour in this recipe.

Other Delicious Mix-Ins

Instead of the cinnamon and streusel topping, feel free to add one of the following to your gluten-free muffins:

  • Blueberries
  • Sliced Bananas
  • Chocolate Chips
  • Cranberries and Orange Zest
  • Lemon Juice and Poppyseeds
  • Strawberries
  • Raspberries
  • or simply leave them plain!

Perfect Gluten-Free Coffee Cake Muffins

3 from 99 votes
Recipe by Samantha Course: BreakfastDifficulty: Easy
Servings

24

servings
Prep time

10

minutes
Cooking time

20

minutes
Total time

30

minutes

Perfectly fluffy and delicious coffee cake muffins made gluten-free, with a dairy-free option as well! They’re irresistibly soft, fluffy, sweet, and complete with a cinnamon streusel topping. I especially love enjoying a warm gluten-free muffin with my coffee in the morning – there’s no better way to start the day!

Ingredients

  • For the gluten-free muffins:
  • 3 cups gluten-free all purpose baking flour

  • 2 teaspoons baking powder

  • 1 teaspoon cinnamon

  • 1/2 teaspoon salt

  • 1 cup sugar

  • 1 cup butter, melted (I used non-dairy butter)

  • 3/4 cup milk (I used non-dairy almond milk)

  • 3 eggs, at room temperature

  • 1 teaspoon vanilla extract

  • For the crumb topping:
  • 1 cup gluten-free all purpose baking flour

  • 1 cup brown sugar

  • 1/2 cup butter, softened

  • 1 teaspoon cinnamon

Directions

  • Preheat oven to 350° Fahrenheit and line a muffin tin with cupcake liners.
  • Mix together the flour, baking powder, cinnamon, and salt in a large bowl.
  • In a separate bowl, whisk together the sugar, melted butter, milk, eggs, and vanilla extract.
  • Slowly pour the wet ingredients into the dry ingredients, mix until just combined. Fill each muffin mold with about ¼ cup of batter.
  • Mix together all crumb topping ingredients in a bowl, then sprinkle over each muffin.
  • Bake for 20-25 minutes or until a toothpick inserted down the center of a muffin comes out clean. Let cool in tin for 10 minutes before transferring to a wire cooling rack to cool completely.

Notes

  • Gluten-Free All Purpose Flour: I used Bob’s Red Mill Gluten Free 1:1 Baking Flour.
  • Butter: I used Earth Balance Vegan Buttery Sticks to make this recipe dairy-free.

Did you make this recipe?

Share it and tag @samdoesherbest on Instagram!

Like this recipe?

Follow us @samdoesherbest on Pinterest

Other Delicious Gluten-Free Recipes You Must Try!