
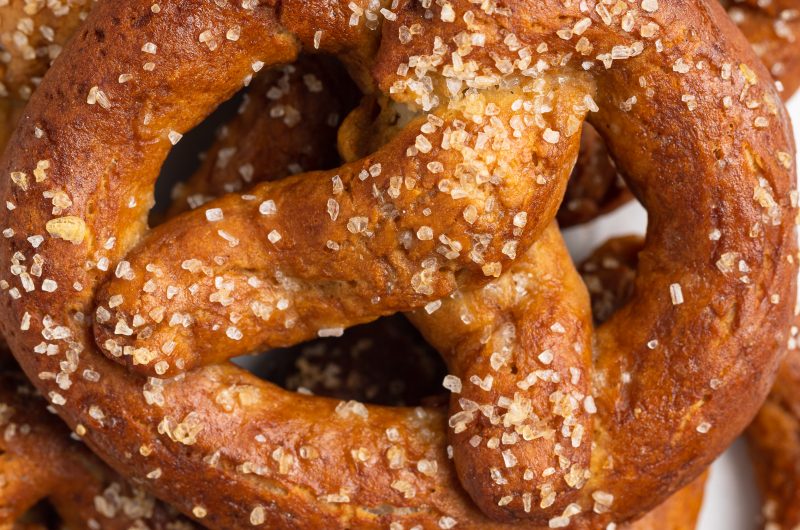
These homemade gluten-free soft pretzels are chewy, soft, flavorful, and so delicious! It’s a fun and easy snack recipe you can make for the whole family. Dip it in cheese sauce, sprinkle it with salt, or drizzle chocolate right on top, the choice is yours. Either way, you won’t be able to eat just one!

Soft pretzels are a classic snack that might seem hard to make, but they’re not hard at all! With simple, healthy ingredients, this gluten-free soft pretzels recipe is fun to make and doesn’t take long. For people with gluten sensitivities, these pretzels are the perfect way to enjoy a classic snack.
MAIN INGREDIENTS NEEDED TO MAKE THESE Gluten-Free Soft Pretzels
- All-Purpose Flour – (I’ve used Bob’s Red Mill All-purpose gluten-free flour with great success!)
- Active Dry Yeast
- Brown Sugar
- Salt
- Xanthan Gum
- Baking Powder
- Water
- Butter (non-dairy)
- Egg & Egg Yolk
TIPS ON MAKING Gluten-Free Soft Pretzels
Salt is the usual go-to when it comes to pretzel toppings. However, you can use all different kinds of toppings to make it sweeter or more to your liking.
- For an almond topping, use Honey Roasted Almonds. Chop roasted almonds into small bits, brush freshly baked pretzels with melted butter, then roll or sprinkle in almonds.
- For a cinnamon sugar topping, mix 1/2 tsp of cinnamon with 1/4 cup granulated sugar and melt 1 Tbsp of butter in a small bowl. Brush the freshly baked pretzels with melted butter, then roll in cinnamon sugar.
- For an extra burst of savory flavors, you can use King Arthur Flour’s Everything Bagel Topping, which is a combination of salt, poppy seeds, sesame seeds, dried onion, and garlic.
Gluten-Free Soft Pretzels
Course: SnacksCuisine: AmericanDifficulty: Easy, Medium10
servings30
minutes30
minutes300
kcal1
hourThese homemade gluten-free soft pretzels are chewy, soft, flavorful, and so delicious! It’s a fun and easy snack recipe you can make for the whole family. Dip it in cheese sauce, sprinkle it with salt, or drizzle chocolate right on top, the choice is yours. Either way, you won’t be able to eat just one!
Ingredients
- For the dough:
3 cups all purpose gluten-free flour
2 ¼ teaspoons active dry yeast
¼ cup brown sugar
2 teaspoons salt
1 teaspoon xanthan gum
½ teaspoon baking powder
1 cup warm water
¼ cup non-dairy butter, melted
1 egg, at room temperature
- For cooking:
10 cups water
2/3 cup baking soda
- For egg wash:
1 egg yolk
1 tablespoon water
- For topping:
Salt
Directions
- Mix together the gluten-free flour, yeast, brown sugar, salt, xanthan gum, and baking powder in a large bowl.
- Form a well in the center of the flour mixture then pour the warm water, melted butter, and egg into the well. Whisk to combine while slowly incorporating the dry ingredients into the wet ingredients.
- Transfer dough to a floured surface and knead until smooth, then shape into a ball and transfer to a lightly greased bowl. Cover bowl with towel, leave to proof in a warm place for an hour or until doubled in size.
- Preheat oven to 450° Fahrenheit and line a baking sheet with parchment paper.
- Place dough on a floured surface and separate into 10 equal balls. Warm each ball between the palm of your hands for a few seconds, then roll into an 18-inch rope before shaping each rope into a pretzel. For help shaping, follow this tutorial.
- Cover pretzels with a towel while you bring 10 cups water to a boil in a large pot. Once boiling, add in the baking soda.
- Once foam subsides, carefully drop one pretzel at a time into the boiling water for just 30 seconds. Remove from water and arrange on a baking sheet.
- Whisk together the egg yolk and one tablespoon of water then brush egg wash over top of each pretzel before sprinkling with salt if you’d like.
- Bake pretzels for 20-25 minutes or until lightly golden brown, then leave to cool on baking sheet for 10 minutes before transferring to a wire cooling rack to cool rest of the way.
Recipe Video
Notes
- Xanthan gum provides a pleasant chewiness to the pretzels. If omitted or substituted, it may affect the softness and texture of the pretzels.
- Storage: These taste best when eaten the same day, but if you want to store them, wrap them individually in plastic wrap and keep in the fridge for up to 2 days or in the freezer for 1 month.
Did you make this recipe?
Share it and tag @samdoesherbest on Instagram!
Like this recipe?
Follow us @samdoesherbest on Pinterest
")
