
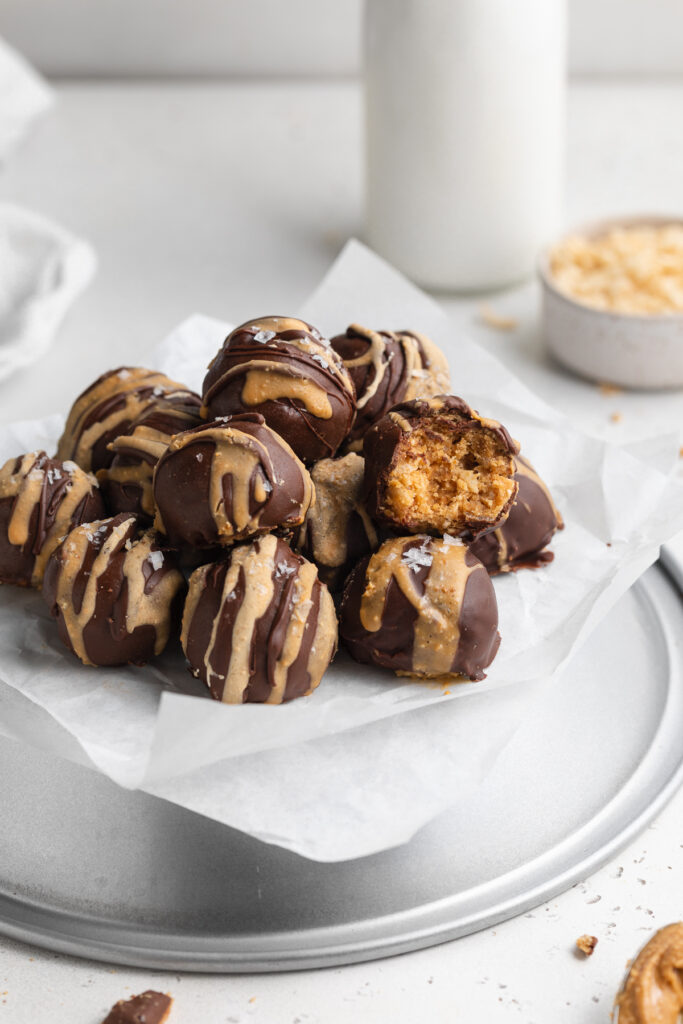
Crunchy peanut butter balls covered in chocolate! Perfectly sweet, surprisingly healthy, and super easy to make. This no-bake dessert is the perfect summer treat when it’s too hot to turn on the oven!
What You’ll Need to Make Crunchy Peanut Butter Balls
Creamy Peanut Butter – Unsweetened, creamy peanut butter is the base of this easy dessert recipe. Check your peanut butter labels closely and make sure it doesn’t contain any sugar! Added sugar in the peanut butter would totally throw off the sweetness in this recipe. For unsweetened peanut butter, I love both Trader Joe’s and Teddie’s brand.
Maple Syrup – Really any liquid sweetener will work in these peanut butter balls. Maple syrup, along with honey and date syrup, are the three least processed options which is why I always use and recommend them. Though is you don’t have those, you can use agave nectar instead. Or, for a sugar-free dessert option, check the “Make it Sugar-Free” section below!
Almond Flour – This gluten-free, low-carb flour is one of my favorites! It’s healthy, super easy to find, and virtually flavorless. The almond flour is also super helpful in holding these dessert balls together, so don’t go without it.
Crispy Rice Cereal – One cup of crispy rice cereal gives these peanut butter balls their unexpected crunch! Feel free to use whichever brand you like best. Or, for an even healthier option, use one cup of puffed quinoa instead.

Tips and Tricks
- Don’t feel like dipping in chocolate? Save major time and energy my melting the chocolate, then simply drizzling over the top of each ball!
- For an extra salty plus sweet combo, finish off these crunchy no-bake peanut butter balls with a pinch of flaky sea salt! A bit of salt balances out the sweetness, and adds an extra layer of crunch.
- These treats are best stored in the refrigerator! The freezer works too, but the fridge helps them hold their shape while also maintaining their crunchiness. But whatever you do, don’t store them at room-temperature, and especially not in the summertime because they will melt!

Adjust This Recipe To Your Dietary Needs
Make it Nut-Free: For a nut-free no-bake dessert, sub sunflower seed butter for the peanut butter and 3 tablespoons of coconut flour in place of the almond flour! Still just as delicious, and totally nut-free friendly.
Make it Sugar-Free: Replace the maple syrup in this recipe with your favorite liquid sugar-free sweetener.

Crunchy No-Bake Peanut Butter Balls
Ingredients
- 1 cup creamy peanut butter, unsweetened
- 1/3 cup maple syrup
- 1 teaspoon vanilla extract
- 1/2 cup almond flour
- 1 cup crispy rice cereal
For dipping/drizzling:
- 1 cup chocolate chips
- 1 teaspoon coconut oil
Instructions
- Mix together the creamy peanut butter, maple syrup, and vanilla extract in a large bowl.
- Add in almond flour and crispy rice cereal, mix to combine.
- Scoop and roll tablespoon-sized balls of the peanut butter ball mixture between the palms of your hands. Repeat this process until no more mixture remains, should make about 12 crunchy peanut butter balls.
- Place balls in freezer for 10-15 minutes, and add chocolate chips and coconut oil to a small bowl. Microwave chocolate in 30 second increments until fully melted.
- Once crunchy peanut butter balls are chilled, dip or drizzle with melted chocolate before placing back in the freezer. Freeze for at least 10 minutes before eating, then store in the fridge.
")

")


")


