")
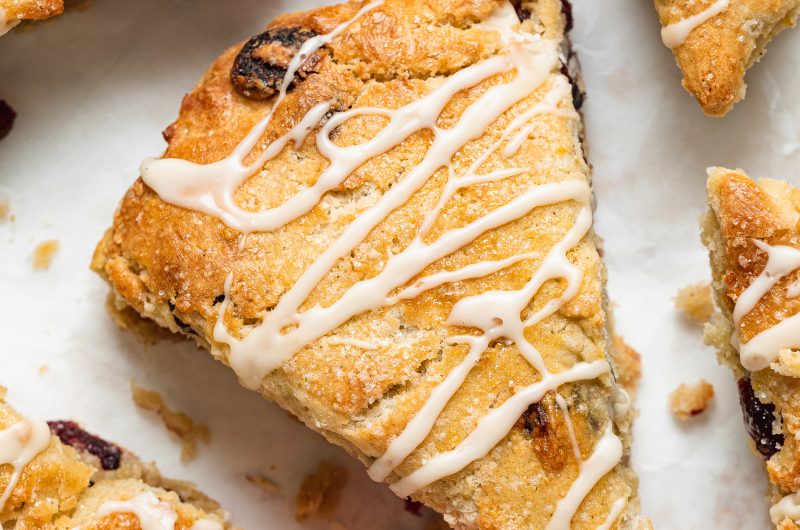
These cranberry orange scones are perfectly flaky and sweet! I took a traditional recipe and turned it gluten and dairy-free with just a few simple swaps. These scones taste incredible with a warm cup of coffee for breakfast or lightly toasted as an afternoon snack.

Breakfast in bed was the big thing on Mother’s Day in my house. And because my dad can barely boil an egg, the cooking of breakfast was always my job. I always loved to cook, so I had fun thinking up a breakfast menu for my mom on Mother’s Day. I don’t remember too many menu items from over the years, but I do remember making her cranberry orange scones one year. And the only reason I remember is because I truly couldn’t believe how INCREDIBLE they were! Ever since that Mother’s Day, I’ve thought about those scones frequently. And honestly, I have no good excuse as to why I haven’t remade them sooner?!
Though for this year’s cranberry orange scones, I added my Sam Does Her Best signature gluten-free and dairy-free twist. You know what it is. Not going to lie here either, I was pretty worried these just wouldn’t work sans gluten and dairy. But to my surprise, they definitely did. And not only did they work, but they taste even better than what I remember! So without further ado, I present to you gluten-free and dairy-free cranberry orange scones that will change your Mother’s Day game forever.
What You Need To Make Cranberry Orange Scones
Gluten-Free Flour – I use and recommend Bob’s Red Mill Gluten-Free 1:1 Baking Powder, it’s pretty much an exact dupe to regular all purpose flour. Though feel free to use any gluten-free flour you’d like, my only recommendation would be to make sure that it contains xantham gum. Xantham gum is a stabilizer and a key ingredient in holding your baked goods together.
Dairy-Free Butter – Make sure your butter is ice cold for this recipe! I’d even recommend dicing it into cubes and then sticking it in the freezer for 10 minutes or so. Cold butter is signature to any and all scones because when baked, it gives your scones that irresistible flaky texture.
Dairy-Free Milk – I used almond milk and had great results, but feel free to use whatever unsweetened dairy-free milk you’d like in these cranberry orange scones. You also want to make sure that the milk is cold, in order to ensure the butter in this recipe stays cold.
Tips and Tricks
- Use a fork to combine the butter into the flour. When mixing, lightly mash the butter cubes with the back of the fork. You’re simply looking to break up the butter into the dry ingredients. You’ll know you’re done with this step when you have a crumbly mixture and your butter is the size of peas.
- Lightly whisk the eggs before adding them into the cranberry orange scones dough. Crack them in a bowl and give them a quick whisk with a fork to break up the yolks before proceeding with the recipe.
- Make sure your surface is well-floured before transferring the dough onto it. The dough will be quite sticky, but when introduced to flour on your work surface, will be much easier to handle! Continue sprinkling gluten-free flour on the surface, on your hands, or on the dough itself whenever it feels too sticky to work with.
Cranberry Orange Scones (Gluten-Free, Dairy-Free)
Course: SnacksCuisine: ScottishDifficulty: Intermediate8
scones10
minutes20
minutes30
minutesThese cranberry orange scones are perfectly flaky and sweet! I took a traditional recipe and turned it gluten and dairy-free with just a few simple swaps. These scones taste incredible with a warm cup of coffee for breakfast or lightly toasted as an afternoon snack.
Ingredients
2 1/2 cups gluten-free flour
1/4 cup almond flour
1/4 cup sugar
1 tablespoon baking powder
1 tablespoon orange zest
8 tablespoons cold dairy-free butter, cut into 1/4-inch cubes
1 cup cold dairy-free milk
2 large eggs, whisked
1 cup dried cranberries
- For the egg wash:
1 egg, whisked
- For the icing:
1/2 cup powdered sugar
3 teaspoons fresh orange juice
Directions
- Preheat oven to 400° Fahrenheit.
- Mix together the gluten-free flour, almond flour, sugar, baking powder, and orange zest in a large bowl.
- Add in the cubed butter and mix with a fork until the butter is the size of peas, then fold in the cranberries.
- Add in the cold milk and whisked eggs, mix until just combined.
- Transfer dough to a floured sheet of parchment paper set on a work surface and gently press into a 1-inch thick circle.
- Slice into six triangles and transfer to a baking sheet, then brush with egg wash and sprinkle with extra sugar.
- Bake for 15-20 minutes or until golden brown, then remove from oven, gently separate scones, and transfer to a wire rack to cool.
- Make the icing by whisking the powdered sugar and orange juice together in a small bowl, then drizzle over cooled scones.
Recipe Video
Notes
- Ingredient Swaps: Feel free to use all purpose flour instead of gluten-free flour, and leave out the almond flour if you’d like. You can also swap regular butter for the dairy-free butter and cow’s milk for the dairy-free milk in this recipe.
Did you make this recipe?
Share it and tag @samdoesherbest on Instagram!
Like this recipe?
Follow us @samdoesherbest on Pinterest


")

")