Learn how to make this deliciously soft and buttery gluten-free coffee cake with a cinnamon filling and streusel crumb topping. This recipe also includes a dairy-free option, making it a treat something everyone can get excited about!

This gluten-free coffee cake recipe so easy to make and such a perfect breakfast or brunch recipe on the weekend. Serve a big slice with a hot cup of coffee for a breakfast treat!
While there are a few different parts to this recipe — the coffee cake, streusel, and filling — they are all very quick to make.
MAIN INGREDIENTS NEEDED TO MAKE Gluten-Free Cinnamon Streusel Coffee Cake
- 1:1 Baking Flour – I used Bob’s Red Mill 1-to-1 Gluten Free Baking flour in this recipe.
- Butter – I used non-dairy butter. Consider using unsalted butter to control the salt content in this recipe.
- Eggs – A common pantry item, you only need 3 large eggs for this.
- Milk – I used non-dairy, but any milk can work with this.
- Vanilla Extract – I use this in almost all my baked goods recipes because it enhances all the other flavors in the recipe.
- Cinnamon – This wouldn’t be a cinnamon streusel coffee cake without the cinnamon!
- Brown Sugar – This will be used for the streusel topping.
ADJUST THIS RECIPE TO YOUR DIET
- Add dairy: I used non-dairy butter and milk, but it’s totally fine to use regular dairy products too.
- Add Gluten: You can try using all purpose flour instead of the gluten-free version. However, flours like almond flour or coconut flour have not been tested in this recipe.
TIPS FOR MAKING Gluten-Free Cinnamon Streusel Coffee Cake
- I like to line my baking dish with parchment paper for easy removal of the coffee cake from the pan after baking.
- You can make the filling and streusel ahead of time. Just store in the refrigerator until ready to use.
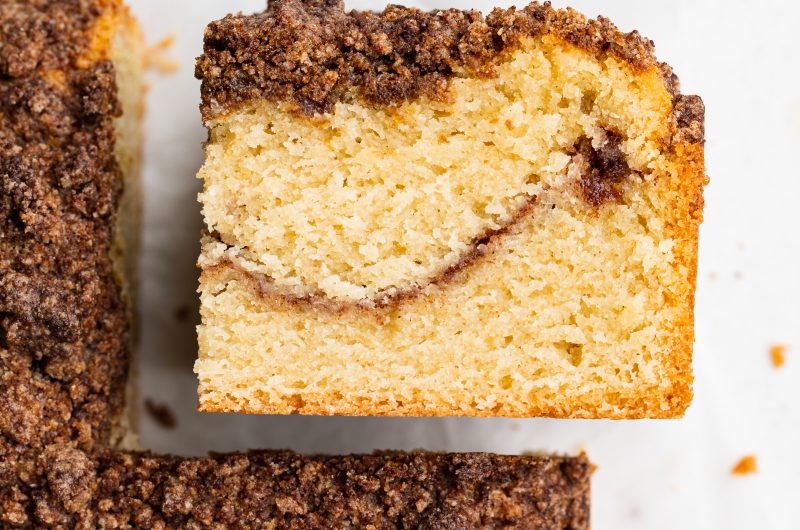
Gluten-Free Cinnamon Streusel Coffee Cake (Dairy-Free)
Course: Breakfast, DessertCuisine: AmericanDifficulty: Easy9
servings10
minutes50
minutes300
kcal1
hourLearn how to make this deliciously soft and buttery gluten-free coffee cake with a cinnamon filling and streusel crumb topping. This recipe also includes a dairy-free option, making it a treat something everyone can get excited about!
Ingredients
- For the cake:
3 cups gluten-free 1:1 baking flour
2 teaspoons baking powder
½ teaspoon salt
1 ½ cups sugar
1 cup butter, melted (I used non-dairy butter)
3/4 cup milk (I used non-dairy milk)
3 eggs
1 tablespoon vanilla extract
- For the filling:
¼ cup sugar
1 tablespoon gluten-free 1:1 baking flour
1 teaspoon cinnamon
- For the streusel topping:
1 cup gluten-free 1:1 baking flour
1 cup brown sugar
½ cup butter, softened (I used non-dairy butter)
1 teaspoon cinnamon
Directions
- Preheat oven to 350° Fahrenheit and grease a 9×9-inch cake pan.
- In a large bowl, mix together the gluten-free flour, baking powder, and salt.
- In a separate bowl, whisk together the sugar, butter, milk, eggs, and vanilla extract.
- Slowly pour the wet ingredients into the dry ingredients while stirring, then mix until just combined.
- Add all filling ingredients to a bowl and mix together.,
- Then, add all streusel topping ingredients to a bowl and mix together until crumbly.
- Transfer half of the batter to the cake pan, then evenly pour the filling over the top.
- Follow that layer with the remaining cake batter before topping the whole thing off with an even sprinkling of the streusel topping.
- Bake for 45-50 minutes or until a toothpick inserted down the center of the cake comes out mostly clean. Remove from pan and cool on a wire rack before slicing and serving.
Recipe Video
Notes
- Storage: Store cooled coffee cake covered at room temperature up to 2 days.
- Be sure to cool this one at least 30 minutes to let it set and be easier to cut and serve.
Did you make this recipe?
Share it and tag @samdoesherbest on Instagram!
Like this recipe?
Follow us @samdoesherbest on Pinterest
")
")

")


