Tag

fruit

Browsing

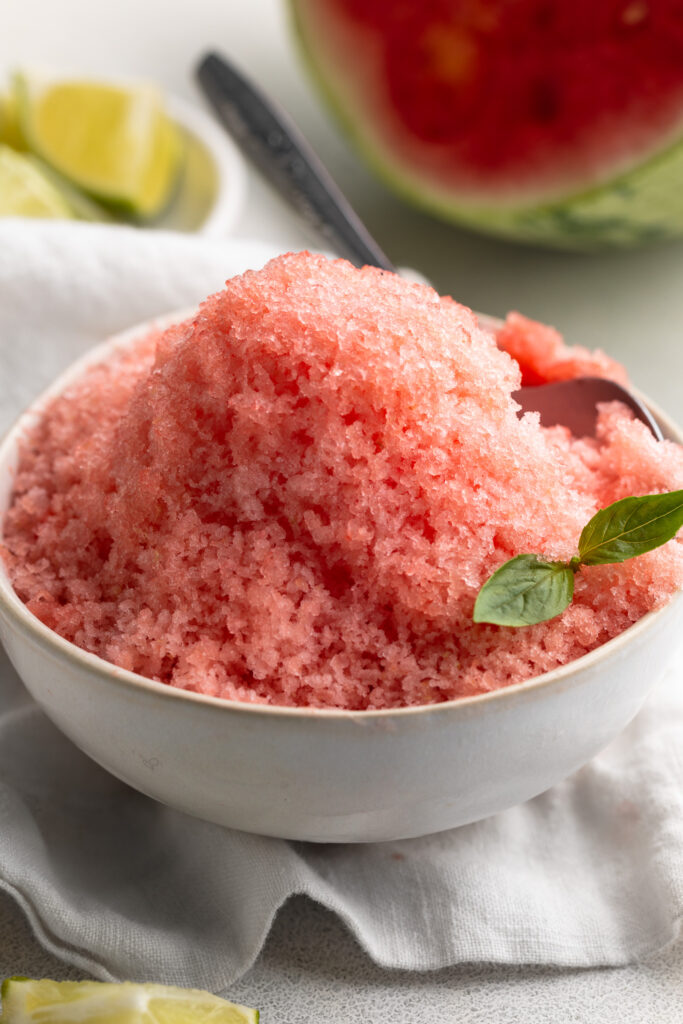
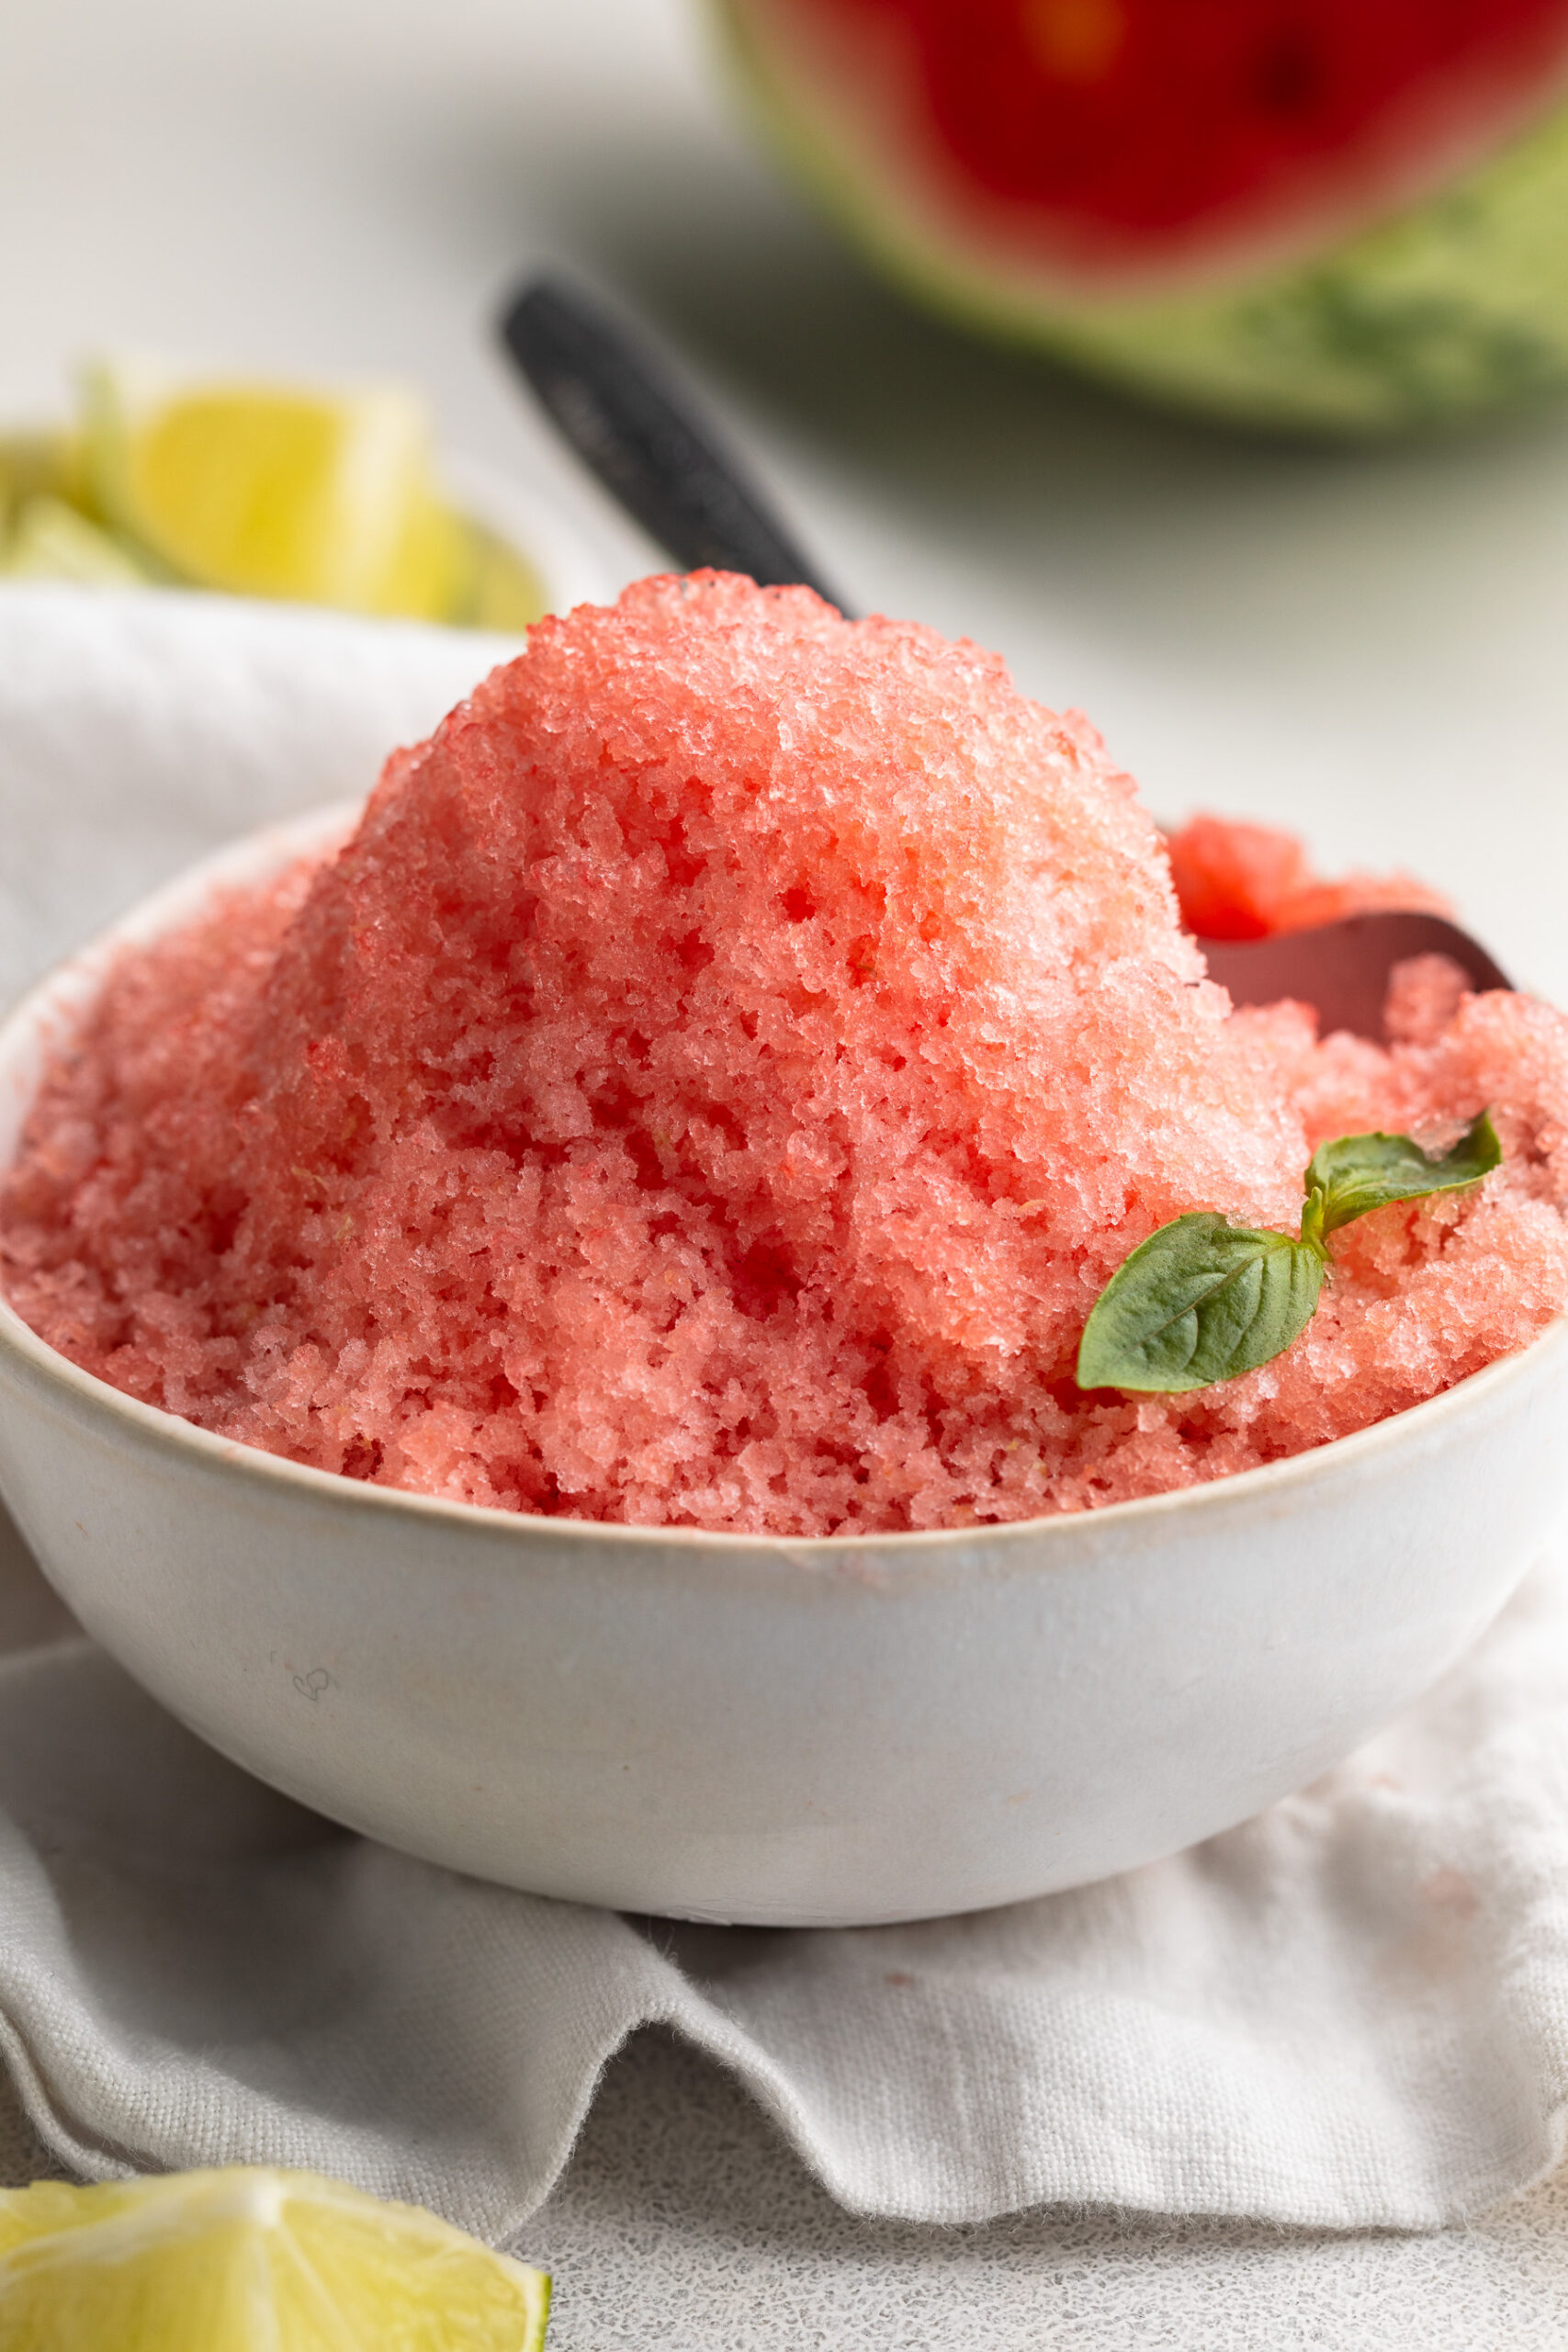
At 9 months pregnant in the dead of summer, watermelon is one of my biggest cravings! I got creative a few weeks ago with these 3-ingredient watermelon gummies, and can’t wait for the day I can have one of my frozen watermelon margaritas again. But for now, fresh watermelon sounds the best – and fresh watermelon happens to be the only ingredient in this watermelon shaved ice recipe. Just fresh watermelon, cut into spears, frozen solid, then shaved into a bowl. This healthy frozen treat couldn’t possibly get any easier (or more delicious)!

frozen watermelon spears on a baking sheet.

Why You’ll Love This Watermelon Shaved Ice

  • Only 2 ingredients – You don’t need any added sugar, syrups, or flavorings.
  • Naturally hydrating – Watermelon is over 90% water and rich in antioxidants like lycopene.
  • Perfect for summer – Cold, sweet, and incredibly refreshing.
  • Vegan, gluten-free, and dairy-free – Great for nearly every dietary preference.
  • Fun to make – Grating frozen watermelon turns it into a fluffy, icy treat that’s just as fun to prepare as it is to eat.

Can I Make This With Any Other Fruit?

Yes! This recipe works well with frozen mango, pineapple, or cantaloupe. Just make sure the fruit is firm enough to grate after freezing. Watermelon works especially well because of its high water content and natural sweetness, but feel free to experiment with other frozen fruits for different flavors and colors.

watermelon shaved ice in a small bowl with a spoon.

Recipe Variations and Toppings

  • Tajin or chili lime seasoning – Add a spicy, tangy twist!
  • Coconut milk drizzle – For a creamy, tropical flavor.
  • Fresh mint or basil – Chopped herbs elevate the flavor beautifully.
  • Fruit syrup or honey – Optional if you want it a little sweeter.
  • Top with berries or shredded coconut – Adds texture and color.
watermelon shaved ice in a small bowl with a sprig of fresh mint.
5 from 1 vote

Viral Watermelon Shaved Ice

This viral watermelon shaved ice is the ultimate healthy summer treat made with just frozen watermelon and a splash of fresh lime juice! It’s refreshing, naturally sweet, and perfect for hot days when you want something light and hydrating. This easy 1-ingredient recipe is vegan, gluten-free, dairy-free, and ready in minutes – no ice cream maker needed!
Print Pin Rate
Prep Time: 5 minutes
Total Time: 5 minutes

Equipment

  • 1 cheese grater

Ingredients

  • 1 whole watermelon
  • fresh lime wedges

Instructions

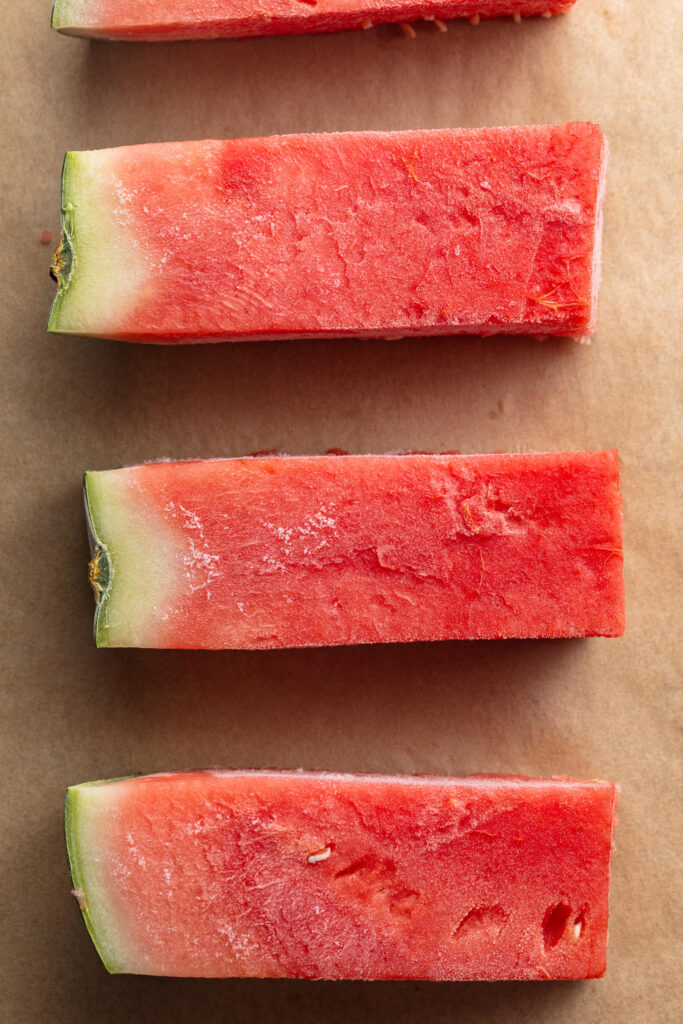
  • Cut the watermelon into spears, then freeze the spears for at least 2 hours.
  • Once the watermelon is frozen solid, use a cheese grater to shave the watermelon into a bowl. Top the shaved watermelon with fresh lime juice.

Hey there, lunch lovers! Are you tired of sad desk lunches or last-minute takeout decisions? We’ve got the solution – a scrumptious, healthy Meal Prep Chicken Salad Lunch Box that’ll have your coworkers drooling and your taste buds doing the happy dance. So, dust off those meal prep containers and let’s dive into lunchtime bliss!

meal prep chicken salad lunch boxes with crackers on the side.

For more meal prep recipes, purchase my ULTIMATE Meal Prep E-Book for just $5 HERE!

What You’ll Need to Make Chicken Salad

Chicken Breast: The star of the show! Opt for boneless, skinless chicken breasts for a lean and protein-packed salad.

Mayonnaise: Go light or use a healthier mayo option if you’re watching your calories. It’s the creamy base that ties everything together. I used Sir Kensington’s Avocado Oil Mayonnaise in my chicken salad.

Pecans or Walnuts: These crunchy nuts add a delightful texture and a hint of nutty flavor to your chicken salad. Choose your favorite!

Fresh Tarragon: Don’t skip this herbaceous gem! Fresh tarragon elevates the flavors to a whole new level.

Lemon Juice: A squeeze of fresh lemon juice provides that zesty kick that makes your taste buds sing.

chicken salad being scooped up with a cracker.

Click HERE for a link to the meal prep lunch boxes I use in this recipe!

Tips and Tricks

  • The Perfect Chicken: Start with perfectly cooked chicken. You can poach it, grill it, or even use rotisserie chicken if you’re short on time. The key is to make sure it’s cooked through but still juicy. Overcooked chicken makes for a dry salad, and we don’t want that!
  • Balance is Key: Play around with the mayo-to-chicken ratio to suit your taste. Some like it creamy, while others prefer a lighter touch. You’re the boss of your lunchbox, so adjust to your heart’s content.
  • Prep for Success: This chicken salad is an MVP in meal prep. Make a big batch on Sunday and portion it into containers for the week. It stays fresh in the fridge, making lunchtime a breeze. Just be sure to keep the nuts separate until you’re ready to dive in to maintain that satisfying crunch.
5 from 1 vote

Meal Prep Chicken Salad Lunch Boxes

Hey there, lunch lovers! Are you tired of sad desk lunches or last-minute takeout decisions? We’ve got the solution – a scrumptious, healthy Meal Prep Chicken Salad Lunch Box that’ll have your coworkers drooling and your taste buds doing the happy dance. So, dust off those meal prep containers and let’s dive into lunchtime bliss!
Print Pin Rate
Prep Time: 15 minutes
Cook Time: 10 minutes
Total Time: 25 minutes
Servings: 4 servings

Ingredients

For the chicken salad:

  • 1 1/2 pounds boneless and skinless chicken breast
  • 1 cup mayonnaise
  • 1 tablespoon Dijon mustard
  • 2 celery stalks, diced
  • 1/2 cup pecans or walnuts, chopped
  • 1/4 cup red onion, finely chopped
  • 2 tablespoons fresh parsley, chopped
  • 1 tablespoon fresh tarragon, chopped
  • 1 lemon, juiced
  • 1 teaspoon salt
  • 1/2 teaspoon black pepper

For the lunch boxes:

  • crackers, I used gluten-free crackers
  • cucumbers or carrots, sliced
  • fruit, such as grapes or berries
  • nuts, such as almonds

Instructions

  • Place chicken breasts in a wide pot or deep skillet, then pour in enough water until chicken is completely submerged in water.
  • Bring pot to a boil, then reduce to a simmer and cover with a lid. Cook for 10-12 minutes, or until chicken is cooked through.
  • Remove chicken from the water, then place on a cutting board and either chop the chicken into cubes or shred the chicken with two forks.
  • Place chopped or shredded chicken into a large bowl and let cool completely.
  • Once cool, add in all remaining chicken salad ingredients. Mix everything together until well combined.

For the lunch boxes:

  • Add the chicken salad to the lunch boxes along with the veggies, fruit, and nuts. Then, store the crackers separately.
  • Store the chicken salad lunch boxes in the fridge for up to 4 days, and store the crackers separately at room temperature.

Notes

  • Nutrition

    Calories: 300kcal

    Say goodbye to boring lunches and hello to lunchtime bliss with our Meal Prep Chicken Salad Lunch Boxes! It’s the perfect blend of protein, flavor, and convenience. Plus, with our handy tips and tricks, you’ll be the lunchtime hero of your office.

    So, go ahead, whip up a batch, and let your taste buds savor the deliciousness. Your coworkers will be envious, and your taste buds will be thanking you. Happy meal prepping!

    Interest In More Meal Prep Recipes? Check These Out!

    A healthy fruit crisp loaded with fresh summer fruits! The perfect warm-weather dessert, best served with a scoop of vanilla ice cream. Super easy to make with just one bowl, in 30 minutes.

    Close-up overhead image of summer fruit crisp in a baking dish with vanilla ice cream on top.

    What You’ll Need to Make Summer Fruit Crisp

    Summer Fruit – I used fresh blueberries, strawberries, and peaches in my summer fruit crisp, but any fruit will work! Feel free to use whatever you have on-hand, or whatever’s on sale at the grocery store that week. The only thing to note is, whichever fruit you use, make sure it totals to about 5-6 cups for this recipe.

    Maple Syrup – This healthy dessert recipe is sweetened with maple syrup! It’s refined sugar-free and honestly so healthy you could get away with eating it for breakfast.

    Rolled Oats – Any type of rolled oats will do – old-fashioned, quick cook, etc. The only type of oats you’ll want to avoid for your fruit crisp topping are whole oats, steel-cut, or Irish oats.

    Almond Flour – The almond flour keeps this recipe gluten-free! However, if you don’t have almond flour, or want to make this nut-free, you can replace the almond flour with all purpose flour.

    Butter or Coconut Oil – Use whichever you prefer in your crisp! I typically just use whichever I have on-hand. Coconut oil is obviously the healthier option, but butter adds a bit more flavor, which I love.

    Overhead image of summer fruit crisp in a baking dish with vanilla ice cream on top.

    Tips and Tricks

    • Keep this recipe simple! You’ll only need one bowl, which is used to first mix together the filling, then the crisp. There’s no need to dirty any extra dishes for this healthy dessert recipe.
    • This summer fruit crisp is best served warm with a scoop of cold vanilla ice cream on top. Though feel free to serve it however you’d like. On its own is delicious, or with a dollop of fresh whipped cream – yum!
    • Store leftover fruit crisp in an airtight container in the fridge for up to 4 days. If enjoying leftovers, I recommend reheating in the microwave for just about 30 seconds before eating.

    Adjust This Recipe to Your Dietary Needs

    Make it Dairy-Free: Use either non-dairy butter, or take the coconut oil option in the crisp.

    Make it Nut-Free: For a nut-free dessert, replace the almond flour with 1/2 cup of all purpose flour.

    Overhead image of summer fruit crisp in a baking dish with vanilla ice cream on top.
    5 from 1 vote

    Healthy Summer Fruit Crisp

    A healthy fruit crisp loaded with fresh summer fruits! The perfect warm-weather dessert, best served with a scoop of vanilla ice cream. Super easy to make with just one bowl, in 30 minutes.
    Print Pin Rate
    Prep Time: 10 minutes
    Cook Time: 20 minutes
    Total Time: 30 minutes
    Servings: 8 servings

    Ingredients

    For the filling:

    • 2 cups blueberries
    • 2 cups sliced strawberries, or raspberries
    • 2-3 peaches, pitted and sliced
    • 2 tablespoons maple syrup
    • 1 tablespoon lemon juice
    • 1 teaspoon vanilla extract

    For the crisp:

    • 1 1/2 cups rolled oats
    • 1/2 cup almond flour
    • pinch of salt
    • 1/4 cup butter or coconut oil, solid
    • 1/4 cup maple syrup

    Instructions

    • Preheat oven to 350° Fahrenheit.
    • Mix together all filling ingredients in a large bowl, then transfer to a 9-inch baking dish.
    • Mix together all crisp ingredients in a large bowl (you can use the same bowl you used to make the filling), then evenly sprinkle crisp over top of the filling.
    • Bake for 20-25 minutes or until fruit is soft, then let cool slightly before serving.

    Nutrition

    Calories: 300kcal

    The easiest holiday treat of all time – Grinch fruit kabobs! Slide fruit onto skewers and you’ve got yourself a festive snack or dessert. Get the kids involved in this fun Christmas activity!

    grinch fruit kabobs on a plate with green grapes, strawberries, mini marshmallows, and skewers on the side.

    What You’ll Need to Make Grinch Fruit Kabobs

    Green Grapes – Green, not red grapes for this Grinch-themed treat!

    Banana – Slice your banana into 1/2-inch pieces before sliding onto your skewers.

    Strawberries – Hull your strawberries before using in this recipe! That basically just means remove the green leaves on top.

    Mini Marshmallows – The perfect little Santa hat topping!

    hand holding a grinch fruit kabob

    How to Store Them

    • Store these Grinch fruit kabobs in an airtight container in the fridge for one day. They may last longer than a day, but the banana will begin to oxidize and turn brown – not ideal! For best results, I recommend making them right before serving.
    close-up image of grinch fruit kabobs on a plate

    These Grinch Fruit Kabobs Are…

    Grinch Fruit Kabobs

    5 from 1 vote
    Recipe by Samantha Course: Snacks, DessertDifficulty: Easy
    Servings

    12

    servings
    Prep time

    5

    minutes
    Cooking time

    0

    minutes
    Total time

    5

    minutes

    The easiest holiday treat of all time – Grinch fruit kabobs! Slide fruit onto skewers and you’ve got yourself a festive snack or dessert. Get the kids involved in this fun holiday activity!

    Ingredients

    • Green grapes

    • Banana, sliced

    • Fresh strawberries, hulled

    • Mini marshmallows

    • Mini skewers or toothpicks

    Directions

    • Slide a grape onto a skewer, about 2-inches down from the top of the skewer.
    • Then, slide a banana slice on top of the grape, followed by a strawberry, followed by a mini marshmallow.
    • Continue this process with remaining ingredients.

    Recipe Video

    Did you make this recipe?

    Share it and tag @samdoesherbest on Instagram!

    Like this recipe?

    Follow us @samdoesherbest on Pinterest

    A delicious peach crisp loaded with fresh fruit, and an easy crump topping. Loaded with simple, good-for-you ingredients, a dessert so healthy you could even eat it for breakfast! Perfectly sweet, best served warm with a scoop of cold vanilla ice cream – YUM.

    peach crisp in a pie dish with vanilla ice cream on top.

    What You’ll Need To Make Peach Crisp

    Peaches – Use fresh, not frozen peaches for this easy crisp recipe! Slice each peach in half, remove the pit, then slice them into 1/4-inch pieces. Either leave the skin on or peel them before slicing, it’s up to you!

    Corn Starch – Corn starch, arrowroot starch, or tapioca starch will all work in the filling of this recipe. A tablespoon of either thickening agent will help the filling stick together.

    Rolled Oats – Any type of rolled oats will work! The only oats you should avoid are steel-cut and/or Irish oats. Or, for a paleo version of this recipe, replace the oats with extra almond flour and chopped nuts!

    peach crisp in a bowl with vanilla ice cream on top.

    Tips and Tricks

    • Let the peach crisp cool for 5-10 minutes before serving! This’ll give the filling enough time to set, and prevent those peach juice from running out when served. Also, don’t forget to serve it with a big ole’ scoop of cold vanilla ice cream – it’s simply the BEST!

    Adjust This Recipe To Your Dietary Needs

    Make it Paleo: For a paleo fruit crisp, use arrowroot starch instead of corn starch in the filling, and replace the rolled oats with an extra 1/4 cup almond flour plus 1/4 cup chopped walnuts or pecans.

    Make it Gluten-Free: This recipe is already gluten-free! However, to ensure no traces of gluten in your peach crisp, be sure to use a gluten-free certified corn starch as well as gluten-free certified rolled oats.

    Easy Peach Crisp (One-Bowl!)

    5 from 1 vote
    Recipe by Samantha Course: DessertDifficulty: Easy
    Servings

    8

    servings
    Prep time

    5

    minutes
    Cooking time

    30

    minutes
    Total time

    35

    minutes

    A delicious fruit crisp loaded with fresh peaches, and an easy crump topping. Loaded with simple, good-for-you ingredients, a dessert so healthy you could even eat it for breakfast! Perfectly sweet, best served warm with a scoop of cold vanilla ice cream – YUM.

    Ingredients

    • For the filling:
    • 4-5 peaches, pitted, pitted, cut into 1/4-inch slices

    • 1 tablespoon corn starch

    • 1 tablespoon maple syrup

    • 1 tablespoon lemon juice

    • 1 teaspoon vanilla extract

    • small pinch cinnamon

    • For the crumb topping:
    • 1/2 cup rolled oats

    • 1/2 cup almond flour

    • 1/2 cup chopped walnuts or pecans

    • pinch of salt

    • 1/4 cup coconut oil, solid

    • 1/4 cup maple syrup

    Directions

    • Preheat oven to 350° Fahrenheit.
    • Add all filling ingredients to a bowl and toss to coat peaches, then transfer to an 8×8-inch baking dish.
    • Add all crisp ingredient to a bowl and mix together until combined.
    • Sprinkle topping over filling and bake for 30-35 minutes, or until golden brown and bubbly.

    Recipe Video

    Did you make this recipe?

    Share it and tag @samdoesherbest on Instagram!

    Like this recipe?

    Follow us @samdoesherbest on Pinterest