Tag

garlic

Browsing

This mouthwatering Vegan Eggplant Parmesan recipe is made with delicious vegan mozzarella, breadcrumbs and marinara sauce baked to bubbly perfection. Whip this super easy meal together for friends, family, or when you’re craving something comforting!

holding a baking dish with vegan eggplant parmesan inside

Mmm, who doesn’t love a good eggplant parm?! When you’re craving something plant-based and super hearty, this is the perfect meal to cook. This recipe also freezes easily, making it the perfect make-ahead dish. 

What You’ll Need To Make Vegan Eggplant Parmesan

Panko Breadcrumbs – For a gluten-free option, Panko Breadcrumbs are my go-to. Panko crumbs are larger, crispier and lighter, so they coat without “packing” like regular bread crumbs, allowing foods to stay crispier longer. 

Cashews– Made from cashews, my recipe for the vegan-based mozzarella cheese is perfect wherever you would normally use mozzarella. This mozzarella spreads, melts, and has a mild flavor that makes it versatile and omnivore-approved.

Nutritional Yeast– Nutritional yeast has a natural sharp and cheesy flavor, so it’s an ideal substitute for vegan cheese or a perfect addition to any dish to make it a little more decadent.

Adjust This Recipe To Your Diet

Make it Paleo: Substitute the Panko breadcrumbs for 1 cup coconut flour.

Add Cheese: If not vegan or dairy-free, then use regular mozzarella and parmesan cheese in place of the vegan options.

Tips For Making Vegan Eggplant Parmesan

  • Soak the Cashews: Before making the vegan mozzarella, soak the cashews to get them nice and soft. This will ensure the mozzarella blends up super smooth and creamy!

  • Make it in Advance: If you don’t plan on eating this vegan eggplant parmesan recipe right away, no worries! It can be stored in the freezer before baking. Just make sure you put it in the fridge the night before to let it thaw out.

  • Shelf Life / Storage: Tightly seal any leftovers in the original baking dish, or transfer them to an airtight container. Store them in the fridge for up to 3 days, or in the freezer for up to 3 months.

Vegan Eggplant Parmesan Recipe

0 from 0 votes
Recipe by Samantha Course: MainDifficulty: Easy

This mouthwatering Vegan Eggplant Parmesan is made with delicious vegan mozzarella, breadcrumbs and marinara sauce baked to bubbly perfection. Whip this super easy meal together for friends, family, or when you’re craving something comforting!

Ingredients For eggplant

  • 1 large eggplant, cut into ½-inch thick slices

  • 1 teaspoon salt

  • 1/2 cup non-dairy milk

  • 1/2 cup cassava flour

  • 2 cups Panko breadcrumbs (I used gluten-free)

  • ¼ cup nutritional yeast

  • 1 tablespoon Italian seasoning

  • INGREDIENTS FOR MOZZARELLA
  • ½ cup raw cashews, soaked in boiling water for 15 minutes

  • ½ cup almond milk

  • 3/4 cup water

  • 1 tablespoon lemon juice

  • 1 tablespoon apple cider vinegar

  • ½ teaspoon garlic powder

  • ½ teaspoon salt

  • 4 tablespoons tapioca starch

  • FOR THE DISH
  • 1 (24-ounce) jar marinara sauce

  • ¼ cup vegan parmesan (optional)

Directions

  • Preheat oven to 375° Fahrenheit and line a baking sheet with parchment paper.
  • Lay eggplant slices out on a dish towel and sprinkle with salt, let sit for 10 minutes then pat dry with a paper towel.
  • Mix together non-dairy milk and cassava flour in a bowl, then mix together breadcrumbs, nutritional yeast, and Italian seasoning in a separate bowl.
  • Dunk each eggplant slice into the milk and flour mixture, then coat in the breadcrumb mixture.
  • Transfer coated eggplant to baking sheet and bake for 20 minutes or until golden brown.
  • While eggplant bakes, add all vegan mozzarella ingredients to a blender and blend until smooth.
  • Transfer mozzarella mixture to a small saucepan over medium heat and cook for 5-10 minutes, stirring constantly. Remove from heat once smooth, thick, and stretchy.
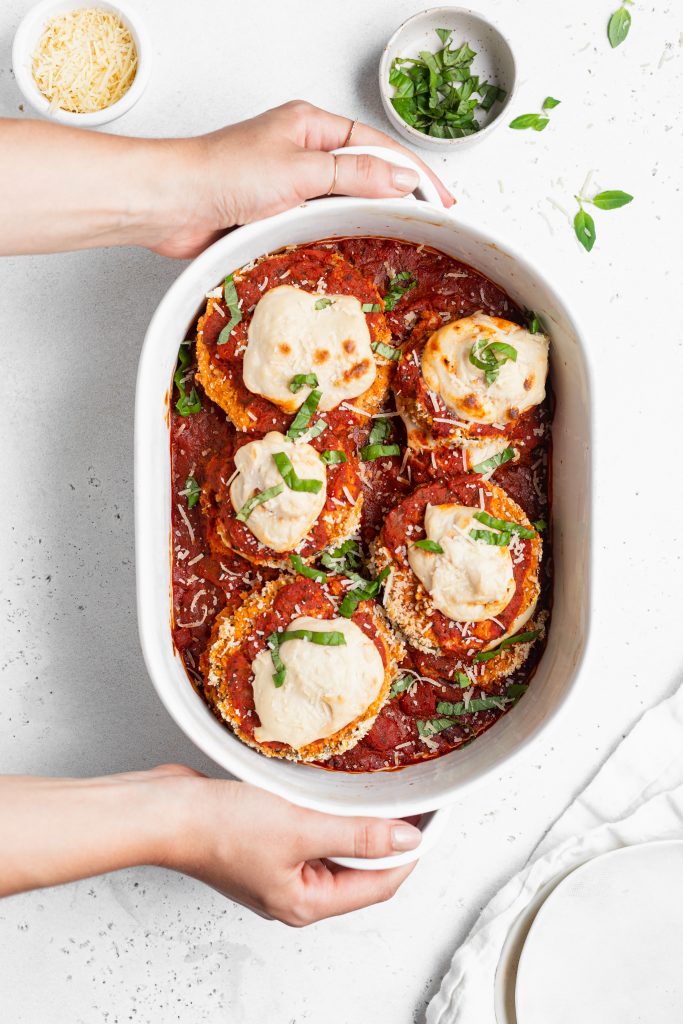
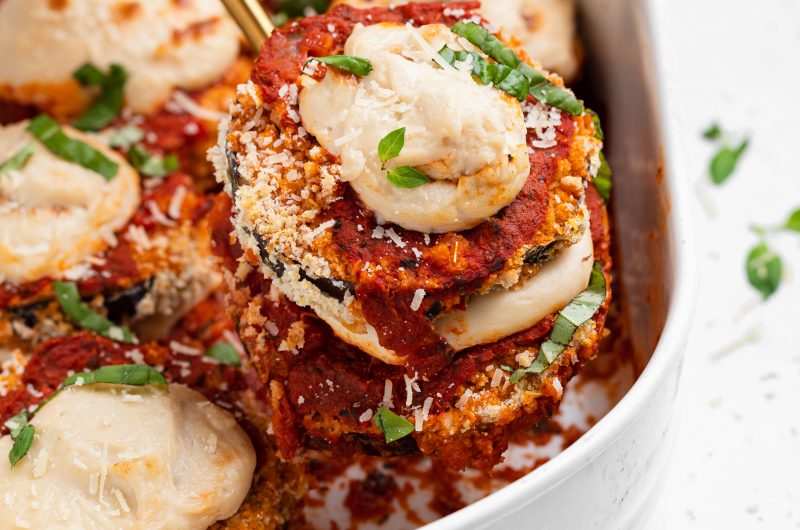
  • Spread 1/3 of the marinara sauce into an even layer at the bottom of a 9×13-inch baking dish. Place an even layer of eggplant on top of marinara, then top eggplant with another 1/3 of marinara.
  • Dollop half of vegan mozzarella over the eggplant and marinara, then repeat those layers – remaining eggplant, marinara, and mozzarella.
  • Sprinkle vegan parmesan over top if using, then cover with foil and bake for 15 minutes. Remove foil and bake for another 5-10 minutes or until lightly brown and bubbly.

Recipe Video

Notes

  • If you don’t have almond milk, any non-dairy milk (like oatmilk) will work just as well!
  • If you don’t have cassava flour, rice flour or all purpose flour will work in its place.

Did you make this recipe?

Share it and tag @samdoesherbest on Instagram!

Like this recipe?

Follow us @samdoesherbest on Pinterest

More Easy Vegan Meals

This blackened chicken is incredibly tender and juicy! With a handful of delicious spices, and just one pan, you’ll have an intensely flavorful protein. Enjoy this blackened chicken over a salad, with your favorite veggies, or whatever your heart desires for a quick and healthy meal!

blackened chicken on a plate with lemon wedges on the side and blackened seasoning on the side

What You Need To Make Blackened Chicken

Smoked Paprika – The main spice in our blackened seasoning is the incredible smoked paprika! Unlike regular paprika, smoked paprika has this irresistible smoky flavor that simply can’t be beat. If you don’t already have this delicious spice in your spice cabinet, then I highly recommend you buy some.

Cayenne Pepper – The amount of cayenne pepper you use in this blackened chicken recipe is entirely up to you and your spice preferences. I personally love a bit of spice, so I use almost 1/4 teaspoon in my seasoning. However, if you’re averse to spice, you can simply leave the cayenne pepper out altogether.

Chicken Breasts – Boneless and skinless chicken breasts are the way to go! Without the skin, the spices can better penetrate into the meat. This makes your chicken that much more delicious. And as far as boneless goes, it’s easier to eat – a no brainer if you ask me!

Adjust This Recipe To Your Diet

  • Make it Less Spicy: If you don’t like spice, simply omit the cayenne pepper in this blackened chicken recipe.
  • Make it Vegan: Turn this into a blackened tofu recipe by taking a block of tofu, pressing as much water out of it as possible, then slicing it down the center to create two tofu “steaks.” Then, season the tofu exactly how you would the chicken and cook for 3-5 minutes per side!

Tips For Making Blackened Chicken

  • Cook over medium-high heat, nothing lower! The key to blackened chicken is placing the seasoned breasts into a very hot pan. Then, do not touch the chicken until it’s ready to be flipped. This way, the crust will cook up super crispy and delicious!
  • Don’t forget to let your chicken rest after cooking. Once out of the pan, your chicken is holding on to a ton of its flavorful juices. Therefore, if you slice into it too soon, you risk having all that flavor pour out. So do yourself a favor and leave the chicken alone for at least 5 minutes!
  • Serve this chicken however you’d like! I enjoyed mine over a salad loaded with my favorite fresh vegetables. However, for a heartier meal, I recommend pairing this blackened chicken with a side of rice and/or roasted potatoes – yum!

Blackened Chicken (Gluten-Free, Dairy-Free)

0 from 0 votes
Recipe by Samantha Russo Course: MainDifficulty: Easy
Servings

2

servings
Prep time

5

minutes
Cooking time

10

minutes
Total time

15

minutes

This blackened chicken is incredibly tender and juicy! With a handful of delicious spices, and just one skillet, you’ll have an intensely flavorful protein. Enjoy this blackened chicken over a salad, with your favorite veggies, or whatever your heart desires for a quick and healthy meal!

Ingredients

  • 3 teaspoons smoked paprika

  • 1/2 teaspoon onion powder

  • 1 teaspoon salt

  • 1/2 teaspoon garlic powder

  • 1/2 teaspoon dried thyme

  • 1/2 teaspoon dried oregano

  • 1/4 teaspoon black pepper

  • pinch of cayenne pepper, optional

  • 2 boneless skinless chicken breasts

  • spray cooking oil

  • 2 tablespoons avocado oil

Directions

  • Mix together the smoked paprika, onion powder, salt, garlic powder, dried thyme, dried oregano, black pepper, and cayenne pepper in a small bowl.
  • Coat both chicken breasts with either spray cooking oil or a drizzle of avocado oil, then sprinkle evenly with blackened seasoning.
  • Heat avocado oil in a large skillet over medium-high heat, then transfer chicken to skillet and cook for 5 minutes per side, or until cooked through. Remove chicken from heat, transfer to a plate, and cover with foil then let rest for 5-10 minutes before serving.

Recipe Video

Notes

  • This blackened chicken recipe can be easily doubles or even tripled! Making it the perfect and healthy meal to throw together for friends or family.

Did you make this recipe?

Share it and tag @samdoesherbest on Instagram!

Like this recipe?

Follow us @samdoesherbest on Pinterest

Other One-Pan Recipes You’ll Love

These chicken taquitos are a healthier take on a comforting classic! They’re irresistibly crispy on the outside and loaded with flavorful shredded chicken on the inside. Throw these super easy chicken taquitos together with just three simple ingredients!

chicken taquitos on a plate with two glasses of beer and cilantro on the side

What You Need To Make Chicken Taquitos

Chicken Breast – I ran an instagram poll to see if you guys wanted to see chicken or beef taquitos, and chicken won by a landslide! But I don’t blame you guys. Chicken is a staple in my kitchen and something I always have at least a couple pounds of in my freezer.

Salsa – This is where the recipe gets super easy. A single jar of salsa packs in all the flavor this dish needs! I used a roasted chipotle salsa for these chicken taquitos. Though I’ve also tried regular salsa and even salsa verde – all tasted delicious!

Tortillas – I used and love Siete Foods Cassava Flour Tortillas for my taquitos. I love the cassava ones since they’re grain-free, making this recipe even healthier. They’re an amazing options for all my gluten-free friends out there too! However, any taco-sized tortilla will work here.

Adjust This Recipe To Your Diet

Make it Paleo: Use paleo salsa and grain-free tortillas to make these paleo chicken taquitos.

Gluten-Free Tortilla Options: Like I said above, I used Site Foods Grain-Free Tortillas in this recipe, though corn tortillas are a great gluten-free option as well.

Tips For Making Chicken Taquitos

  • Don’t forget to quickly heat your tortillas in a pan before rolling! Warming them up will make them more pliable, and less likely to break when rolled.
  • Avoid overfilling the tortillas with the shredded chicken. I found about 1/4 cup of chicken to be the perfect amount to fit inside each tortilla. Any more chicken and you run the risk of it either breaking through your tortilla or leaking out the sides!
  • Store leftover chicken taquitos in an airtight container in the fridge for up to 4 days. To reheat, place on a baking sheet in the oven at 400° Fahrenheit. Bake for 3-5 minutes or until heated throughout.

Three-Ingredient Chicken Taquitos (Gluten-Free, Dairy-Free)

0 from 0 votes
Recipe by Samantha Russo Course: MainCuisine: MexicanDifficulty: Easy
Servings

4

servings
Prep time

10

minutes
Cooking time

20

minutes
Total time

30

minutes

These chicken taquitos are a healthier take on a comforting classic! They’re irresistibly crispy on the outside and loaded with flavorful shredded chicken on the inside. Throw these super easy chicken taquitos together with just three simple ingredients!

Ingredients

  • 1 1/2 pounds boneless skinless chicken breast

  • 1 (16-ounce) jar salsa, see Notes

  • 6 tortillas

  • avocado crema, for serving

Directions

  • Place chicken and salsa in a large pot over medium-high heat, bring to a boil.
  • Once boiling, reduce to a simmer, and cook covered for 10-15 minutes or until chicken is cooked through.
  • Remove chicken from pot and shred with two forks then place back into pot and simmer for 1-2 minutes.
  • Place a large pan over medium heat and one by one, quickly warm up the tortillas for 30 seconds per side of until soft and pliable.
  • Place about 1/4 cup of shredded chicken into each tortilla and roll them up to form taquitos. Once all taquitos are prepped, place a couple tablespoons of oil in your pan.
  • Carefully place each taquito in the pan with the seam-side facing down, and lightly fry for 2-3 minutes per side or until golden brown.

Recipe Video

Notes

  • Salsa: Use your favorite salsa in this recipe, I’ve used a whole variety of salsas and they all turned out delicious!

Did you make this recipe?

Share it and tag @samdoesherbest on Instagram!

Like this recipe?

Follow us @samdoesherbest on Pinterest

Other Gluten-Free and Dairy-Free Mexican-Inspired Recipes

Fish tacos are a favorite around here, and making them in the air fryer is SUPER easy! Light, flaky fish is smothered in a smoky spice rub and rests atop a bed of homemade mango jalapeño salsa. Throw these tacos together in under 20 minutes and enjoy with friends, family, and loved ones!

air fryer fish tacos on a plate with beer on the side

What You Need To Make Air Fryer Fish Tacos

Firm White Fish – Cod, mahi mahi, and halibut are a few examples or firm white fish that would taste great in this recipe. I used wild caught cod fillets in my air fryer fish tacos and they cooked up perfectly flaky and delicious!

Smoked Paprika – Different from regular paprika, smoked paprika contributes this essence of smokiness to recipes that simply can’t be beat. If you don’t have smoked paprika at home, I highly recommend you go pick some up. It’s a great spice to use in all sorts of recipes and tastes especially delicious on fish, chicken, beef, and pork.

Tortillas – I use and love the Siete Almond Flour tortillas for all of my tacos! They’re a delicious grain-free tortilla that are pliable and hardly ever bottom out. However, you can use any kind of tortillas you’d like in this recipe. For a cheaper gluten-free alternative, I recommend corn tortillas. And if you’re not gluten-free, go ahead and use flour tortillas instead!

Adjust This Recipe To Your Diet

Make Them Air Fryer Chicken Tacos: Easily swap out the fish for a half a pound of boneless skinless chicken breast, then season and cook the chicken exactly how you would the fish in this recipe!

Make it Paleo: To make this dish paleo, use either Siete Grain-Free Tortillas or lettuce wraps in place of the tortillas.

Tips For Making Air Fryer Fish Tacos

  • Don’t forget to lightly coat your air fryer basket with a little bit of oil before placing the fish filets inside. Due to it’s light and flakiness, fish is at risk of sticking to the inside of the basket once cooked. Therefore, to avoid the hassle, quickly either sprits the inside of the basket with spray cooking oil or drizzle it with a little avocado oil before cooking!
  • Serve these air fryer fish tacos however you’d like. I love topping mine with sliced avocado and a little bit of chipotle mayo – YUM!
  • Store any leftovers in separate airtight containers in the fridge for up to 3 days. Avoid storing pre-assembled tacos in the fridge, since any moisture on the tortillas will sauce them to get soggy and break apart.

Air Fryer Fish Tacos

0 from 0 votes
Recipe by Samantha Russo Course: MainCuisine: MexicanDifficulty: Easy
Servings

2

servings
Prep time

10

minutes
Cooking time

10

minutes
Total time

20

minutes

Fish tacos are a favorite around here, and making them in the air fryer is SUPER easy! Light, flaky fish is smothered in a smoky spice rub and rests atop a bed of homemade mango jalapeño salsa. Throw these air fryer fish tacos together in under 20 minutes and enjoy with friends, family, and loved ones!

Ingredients

  • For the fish:
  • 1/2 pound firm white fish, see Notes

  • 1/2 teaspoon chili powder

  • 1/2 teaspoon smoked paprika

  • 1/2 teaspoon garlic powder

  • 1/4 teaspoon salt

  • For the salsa:
  • 2 tablespoons lime juice

  • 1 cup fresh mango, diced

  • 1/2 jalapeno, finely chopped

  • 1/4 cup fresh cilantro, chopped

  • 1/2 teaspoon salt

  • For serving:
  • 6 tortillas, see Notes

Directions

  • Mix together the chili powder, smoked paprika, garlic powder, and salt in a small bowl then evenly sprinkle over the fish.
  • Lightly coat the inside of air fryer basket with oil, then transfer fish to basket and cook at 400° Fahrenheit for 10 minutes.
  • While fish cooks, add all salsa ingredients to a bowl and toss to combine.
  • Warm tortillas then place a bed of homemade salsa and a few pieces of flaked fish into each taco.

Recipe Video

Notes

  • Firm White Fish: I used cod, though mahi mahi and halibut would work great as well!
  • Tortillas: I use and LOVE Siete Almond Flour Tortillas, though any tortillas will work in this recipe.

Did you make this recipe?

Share it and tag @samdoesherbest on Instagram!

Like this recipe?

Follow us @samdoesherbest on Pinterest

Other Fun and Flavorful Recipes

This pork stir fry requires just one pan and 20 minutes to make! It’s loaded with crisp, fresh vegetables and finished off with a savory sauce.

pork stir fry in a pan with tongs and lime wedges on the side

I don’t know about you, but I could always use more one-pan, 20 minute meals in my life! This is literally one of my favorite recipes to throw together after a long day when I don’t feel like cooking but also don’t feel like ordering/waiting for takeout.

What You Need To Make Pork Stir Fry

Boneless Pork Chops – The key here is slicing the pork chops against the grain. By slicing against the grain, we cut through the meat fibers making the pork much more tender and easier to chew. However, feel free to slice the pork into whatever sizes you’d like. I prefer about 1/4-inch slices of pork in my stir fry, but even smaller/thinner slices would taste great too! Just remember – the smaller the pieces, the faster they’ll cook. So keep an eye on the meat and remove it from the pan as soon as it’s cooked through.

Rice Noodles – There are an extensive variety of rice noodles out there and almost all will work in this easy recipe. I used pad thai rice noodles since they were the easiest to find and I enjoy their heartier texture. Though I’ve also made this stir fry with vermicelli rice noodles and with buckwheat noodles and both versions were delicious!

Fresh Ginger – Just one teaspoon of fresh grated ginger goes a long way in the sauce for this pork stir fry. I know fresh ginger isn’t a staple in most peoples homes, but I promise it will take all your stir fry/Asian sauces to the next level! The next time you’re at the store, pick up a knob of fresh ginger in the produce section. Once home, store it in the freezer to make it last longer. Fresh ginger is also a great and tasty addition to most teas, broths, and the occasional dessert!

Adjust This Recipe To Your Diet

Make it a Chicken Stir Fry: Simply substitute one pound of boneless skinless chicken breasts for the pork in this recipe.

Make it Paleo: To make this a paleo pork stir fry, replace the rice noodles with zucchini noodles, sugar with coconut sugar, and the corn starch with arrowroot starch!

Make it Vegan/Vegetarian: You can easily remove the meat from this recipe and either increase the amount of mushrooms or fry up some tofu to up the protein of this stir fry. Also, use vegetable broth instead of chicken broth for the sauce.

Tips For Making Pork Stir Fry

  • Keep the skillet at medium-high heat when cooking the veggies. The goal here is to very quickly sauté the vegetables and doing so at higher heat will help them maintain their delightful crunch!
  • Stir together the sauce for this pork stir fry in a bowl until all of the corn starch has dissolved. If any corn starch clumps are left behind, you risk having a lumpy sauce!
  • Get creative and make this recipe your own! I love throwing in whatever veggies I have in my fridge that are on the verge of going bad. This easy pork stir fry is the best way to use up leftover and/or your favorite produce!

Pork Stir Fry (Gluten-Free)

5 from 1 vote
Recipe by Samantha Russo Course: MainCuisine: AsianDifficulty: Easy
Servings

4

servings
Prep time

5

minutes
Cooking time

15

minutes
Total time

20

minutes

This pork stir fry requires just one pan and 20 minutes to make! It’s loaded with crisp, fresh vegetables and finished off with a savory sauce.

Ingredients

  • For the stir fry:
  • 1 tablespoon avocado or vegetable oil

  • 1 pound boneless pork chops, sliced into 1/4-inch thick strips against the grain

  • 1/2 cup shredded carrots

  • 1 cup snow peas

  • 3 green onions, chopped

  • 1 1/2 cups mushrooms, sliced

  • 8 ounces rice noodles, cooked according to package instructions

  • For the sauce:
  • 1 cup chicken broth

  • 1/4 cup soy sauce

  • 2 tablespoons rice vinegar

  • 2 tablespoons corn starch

  • 1 tablespoon sesame oil

  • 1 tablespoon sugar, see Notes

  • 1 teaspoon grated ginger

Directions

  • Heat oil in a large skillet over medium-high heat, then add in the pork chops and a pinch of salt. Cook for 3 minutes or until cooked through, then remove from skillet and set aside.
  • Add in the carrots, snow peas, red bell pepper, green onions, and mushrooms – quickly sauté for 1-2 minutes.
  • Mix all sauce ingredients together in a bowl then add into the skillet along with the cooked pork.
  • Reduce heat to low and simmer until sauce has thickened, then add in the cooked noodles and toss to coat in the sauce.

Recipe Video

Notes

  • Sugar: You can use white sugar, coconut sugar, honey, or maple syrup!

Did you make this recipe?

Share it and tag @samdoesherbest on Instagram!

Like this recipe?

Follow us @samdoesherbest on Pinterest

More Quick and Easy Dinner Recipes