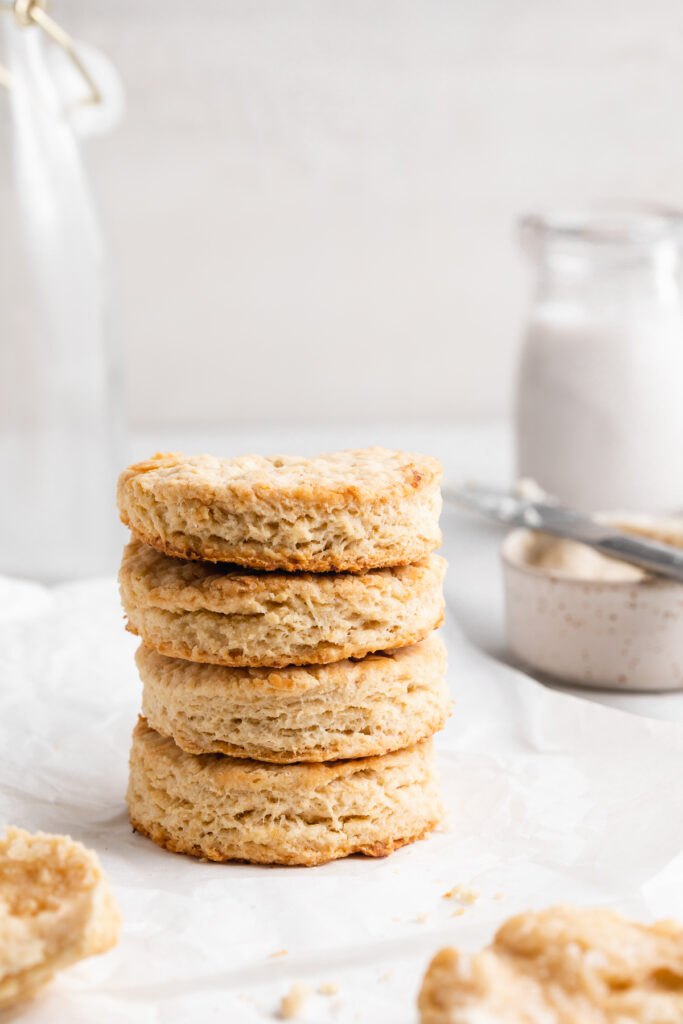
Tag

gluten-free

Browsing

This homemade vegan caramel sauce is perfectly sweet and super easy to make! It comes together in one saucepan, with just 3 ingredients, and in under 5 minutes. This vegan caramel is delicious drizzled over ice cream, apples, cake, or cookies! Try it over my no-churn vegan vanilla ice cream recipe, or even on top of my healthy apple crisp. YUM!

3 ingredient vegan caramel sauce being poured over a green apple.

What You’ll Need

Coconut Cream – Coconut cream is the thick, white cream found at the top of a can of full-fat coconut milk. It’s important to note that coconut cream can only be obtained by a can of full-fat coconut milk, not low-fat or boxed coconut milk. Native Organics also sells a great canned coconut cream, which is what I used in this recipe. Also, remember to only use the coconut cream and not any of the liquid found at the bottom of the can. To do this, open your can of full-fat coconut milk or cream, then scrape and remove the cream from the top. Fill a one-cup measurer with this coconut cream, then save the liquid for use in smoothies later on!

Maple Syrup – This natural sweetener is the only sweetener in this vegan dessert recipe! Our vegan caramel is so much healthier than your standard caramel because it contains only natural ingredients, and has a lot less sugar. However, healthier doesn’t mean any less delicious. Maple syrup gives this sauce an irresistibly rich flavor.

Peanut Butter – Peanut butter is the finishing touch to this recipe, adding the perfect texture and flavor. Though if you’re not a fan of peanut butter, you can use almond butter, cashew butter, pecan butter, or sunflower seed butter in its place!

vegan caramel sauce being whisked in a saucepan

This Vegan Caramel Is….

  • Healthy
  • Plant-Based
  • Gluten-Free
  • Refined Sugar-Free
  • Paleo
  • & Delicious!

Adjust This Recipe to Your Dietary Needs

Make it Nut-Free: Replace the peanut butter in this recipe with 1/4 cup of sunflower seed butter!

Make it Paleo: Use almond butter instead of peanut butter for a delicious paleo caramel recipe.

3 ingredient vegan caramel sauce in a small jar with a spoon
5 from 1 vote

3-Ingredient Vegan Caramel Sauce

This homemade vegan caramel sauce is perfectly sweet and super easy to make! It comes together in one saucepan, with just 3 ingredients, and in under 5 minutes. This vegan caramel is delicious drizzled over ice cream, apples, cake, or cookies!
Print Pin Rate
Prep Time: 2 minutes
Cook Time: 3 minutes
Total Time: 5 minutes
Servings: 8 servings

Ingredients

  • 1 cup coconut cream, see Notes
  • 1/2 cup maple syrup
  • 1/4 cup almond butter or peanut butter

Instructions

  • Add coconut cream and maple syrup to a small saucepan over medium-high heat. Stir constantly until bubbling, then reduce to low heat and continue stirring for 3 minutes.
  • Remove pan from heat and stir in almond or peanut butter. Let cool, it’ll continue to thicken as it cools.

Notes

  • Coconut Cream: Coconut cream is the thick, white creamy part at the top of a can of full-fat coconut milk. You can only obtain coconut cream from either a can of full-fat coconut milk, or a can of coconut cream.
  • In need of a quick and easy dinner recipe, ready in under 30 minutes? Look no further than these Instant Pot Shredded Chicken Tacos! They’re loaded with delicious flavor, and ready to be topped with whatever your heart desires. Salsa, shredded lettuce, cheese, avocado, guacamole – the possibilities are endless!

    two instant pot shredded chicken tacos on a plate with fresh cilantro on the side

    What You’ll Need

    Instant Pot – I was definitely very late to the Instant Pot game. I only just purchased my Instant Pot about 6 months ago, but man do I already LOVE it. I have an 8 quart Instant Pot, and it’s truly the perfect size for either big batch meals or a quick dinner for two. Two pounds of chicken takes only 12 minutes to fully cook in an Instant Pot or pressure cooker. I set my pot to the “Meat” setting to cook, but depending on your pot, your same setting may be labeled as “Poultry” instead. Once the 12 minutes is up, press the steam release button on the lid of your Instant Pot to manually release the pressure before removing the lid. Then, remove the chicken from the pot, shred it, before placing it back into the pot to absorb that delicious sauce!

    Chicken Breasts – Boneless, skinless chicken breasts are ideal for this shredded chicken recipe. They’re perfectly lean, and a blank canvas for the seasonings in this dish.

    Taco Seasoning – One packet of taco seasoning contains all the flavor we need for this recipe! I love the Siete Mild Taco Seasoning, but really any brand will work. I especially enjoy using pre-packaged taco seasoning since it has all the spices we’d want in this taco recipe. This single ingredient makes our entire meal so much quicker and easier to make!

    Top Tips

    • Reserve any leftover sauce in the Instant Pot and spoon it over your tacos! All of the flavor in this dish comes from the sauce our chicken is cooked in. Therefore, use every last bit of it – trust me, it’s delicious!
    • Serve this taco-seasoned Instant Pot shredded chicken over rice or a salad instead. I love turning this flavorful Mexican-inspired chicken into a taco salad or burrito bowl for a new, and exciting meal. This is also a great way to use up any leftover chicken!
    instant pot shredded chicken on a plate with limes and cilantro on the side

    Adjust This Recipe To Your Dietary Needs

    Make it Gluten-Free: Ensure the taco seasoning you’re using is gluten-free, since some contain all purpose flour! Also, serve these Instant Pot shredded chicken tacos over corn tortillas, or Siete Grain-Free Tortillas for a completely gluten-free meal.

    Make it Vegan: For Instant Pot vegan tacos, replace the chicken with one cup of dried lentils! Cook your lentils with the taco seasoning, vegetable broth, and fire roasted tomatoes at high pressure for 15 minutes. The lentils will soak up so much delicious flavor!

    Make it Paleo/Whole30: Use a paleo-compliant taco seasoning such as Siete Taco Seasoning, then serve your shredded chicken over lettuce wraps to turn this into a super healthy, low-carb lunch or dinner.

    No ratings yet

    4-Ingredient Instant Pot Shredded Chicken Tacos

    In need of a quick and easy dinner recipe, ready in under 30 minutes? Look no further than these Instant Pot Shredded Chicken Tacos! They’re loaded with delicious flavor, and ready to be topped with whatever your heart desires. Salsa, shredded lettuce, cheese, avocado, guacamole – the possibilities are endless!
    Print Rate
    Prep Time: 5 minutes
    Cook Time: 12 minutes
    Total Time: 17 minutes
    Servings: 4 servings

    Ingredients

    For the Instant Pot shredded chicken:

    • 2 pounds boneless skinless chicken breasts
    • 1 (1-ounce) packet taco seasoning
    • 1 cup chicken or vegetable broth
    • 1 (15-ounce) can fire roasted diced tomatoes, undrained

    For the tacos:

    • corn or flour tortillas
    • salsa
    • avocado
    • cilantro
    • slice jalapeño
    • limes

    Instructions

    • Place chicken breasts in Instant Pot, then pour in broth. Sprinkle with the taco seasoning, then add in diced tomatoes.
      IP-Shredded-Chicken-Tacos-Step-1
    • Set to Poultry/Meat for 12 minutes, then manually release steam before removing lid.
      IP-Shredded-Chicken-Tacos-Step-2
    • Remove chicken breasts from Instant Pot and shred with two forks. Place shredded chicken back into Instant Pot and stir to mix in with the sauce.
    • Fill tortillas with shredded chicken and any toppings you’d like.

    Nutrition

    Calories: 300kcal

    These almond flour pancakes are extra fluffy, delicious, and super easy to make! One bowl, a handful of ingredients, and 15 minutes is all you need to throw this simple gluten-free breakfast together. These almond flour pancakes are also the perfect blank canvas to any toppings you’d like (I went with blueberries – yum!).

    stacked almond flour pancakes with blueberries, butter, and powdered sugar on top

    What You’ll Need

    Almond Flour – The star of our show – almond flour! It’s naturally gluten-free, grain-free, and paleo friendly. Almond flour is actually the only flour you’ll need for this healthy breakfast recipe. The most common misconception when it comes to almond flour is that it can be used as a 1:1 substitution for regular all purpose flour. However, that’s definitely not the case! Almond flour is much more dense and creates a heavier bake than regular flour. Though in this recipe we lighten the pancakes up with two whole eggs and a touch of milk.

    Eggs – Eggs are crucial to keeping these almond flour pancakes held together! They are our binding agent, and without them the pancakes would simply fall apart. I highly recommend using large or extra large eggs for this recipe, though really any size will work.

    Coconut Oil or Butter – Whether you’re using a non-stick pan or not, a touch or butter or oil is very useful to prevent sticking. For a non-stick pan, you may be able to get away with using less oil or butter than the recipe calls for. But for either a stainless steel or cast-iron pan, you’ll need the full tablespoon. And if you ever begin to notice sticking throughout the cooking process, then go ahead and add a bit more butter or oil to your pan!

    How to Make Almond Flour Pancakes

    Making homemade almond flour pancakes is super easy! Start by adding the almond flour and baking powder to a large bowl. Whisk those dry ingredients together before adding in the eggs, milk, maple syrup, and vanilla extract. Once your pancake batter is completely combined, then you can add in any fillings/toppings you’d like – fresh blueberries and chocolate chips are my personal favorite!

    Now that your batter is all prepped, heat a tablespoon of either butter, coconut oil, or any other neutral-tasting oil in a large skillet over medium heat. Once hot, scoop about 1/4 cup of batter into the skillet. The batter will disperse out and form that signature circular pancake shape.

    Cook each pancake in the skillet for about 3-5 minutes, or until the bottom is nicely golden brown. Then, use a spatula to carefully flip the pancake and cook the other side. Repeat this cooking process with your remaining better then serve your almond flour pancakes! I recommend finishing them off with a dusting of powdered sugar and a drizzle of maple syrup.

    Adjust This Recipe to Your Dietary Needs

    Make it Vegan – Make this a vegan almond flour pancake recipe by substituting the two eggs for one flax egg (1 tablespoon of ground flax meal + 3 tablespoons water) and one mashed banana. The flax egg and banana will work together to bind your pancakes and prevent them from falling apart. Also, use your favorite vegan milk in place of the regular milk this recipe calls for.

    Make it Dairy-Free – To make this a dairy-free breakfast, simply use almond milk or your favorite non-dairy milk in place of the regular milk in this recipe. Also, be sure to use coconut oil for cooking, instead of butter.

    almond flour pancakes with blueberries on a marble board
    No ratings yet

    Perfect Almond Flour Pancakes

    These almond flour pancakes are extra fluffy, delicious, and super easy to make! One bowl, a handful of ingredients, and 15 minutes is all you need to throw this simple gluten-free breakfast together. These almond flour pancakes are also the perfect blank canvas to any toppings you’d like (I went with blueberries – yum!).
    Print Pin Rate
    Prep Time: 5 minutes
    Cook Time: 10 minutes
    Total Time: 15 minutes
    Servings: 2 servings

    Ingredients

    • 1 cup almond flour, see Notes
    • 1 teaspoon baking powder
    • 2 eggs
    • 1/4 cup milk, I used non-dairy milk
    • 1 tablespoon maple syrup
    • 1 teaspoon vanilla extract
    • 1 tablespoon coconut oil or butter

    Instructions

    • Whisk together the almond flour and baking powder in a large bowl.
    • Add in eggs, milk, maple syrup, and vanilla extract, whisk to combine.
    • Melt coconut oil or butter in a large skillet over medium low-medium heat and spoon ¼ cup batter into skillet.
    • Cook pancakes for 2-3 minutes per side or until edges are slightly golden brown. Repeat until no more batter remains.

    Notes

  • Almond Flour: Be sure to use blanched almond flour, not almond meal in this recipe.
  • Nutrition

    Calories: 300kcal

    This kung pao tofu will quickly become one of your favorite dinner recipes! One pan and 15 minutes is all you need for this intensely flavorful meal. This kung pao tofu is also entirely vegan, plant-based, and gluten-free!

    kung pao tofu on a plate over rice, with sesame seeds on top

    What You’ll Need

    Extra Firm Tofu – Extra firm tofu is the key to getting it super crispy! It will hold its shapes once cut and cooked, forming these little golden brown nuggets of perfection. Tofu is also the perfect blank canvas to really any recipe! It has very little flavor on its own, but absorbs all the flavors it’s paired with. The tofu in this recipe soaks up all of our delicious kung pao sauce, making it just incredible!

    Red and Green Bell Peppers – Two bell peppers give this dish incredible color and brightness! Start by removing the core and any seeds from each pepper. Then, chop them into similarly-sized pieces. Stir fry the bell peppers for only a couple of minutes in the fourth step of this recipe. The goal is to get them tender, while still maintaining their bite.

    Unsalted Cashews or Peanuts – You’ll find either cashews or peanuts in most kung pao recipes. They, too, give this overall dish the perfect crunchy texture that pairs beautifully with our smooth and tangy sauce. However, if you don’t like nuts, you can simply leave them out of your kung pao tofu.

    kung pao tofu in a pan

    Top Tips

    • Oil your pan well before frying up the tofu. If not enough oil is used, your tofu might stick to the pan – losing that delicious outer, crisp coating!
    • For an even saucier vegetable stir fry, double the sauce recipe! This kung pao tofu sauce is seriously so good, you’ll practically want to drink it. So don’t skimp on the sauce, and make as much as you’d like!
    • Feel free to turn this into a kung pao chicken recipe instead! To do this, simply replace the tofu with 2-inch cubes of chicken and cook them in the second step until fully cooked through. Then, use your chicken just as you would the tofu in the remainder of the recipe.
    close-up image of kung pao tofu on a plate over rice

    Adjust This Recipe To Your Dietary Needs

    • Make it Gluten-Free: To ensure this recipe is completely gluten-free, use tamari instead of soy sauce. Tamari is the gluten-free equivalent to soy sauce and tastes exactly the same!
    • Make it Nut-Free: For a nut-free version, simple leave out the cashews or peanuts in this recipe. But if you’d still like that nutty flavor, you can add in a couple tablespoons of sesame seeds instead.
    overhead close-up image of kung pao tofu in a pan
    4.84 from 6 votes

    One-Pan Kung Pao Tofu

    This kung pao tofu will quickly become one of your favorite dinner recipes! One pan and 15 minutes is all you need for this intensely flavorful meal. This kung pao tofu is also entirely vegan, plant-based, and gluten-free!
    Print Pin Rate
    Prep Time: 5 minutes
    Cook Time: 10 minutes
    Total Time: 15 minutes
    Servings: 4 servings

    Ingredients

    For the tofu:

    • 14 ounces extra firm tofu, cut into cubes
    • 2 tablespoons cornstarch
    • 2 tablespoons sesame oil or avocado oil

    For the veggies:

    • 3 garlic cloves, minced
    • 2-inch piece ginger, grated
    • 3 scallions, sliced (white and green parts separated)
    • 1 red bell pepper, chopped
    • 1 green bell pepper, chopped
    • 1 cup raw unsalted cashews or peanuts

    For the sauce:

    • 1/4 cup vegetable broth
    • 3 tablespoons soy sauce, use Tamari for gluten-free
    • 1 tablespoon rice vinegar, or white wine vinegar
    • 1 tablespoon brown sugar
    • 2 teaspoons corn starch
    • 1 teaspoon sriracha
    • 1 teaspoon sesame oil

    Instructions

    • Place cubed tofu in a bowl with cornstarch and toss to evenly coat.
      Kung-Pao-Tofu-Step-1
    • Heat sesame oil in a large pan over medium-high heat, then fry tofu in a single layer for 2-3 minutes per side or until golden brown. Remove cooked tofu and set aside.
      Kung-Pao-Tofu-Step-2
    • Add garlic, ginger, and white parts of scallions to pan and cook for 2-3 minutes or until fragrant.
      Kung-Pao-Tofu-Step-3
    • Add in red and green bell peppers, sauté for 2-3 minutes then place tofu back into pan along with green parts of scallions and cashews or peanuts.
      Kung-Pao-Tofu-Step-4
    • Whisk together all sauce ingredients in a bowl, then pour into pan and reduce heat to a simmer. Simmer until sauce has thickened then serve over rice.

    Nutrition

    Calories: 300kcal

    These paleo brownies are total perfection! Extra chocolatey and extremely indulgent, yet are entirely gluten-free, grain-free, dairy-free, and refined sugar-free.

    overhead image of paleo brownies with milk and cocoa powder on the side

    What You’ll Need

    Almond Flour – Be sure to use almond flour, and not almond meal in these paleo brownies! Almond flour is ground much finer than meal, resulting in a lighter and overall better brownie. I’ve tried many different brands of almond flour and truly loved them all. Trader Joe’s makes a great almond flour, as does Costco. Almond flour was once hard to come by, but thankfully, it’s sold in most grocery stores these days!

    Almond Butter – Almond butter makes these brownies exceptionally rich and delicious! Don’t worry though, your brownies won’t at all taste like almonds. Almond butter also gives these brownies structure, in the absence of gluten or grains.

    Coconut Sugar – This unrefined sugar is a paleo-friendly alternative to regular white sugar. Also, unflike white sugar, coconut sugar contains vitamins, minerals, and even fiber. The fiber in particular aids in slowing down the absorption of sugar in our body, placing it lower on the glycemic index. Basically, what this means is you’re less likely to experience that sugar spike and crash with coconut sugar, than with refined white sugar.

    three paleo brownies stacked on top of each other

    Top Tips

    • Let the brownies cool slightly before cutting! Trust me, I understand the temptation of wanting to dive straight into a pan of brownies as soon as they’re out of the oven. But try your best to fight those urges and let the paleo brownies cool for at least 10 minutes before slicing. This’ll help them hold their shape!
    • Bring any chilled ingredients to room temperature before getting started. If the eggs, for example, are too cold, they’ll cause the melted coconut oil to seize up and harden in the batter. Therefore, place all ingredients out on the counter about an hour before diving into this recipe!

    Adjust This Recipe To Your Dietary Needs

    Make it Vegan: Simply swap out the eggs for 2 flax eggs (1 flax egg = 1 tablespoon flaxseed meal + 3 tablespoons water) for vegan paleo brownies!

    Make it Nut-Free: I haven’t tested this version myself yet, but you can try using sunflower seed butter in place of the almond butter and 1/4 cup of coconut flour in place of the almond flour. If you give this nut-free version a try, please let me know how it is!

    close up image of the inside of paleo brownies
    5 from 1 vote

    Perfect Paleo Brownies

    These paleo brownies are total perfection! Extra chocolatey and extremely indulgent, yet are entirely gluten-free, grain-free, dairy-free, and refined sugar-free.
    Print Pin Rate
    Prep Time: 5 minutes
    Cook Time: 20 minutes
    Total Time: 25 minutes
    Servings: 16 servings

    Ingredients

    • 2 eggs, at room temperature
    • 1/2 cup almond butter
    • 1/2 cup coconut sugar
    • 1/4 cup maple syrup
    • 1/4 cup coconut oil, melted
    • 1 teaspoon vanilla extract
    • 1/2 cup almond flour
    • 3/4 cup cocoa powder
    • 1 teaspoon baking soda
    • 1/2 teaspoon salt
    • 1/2 cup chocolate chips, optional

    Instructions

    • Preheat oven to 350° Fahrenheit and line or grease a 9×9-inch baking dish.
    • Add eggs, almond butter, coconut sugar, maple syrup, coconut oil, and vanilla extract to a large bowl and beat together either by hand or with an electric mixer.
    • Add in almond flour, cocoa powder, baking soda, and salt and mix until completely smooth and combined. Fold chocolate chips into brownie batter.
    • Transfer batter to your prepared baking dish and bake for 20-25 minutes. Let cool slightly before slicing and serving.

    Notes

  • Leftover paleo brownies can be stored at room temperature in an airtight container for up to 5 days.
  • Nutrition

    Calories: 300kcal