Tag

gluten-free

Browsing

This cherry cordial is perfectly sweet and slightly sour! Drip this easy and delicious fruit syrup over ice cream or add some to a glass of sparkling water for a refreshing summer treat.

cherry cordial in a glass with sparkling water, ice, and a fresh cherry

Never heard of cherry cordial? Well you’re not alone, because neither had I! I’m a BIG fan of cherry season, and I was set on developing a recipe to honor this special time of year. Though I felt like the cherry cobblers, cherry pies, and cherry crumbles have all been sooOooOoOo overdone. So I did a little research for undiscovered cherry recipes and came across the cherry cordial. Now for those of you who don’t know, cherry cordial is a syrup that is most commonly added to sparkling water and served as a refreshing drink. It’s SUPER easy to make, and one of the only cherry recipes that doesn’t require you to painstakingly remove the stems and pits from each and every cherry.

As I learned more about cherry cordials, I noticed that most are loaded with sugar. And to me, that seemed unnecessary. So I set out to create a recipe that is low in sugar and allows as much of that delicious cherry flavor to shine through as possible! This cherry cordial is perfectly *chef’s kiss* sweet, insanely refreshing, and super easy to make.

What You Need To Make Cherry Cordial

Fresh Cherries – Pick up a big bag of whole sweet cherries the next time you’re at the grocery store! Cherry season spans from May through August, giving you plenty of time to enjoy this delicious fruit. I highly advise against using frozen cherries in this recipe as they release too much water when cooked. If you’d like to enjoy this cherry cordial in the winter time, I recommend making the recipe now and freezing it in an airtight container until you’re ready to use it.

Sugar – Any sugar will work, though I use coconut sugar to make this a tiny bit more nutritious! Coconut sugar is less processed and therefore contains more vitamins and mineral than white sugar. However, white sugar and cane sugar would both taste great in this cherry cordial recipe.

Fresh Ginger – You’ll just have to trust me on this one! Fresh ginger adds a slightly spicy bite that contrasts with the sweet cherries and takes this cordial to the next level. Feel free to add even more fresh ginger if you’d like!

Adjust This Recipe To Your Dietary Needs

  • Make it Paleo: Use coconut sugar to make this a paleo cherry cordial!
  • Lemon Substitution: Feel free to use fresh orange juice and zest in place of the lemon juice and zest in this recipe.

Cherry Cordial

0 from 0 votes
Recipe by Samantha Course: Uncategorized
Servings

4

servings
Prep time

30

minutes
Cooking time

40

minutes
Calories

300

kcal
Total time

1

hour 

10

minutes

This cherry cordial is perfectly sweet and slightly sour! Drip this easy and delicious fruit syrup over ice cream or add some to a glass of sparkling water for a refreshing summer treat.

Ingredients

  • 1 1/2 pounds fresh sweet cherries, see Notes

  • 1 cup sugar, I used coconut sugar

  • 1-inch knob fresh ginger, peeled and sliced

  • 2 teaspoons lemon zest

  • 1/4 cup lemon juice

Directions

  • Add all ingredients to a large saucepan over medium-low heat. Bring to a boil then reduce to a simmer for 20-25 minutes.
  • Strain cherry syrup through a fine mesh strainer, let cool at room temperature before storing in the fridge to cool completely.
  • Pour a few tablespoons into the bottom of a glass then fill with ice and top with sparkling water.

Recipe Video

Notes

  • Cherries: No need to remove the pits or stems from your cherries before using them in this recipe! Simply gives them a good rinse them add them to your saucepan.

Did you make this recipe?

Share it and tag @samdoesherbest on Instagram!

Like this recipe?

Follow us @samdoesherbest on Pinterest

Other Summertime Recipes You’ll Love

This gyro salad with (dairy-free) tzatziki dressing is loaded with fresh flavor! Easier and healthier than classic gyro wraps, this salad comes together in under 30 minutes. Make this protein and veggie-packed meal on a busy weeknight when you’re craving something delicious and nutritious!

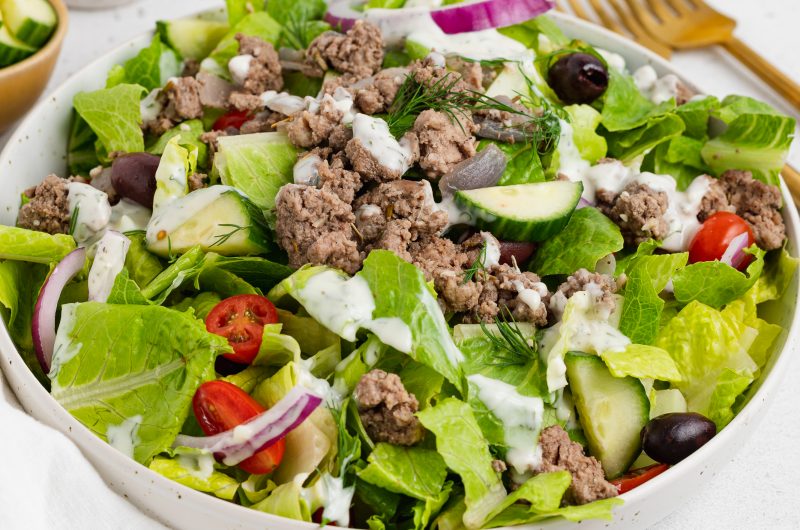
tzatziki dressing being poured over a gyro salad

So basically, I woke up one morning craving a gyro. Though when I searched for recipes, they all seemed way too complicated (yes, even for me) to make. And that my friends, is how the gyro salad was born. I wanted to keep this Greek-inspired recipe as similar to the traditional gyro wrap as possible. Therefore, I was sure to include every classic seasoning, herb, and flavor. The only thing I changed for this gyro salad was the method! First, you sautée the ground meat instead of baking and slicing it. Then, you quickly mix together the homemade tzatziki dressing with just a few simple ingredients. Lastly, you throw all of the ingredients in a bowl, drizzle it with that tangy dressing and enjoy! Also, I’m just going to say it, I could drink this tzatziki dressing with a straw – it’s that good!

What You Need To Make Gyro Salad with Tzatziki Dressing

Ground Beef + Ground Lamb – These two meats are traditional to any gyro recipe. If you’re not a fan of either ground meat, you can easily leave it out! Also, feel free to use ground turkey instead.

Dairy-Free Sour Cream – I use and love Kite Hill Dairy-Free Sour Cream. It’s deliciously creamy, perfectly tangy, and tastes incredibly similar to the real thing. However, any dairy-free sour cream would work here. And if you can’t find dairy-free sour cream, a dairy-free plain and unsweetened yogurt will also do the trick!

Fresh Dill – The star herb of this gyro salad show! Fresh dill brings on much of the irresistible flavor of this dressing. I highly recommend you use fresh dill instead of dried dill, it simply won’t taste the same. Additionally, you’ll be able to sprinkle any extra fresh dill on top of your finished gyro salad for even MORE delicious flavor!

Adjust This Recipe To Your Dietary Needs

  • Use Regular Sour Cream: Feel free to use an equal amount of regular sour cream if you’re not dairy-free!
  • Add Feta: For all my cheese-lovers out there, a sprinkling of crumbled feta cheese would make the PERFECT addition to this gyro salad.

Gyro Salad with Tzatziki Dressing (Gluten-Free, Dairy-Free)

0 from 0 votes
Recipe by Samantha Russo Course: MainCuisine: GreekDifficulty: Easy
Servings

4

servings
Prep time

15

minutes
Cooking time

10

minutes
Total time

25

minutes

This gyro salad with (dairy-free) tzatziki dressing is loaded with fresh flavor! Easier and healthier than classic gyro wraps, this salad comes together in under 30 minutes. Make this protein and veggie-packed meal on a busy weeknight when you’re craving something delicious and nutritious!

Ingredients

  • For the gyro meat:
  • 1 tablespoon olive oil

  • 1/2 onion, finely chopped

  • 1 pound ground beef

  • 1 pound ground lamb

  • 3 garlic cloves, minced

  • 1 tablespoon dried rosemary

  • 1 teaspoon salt

  • 1/2 teaspoon black pepper

  • For the dairy-free tzatziki dressing:
  • 1 cup dairy-free sour cream, see Notes

  • 3 tablespoons fresh dill, chopped

  • 2 teaspoons lemon juice

  • 2 garlic cloves, minced

  • 1 teaspoon salt

  • 1/4 teaspoon black pepper

  • For the salad:
  • 6 cups romaine lettuce, chopped

  • 1/2 red onion, sliced

  • 1/2 cup kalamata olives

  • 1 cup cherry tomatoes, sliced

  • 1 cup cucumber, sliced

  • 1/4 cup fresh dill, chopped

Directions

  • Add all gyro meat ingredients to a large skillet over medium heat and cook until meat is no longer pink, breaking it up in the process. Strain any unwanted rendered fat from the meat.
  • Add all tzatziki dressing ingredients to a small bowl and mix together to combine.
  • Assemble salad ingredients in a bowl, then top with gyro meat and tzatziki dressing.

Recipe Video

Notes

  • Dairy-Free Sour Cream: Feel free to use dairy-free plain and unsweetened yogurt or regular sour cream in its place.

Did you make this recipe?

Share it and tag @samdoesherbest on Instagram!

Like this recipe?

Follow us @samdoesherbest on Pinterest

Other Delicious Dairy-Free Healthy Recipes

These vegan graham crackers are also gluten and refined sugar-free! This easy recipe bakes up deliciously soft cookies and crumbly cookies. Enjoy these vegan graham crackers with a thick slather of peanut butter, some toasted marshmallows and melted chocolate, or simply on their own as a healthy snack or dessert!

vegan graham crackers witha glass of almond milk and rolled oats

I’d like to start off by thanking the person that first invented s’mores. Graham crackers are great, but let’s be honest they’d be nothing without the s’more. S’mores put graham crackers on the map. And it wasn’t until I had leftover boxes of this crispy cookie lying around from s’more-making that I realized how perfect they truly are. They’re soft, light, crumbly, and not to sweet. Graham crackers deserve a moment of their own and I am here to give them that. Think about this for a second – why don’t we place this sweet cracker in the same lineup as say a chocolate chip cookie? They are more than worthy of standing alone in my opinion. Not convinced yet? OK OK just make this vegan graham cracker recipe yourself and you’ll understand.

What You Need To Make Vegan Graham Crackers

Oat Flour – I love baking up my gluten-free treats with oat flour! Not only is it inexpensive, but it’s super easy to acquire. I highly advise against purchasing pre-made oat flour, it’s simply not necessary. Instead, purchase a big bag of oats then grind them in a food processor or blender to make your own cheap and easy oat flour. Oat flour gives these vegan graham crackers their irresistibly soft texture. It also make them healthier and more nutritious!

Maple Syrup – Just a touch of maple syrup gives these gluten-free cookies a bit of caramel color and flavor. You’ll notice that I keep the amount of sweetener in this recipe low because these vegan graham crackers really don’t need much! Maple syrup is a delicious natural sweetener and much healthier than any refined sugar.

Vegan Butter – I use and love the Earth Balance Vegan Buttery Sticks in my vegan/dairy-free baked goods. Though any vegan butter will work here, just be sure to melt it completely before adding it to this recipe. You could also sub the vegan butter for melted coconut oil or regular butter if you’d like!

Adjust This Recipe To Your Dietary Needs

Add Dairy: Feel free to use regular milk and butter in place of the almond milk and vegan butter in this recipe.

Make it Nut-Free: Use soy, hemp, or coconut milk instead of almond milk to make this vegan recipe nut-free.

Add Gluten: I haven’t tested this myself, but you can try using 2 cups of all purpose flour instead of oat flour. If you give this a try, start with just the 2 cups then add a bit more flour until a dough forms. And of course, let me know how it goes!

Vegan Graham Crackers (gluten-free)

0 from 0 votes
Recipe by Samantha Russo Course: DessertCuisine: AmericanDifficulty: Easy
Servings

16

cookies
Prep time

5

minutes
Cooking time

10

minutes
Chilling time

1

hour

These vegan graham crackers are also gluten and refined sugar-free! This easy recipe bakes up deliciously soft cookies and crumbly cookies. Enjoy these vegan graham crackers with a thick slather of peanut butter, some toasted marshmallows and melted chocolate, or simply on their own!

Ingredients

  • 2 1/2 cups oat flour, see Notes

  • 1/4 cup coconut sugar, see Notes

  • 1 teaspoon cinnamon

  • 1/2 teaspoon baking powder

  • 1/2 teaspoon baking soda

  • 1/4 teaspoon salt

  • 1/2 cup vegan butter or coconut oil, melted

  • 1/4 cup maple syrup

  • 1/4 cup almond milk

  • 1 teaspoon vanilla extract

Directions

  • Mix together the oat flour, coconut sugar, cinnamon, baking powder, baking soda, and salt in a large bowl.
  • Add in the melted vegan butter, maple syrup, almond milk, and vanilla extract. Mix until a dough forms.
  • Cover and transfer dough to the fridge for 1 hour.
  • Preheat oven to 350° Fahrenheit and line a baking sheet with parchment paper.
  • Remove dough from fridge and roll out on a floured surface to 1/4-inch thick.
  • Cut dough into 2-inch squares, transfer to a baking sheet, poke the top of each graham cracker with a fork, then bake for 10-12 mintues.
  • Remove from oven, then let cool slightly on a baking sheet before transferring to a wire rack to cool completely.

Recipe Video

Notes

  • Oat Flour: Make oat flour by grinding rolled oats in a blender or food processor until a fine flour forms and no large oat pieces remain.
  • Coconut Sugar: Feel free to use cane sugar or white sugar in place of the coconut sugar in this recipe!

Did you make this recipe?

Share it and tag @samdoesherbest on Instagram!

Like this recipe?

Follow us @samdoesherbest on Pinterest

More Healthier Vegan Desserts

This sous vide asparagus is incredibly tender and delicious! This method yields perfectly cooked asparagus with minimal effort every time.

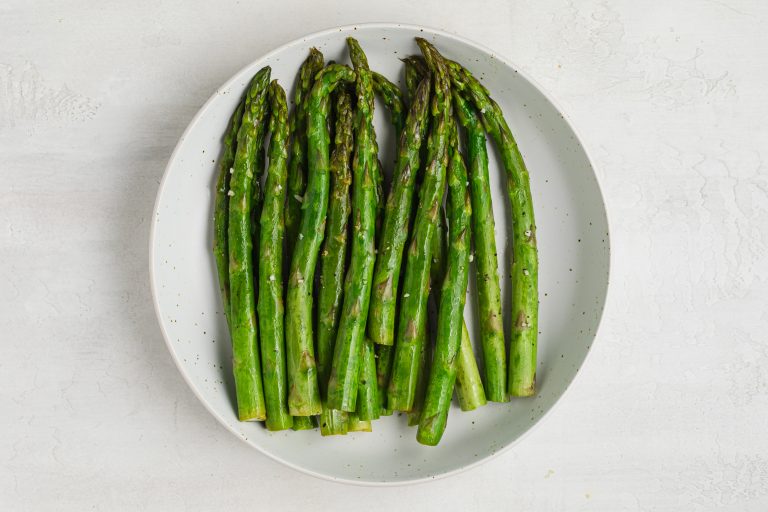
fresh lemon being squeezed over sous vide asparagus

If you own a sous vide throw ya hands in the aiiiiiir! I’m still pretty new on the sous-vide-scene, having only owned mine for a few months now. Though I gotta say, I already can’t stop using it! The sous vide is the new crockpot in my opinion. It gives you the magical ability to throw something in there, then return to a perfect meal or side dish without worry every time. This sous vide asparagus is no exception to that. Except, thanks to asparagus’ quick-cooking abilities, you’ll only need to leave it to cook for about 10 minutes. Once done, you’ll have the tastiest, most tender fool-proof asparagus of all time!

What You Need To Make Sous Vide Asparagus

Asparagus – This easy vegetable pairs well with most meals, making it a year-round favorite. Though when cooking asparagus, there is always one thing to cook in mind – it cooks quickly. Despite setting the sous vide to a pretty low temperature, you will still only need to set the time to 10 minutes. Your cook time may vary slightly, depending on the thickness or thinness of your asparagus. Though my recommendation is to start slowly, give your asparagus a quick check, then continue to cook if needed. I used pretty medium-sized asparagus and found that just 10 minutes left my asparagus tender with a slightly crunchy bite – yum!

Butter – The butter is used for flavor in this recipe, and just a tablespoon gives delicate asparagus that delicious savory taste. I used vegan butter since we like to keep things dairy-free around here, though any kind of butter will do! You can even leave the butter out altogether if you’d like.

Lemon Juice and Zest – A touch of lemon right before serving brings some freshness back into the sous vide asparagus. Lemon juice and zest is totally optional in this recipe, but highly recommended!

Why Sous Vide?

  • The sous vide does an incredible job at keeping the temperature consistent, giving you amazing results every time.
  • Cooks slower in seasoning, giving the flavors time to permeate and develop throughout the food.
  • The sous vide does all the work for you – just set it, then walk away and return to a perfectly cooked meal or side dish!

Sous Vide Asparagus

0 from 0 votes
Recipe by Samantha Russo Course: SidesDifficulty: Easy
Servings

4

servings
Prep time

5

minutes
Cooking time

10

minutes
Total time

15

minutes

This sous vide asparagus is incredibly tender and delicious! This method yields perfectly cooked asparagus with minimal effort every time.

Ingredients

  • 1 bunch asparagus

  • 1 tablespoon butter (I used dairy-free)

  • 1 garlic clove, minced

  • 1/2 teaspoon salt

  • 1/4 teaspoon black pepper

  • Fresh lemon juice and zest, optional

Directions

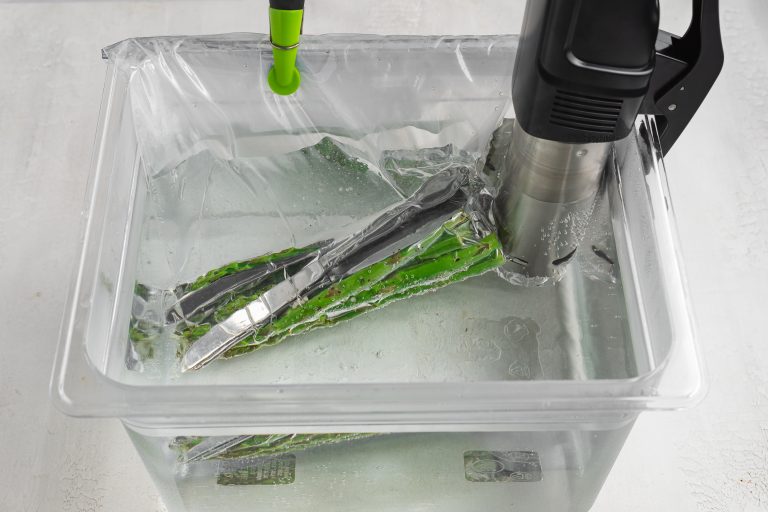
  • Toss all ingredients to a zip-top bag, toss asparagus in bag to coat in spices then remove air from bag.sous vide asparagus process photo 1
  • Drop in sous vide bath set to 180° Fahrenheit (or 82° Celsius) for 10 minutes. If the bag floats to the top, add a few metal utensils to help weigh it down.sous vide asparagus process photo 1
  • Remove bag from bath, then remove asparagus from bag and finish off with fresh lemon juice and zest.sous vide asparagus process photo 3

Notes

  • If you’re not vegan or dairy-free, finish this asparagus off with some shredded parmesan cheese for even more flavor!

Did you make this recipe?

Share it and tag @samdoesherbest on Instagram!

Like this recipe?

Follow us @samdoesherbest on Pinterest

More Easy Side Dish Recipes

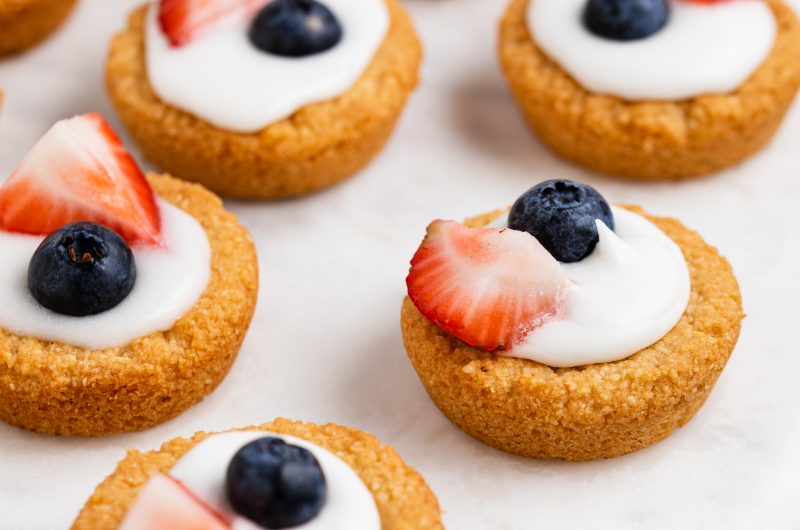
These mini vegan berry shortcakes are as cute as they are delicious! A few simple ingredients come together to create a soft shortcake base, which is then topped off with homemade coconut whipped cream. A sprinkling of fresh berries is the finishing touch to this easy and adorable dessert!

close-up image of mini vegan berry shortcakes

These Mini Vegan Berry Shortcakes Are…

  • Soft
  • Crumbly
  • Perfectly Sweet
  • Grain-Free
  • Fresh
  • Summery
  • & a total crowd-pleaser!

What You Need To Make Mini Vegan Berry Shortcakes

Almond Flour – This gluten and grain-free flour is a staple in my kitchen. Almond flour has a very mild taste and gives these shortcakes their irresistibly soft and crumbly texture! While almond flour used to be difficult to locate, you can easily find it either online or in most grocery stores these days.

Coconut Flour – This particular ingredient is vital to the construction of these mini vegan berry shortcakes. Coconut flour holds together these tiny treats, in the absence of eggs. It is very important that you do not skip or replace this it with any other type of flour (unless noted in the flour substitutions section below).

Coconut Cream – If you’re looking to make the vegan coconut whipped cream yourself, you’re going to need a can of coconut cream! I highly recommend the tiny cans of Native Forest Coconut Cream which can be found at Whole Foods. However, if you can’t find that particular brand then pick up any can of coconut cream and use just the solid coconut cream at the top of the can in this recipe. This step will ensure your cream whips up beautifully light and fluffy!

Adjust This Recipe To Your Dietary Needs

Make it Nut-Free: I have not tested this myself, but I can imagine that equal parts oat flour would work in place of the almond flour in this recipe. If you give this a try, let me know how it turns out! 🙂

Flour Substitutions: I get asked a lot if all purpose flour can be subbed in my gluten-free recipes and for this one in particular, you can try using 1 1/2 cups of all purpose flour in place of the almond and coconut flour. Though keep in mind that I have also not tested this myself and therefore cannot attest to its success! If you opt for all purpose flour in these mini vegan berry shortcakes, start with just one cup and the remaining half cup (or maybe even more flour) until a dough forms.

Mini Vegan Berry Shortcakes (Grain-Free)

5 from 1 vote
Recipe by Samantha Russo Course: DessertDifficulty: Easy
Servings

24

mini shortcakes
Prep time

30

minutes
Cooking time

15

minutes
Total time

45

minutes

These mini vegan berry shortcakes are as cute as they are delicious! A few simple ingredients come together to create a soft shortcake base, which is then topped off with homemade coconut whipped cream. A sprinkling of fresh berries is the finishing touch to this easy and adorable dessert!

Ingredients

  • For the vegan shortcakes:
  • 1/2 cup dairy-free butter, softened

  • 1/2 cup maple syrup

  • 1 teaspoon vanilla extract

  • 2 cups almond flour

  • 1/4 cup coconut flour

  • 1/2 teaspoon baking powder

  • For the coconut whipped cream:
  • 1 (13.5 ounce) can coconut cream

  • 1/4 – 1/2 cup powdered sugar

  • 1/2 teaspoon vanilla extract

  • For topping:
  • fresh berries

Directions

  • Preheat oven to 350° Fahrenheit and lightly grease a mini muffin pan.
  • Beat together the dairy-free butter and maple syrup, then add in the vanilla extract and mix until combined.
  • In a separate bowl, combine the almond flour, coconut flour, and baking soda.
  • Add the dry ingredients into the wet ingredients and mix until combined, then cover and let chill in the fridge for 20 minutes.
  • Scoop two tablespoons of dough into each mini muffin mold and press down then up the sides to form a cup shape.
  • Bake for 12-15 minutes, then let cookies cool in pan for 15 minutes before transferring to a wire cooling rack to cool completely.
  • While cookies cool, remove the top later of solid coconut cream from the can and discard any liquid. Beat coconut cream along with powdered sugar and vanilla extract until light and fluffy.
  • Top each mini shortcake with whipped cream and fresh berries – enjoy!

Recipe Video

Notes

  • Store these mini vegan berry shortcakes in an airtight container in either the fridge or freezer!

Did you make this recipe?

Share it and tag @samdoesherbest on Instagram!

Like this recipe?

Follow us @samdoesherbest on Pinterest

Other Delicious Vegan Dessert Recipes