Tag

lemon

Browsing

The viral Jennifer Aniston salad is super easy to make! Loaded with fresh ingredients – cucumber, red onion, parsley, mint, and feta – all tossed in simple lemon dressing. It’s not just healthy, but totally delicious too!

overhead image of Jennifer Aniston salad with pistachios and dressing on the side.

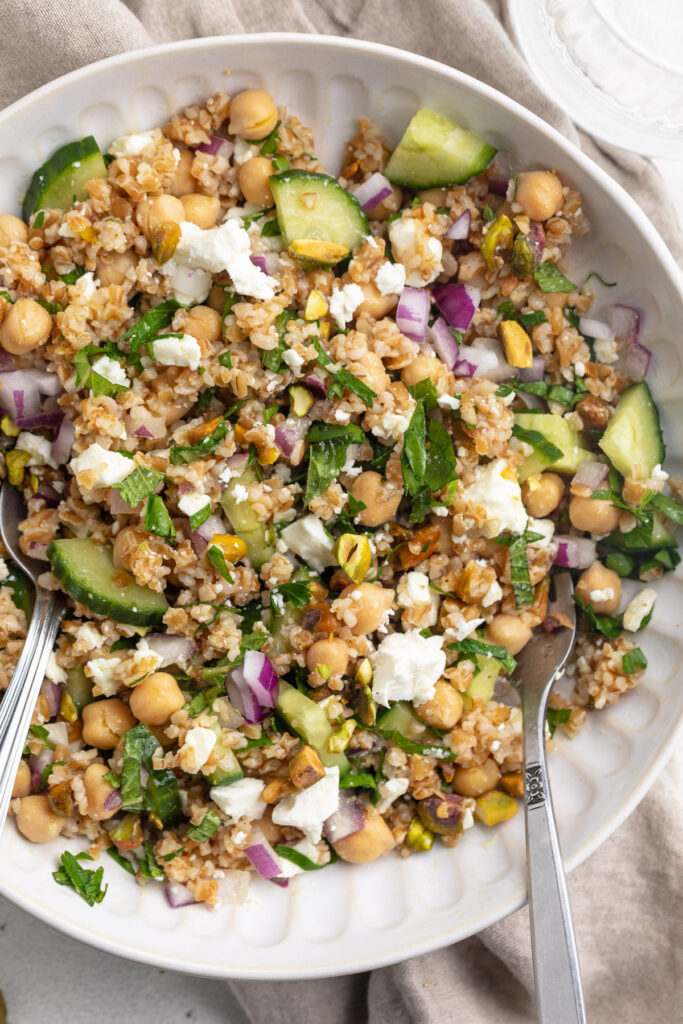
Jennifer Aniston recently described her perfect salad as, “bulgur wheat, cucumbers, parsley, mint, red onion, garbanzo beans, feta cheese, and pistachios.” And OMG the internet went CRAZY for it! Recipes similar to the salad the Friends actress described quickly popped up all over TikTok. The Jennifer Aniston salad went viral. So, as a foodie and fellow salad-lover, I had to give it a try for myself.

My version of the salad contains everything Jennifer described – bulgur wheat, cucumbers, parsley, mint, red onion, garbanzo beans, feta cheese, and pistachios – my only addition is a simple lemon, olive oil, salt, and black pepper dressing. Since Jen didn’t offer up a dressing herself, this is what I envisioned a salad like this being tossed in. And let me tell you, it TOTALLY lived up to the hype!

Dressing being poured over the Jennifer Aniston salad.

What You’ll Need to Make the Jennifer Aniston Salad

Bulgur Wheat or Quinoa – In keeping this super authentic to Jen’s recipe, I used bulgur wheat in my salad. However, bulgur wheat can be hard to come by, so I also offer up the option to use quinoa instead. Both are hearty, protein-rich, super nutritious grains. Never had bulgur wheat? It’s most similar to farro or barley, but smaller grain. Bulgur wheat has a nice nutty flavor, and will keep you full without feeling weighed down.

Garbanzo Beans/Chickpeas – What’s the difference between garbanzo beans and chickpeas? Literally nothing! They’re two names for the exact same thing. Jennifer Aniston called them “garbanzo beans,” but I call them “chickpeas,” so that’s what we’re sticking with. Chickpeas are an excellent source of protein, especially in this salad recipe!

Feta Cheese – Greek brined white cheese, made from sheep’s milk. Feta adds the perfect salty bite to this salad! And because it’s made with sheep’s milk, it has a lower lactose content. Meaning, those whoe are lactose intolerant (aka ME!), may have an easier time tolerating feta cheese. I, personally, can enjoy it in small amounts without any issue. However, if you can’t tolerate feta, or simply need a dairy-free option, check out my “make it vegan” section below!

Parsley and Mint – Don’t skimp on the fresh herbs! Fresh parsley and mint are my favorite parts of this salad. They add a super fresh and vibrant component to this recipe. Therefore, don’t leave ’em out!

close-up overhead image of Jennifer Aniston salad.

Adjust This Recipe to Your Dietary Needs

Make it Gluten-Free: Yes, bulgur wheat contains gluten. Therefore, opt for quinoa instead of bulgur wheat to make this Jennifer Aniston salad entirely gluten-free.

Make it Vegan/Dairy-Free: For a vegan/dairy-free salad, either leave out the feta cheese, or replace it with your favorite vegan feta. I love the Violife Vegan Feta, it tastes and crumbles just like the real thing!

close-up image of jennifer aniston salad in a serving bowl
4.38 from 24 votes

Jennifer Aniston Salad

The viral Jennifer Aniston salad is super easy to make! Loaded with fresh ingredients – cucumber, red onion, parsley, mint, and feta – all tossed in simple lemon dressing. It’s not just healthy, but totally delicious too!
Print Pin Rate
Prep Time: 10 minutes
Cook Time: 15 minutes
Total Time: 25 minutes
Servings: 4 servings

Ingredients

For the bulgur wheat/quinoa:

  • 1 cup bulgur wheat or quinoa, dry
  • 2 cups water or vegetable broth

For the salad dressing:

  • 1/2 cup olive oil
  • 1/2 cup lemon juice
  • 1/2 teaspoon salt
  • 1/4 teaspoon black pepper

For the salad:

  • 1 (15 ounce) can chickpeas, drained and rinsed
  • 1 cup English cucumber, chopped
  • 1 cup feta cheese, crumbled
  • 1/2 red onion, diced
  • 1/2 cup roasted salted pistachios, roughly chopped
  • 1/2 cup fresh parsley, chopped
  • 1/4 cup fresh mint, chopped

Instructions

  • Add either bulgur wheat or quinoa to a small saucepan, along with water or vegetable broth. Bring to a simmer, then cover and cook over low heat for 12-15 minutes. Once bulgur wheat or quinoa has absorbed all liquid, remove from heat and let stand covered for an additional 5 minutes. Then, remove lid and fluff with a fork.
  • While the bulgur wheat or quinoa cooks, make the salad dressing by adding all ingredients to a bowl and whisking to combine.
  • Add cooked bulgur wheat or quinoa to a large bowl, along with the remaining salad ingredients. Pour dressing over salad and toss, then either serve immediately or let chill in the fridge for a few hours before serving.

Notes

  • Leaving the salad to chill for a few hours before eating will increase the flavor!
  • Leftover salad will stay fresh in an airtight container in the fridge for up to 5 days. No need to store the dressing separately.
  • Nutrition

    Calories: 300kcal

    The BEST of both worlds! Super easy and ultra delicious spinach artichoke hummus. One of my all-time favorite healthy snacks or appetizers!

    overhead image of spinach artichoke hummus with pita, cucumber, and white wine on the side.

    What You’ll Need to Make Spinach Artichoke Hummus

    Chickpeas – I used canned chickpeas, but feel free to soak and boil your own for this recipe. However, canned chickpeas makes things extra easy on you (which I highly recommend!).

    Tahini – Every good hummus recipe has tahini! Never heard of tahini? It’s just ground sesame seeds. It’s also super easy to find at most grocery stores, typically located in the ethnic food aisle. This is the tahini brand I use and love in this spinach artichoke hummus!

    Baby Spinach – Use fresh, not frozen spinach in this healthy snack recipe! Lucky for us, fresh spinach is loaded with good-for-you vitamins and minerals.

    Canned Artichoke Hearts – Either whole or quartered canned artichoke hearts will work. I used these Cento artichoke hearts, and they were delicious. Also, if you have any leftover artichoke hearts, they make a great addition to salads and charcuterie boards!

    pita being dipped into spinach artichoke hummus.

    Tips and Tricks

    • Once you add the spinach and artichokes, pulse the hummus only a few times. Too much pulsing will completely puree the spinach and artichokes. Instead, to achieve that finely chopped texture you get in a spinach artichoke dip, give your food processor just a few quick pulses.
    • Taste the hummus after the first step! This is the best time to adjust/add any seasonings you’d like. For an extra tangy hummus, add in a bit more lemon juice. Or, for a super garlicky hummus, add in another clove or two of garlic.
    • This spinach artichoke hummus dip will stay fresh in an airtight container in the fridge for up to 5 days. Enjoy it all week long with pita, pita chips, fresh veggies, or simply by the spoonful!
    overhead image of spinach artichoke hummus with pita on the side.

    This Recipe Is…

    close-up image of spinach artichoke hummus with artichoke hearts on top.
    5 from 2 votes

    Spinach Artichoke Hummus

    The BEST of both worlds! Super easy and ultra delicious spinach artichoke hummus. One of my all-time favorite healthy snacks or appetizers!
    Print Pin Rate
    Prep Time: 5 minutes
    Total Time: 5 minutes
    Servings: 2 cups

    Ingredients

    • 1 (15 ounce) can chickpeas, drained and rinsed
    • 1/4 cup tahini
    • 1/4 cup olive oil
    • 2 tablespoons fresh lemon juice
    • 1 garlic clove, peeled
    • 1/2 teaspoon cumin
    • salt, to taste
    • 1 cup baby spinach
    • 1/2 cup canned artichoke hearts, drained

    Instructions

    • Add chickpeas, tahini, olive oil, lemon juice, garlic, cumin, and salt to a food processor. Blend until completely smooth.
    • Add in baby spinach and artichoke heart, pule 5-6 times until spinach and artichokes are finely chopped, then serve.

    Nutrition

    Calories: 300kcal

    Quick, easy, and super delicious one-pan chicken and rice! Full of flavor, with a handful of simple ingredients you likely already have on hand. This chicken and rice recipe is the perfect weeknight meal, ready in just 30 minutes!

    overhead image of chicken and rice on a plate with lemon, parsley, and white wine on the side.

    What You’ll Need to Make This Chicken and Rice Recipe

    Chicken – Any piece of chicken will work in this recipe! I used skin-on bone-in chicken thighs, because they pack in tons of delicious flavor. However, feel free to use chicken breasts for a healthier option, or chicken legs if that’s what you have handy.

    White Rice – The rice in this recipe must specifically be long grain white rice. Other rices will have a different cook time/method, and simply won’t work. I used this brand of organic long grain white rice, but any will work!

    Broth – Either chicken or vegetable broth will taste great! Though if you don’t have broth, you can use 2 cups of water plus one chicken or vegetable bouillon cube instead.

    chicken and rice in a pan with a serving spoon.

    Tips and Tricks

    • I recommend a large skillet with high sides and a tight fitting lid for this chicken and rice recipe. Since everything gets cooked in the same skillet, make sure the one you use is large enough to fit all ingredients! I use and looooove my Always Pan – I can’t recommend it enough.
    • You can make this in your Instant Pot if you’d like! To do that, sear the chicken then cook the onion and garlic on the saute setting. Then, add in all remaining ingredients, secure lid, and set to manual high pressure for 10 minutes. After 10 minutes, your chicken should be cooked through, and your rice fluffy!
    close-up image of chicken and rice in a pan with lemon slices on top.

    Adjust This Recipe To Your Dietary Needs

    Make it Gluten-Free: While this recipe is already both gluten and dairy-free, I always recommend double checking your rice to make sure it’s 100% gluten-free. Most rice is, but some contain trace amounts of gluten.

    Make it Paleo/Grain-Free: For a paleo chicken and “rice” recipe, replace the white rice with cauliflower rice. To do this, reduce the amount of broth you use to just 1/4 cup, then cover skillet and cook until the chicken is cooked through.

    overhead image of chicken and rice in a pan with lemon slices on top.
    5 from 1 vote

    One-Pan Chicken and Rice Recipe

    Quick, easy, and super delicious one-pan chicken and rice! Full of flavor, with a handful of simple ingredients you likely already have on hand. This chicken and rice recipe is the perfect weeknight meal, ready in just 30 minutes!
    Print Pin Rate
    Prep Time: 5 minutes
    Cook Time: 25 minutes
    Total Time: 30 minutes
    Servings: 4 servings

    Ingredients

    • 4 pieces chicken (I use bone-in skin-on chicken thighs)
    • salt and black pepper, to taste
    • 1 tablespoon avocado or olive oil
    • 1 yellow onion, chopped
    • 3 garlic cloves, minced
    • 1 cup uncooked long grain white rice
    • 2 cups chicken or vegetable broth
    • 1 tablespoon lemon juice
    • fresh chopped parsley, for serving

    Instructions

    • Pat chicken dry with a paper towel, then season well with salt and black pepper.
    • Heat oil in a large skillet over medium-high heat. Place chicken into hot skillet, and sear for 2-3 minutes per side, or until golden brown. (You do not want to fully cook the chicken in this step, just sear it until brown).
    • Remove chicken from skillet, then add onion and garlic to the skillet. Cook 4-5 minutes or until onion is soft.
    • Add in the rice and cook for 1-2 minutes to toast the rice, then pour in the chicken or vegetable broth. Gently stir and lift any brown bits from the bottom of the skillet.
    • Return chicken to the skillet, then bring rice to a boil before reducing to a simmer. Cover skillet with lid, and leave to simmer for 20 minutes, or until rice is cooked. Remove from heat, add in lemon juice and gently fluff rice with a fork. Serve warm with fresh chopped parsley on top.

    Nutrition

    Calories: 300kcal

    Quick, easy, and full of flavor – air fryer salmon patties with a creamy dill sauce! The perfect healthy, gluten-free, and dairy-free dinner recipe. Comes together in a few simple steps, and in just 15 minutes!

    Overhead image of air fryer salmon patties on a plate over rice and lettuce with creamy dill sauce on top.

    What You’ll Need to Make Air Fryer Salmon Patties

    Canned Salmon – I used two cans of wild sockeye salmon in my patties, but any canned salmon will work. Canned salmon is an easy addition to this already super easy meal. It’s also a great source of lean protein, vitamin B12, iron, potassium, and vitamin D. However, these air fryer salmon patties are so delicious, no one will ever guess how healthy they are!

    Breadcrumbs – I used gluten-free panko breadcrumbs, but any unflavored/unseasoned breadcrumbs will taste great! Panko breadcrumbs are lighter and will yield a crispier patty. Or, if you don’t have breadcrumbs, you can use 1/3 cup of almond flour in its place.

    Mayonnaise – This creamy condiment comes in handy in both the salmon patties and the creamy dill sauce. If not a mayo fan, you can use unsweetened greek yogurt instead!

    creamy dill sauce being poured over air fryer salmon patties.

    Tips and Tricks

    • For an even crisper salmon patty, coat the outside in additional breadcrumbs. Then, place in the air fryer and coat with a drizzle of oil before cooking. The end result will be golden brown, soft on the inside, and crispy on the outside air fryer salmon patties!
    • Enjoy this recipe however you’d like. I served mine over lettuce and rice, with a drizzle of that creamy dill sauce. Though these would also taste amazing as a salmon burger between two buns!
    overhead image of air fryer salmon patties on a platter.

    Adjust This Recipe To Your Dietary Needs

    Make it Egg-Free: While I haven’t tested this option myself, you may be able to replace the eggs in this recipe with flax eggs. Or, try this Bob’s Red Mill Egg Replacer as a substitute. Also, be sure to use an egg-free mayo!

    Make it Gluten-Free: For a gluten-free dinner recipe, use gluten-free breadcrumbs like I did! Then, serve these air fryer salmon patties over a bed of your favorite veggies and rice.

    close-up image of air fryer salmon patties on a plate with rice and cucumbers.
    No ratings yet

    Air Fryer Salmon Patties with Creamy Dill Sauce

    Quick, easy, and full of flavor – air fryer salmon patties with a creamy dill sauce! The perfect healthy, gluten-free, and dairy-free dinner recipe. Comes together in a few simple steps, and in just 15 minutes!
    Print Pin Rate
    Prep Time: 5 minutes
    Cook Time: 8 minutes
    Total Time: 13 minutes
    Servings: 8 salmon patties

    Ingredients

    • 2 (7.5 ounce) cans canned salmon, drained
    • 2 eggs
    • 1/2 cup breadcrumbs, I used gluten-free panko breadcrumbs
    • 2 tablespoons mayonnaise
    • 1 green onion, finely chopped
    • 1 tablespoon fresh dill, chopped
    • 1/2 teaspoon paprika
    • 1/4 teaspoon salt

    For the dill sauce:

    • 1/2 cup mayonnaise
    • 1-2 tablespoons lemon juice
    • 3 tablespoons fresh dill, chopped

    Instructions

    • Mix together all salmon patty ingredients in a large bowl until fully combined.
    • Scoop ¼ cup of the mixture into the palms of your hands and gently form a 1-inch thick patty. Repeat this process with remaining mixture, should form 8 salmon patties.
    • Lightly grease air fryer tray or basket, then place salmon patties into the air fryer and cook at 390° Fahrenheit for 8 minutes, pausing to flip halfway through.
    • Make the dill sauce by adding all ingredients to a small bowl and whisking until smooth, then spoon over salmon patties.

    Nutrition

    Calories: 300kcal

    Tender, juicy, and intensely flavorful chicken scarpariello with crispy rosemary baby potatoes! A complete, healthy, and wholesome dinner recipe just about anyone can throw together.

    overhead image of chicken scarpariello with crispy potatoes on a plate with white wine on the side.

    What You’ll Need To Make Chicken Scarpariello with Crispy Rosemary Potatoes

    Baby Potatoes – I love baby potatoes for how creamy they are! These crispy rosemary potatoes bake up ultra crispy on the outside, while smooth and buttery on the inside. Either yellow or red baby potatoes will taste great in this recipe. And if you can’t find baby potatoes, you can sub standard yellow or red potatoes in their place.

    Chicken Thighs – Feel free to use either bone-in or boneless, skin-on or skinless chicken thighs in this recipe! Bone-in and skin-on chicken thighs will yield a bit more flavor, while boneless and skinless will be easier to eat. Both options have their pros and cons, so go ahead and use whichever your prefer / can get your hands on.

    Italian Sausage – You’ll need uncooked Italian sausage links for this chicken scarpariello. Most come pre-cooked, so be sure the ones you buy are raw. And when it comes to either hot or sweet Italian sausage, use whichever’s your favorite! I used sweet sausages for a perfectly mild, but still flavorful dinner recipe.

    Dry White Wine – When picking out a dry white cooking wine, look for a bottle with “dry” or “crisp” in the description. Sauvignon Blanc and Pinot Grigio are my cooking wine go-tos. And don’t worry, all of the alcohol will get cooked off in this meal, leaving you with it’s bright and fresh flavor.

    chicken scarpariello in a skillet with fresh parsley on top

    Tips and Tricks

    • Do NOT touch the handle of your hot skillet once you’ve removed it from the oven! I’ve made this mistake more than once, and still have the scars to show for it. I highly recommend buying and placing one of these covers on your skillet handle as soon as you take it out of the oven.
    • Serve this chicken scarpariello with whatever you’d like! The crispy rosemary potatoes are the perfect side, but feel free to replace them with mashed potatoes, cooked rice, or even pasta. Or, for a low-carb option, roast up some broccoli and/or cauliflower in place of the potatoes.
    • Use a large skillet with high sides to make this meal. The key is using something large enough to fit eight chicken breasts, three sausages, and the white wine sauce. If you don’t have a skillet large enough for this recipe, use a dutch oven instead!
    sauce being poured over chicken scarpariello on a plate.

    Adjust This Recipe To Your Dietary Needs

    Make it Non-Alcoholic – For a recipe without any alcohol, replace the white wine with an extra cup of chicken stock, and an extra tablespoon of fresh lemon juice.

    Make it Paleo – Make yourself a paleo chicken scarpariello by taking the non-alocoholic option above, and replacing the baby potatoes with white sweet potatoes. Totally grain-free, gluten-free, sugar-free, low-carb, and paleo-friendly!

    overhead image of chicken scarpariello in a skillet with crispy potatoes on the side.
    No ratings yet

    Chicken Scarpariello with Crispy Rosemary Potatoes

    Tender, juicy, and intensely flavorful chicken scarpariello with crispy rosemary baby potatoes! A complete, healthy, and wholesome dinner recipe just about anyone can throw together.
    Print Pin Rate
    Prep Time: 10 minutes
    Cook Time: 30 minutes
    Total Time: 40 minutes
    Servings: 6 servings

    Ingredients

    For the crispy potatoes:

    • 1 pound baby potatoes
    • 2 tablespoons avocado oil
    • salt and black pepper, to taste
    • 1 sprig fresh rosemary, leaves removed from stem

    For the chicken scarpariello:

    • 8 chicken thighs
    • salt and black pepper, to taste
    • 3 tablespoons olive oil
    • 4 hot or sweet Italian sausage links
    • 1 large yellow onion, chopped
    • 1/2 red bell pepper, chopped
    • 8 garlic cloves, minced
    • 2 sprigs fresh rosemary
    • 1/2 cup pickled peppadew peppers, drained
    • 1 cup dry white wine
    • 1 cup chicken stock
    • 1 lemon, juiced
    • fresh chopped parsley, for serving

    Instructions

    • Preheat oven to 400° Fahrenheit. Place all potato ingredients on a large baking sheet and toss to combine. Bake for 25-20 minutes or until super crispy, flipping potatoes halfway through.
    • Make the chicken scarpariello by patting each chicken thigh dry with a paper towel, then season generously with salt and black pepper.
    • Heat olive oil in a large skillet over medium-high heat, cook sausages in skillet for 2-3 minutes per side of until golden brown (but not yet fully cooked). Remove sausage form skillet and set aside.
    • Place chicken thighs in hot skillet with the skin-side facing down. Sear chicken thighs for 5-8 minutes, or until golden brown, but also not yet fully cooked through. Remove chicken thighs from skillet and set aside.
    • Add onions, bell pepper, and garlic to the skillet – cook until soft and very fragrant, about 8 minutes.
    • Add rosemary, pickled peppers, white wine, and chicken stock to the skillet and bring to a boil. Whisk and continue to cook until liquid has slightly reduced.
    • Place sausages and chicken back into the skillet with the sauce, then transfer to the oven and cook for about 10-15 minutes or until chicken is cooked through. Remove from oven along with the potatoes, pour lemon juice over chicken, then serve over roasted potatoes with fresh chopped parsley.

    Nutrition

    Calories: 300kcal