The easiest holiday treat of all time – Grinch fruit kabobs! Slide fruit onto skewers and you’ve got yourself a festive snack or dessert. Get the kids involved in this fun Christmas activity!
What You’ll Need to Make Grinch Fruit Kabobs
Green Grapes – Green, not red grapes for this Grinch-themed treat!
Banana – Slice your banana into 1/2-inch pieces before sliding onto your skewers.
Strawberries – Hull your strawberries before using in this recipe! That basically just means remove the green leaves on top.
Store these Grinch fruit kabobs in an airtight container in the fridge for one day. They may last longer than a day, but the banana will begin to oxidize and turn brown – not ideal! For best results, I recommend making them right before serving.
Recipe by SamanthaCourse: Snacks, DessertDifficulty: Easy
Servings
12
servings
Prep time
5
minutes
Cooking time
0
minutes
Total time
5
minutes
The easiest holiday treat of all time – Grinch fruit kabobs! Slide fruit onto skewers and you’ve got yourself a festive snack or dessert. Get the kids involved in this fun holiday activity!
Ingredients
Green grapes
Banana, sliced
Fresh strawberries, hulled
Mini marshmallows
Mini skewers or toothpicks
Directions
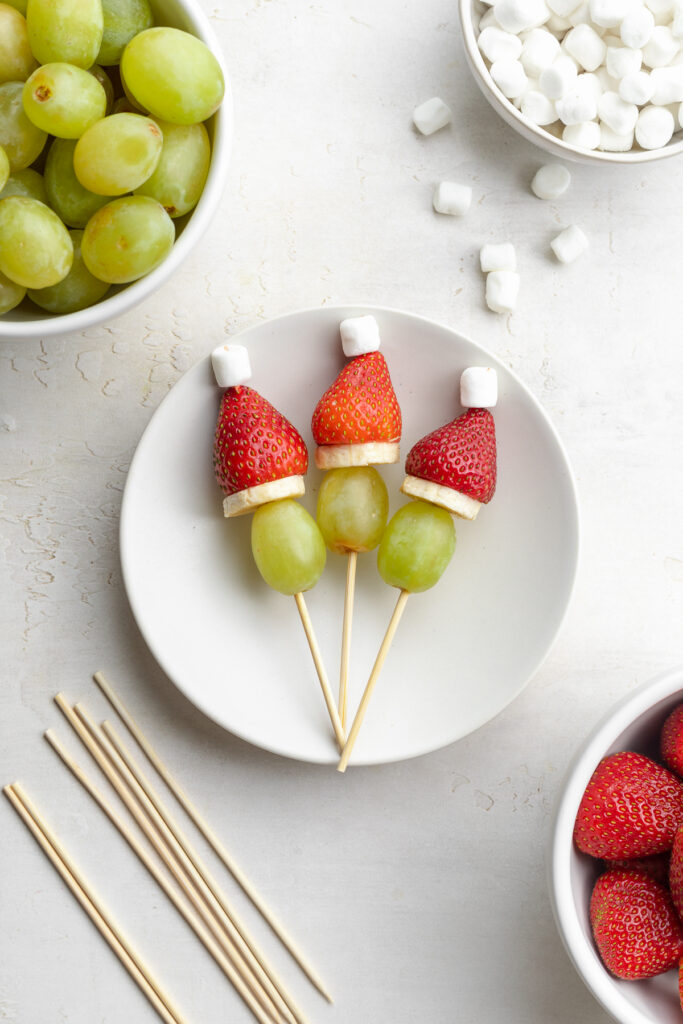
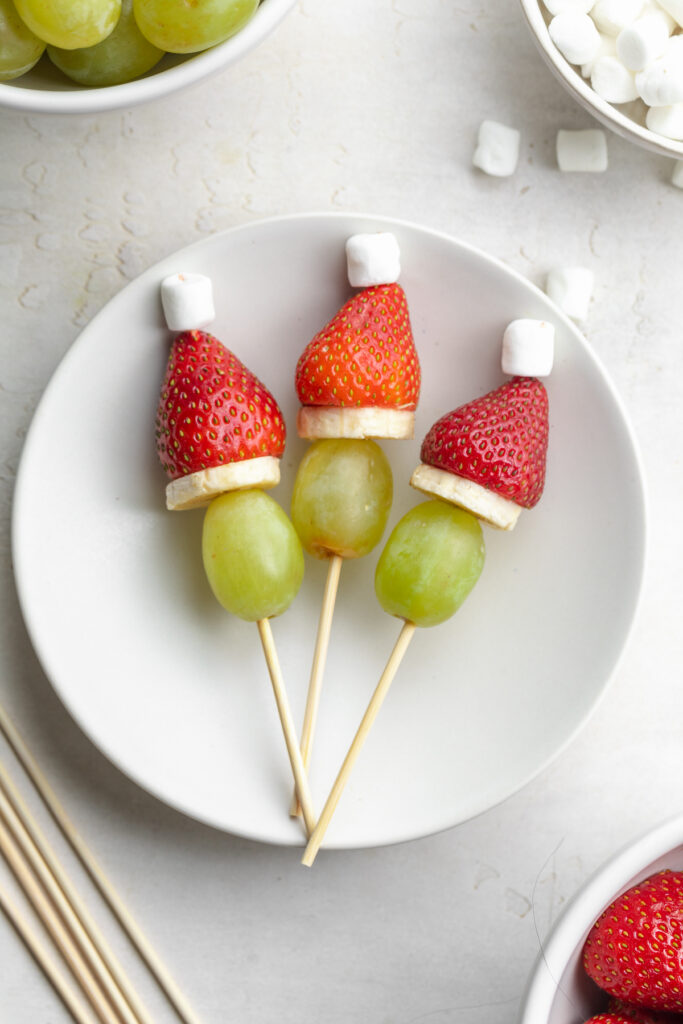
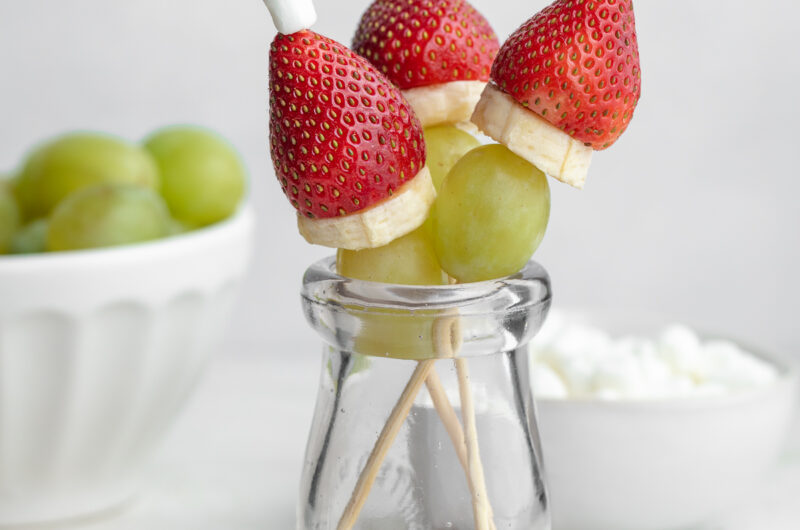
Slide a grape onto a skewer, about 2-inches down from the top of the skewer.
Then, slide a banana slice on top of the grape, followed by a strawberry, followed by a mini marshmallow.
Blissfully easy and delicious vegan hot chocolate dip! Made with just 3 ingredients, no cooking or baking required. This fool-proof dessert recipe is perfect for holiday parties or potlucks!
What You’ll Need to Make Vegan Hot Chocolate Dip
Vegan Whipped Cream – If not vegan, feel free to use regular ole’ whipped cream instead. However, I used Truwhip’s Vegan Whipped Topping and it tastes just like the real thing. I’ve also tested this recipe with So Delicious cocowhip, and it turned out fabulous! Or, for a healthier option, feel free to make a homemade coconut whipped cream. To do this, whip together the coconut cream (not the liquid part) from two cans of full-fat coconut milk with either a hand or stand mixer until light and fluffy. If taking this option, I recommend adding in at least 3 tablespoons of sugar to help sweeten this dessert dip!
Unsweetened Cocoa Powder – It’s super important to use unsweetened cocoa powder in this vegan hot chocolate dip recipe. If sweetened, you risk an overly sweet dip. Therefore, check the baking aisle at your grocery store for an unsweetened cocoa powder, such as this Hershey’s one.
Vanilla Extract – A splash of vanilla extract is the finishing touch to this vegan dessert recipe! It brings the hot chocolate flavor together, and is seriously so good.
Tips and Tricks
Don’t over-mix your dip! An over-mixed dip will turn runny, and lose its fluffiness. Simply stir until everything’s incorporated, then enjoy!
Feel free to prepare this vegan hot chocolate dip in advance! To do this, store in an airtight container in either the freezer for up to 2 months, or the fridge for up to 4 days. If freezing, simply transfer to the fridge a few hours before serving to thaw, then give it a quick stir.
Serve this chocolatey dessert dip however you’d like! I love mine with graham crackers and fresh strawberries. Though chocolate chip cookies, teddy grahams, apple slices, or even marshmallows all make for great dippers!
Adjust This Recipe to Your Dietary Needs
Make it Paleo: For a paleo version, make a homemade coconut whipped cream and sweeten with either coconut sugar or a splash of maple syrup – YUM!
Blissfully easy and delicious vegan hot chocolate dip! Made with just 3 ingredients, no cooking or baking required. This fool-proof dessert recipe is perfect for holiday parties or potlucks!
Ingredients
8ouncesvegan whipped cream
3tablespoonsunsweetened cocoa powder
1-3tablespoonssugar, optional depending on how sweet you’d like it
1/2teaspoonvanilla extract
Directions
Add all ingredients to a bowl, then whisk together until combined.
Serve with graham crackers, animal crackers, marshmallows, strawberries, apple slices, Oreos, etc.
These s’mores rice crispy treats are insanely delicious and super easy to make! They’re loaded with gluten-free cookies, crisp rice cereal, gooey melted marshmallow, and plenty of chocolate chips.
What You Need To Make S’mores Rice Crispy Treats
Rice Cereal – Classic Rice Krispies cereal is my favorite in this recipe! They’re light and remain super crunchy in these treats. I have to say, I’ve tried a handful of off-brand rice cereals for this recipe and none taste nearly as good as Rice Krispies do. I’m not sure what it is, but most other kinds end up too soft and almost soggy when mixed into these s’mores rice crispy treats.
Marshmallows – I used regular-sized marshmallows to make my s’mores rice crispy treat. However, you can use a 10-ounce bag of mini marshmallows instead. I also recommend topping your treats with a small handful of mini marshmallows for a super cute look!
Make it Nut-Free: Use nut-free graham crackers/cookies!
Tips For Making S’mores Rice Crispy Treats
Move quickly when adding the melted marshmallow mixture into the cereal mixture. The melted marshmallows will immediately start to cool once removed from the heat. And you’ll notice that as soon as they cool, they also begin to seize up and can be quite difficult to work with.
Spray a little cooking oil on your hands before handling the treats! I like to sprits a little cooking oil on one hand and then rub them together right before transferring the treats to the baking dish.
Similar to your hands, spray a little cooking oil on your knife before slicing! A greased knife will glide through these s’mores rice crispy treats. However, an un-greased knife will almost certainly get stuck and struggle to make it through your treats!
Recipe by Samantha RussoCourse: DessertDifficulty: Easy
Servings
12
treats
Prep time
10
minutes
Cooking time
5
minutes
Total time
15
minutes
These s’mores rice crispy treats are insanely delicious and super easy to make! They’re loaded with gluten-free cookies, crisp rice cereal, gooey melted marshmallow, and plenty of chocolate chips.
Ingredients
1(12-ounce) bagmarshmallows
6ouncesbutter
4cupsrice cereal
1cupgraham crackers, crushed
1/2cupchocolate chips
Directions
Line a 9×9-inch baking dish with parchment paper, then melt butter and marshmallows in a large saucepan over medium-low heat.
Mix together the rice cereal, crushed graham crackers, and chocolate chips in a large bowl.
Add melted marshmallows to the cereal mixture, mix well.
Transfer treats mixture to your lined baking dish and let sit at room temperature for 1 hour before slicing.
Recipe Video
Notes
Optional Step: Top finished treats off with an extra sprinkling of crushed graham crackers, marshmallows, and chocolate. Then place it in the oven on broil for 1 minute or until marshmallows are golden brown and toasty!
Crunchy peanut butter balls covered in chocolate! Perfectly sweet, surprisingly healthy, and super easy to make. This no-bake dessert is the perfect summer treat when it’s too hot to turn on the oven!
What You’ll Need to Make Crunchy Peanut Butter Balls
Creamy Peanut Butter – Unsweetened, creamy peanut butter is the base of this easy dessert recipe. Check your peanut butter labels closely and make sure it doesn’t contain any sugar! Added sugar in the peanut butter would totally throw off the sweetness in this recipe. For unsweetened peanut butter, I love both Trader Joe’s and Teddie’s brand.
Maple Syrup – Really any liquid sweetener will work in these peanut butter balls. Maple syrup, along with honey and date syrup, are the three least processed options which is why I always use and recommend them. Though is you don’t have those, you can use agave nectar instead. Or, for a sugar-free dessert option, check the “Make it Sugar-Free” section below!
Almond Flour – This gluten-free, low-carb flour is one of my favorites! It’s healthy, super easy to find, and virtually flavorless. The almond flour is also super helpful in holding these dessert balls together, so don’t go without it.
Crispy Rice Cereal – One cup of crispy rice cereal gives these peanut butter balls their unexpected crunch! Feel free to use whichever brand you like best. Or, for an even healthier option, use one cup of puffed quinoa instead.
Tips and Tricks
Don’t feel like dipping in chocolate? Save major time and energy my melting the chocolate, then simply drizzling over the top of each ball!
For an extra salty plus sweet combo, finish off these crunchy no-bake peanut butter balls with a pinch of flaky sea salt! A bit of salt balances out the sweetness, and adds an extra layer of crunch.
These treats are best stored in the refrigerator! The freezer works too, but the fridge helps them hold their shape while also maintaining their crunchiness. But whatever you do, don’t store them at room-temperature, and especially not in the summertime because they will melt!
Adjust This Recipe To Your Dietary Needs
Make it Nut-Free: For a nut-free no-bake dessert, sub sunflower seed butter for the peanut butter and 3 tablespoons of coconut flour in place of the almond flour! Still just as delicious, and totally nut-free friendly.
Make it Sugar-Free: Replace the maple syrup in this recipe with your favorite liquid sugar-free sweetener.
Recipe by SamanthaCourse: Dessert, SnacksDifficulty: Easy
Servings
16
balls
Prep time
15
minutes
Cooking time
0
minutes
Total time
10
minutes
Crunchy peanut butter balls covered in chocolate! Perfectly sweet, surprisingly healthy, and super easy to make. This no-bake dessert is the perfect summer treat when it’s too hot to turn on the oven!
Ingredients
1cupcreamy peanut butter, unsweetened
1/3cupmaple syrup
1teaspoonvanilla extract
1/2cupalmond flour
1cupcrispy rice cereal
For dipping/drizzling:
1cupchocolate chips
1teaspooncoconut oil
Directions
Mix together the creamy peanut butter, maple syrup, and vanilla extract in a large bowl.
Add in almond flour and crispy rice cereal, mix to combine.
Scoop and roll tablespoon-sized balls of the peanut butter ball mixture between the palms of your hands. Repeat this process until no more mixture remains, should make about 12 crunchy peanut butter balls.
Place balls in freezer for 10-15 minutes, and add chocolate chips and coconut oil to a small bowl. Microwave chocolate in 30 second increments until fully melted.
Once crunchy peanut butter balls are chilled, dip or drizzle with melted chocolate before placing back in the freezer. Freeze for at least 10 minutes before eating, then store in the fridge.
Perfectly smooth and creamy vegan ice cream – no fancy equipment required! Only three ingredients, this super easy plant-based recipe comes together in just two steps. The BEST sweet (but not too sweet) summertime treat!
What You’ll Need To Make No-Churn Vegan Ice Cream
Full-Fat Coconut Milk – Two cans (must be canned!) of full-fat coconut milk are the base of this creamy vegan ice cream recipe. I use and love the Native Forest Coconut Milk, but any unsweetened full-fat coconut milk should work. Other brands I recommend are Thai Kitchen and A Taste of Thai Coconut Milk.
Sweetened Condensed Coconut Milk – I used Nature’s Charm Sweetened Condensed Coconut Milk in my ice cream and it turned out perfect! However, I’m sure any brand of sweetened condensed coconut milk will work. And it doesn’t have to be coconut milk either, your sweetened condensed milk can be made of any non-dairy milk!
Vanilla Extract – A touch of vanilla extract for that deliciously sweet vanilla flavor! For an extra fancy ice cream, you can add a touch of vanilla bean paste as well.
Pinch of Salt – While not totally necessary, a pinch of salt helps to bring out the sweetness of this recipe! You’re gonna have to trust me on this one, a tiny pinch of salt goes a long way here. I highly recommend giving it a try!
Adjust The Flavors
Make it Vegan Chocolate Ice Cream: For a chocolate version, add 1/2 cup cocoa powder into the blender. And, for double chocolate (because why the heck not?!) swirl in some mini chocolate chips before freezing.
Add Cookie Dough: If you’re a cookie dough ice cream lover like me, sprinkle small scoops of this Healthy Cookie Dough into the coconut milk mixture right before freezing.
Make it Vegan Coffee Ice Cream: Blend a quarter cup of instant coffee powder in with the rest of the ingredients for a caffeinated twist!
Recipe by SamanthaCourse: UncategorizedDifficulty: Easy
Servings
8
servings
Prep time
5
minutes
Freezing Time
6
hours
Perfectly smooth and creamy vegan ice cream – no fancy equipment required! Only three ingredients, this super easy plant-based recipe comes together in just two steps. The BEST sweet (but not too sweet) summertime treat!
Ingredients
2(14-ounce) cansfull-fat coconut milk
1(11.2-ounce) cansweetened condensed coconut milk
1teaspoonvanilla extract
small pinch of salt
Directions
Add all vegan vanilla ice cream ingredients to a blender and blend until smooth.
Transfer to a lined loaf pan or large container, then freeze for 6 hours. Thaw for at least 10 minutes before serving.