Tag

almond flour

Browsing

These chicken taquitos are a healthier take on a comforting classic! They’re irresistibly crispy on the outside and loaded with flavorful shredded chicken on the inside. Throw these super easy chicken taquitos together with just three simple ingredients!

chicken taquitos on a plate with two glasses of beer and cilantro on the side

What You Need To Make Chicken Taquitos

Chicken Breast – I ran an instagram poll to see if you guys wanted to see chicken or beef taquitos, and chicken won by a landslide! But I don’t blame you guys. Chicken is a staple in my kitchen and something I always have at least a couple pounds of in my freezer.

Salsa – This is where the recipe gets super easy. A single jar of salsa packs in all the flavor this dish needs! I used a roasted chipotle salsa for these chicken taquitos. Though I’ve also tried regular salsa and even salsa verde – all tasted delicious!

Tortillas – I used and love Siete Foods Cassava Flour Tortillas for my taquitos. I love the cassava ones since they’re grain-free, making this recipe even healthier. They’re an amazing options for all my gluten-free friends out there too! However, any taco-sized tortilla will work here.

Adjust This Recipe To Your Diet

Make it Paleo: Use paleo salsa and grain-free tortillas to make these paleo chicken taquitos.

Gluten-Free Tortilla Options: Like I said above, I used Site Foods Grain-Free Tortillas in this recipe, though corn tortillas are a great gluten-free option as well.

Tips For Making Chicken Taquitos

  • Don’t forget to quickly heat your tortillas in a pan before rolling! Warming them up will make them more pliable, and less likely to break when rolled.
  • Avoid overfilling the tortillas with the shredded chicken. I found about 1/4 cup of chicken to be the perfect amount to fit inside each tortilla. Any more chicken and you run the risk of it either breaking through your tortilla or leaking out the sides!
  • Store leftover chicken taquitos in an airtight container in the fridge for up to 4 days. To reheat, place on a baking sheet in the oven at 400° Fahrenheit. Bake for 3-5 minutes or until heated throughout.

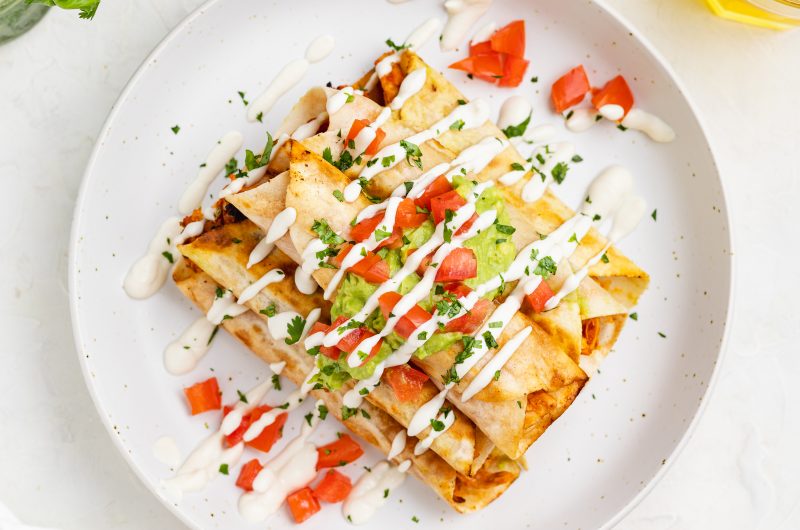
Three-Ingredient Chicken Taquitos (Gluten-Free, Dairy-Free)

0 from 0 votes
Recipe by Samantha Russo Course: MainCuisine: MexicanDifficulty: Easy
Servings

4

servings
Prep time

10

minutes
Cooking time

20

minutes
Total time

30

minutes

These chicken taquitos are a healthier take on a comforting classic! They’re irresistibly crispy on the outside and loaded with flavorful shredded chicken on the inside. Throw these super easy chicken taquitos together with just three simple ingredients!

Ingredients

  • 1 1/2 pounds boneless skinless chicken breast

  • 1 (16-ounce) jar salsa, see Notes

  • 6 tortillas

  • avocado crema, for serving

Directions

  • Place chicken and salsa in a large pot over medium-high heat, bring to a boil.
  • Once boiling, reduce to a simmer, and cook covered for 10-15 minutes or until chicken is cooked through.
  • Remove chicken from pot and shred with two forks then place back into pot and simmer for 1-2 minutes.
  • Place a large pan over medium heat and one by one, quickly warm up the tortillas for 30 seconds per side of until soft and pliable.
  • Place about 1/4 cup of shredded chicken into each tortilla and roll them up to form taquitos. Once all taquitos are prepped, place a couple tablespoons of oil in your pan.
  • Carefully place each taquito in the pan with the seam-side facing down, and lightly fry for 2-3 minutes per side or until golden brown.

Recipe Video

Notes

  • Salsa: Use your favorite salsa in this recipe, I’ve used a whole variety of salsas and they all turned out delicious!

Did you make this recipe?

Share it and tag @samdoesherbest on Instagram!

Like this recipe?

Follow us @samdoesherbest on Pinterest

Other Gluten-Free and Dairy-Free Mexican-Inspired Recipes

Fish tacos are a favorite around here, and making them in the air fryer is SUPER easy! Light, flaky fish is smothered in a smoky spice rub and rests atop a bed of homemade mango jalapeño salsa. Throw these tacos together in under 20 minutes and enjoy with friends, family, and loved ones!

air fryer fish tacos on a plate with beer on the side

What You Need To Make Air Fryer Fish Tacos

Firm White Fish – Cod, mahi mahi, and halibut are a few examples or firm white fish that would taste great in this recipe. I used wild caught cod fillets in my air fryer fish tacos and they cooked up perfectly flaky and delicious!

Smoked Paprika – Different from regular paprika, smoked paprika contributes this essence of smokiness to recipes that simply can’t be beat. If you don’t have smoked paprika at home, I highly recommend you go pick some up. It’s a great spice to use in all sorts of recipes and tastes especially delicious on fish, chicken, beef, and pork.

Tortillas – I use and love the Siete Almond Flour tortillas for all of my tacos! They’re a delicious grain-free tortilla that are pliable and hardly ever bottom out. However, you can use any kind of tortillas you’d like in this recipe. For a cheaper gluten-free alternative, I recommend corn tortillas. And if you’re not gluten-free, go ahead and use flour tortillas instead!

Adjust This Recipe To Your Diet

Make Them Air Fryer Chicken Tacos: Easily swap out the fish for a half a pound of boneless skinless chicken breast, then season and cook the chicken exactly how you would the fish in this recipe!

Make it Paleo: To make this dish paleo, use either Siete Grain-Free Tortillas or lettuce wraps in place of the tortillas.

Tips For Making Air Fryer Fish Tacos

  • Don’t forget to lightly coat your air fryer basket with a little bit of oil before placing the fish filets inside. Due to it’s light and flakiness, fish is at risk of sticking to the inside of the basket once cooked. Therefore, to avoid the hassle, quickly either sprits the inside of the basket with spray cooking oil or drizzle it with a little avocado oil before cooking!
  • Serve these air fryer fish tacos however you’d like. I love topping mine with sliced avocado and a little bit of chipotle mayo – YUM!
  • Store any leftovers in separate airtight containers in the fridge for up to 3 days. Avoid storing pre-assembled tacos in the fridge, since any moisture on the tortillas will sauce them to get soggy and break apart.

Air Fryer Fish Tacos

0 from 0 votes
Recipe by Samantha Russo Course: MainCuisine: MexicanDifficulty: Easy
Servings

2

servings
Prep time

10

minutes
Cooking time

10

minutes
Total time

20

minutes

Fish tacos are a favorite around here, and making them in the air fryer is SUPER easy! Light, flaky fish is smothered in a smoky spice rub and rests atop a bed of homemade mango jalapeño salsa. Throw these air fryer fish tacos together in under 20 minutes and enjoy with friends, family, and loved ones!

Ingredients

  • For the fish:
  • 1/2 pound firm white fish, see Notes

  • 1/2 teaspoon chili powder

  • 1/2 teaspoon smoked paprika

  • 1/2 teaspoon garlic powder

  • 1/4 teaspoon salt

  • For the salsa:
  • 2 tablespoons lime juice

  • 1 cup fresh mango, diced

  • 1/2 jalapeno, finely chopped

  • 1/4 cup fresh cilantro, chopped

  • 1/2 teaspoon salt

  • For serving:
  • 6 tortillas, see Notes

Directions

  • Mix together the chili powder, smoked paprika, garlic powder, and salt in a small bowl then evenly sprinkle over the fish.
  • Lightly coat the inside of air fryer basket with oil, then transfer fish to basket and cook at 400° Fahrenheit for 10 minutes.
  • While fish cooks, add all salsa ingredients to a bowl and toss to combine.
  • Warm tortillas then place a bed of homemade salsa and a few pieces of flaked fish into each taco.

Recipe Video

Notes

  • Firm White Fish: I used cod, though mahi mahi and halibut would work great as well!
  • Tortillas: I use and LOVE Siete Almond Flour Tortillas, though any tortillas will work in this recipe.

Did you make this recipe?

Share it and tag @samdoesherbest on Instagram!

Like this recipe?

Follow us @samdoesherbest on Pinterest

Other Fun and Flavorful Recipes

This healthy cookie dough is perfectly sweet and loaded with chocolate chips! With just 5 ingredients and in just 5 minutes, you’ll have a totally edible and good-for-you cookie dough. Sprinkle some of this healthy cookie dough over your favorite vegan ice cream for a healthier no-bake treat!

scoops of healthy cookie dough on a baking sheet

I’m sure we’ve all eaten raw cookie dough. I may or may not have purchased cookie dough in the past for the sole purpose of eating it raw. I know, don’t judge me! While I never thought twice about shoving spoonfuls of cookie dough in my mouth before it even had a chance to make it to the oven, there was always that little thought in the back of my mind like – this is SO not good for me. If anyone out there is like me and actually prefers raw cookie dough to the baked kind, then this recipe is for you!

This isn’t just any edible cookie dough recipe, it’s HEALTHY edible cookie dough. So healthy, in fact, that you could even enjoy it as an afternoon snack if you’d like! Protein-rich almond flour, a dash of natural maple syrup, and healthy fat-packed coconut oil make this edible cookie dough the most nutritious of its kind. I personally love whipping together a small batch of this stuff at around 3pm on a Tuesday when I am in dire need of a pick-me-up. This healthy cookie dough tastes indulgent without leaving you feeling like you overindulged. Trust me when I tell you this, you NEED this better-for-you sweet treat in your life. And lucky for you, with just five ingredients and five minutes you can have this healthy cookie dough in your life!

What You Need To Make Healthy Cookie Dough

Almond Flour – Almond flour is becoming easier and easier to find at the grocery store these days. I love almond flour for most of my gluten-free baked goods and treats. It also does a darn good job as the base in this recipe. If you don’t already have a bag of almond flour on hand, I highly recommend you go pick one up. And when you do, make sure this vegan and gluten-free cookie dough recipe is the first thing you make with it. Though be sure to purchase almond flour, and not almond meal. Almond meal is not as fine as the flour and will result in a grainier dough.

Coconut Oil – Coconut oil, like almond flour, is becoming increasingly easy to find at most major grocery stores. If you’re not a fan of that coconut flavor, try to use an ultra-refined coconut oil in this recipe. The refining process strips the oil of most, if not all of its flavor. If you don’t have coconut oil, you can easily use melted vegan butter or regular butter instead!

Vegan Chocolate Chips – I use and LOVE the Enjoy Life Mini Chocolate Chips for this recipe. Enjoy Life’s chocolate is entirely dairy, nut, and soy-free. Making it the ultimate addition to this healthier recipe. However, feel free to use your favorite vegan chocolate chips in this recipe. You can even chop up a vegan chocolate bar into chunks and add that to your healthy cookie dough!

Adjust This Recipe To Your Diet

  • Add Dairy: Use regular melted butter instead of coconut oil if you’re not vegan or dairy-free.
  • Make it Sugar-Free: Substitute the maple syrup for your favorite sugar-free syrup, or leave it out altogether. Also, be sure to use sugar-free or stevia-sweetened chocolate chips instead!

Healthy Cookie Dough (Vegan, Gluten-Free)

4 from 29 votes
Recipe by Samantha Russo Course: DessertCuisine: AmericanDifficulty: Easy
Servings

2

servings
Prep time

5

minutes
Cooking time

0

minutes
Total time

5

minutes

This healthy cookie dough is perfectly sweet and loaded with chocolate chips! With just 5 ingredients and in just 5 minutes, you’ll have a totally edible and good-for-you cookie dough. Sprinkle some of this healthy cookie dough over your favorite vegan ice cream for a healthier no-bake treat!

Ingredients

  • 1 1/4 cups almond flour

  • 3 tablespoons maple syrup

  • 3 tablespoons coconut oil or vegan butter, melted

  • 1 teaspoon vanilla extract

  • Pinch of salt

  • 1/4 cup vegan chocolate chips, see Notes

Directions

  • Stir together all ingredients except chocolate chips, until combined.
  • Fold in the chocolate chips and serve.

Recipe Video

Notes

  • I used mini vegan chocolate chips in this recipe, though you can use any kind of chocolate chips or chunks you’d like!

Did you make this recipe?

Share it and tag @samdoesherbest on Instagram!

Like this recipe?

Follow us @samdoesherbest on Pinterest

Other Healthier Dessert Recips

These mini vegan berry shortcakes are as cute as they are delicious! A few simple ingredients come together to create a soft shortcake base, which is then topped off with homemade coconut whipped cream. A sprinkling of fresh berries is the finishing touch to this easy and adorable dessert!

close-up image of mini vegan berry shortcakes

These Mini Vegan Berry Shortcakes Are…

  • Soft
  • Crumbly
  • Perfectly Sweet
  • Grain-Free
  • Fresh
  • Summery
  • & a total crowd-pleaser!

What You Need To Make Mini Vegan Berry Shortcakes

Almond Flour – This gluten and grain-free flour is a staple in my kitchen. Almond flour has a very mild taste and gives these shortcakes their irresistibly soft and crumbly texture! While almond flour used to be difficult to locate, you can easily find it either online or in most grocery stores these days.

Coconut Flour – This particular ingredient is vital to the construction of these mini vegan berry shortcakes. Coconut flour holds together these tiny treats, in the absence of eggs. It is very important that you do not skip or replace this it with any other type of flour (unless noted in the flour substitutions section below).

Coconut Cream – If you’re looking to make the vegan coconut whipped cream yourself, you’re going to need a can of coconut cream! I highly recommend the tiny cans of Native Forest Coconut Cream which can be found at Whole Foods. However, if you can’t find that particular brand then pick up any can of coconut cream and use just the solid coconut cream at the top of the can in this recipe. This step will ensure your cream whips up beautifully light and fluffy!

Adjust This Recipe To Your Dietary Needs

Make it Nut-Free: I have not tested this myself, but I can imagine that equal parts oat flour would work in place of the almond flour in this recipe. If you give this a try, let me know how it turns out! 🙂

Flour Substitutions: I get asked a lot if all purpose flour can be subbed in my gluten-free recipes and for this one in particular, you can try using 1 1/2 cups of all purpose flour in place of the almond and coconut flour. Though keep in mind that I have also not tested this myself and therefore cannot attest to its success! If you opt for all purpose flour in these mini vegan berry shortcakes, start with just one cup and the remaining half cup (or maybe even more flour) until a dough forms.

Mini Vegan Berry Shortcakes (Grain-Free)

5 from 1 vote
Recipe by Samantha Russo Course: DessertDifficulty: Easy
Servings

24

mini shortcakes
Prep time

30

minutes
Cooking time

15

minutes
Total time

45

minutes

These mini vegan berry shortcakes are as cute as they are delicious! A few simple ingredients come together to create a soft shortcake base, which is then topped off with homemade coconut whipped cream. A sprinkling of fresh berries is the finishing touch to this easy and adorable dessert!

Ingredients

  • For the vegan shortcakes:
  • 1/2 cup dairy-free butter, softened

  • 1/2 cup maple syrup

  • 1 teaspoon vanilla extract

  • 2 cups almond flour

  • 1/4 cup coconut flour

  • 1/2 teaspoon baking powder

  • For the coconut whipped cream:
  • 1 (13.5 ounce) can coconut cream

  • 1/4 – 1/2 cup powdered sugar

  • 1/2 teaspoon vanilla extract

  • For topping:
  • fresh berries

Directions

  • Preheat oven to 350° Fahrenheit and lightly grease a mini muffin pan.
  • Beat together the dairy-free butter and maple syrup, then add in the vanilla extract and mix until combined.
  • In a separate bowl, combine the almond flour, coconut flour, and baking soda.
  • Add the dry ingredients into the wet ingredients and mix until combined, then cover and let chill in the fridge for 20 minutes.
  • Scoop two tablespoons of dough into each mini muffin mold and press down then up the sides to form a cup shape.
  • Bake for 12-15 minutes, then let cookies cool in pan for 15 minutes before transferring to a wire cooling rack to cool completely.
  • While cookies cool, remove the top later of solid coconut cream from the can and discard any liquid. Beat coconut cream along with powdered sugar and vanilla extract until light and fluffy.
  • Top each mini shortcake with whipped cream and fresh berries – enjoy!

Recipe Video

Notes

  • Store these mini vegan berry shortcakes in an airtight container in either the fridge or freezer!

Did you make this recipe?

Share it and tag @samdoesherbest on Instagram!

Like this recipe?

Follow us @samdoesherbest on Pinterest

Other Delicious Vegan Dessert Recipes

These cranberry orange scones are perfectly flaky and sweet! I took a traditional recipe and turned it gluten and dairy-free with just a few simple swaps. These scones taste incredible with a warm cup of coffee for breakfast or lightly toasted as an afternoon snack.

Cranberry orange scones stacked on top of eachother.

Breakfast in bed was the big thing on Mother’s Day in my house. And because my dad can barely boil an egg, the cooking of breakfast was always my job. I always loved to cook, so I had fun thinking up a breakfast menu for my mom on Mother’s Day. I don’t remember too many menu items from over the years, but I do remember making her cranberry orange scones one year. And the only reason I remember is because I truly couldn’t believe how INCREDIBLE they were! Ever since that Mother’s Day, I’ve thought about those scones frequently. And honestly, I have no good excuse as to why I haven’t remade them sooner?!

Though for this year’s cranberry orange scones, I added my Sam Does Her Best signature gluten-free and dairy-free twist. You know what it is. Not going to lie here either, I was pretty worried these just wouldn’t work sans gluten and dairy. But to my surprise, they definitely did. And not only did they work, but they taste even better than what I remember! So without further ado, I present to you gluten-free and dairy-free cranberry orange scones that will change your Mother’s Day game forever.

What You Need To Make Cranberry Orange Scones

Gluten-Free Flour – I use and recommend Bob’s Red Mill Gluten-Free 1:1 Baking Powder, it’s pretty much an exact dupe to regular all purpose flour. Though feel free to use any gluten-free flour you’d like, my only recommendation would be to make sure that it contains xantham gum. Xantham gum is a stabilizer and a key ingredient in holding your baked goods together.

Dairy-Free Butter – Make sure your butter is ice cold for this recipe! I’d even recommend dicing it into cubes and then sticking it in the freezer for 10 minutes or so. Cold butter is signature to any and all scones because when baked, it gives your scones that irresistible flaky texture.

Dairy-Free Milk – I used almond milk and had great results, but feel free to use whatever unsweetened dairy-free milk you’d like in these cranberry orange scones. You also want to make sure that the milk is cold, in order to ensure the butter in this recipe stays cold.

Tips and Tricks

  • Use a fork to combine the butter into the flour. When mixing, lightly mash the butter cubes with the back of the fork. You’re simply looking to break up the butter into the dry ingredients. You’ll know you’re done with this step when you have a crumbly mixture and your butter is the size of peas.
  • Lightly whisk the eggs before adding them into the cranberry orange scones dough. Crack them in a bowl and give them a quick whisk with a fork to break up the yolks before proceeding with the recipe.
  • Make sure your surface is well-floured before transferring the dough onto it. The dough will be quite sticky, but when introduced to flour on your work surface, will be much easier to handle! Continue sprinkling gluten-free flour on the surface, on your hands, or on the dough itself whenever it feels too sticky to work with.

Cranberry Orange Scones (Gluten-Free, Dairy-Free)

0 from 0 votes
Recipe by Samantha Russo Course: SnacksCuisine: ScottishDifficulty: Intermediate
Servings

8

scones
Prep time

10

minutes
Cooking time

20

minutes
Total time

30

minutes

These cranberry orange scones are perfectly flaky and sweet! I took a traditional recipe and turned it gluten and dairy-free with just a few simple swaps. These scones taste incredible with a warm cup of coffee for breakfast or lightly toasted as an afternoon snack.

Ingredients

  • 2 1/2 cups gluten-free flour

  • 1/4 cup almond flour

  • 1/4 cup sugar

  • 1 tablespoon baking powder

  • 1 tablespoon orange zest

  • 8 tablespoons cold dairy-free butter, cut into 1/4-inch cubes

  • 1 cup cold dairy-free milk

  • 2 large eggs, whisked

  • 1 cup dried cranberries

  • For the egg wash:
  • 1 egg, whisked

  • For the icing:
  • 1/2 cup powdered sugar

  • 3 teaspoons fresh orange juice

Directions

  • Preheat oven to 400° Fahrenheit.
  • Mix together the gluten-free flour, almond flour, sugar, baking powder, and orange zest in a large bowl.
  • Add in the cubed butter and mix with a fork until the butter is the size of peas, then fold in the cranberries.
  • Add in the cold milk and whisked eggs, mix until just combined.
  • Transfer dough to a floured sheet of parchment paper set on a work surface and gently press into a 1-inch thick circle.
  • Slice into six triangles and transfer to a baking sheet, then brush with egg wash and sprinkle with extra sugar.
  • Bake for 15-20 minutes or until golden brown, then remove from oven, gently separate scones, and transfer to a wire rack to cool.
  • Make the icing by whisking the powdered sugar and orange juice together in a small bowl, then drizzle over cooled scones.

Recipe Video

Notes

  • Ingredient Swaps: Feel free to use all purpose flour instead of gluten-free flour, and leave out the almond flour if you’d like. You can also swap regular butter for the dairy-free butter and cow’s milk for the dairy-free milk in this recipe.

Did you make this recipe?

Share it and tag @samdoesherbest on Instagram!

Like this recipe?

Follow us @samdoesherbest on Pinterest

More Delicious Gluten-Free and Dairy-Free Recipes