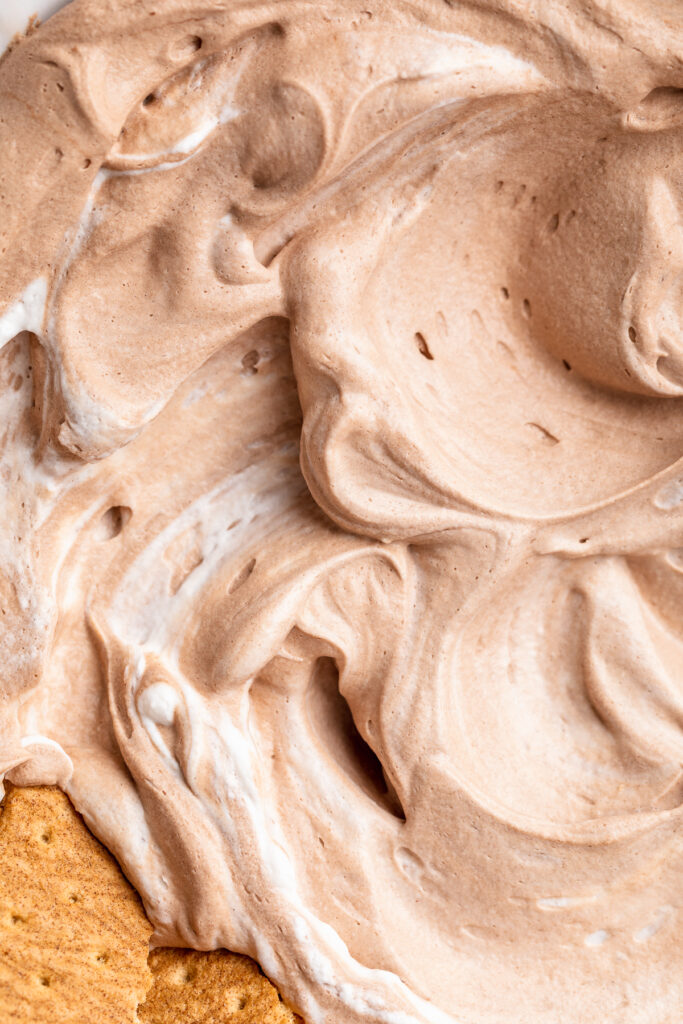
Tag

dairy-free

Browsing

Fluffy and perfectly spicy healthy gingerbread muffins! The perfect festive snack, that comes together in the blender. Oats, molasses, and ground ginger make these gingerbread muffins healthy AND delicious!

glunte-free gingerbread muffins piled on top of a marble board.

What You’ll Need to Make Gluten-Free Gingerbread Muffins

Old Fashioned Rolled Oats – It’s super important you use old fashioned/rolled oats in this recipe. Avoid instant, steel-cut, or Irish oats. The first step involves grinding these oats into a flour in your blender. When doing this, try to grind them as fine as possible. Finely ground oats will result in fluffier muffins!

Apple Sauce – I used apple sauce in these gingerbread muffins, because it yields little to no flavor. However, if you don’t have apple sauce, feel free to substitute it with 1/2 cup mashed banana. Mashed banana will give these muffins a slight banana flavor, which if you like banana, I’m sure you won’t mind.

Molasses – Any and all gingerbread recipes contain molasses, which is how they get their signature dark-brown color. Don’t skip the molasses, it’s super important for both the flavor and structure of these muffins.

Ground Ginger – Wouldn’t be gingerbread muffins without some ginger! This recipe packs in tons of that spicy ginger flavor, which I personally LOVE. However, if you want a more subtle ginger flavor, go ahead and use just 1/2 teaspoon ground ginger instead.

three gluten-free gingerbread muffins stacked on top of each other.

Tips and Tricks

  • Use a large cookie scoop or 1/4-cup measuring cup to fill your muffin tin. This’ll ensure even-sized muffins, with that beautiful dome on top!
  • For extra sweetness, top your muffins with a simple 2-ingredient powdered sugar glaze. To make it, whisk together 1/2 cup powdered sugar with 2-3 tablespoons milk. Once smooth, use a spoon to drizzle glaze over cooled gluten-free gingerbread muffins.
  • Store these muffins in an airtight container at room temperature for up to 3 days. Or, to make them last longer, pop them in the freezer for up to 3 months!

Adjust This Recipe to Your Dietary Needs

Make it Vegan: While I haven’t tested it myself, you can try replacing the eggs with either two flax eggs or by using your favorite vegan egg replacer. I’ve used this Bob’s Red Mill Egg Replacer in a number of other recipes and have always loved it!

gingerbread muffin with a bite taken out.
4.03 from 34 votes

Gluten-Free Gingerbread Muffins

Fluffy and perfectly spicy gluten-free gingerbread muffins! The perfect festive snack, that comes together in the blender. Oats, molasses, and ground ginger make these gluten-free gingerbread muffins healthy AND delicious!
Print Pin Rate
Prep Time: 5 minutes
Cook Time: 20 minutes
Total Time: 25 minutes
Servings: 10 muffins

Ingredients

  • 2 cups old fashioned rolled oats
  • 1/2 cup apple sauce, unsweetened
  • 1/2 cup maple syrup
  • 1/4 cup molasses
  • 2 eggs
  • 2 teaspoons vanilla extract
  • 2 teaspoons baking powder
  • 2 teaspoons cinnamon
  • 1 1/2 teaspoons ground ginger
  • 1/2 teaspoon nutmeg
  • 1/2 teaspoon salt

Instructions

  • Preheat oven to 350° Fahrenheit and line a muffin tin with muffin liners.
  • Add oats to a blender and blend until it’s ground into a flour.
  • Add in remaining ingredients, then blend until a smooth batter forms.
  • Transfer ½ cup batter into each muffin mold, then bake for 20-25 minutes or until a toothpick inserted down the center of one muffin comes out clean. Remove from oven and transfer muffins to a wire cooling rack, let cool before eating.

Nutrition

Calories: 300kcal

These gluten-free Christmas sugar cookies with baked-in sprinkles are so delicious that everyone will want a bite! With only a handful of pantry ingredients needed, baking these gluten-free Christmas cookies will surely get you into the holiday spirit. Perfect for gifts, parties, platters or all for yourself. Don’t forget to leave some for Santa!

Overhead image of a gluten-free Christmas cookie with red, green, and white sprinkles with a bite taken out.

What’s Christmas without festive sugar cookies to bring to parties, give as gifts, and leave out for Santa?! This homemade recipe is beyond any gluten-free Christmas cookie you’d find at the store. And baking them just really gets me into the holiday spirit! Bake these with your kids, friends, or partner while listening to Christmas music – it’s truly so much fun

Why You’ll Love This Gluten-Free Christmas Cookie Recipe

  • Fun For The Family: This is a great way to kick of your holiday season! Whether you’re measuring the sugar or your little ones are helping with the sprinkles, there’s room for everyone!
  • Easy and Quick: With a simple batter these cookies are ready for the oven and baked within 12 minutes.
  • Versatile and Customizable: Feel free to add chocolate chips, nuts, or crushed peppermint to the top of your cookies for a fun twist!

What You’ll Need To Make Gluten-Free Christmas Sugar Cookies

  • Butter: I used non-dairy butter to make these cookies dairy-free. Though whatever butter you use, make sure to soften it ahead of time!
  • Sugar: granulated sugar will work great for this recipe!
  • Eggs: These help bind the batter together, creating a soft classic christmas sugar cookie texture that will leave you wanting more!
  • Gluten-Free All Purpose Baking Flour: I use and love Bob’s Red Mill Gluten-Free Baking Flour for all my gluten-free baking recipes. Your gluten-free flour must contain xanthan gum. If it doesn’t, then add 1 teaspoon xanthan gum in with the dry ingredients.
  • Salt: This will help to bring the cookies together by providing a balance to the sweetness.
  • Christmas Sprinkles: If you don’t celebrate Christmas, feel free to use your favorite holiday sprinkles instead!
Close-up of a gluten-free Christmas cookie with a bite taken out.

How To Make The Best Gluten-Free Christmas Sugar Cookies

  • 1. Prepare Your Cookie Batter: Beat together your butter and sugar until light and creamy. Add your egg, and vanilla extract until well combined.
  • 2. Bake The Cookies: Scoop 2 tablespoons-sized balls of cookie dough and place them 2 inches apart on a baking sheet. Bake for 10-12 minutes.
  • 3. Remove and Cool: Remove cookies from the oven and let them cool on a cookie sheet for 5 minutes before transferring them to a wire rack to cool completely.

Tips, Tricks, and Storage

  • Making the Dough: It’s easier if you use a stand mixer or handheld mixer. But, if you want, I think it’s fun to do it by hand, just might take some extra elbow grease!
  • Make it Vegan: Okay, so usually I would swap the egg with a flax egg (1 tablespoon of ground flax meal mixed with warm water), but Bob’s Red Mill’s Egg Replacer might be the better option here. I haven’t tried this yet, but if you do, let me know in the comments!
  • Storage: Store the gluten-free Christmas cookies in an air tight container at room temperature for up to 5 days!

Additional Gluten- Free Holiday Favorites

overhead image of gluten-free christmas cookies
5 from 1 vote

Gluten-Free Christmas Sugar Cookies With Sprinkles

These gluten-free Christmas sugar cookies with baked-in sprinkles are soo delicious, everyone is going to want a bite! With only a handful of pantry ingredients needed, baking these Christmas cookies will surely get you into the holiday spirit. Perfect for gifts, parties, platters or all for yourself. Don't forget to leave some out for Santa!
Print Pin Rate
Prep Time: 10 minutes
Cook Time: 12 minutes
Total Time: 22 minutes
Servings: 16 cookies

Ingredients

  • 6 Tablespoons Softened Butter (Dairy or Non-Dairy)
  • 3/4 Cup Sugar
  • 1 Egg
  • 1 Teaspoon Vanilla Extract
  • 1 1/2 Cups Gluten-Free All Purpose Baking Flour, see Notes
  • 1 1/2 Teaspoons Baking Powder
  • 1/4 Teaspoon Salt
  • 1/2 Cup Sprinkles

Instructions

  • Preheat oven to 350° Fahrenheit and line a cookie sheet with parchment paper.
  • Beat the butter and sugar with either a hand or stand mixer until light and fluffy. Add in egg and vanilla extract, beat again to combine.
  • Add in the flour, baking powder, and salt. Beat together until a dough forms, then gently mix in the sprinkles until the sprinkles are evenly distributed throughout the dough.
  • Scoop 2 tablespoon-sized balls of cookie dough and place them about 2-inches apart on cookie sheet. Press down on each cookie to slightly flatten (they should be about 1-inch thick). Bake 10-12 minutes or until lightly golden around the edges.
  • Remove cookies from oven and let cool on cookie sheet for 5 minutes before transferring to a wire rack to cool completely.

Notes

Gluten-Free All Purpose Flour:Your gluten-free flour must contain xanthan gum. If it doesn’t, then add 1 teaspoon xanthan gum in with the dry ingredients.

Nutrition

Serving: 1cookie | Calories: 137kcal | Carbohydrates: 21g | Protein: 1.2g | Fat: 4.8g | Sugar: 12g

This hearty Mexican soup is full of fresh, delicious flavor! The perfect quick and easy dinner recipe to throw together on a busy weeknight. Requires only a handful of simple ingredients, cooked in one pot, in just 30 minutes!

overhead image of Mexican soup with avocado, cilantro, sour cream, and tortillas on top.

What You’ll Need to Make Mexican Soup

Chicken – This recipe calls for chicken breasts, but really any cut of chicken will work. My one recommendation when it comes to buying your chicken, is to make sure it’s boneless and skinless. This’ll make the cooking and dicing process much easier! Also, for a vegan/vegetarian Mexican soup, check out the “Adjust This Recipe to Your Dietary Needs” section below.

Chicken Broth – I used chicken bone broth in my Mexican soup for an extra boost of nutrients. However, any chicken broth, or even chicken bouillon dissolved in water will do the trick. And if you don’t have chicken broth, feel free to use vegetable broth instead.

Taco Seasoning – Two tablespoons of taco seasoning load this soup up with TONS of delicious flavor! This addition makes this recipe even easier to throw together. Though if you don’t have taco seasoning, feel free to use a combo of your favorite Mexican spices. I love smoked paprika, cumin, garlic powder, onion powder, and dried oregano.

Jalapeño – While optional, I love throwing in a diced jalapeño for extra flavor and spice! However, for a mild soup, try just half a jalapeño. Or, feel free to leave it out altogether.

mexican chicken soup in a bowl with a spoon.

Tips and Tricks

  • I highly recommend doubling this recipe! Leftover Mexican soup tastes just as good, and is easy to reheat and enjoy all week long. Heck, you can even freeze it for up to three months!
  • For a heartier meal, add rice! I love adding in a cup or two of cooked rice to my soup. And to keep things super easy, I typically opt for a pre-cooked microwaveable rice.
  • You can also make this Mexican soup in the Instant Pot! To do that, use the sauté function to cook up with veggies. Then, add the remaining ingredients, seal the lid and cook on high pressure for 15 minutes. After 15 minutes, remove the chicken, dice it up, then add it back into your soup – that’s it!
close-up overhead image of Mexican soup with avocado, cilantro, sour cream, and tortillas on top.

Adjust This Recipe to Your Dietary Needs

Make it Vegan/Vegetarian: For a vegan or vegetarian Mexican soup, replace the chicken with two cans of your favorite beans – I love either black beans or navy beans! Also, replace the chicken broth with vegetable broth.

Make it Gluten-Free: While mostly gluten-free, make sure the taco seasoning you use is 100% gluten-free as well!

overhead image of Mexican soup with avocado, cilantro, sour cream, and tortillas on top.
No ratings yet

One-Pot Mexican Soup

This hearty Mexican soup is full of fresh, delicious flavor! The perfect quick and easy dinner recipe to throw together on a busy weeknight. Requires only a handful of simple ingredients, cooked in one pot, in just 30 minutes!
Print Pin Rate
Prep Time: 5 minutes
Cook Time: 20 minutes
Total Time: 25 minutes
Servings: 5 servings

Ingredients

  • 2 tablespoons olive oil
  • 1/2 yellow onion, chopped
  • 1 celery stalk, chopped
  • 1 carrot, chopped
  • 3 garlic cloves, minced
  • 1 quart chicken broth
  • 1 (14-ounce) can crushed tomatoes
  • 1-2 pounds chicken breast
  • 2 tablespoons taco seasoning
  • salt, to taste

Instructions

  • Heat olive oil in a large pot over medium heat, Add in the onion, celery, carrots, garlic, and jalapeño. Cooked 4-5 minutes, or until veggies are tender.
  • Add in chicken broth, crushed tomatoes, chicken, taco seasoning, and salt.
  • Bring to a boil then reduce heat to a simmer, cook uncovered for 20 minutes. Remove chicken from pot, dice into ½-inch pieces, then transfer back into pot. Stir to combine then serve warm with fresh cilantro, lime juice, avocado, sour cream, and tortilla chips.

Nutrition

Calories: 300kcal

This light and fluffy gluten-free cornbread is perfectly sweet and surprisingly simple to make! With just a few easy swaps, you’ll have a gluten-free and dairy-free version of a comforting classic. Slather some dairy-free honey butter on a slice of this gluten-free cornbread for a delicious snack or side dish!

overhead image of gluten-free cornbread with honey butter on the side.

One Mother’s Day I wrote my Mom a card that read “Happy Mother’s Day! I like your cornbread.” And that my friends, is a true story. My Mom always made the BEST cornbread. Not too sweet, perfectly crumbly, and always served with her own homemade honey butter. I’d dream about that stuff and request it for breakfast, lunch, or dinner any chance I got.

While I wrote that Mother’s Day card many years ago, I’m still a huge fan of my Mom’s cornbread. Though her version has all of your “standard” ingredients – all purpose flour, milk, regular butter, etc. So when I set out to develop a gluten-free and dairy-free version of my Mom’s cornbread, I have to be honest, I didn’t have high hopes. But oh boy was I pleasantly surprised with how this recipe turned out! Nearly identical to the cornbread I grew up on, this gluten-free and dairy-free recipe does NOT disappoint. I was able to easily swap the all purpose flour for naturally gluten-free (and grain-free) flours, and the dairy for non-dairy counterparts. And if that hasn’t sold you on this cornbread – I was developed this recipe using just ONE BOWL. That’s right – easy baking and easy cleanup!

honey being drizzled over stacked gluten-free cornbread

What You Need To Make Gluten-Free Cornbread with Honey Butter

Cornmeal – Made from ground corn, this coarse “flour”is the star of this recipe! Though be sure to use cornMEAL and not corn starch or corn flour, which are simply not the same. And if you’re gluten-intolerant, be sure to use a cornmeal that reads “gluten-free” somewhere on the label. While cornmeal is naturally gluten-free, some brands may still contain traces of gluten.

Almond Flour – Not to be confused with almond meal, almond flour is a light, fluffy, and naturally gluten-free flour. Almond flour works in conjunction with tapioca flour to replace the all purpose flour in my Mom’s famous cornbread recipe. I’m not able to fully understand or explain the science of how these gluten-free flours work, but just trust me when I tell you, they WORK. Almond Flour and tapioca flour create a gluten-free cornbread that tastes just like any other cornbread!

Non-Dairy Butter – I use and love Earth Balance Vegan Buttery sticks in my dairy-free honey butter. However, feel free to use your favorite non-dairy butter in this recipe! And if you’re not dairy-free, feel free to use regular butter instead.

gluten-free cornbread with a bite taken out

Adjust This Recipe To Your Diet

  • Make it Vegan: Replace the egg with a flax egg and use maple syrup instead of honey to make this recipe vegan!
  • Add Dairy: Use regular milk instead of non-dairy milk, melted butter instead of coconut oil, and regular butter in the honey butter if you’re not dairy-free.
  • Make it Refined Sugar-Free: SURPRISE – this recipe is already refined sugar-free!
gluten-free cornbread with milk on the side.
4.38 from 8 votes

Gluten-Free Cornbread with Honey Butter

This light and fluffy gluten-free cornbread is perfectly sweet and surprisingly simple to make! With just a few easy swaps, you’ll have a gluten-free and dairy-free version of a comforting classic. Slather some dairy-free honey butter on a slice of this gluten-free cornbread for a delicious snack or side dish!
Print Pin Rate
Prep Time: 5 minutes
Cook Time: 20 minutes
Total Time: 25 minutes
Servings: 9 servings

Ingredients

For the cornbread:

  • 1 cup cornmeal
  • 1 cup almond flour
  • 1/2 cup tapioca flour
  • 1/4 cup coconut sugar
  • 2 teaspoons baking powder
  • 1 teaspoon salt
  • 1 cup non-dairy milk
  • 1 egg, see Notes
  • 1/4 cup coconut oil, melted

For the honey butter:

  • 1/4 cup dairy-free butter, softened
  • 1/4 cup honey, see Notes

Instructions

  • Preheat oven to 425° Fahrenheit and lightly grease an 8×8 baking dish.
  • Combine cornmeal, almond flour, tapioca flour, coconut sugar, baking powder, and salt in a large bowl.
  • Add in the almond milk, egg, and melted coconut oil then mix until well combined.
  • Transfer batter to the baking dish and bake for 20-25 minutes, then remove from the oven and transfer to a wire cooling rack.
  • While cornbread is cooling, mix together the softened butter and honey in a small bowl. Refrigerate the honey butter until ready to serve.

Notes

  • Egg: You can substitute the egg in this recipe for a flax egg or your favorite egg substitute.
  • Honey: Feel free to use maple syrup instead of honey to turn this into a maple butter recipe.
  • Nutrition

    Calories: 300kcal

    More Gluten-Free Recipes You NEED To Make

    Quick and easy white chicken chili made in the Instant Pot! Full of flavor, and deliciously creamy. Whip up this Instant Pot white chicken chili in under 30 minutes!

    close-up overhead image of Instant Pot white chicken chili with cilantro and avocado on top

    What You’ll Need to Make Instant Pot White Chicken Chili

    Chicken – Duh! Two boneless and skinless chicken breasts are the main characters of this show. However, if you don’t have chicken breasts, you can certainly use one to two pounds of any chicken part. Boneless and skinless chicken thighs would work great in this chili recipe, too!

    White Beans – A can of drained and rinsed white beans make for a heartier soup. They cook up perfectly soft and creamy in the Instant Pot, and absorb a ton of flavor. Any kind of white bean will work too! I used cannellini beans, but navy, great northern, or even lima beans would taste just as delicious.

    Jalapeño – One jalapeño adds loads of flavor, but very (and I mean VERY) little spice! If you’re worried about any spice, use just half a jalapeño instead. Or, if you’re like me, and loooove spice – use two or three whole jalapeños in this Instant Pot white chicken chili recipe!

    Cream Cheese – Melt some cream cheese into the pot for an ultra creamy, and velvety smooth soup! Cream cheese also adds a slight bit of tanginess to this chili, which is just to-die-for.

    Instant Pot white chicken chili in a bowl with lime wedges on the side.

    Tips and Tricks

    • Serve this easy weeknight meal however you’d like! I love mine with fresh avocado, cilantro, a squeeze of lime juice, and tortilla chips. And not just any tortilla chips, but these Siete Grain-Free Tortilla Chips – yum!
    • If the cream cheese and sour cream won’t melt in the last step, then turn your Instant Pot back on to the sauté setting. This’ll heat the pot up and help melt the creams!
    • Store leftover Instant Pot white chicken chili in an airtight container in the fridge for up to four days. Or, to enjoy weeks later, freeze this chili for up to three months! To reheat, simply transfer to the fridge for a few hours, then reheat in a pot until warm throughout.
    close-up image of Instant Pot white chicken chili in a bowl with avocado and cilantro on top.

    Adjust This Recipe to Your Dietary Needs

    Make it Vegan/Vegetarian: For a fully vegan or vegetarian white chili recipe, then replace the chicken with an additional can of white beans. Also, sub the chicken broth for vegetables broth – it’s that easy!

    Make it Dairy-Free: Use your favorite dairy-free cream cheese and dairy-free sour cream in this Instant Pot white chicken chili. Or, replace both of those things with a can of full-fat coconut milk, just as creamy and delicious!

    overhead image of Instant Pot white chicken chili with cilantro and avocado on top
    No ratings yet

    Instant Pot White Chicken Chili

    Quick and easy white chicken chili made in the Instant Pot! Full of flavor, and deliciously creamy. Whip up this Instant Pot white chicken chili in under 30 minutes!
    Print Pin Rate
    Prep Time: 5 minutes
    Cook Time: 20 minutes
    Total Time: 25 minutes
    Servings: 4 servings

    Ingredients

    • 2 tablespoons olive oil
    • 1 yellow onion, chopped
    • 4 garlic cloves, minced
    • 1 jalapeño, seeded and chopped
    • 1 teaspoon cumin
    • 1 teaspoon paprika
    • 1/2 teaspoon chili powder
    • 1/2 teaspoon salt
    • 1/4 teaspoon black pepper
    • 1 (15-ounce) can white beans, drained and rinsed
    • 2 boneless and skinless chicken breasts
    • 1 (4-ounce) can diced green chiles, undrained
    • 1 quart chicken broth
    • 1/2 cup sour cream or unsweetened plain Greek yogurt
    • 1/4 cup cream cheese
    • 1/2 cup fresh cilantro, chopped

    For serving:

    • Tortilla chips
    • Additional fresh cilantro
    • Lime wedges
    • Avocado, sliced

    Instructions

    • Turn Instant Pot to sauté setting and add in olive oil. Once oil is hot, add in the onion, garlic, and jalapeno. Sauté for 2-3 minutes or until veggies are tender.
    • Add the cumin, paprika, chili powder, salt, and black pepper, then cook for just 1 minute.
    • Add in the drained beans, chicken breast, diced green chiles, and chicken broth (in that order). Secure the lid and cook on high pressure for 15 minutes, then manually release the steam.
    • Remove chicken from Instant Pot and shred with two forks before adding back into the pot. While chili is still hot, add in the sour cream, cream cheese, and fresh cilantro then stir to combine. Serve warm with tortilla chips, additional cilantro, fresh avocado, and lime wedges.

    Nutrition

    Calories: 300kcal