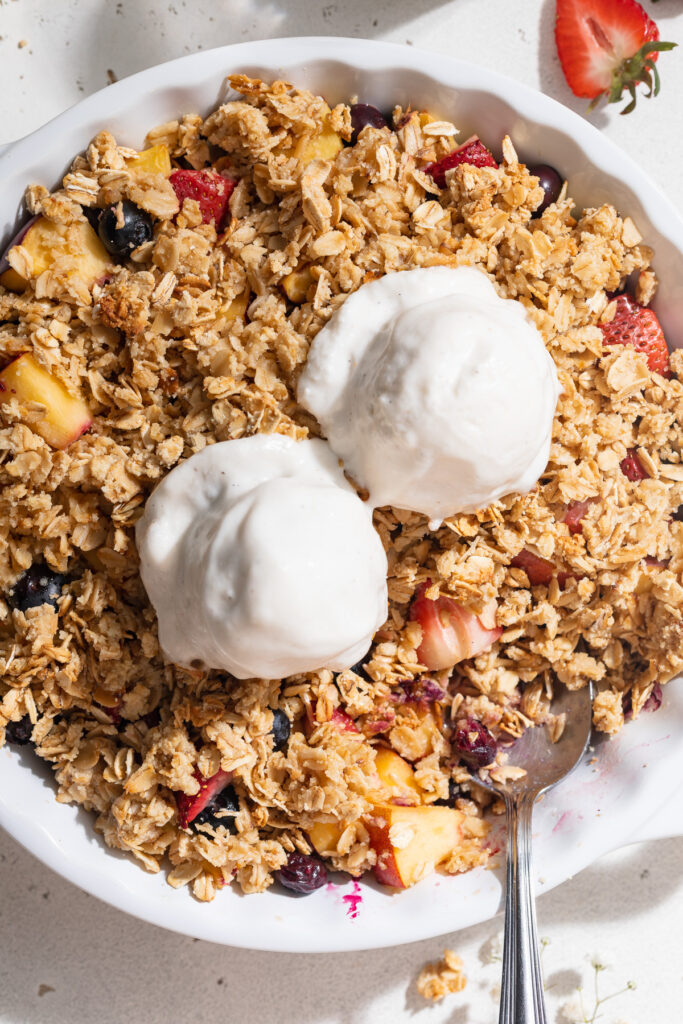
Tag

gluten-free

Browsing

The easiest Oreo mug cake, made with just 3 ingredients in 1 minute! This tiktok recipe went viral for a reason – because it’s so damn good. Whip up this fast and simple personal cake anytime you’re craving something sweet and delicious!

spoon scooping order mug cake out of a mug

What You’ll Need to Make Oreo Mug Cake

Oreos – I used gluten-free Oreos, but any Oreo will work! Have fun with this recipe, and use your favorite Oreo cookies. Double stuffed, golden, mint, etc. – all will taste delicious!

Milk – I used non-dairy milk, but just like the Oreos, any kind of milk will do!

Baking Powder – A little bit of baking powder gives this Oreo mug cake it’s cake-like texture. You can make the mug cake without it, but I wouldn’t recommend it. Just 1/4 teaspoon of this pantry-staple ingredient is all you’ll need.

overhead image of oreo mug cake with vanilla ice cream on top and milk on the side.

Tips and Tricks

  • Throw in any mix-ins you’d like! For a double chocolate mug cake, add in a tablespoon of mini chocolate chips. Or, if you’re feeling celebratory, a small handful of rainbow sprinkles are always a fun addition.
  • Top this Oreo mug cake with whatever you’d like. A scoop of ice cream, a dollop of whipped cream, or an extra crushed Oreo all taste incredible atop this personal cake!
  • Make sure you use a microwave-safe mug for this recipe! Not all mugs can be heated in the microwave. To check if your mug is safe to use, flip it over and check the bottom for the words “microwave safe.” If it doesn’t state that it’s microwave safe, it’s probably best to avoid using it in this recipe.
oreo mug cake with milk on the side.

Adjust This Recipe to Your Dietary Needs

Make it Vegan: For a vegan Oreo mug cake, simply use non-dairy milk in this recipe. Also, just so you know, all Oreos are actually completely vegan!

Make it Gluten-Free: Use gluten-free Oreos for a gluten-free mug cake!

overhead image of oreo mug cake with a scoop of vanilla ice cream on top.
4.75 from 4 votes

3-Ingredient Oreo Mug Cake

The easiest Oreo mug cake, made with just 3 ingredients in 1 minute! This tiktok recipe went viral for a reason – because it’s so damn good. Whip up this fast and simple oreo mug cake anytime you’re craving something sweet and delicious!
Print Pin Rate
Prep Time: 1 minute
Cook Time: 1 minute
Total Time: 2 minutes
Servings: 1 serving

Ingredients

  • 5 Oreos
  • 3 tablespoons milk
  • 1/4 teaspoon baking powder

Instructions

  • In a large microwave-safe mug, mash together 4 of the Oreos and milk, until you achieve a cake batter-like texture.
  • Add in the baking powder and stir to combine.
  • Microwave on high for 1 minute, then break off large chunks from the extra Oreo and place those on top of your mug cake. Top with vanilla ice cream and/or whipped cream, then enjoy warm!

Nutrition

Calories: 300kcal

Surprisingly simple, but totally delicious buffalo chicken salad! Complete with a homemade ranch dressing, this healthy recipe is FULL of delicious flavor. Quick and easy to make, it’s perfect for meal prep!

overhead image of buffalo chicken salad in a bowl with homemade ranch dressing and buffalo sauce on the side.

What You’ll Need to Make Buffalo Chicken Salad

Chicken – Start by either slicing and pounding chicken breasts until thin, or make your life super easy and buy pre-cut chicken cutlets! Or, if you’re not up for the extra step and can’t find chicken cutlets, then simply cook whole chicken breasts for your salad. If taking this option, you’ll likely need to cook the chicken for 4-5 additional minutes each side. To check if your chicken is fully cooked, insert a meat thermometer into the thickest part of a breast. Once the thermometer reads 165° Fahrenheit, then you’re chicken is cooked through and ready for this salad recipe!

Buffalo Sauce – I make my own buffalo sauce for this buffalo chicken salad because it’s truly so easy. However, you can totally buy pre-made buffalo sauce instead, if you’d like. For the homemade buffalo sauce, all you’ll need is hot sauce, melted butter, and honey – that’s it!

Ranch Dressing – Again, I made my own ranch dressing for this salad. But you can buy bottled ranch instead, if that’s more your thing. If I’m short on time or looking for a short cut, I use this Primal Kitchen Vegan Ranch Dressing – it’s lighter and healthier than most other ranch dressings on the market!

Blue Cheese – Salty, tangy blue cheese crumbles are the cherry-on-top of this buffalo chicken salad! Though you can totally add any kind of cheese you’d like to this meal. Or, for a non-dairy salad, leave the blue cheese out altogether.

homemade ranch dressing being poured over a buffalo chicken salad.

Tips and Tricks

  • Meal prep this buffalo chicken salad ahead of a busy week! It’s the perfect grab-and-go lunch recipe. To do this, prepare the salads, then store the buffalo sauce and ranch dressing separately. When ready to eat, dress the salads and enjoy!
  • Feel free to switch out/swap in any ingredients you’d like! This salad is super simple, and easy to customize – so have fun with it and don’t be afraid to make it your own.
  • I always recommend dressing this salad right before serving! Leftover salad (without dressing) will stay fresh in the fridge for up to four days.
buffalo chicken salad in a bowl with a fork.

Adjust This Recipe to Your Dietary Needs

Make it Dairy-Free: For a dairy-free salad, leave out the blue cheese and make the homemade ranch dressing with mayonnaise, instead of Greek yogurt.

Make it Vegan/Vegetarian: Make some simple plant-based swaps to turn this into a vegan buffalo salad recipe! Replace the chicken with chickpeas – toss them in the chicken seasoning, then roast them in the oven at 350° Fahrenheit for 15-20 minutes, or until crispy. Also, leave out the blue cheese and use a vegan mayo or plain vegan Greek yogurt to make the ranch dressing.

Close-up overhead image of buffalo chicken salad in a bowl.
5 from 1 vote

Buffalo Chicken Salad with Homemade Ranch Dressing

Surprisingly simple, but totally delicious buffalo chicken salad! Complete with a homemade ranch dressing, this healthy recipe is FULL of delicious flavor. Quick and easy to make, it’s perfect for meal prep!
Print Pin Rate
Prep Time: 5 minutes
Cook Time: 10 minutes
Total Time: 15 minutes
Servings: 4 servings

Ingredients

For the chicken:

  • 1-2 pounds chicken breasts, cut or pounded thin (or chicken cutlets)
  • 1 teaspoon garlic powder
  • 1 teaspoon onion powder
  • salt and black pepper, to taste
  • 1 tablespoon oil

For the buffalo sauce:

  • 1/2 cup Frank’s hot sauce
  • 1/4 cup melted butter
  • 3 tablespoons honey

For the ranch dressing:

  • 1 cup mayo or plain Greek yogurt
  • 2-3 tablespoons milk
  • 2 tablespoons lemon juice
  • 2 tablespoons fresh dill, chopped
  • 1 tablespoon fresh chives, chopped
  • 1 tablespoon fresh parsley, chopped
  • 1/2 teaspoon garlic powder
  • 1/4 teaspoon onion powder
  • 1/4 teaspoon salt
  • 1/4 teaspoon black pepper

For the salad:

  • 1 bunch romaine, chopped
  • 2 celery stalks, chopped
  • 1 avocado, sliced
  • 1/2 English cucumber, chopped
  • 1/2 cup shredded carrots
  • 1/2 cup tomatoes, chopped
  • 1/2 cup crumbled blue cheese

Instructions

  • Pat chicken breasts dry with a paper towel, then season on both sides with garlic powder, onion powder, salt, and black pepper.
  • Heat oil in a large skillet over medium-high heat, then sear chicken breasts 4-5 minutes per side or until cooked through.
  • Make the buffalo sauce by whisking together the hot sauce, melted butter, and honey in a small bowl.
  • Make the ranch dressing my whisking together all dressing ingredients in a small bowl.
  • Assemble the salad with romaine, celery, avocado, cucumber, carrots, blue cheese, and the cooked chicken, then top with a drizzle of buffalo sauce and ranch dressing.

Nutrition

Calories: 300kcal

These healthy teriyaki chicken rice bowls come together in under 20 minutes! Fresh ginger, garlic, tamari to make it gluten-free, and honey to naturally sweeten things up. Ditch the takeout this week, and make this healthier recipe instead!

close-up image of healthy teriyaki chicken

What You’ll Need to Make Healthy Teriyaki Chicken Rice Bowls

Chicken Breast: Boneless and skinless chicken breasts, cut into bite-sized pieces cooks in just a matter of minutes! However, feel free to use any piece/cut of chicken you’d like. Or, if you’re feeling adventurous, replace the chicken with salmon or tofu – the possibilities are endless!

Ginger: Fresh, grated ginger adds tons of delicious fresh flavor to our healthy teriyaki chicken. I usually purchase a bunch of fresh ginger (it’s pretty cheap!) and store it in my freezer until I need to use it. But if you can’t find fresh ginger, feel free to use just 1 teaspoon of dried ground ginger in its place.

Tamari: What is tamari? Tamari is simply gluten-free soy sauce. It tastes exactly the same as soy sauce, but is 100% gluten-free. It’s safe for people who suffer from celiac disease or a gluten intolerance! However, if you’re fine with gluten, go ahead and use soy sauce in this recipe instead.

Honey: A refined sugar-free sweetener to help balance this teriyaki sauce! You won’t notice the difference between this honey-sweetened sauce and the sauce you’d order at a restaurant.

healthy teriyaki chicken rice bowls with sliced green onion on top.

Tips and Tricks

  • I served my healthy teriyaki chicken over white rice with a side of steamed broccoli, but feel free to serve yours with whatever you’d like! Brown rice, quinoa, or even cauliflower rice make a great base to these bowls. Also, any steamed veggie will pair perfectly with this meal!
  • The chicken cooks pretty quickly in this recipe, thanks to it being cut into such small pieces. Therefore, keep an eye on it and be careful not to overcook the chicken. It should only take a few minutes to cook through!

Adjust This Recipe to Your Dietary Needs

  • Make it Gluten-Free: Use tamari instead of soy sauce, which is 100% gluten-free.
  • Make it Vegan/Vegetarian: Replace the chicken with pressed and cubed tofu, and the honey with maple syrup!
  • Make it Paleo: To make a paleo teriyaki chicken, simply replace the honey with maple syrup and use coconut aminos instead of soy sauce – it’s that easy! Also, serve over cauliflower rice or with extra steamed veggies, instead of white rice.
overhead image of healthy teriyaki chicken rice bowls with rice and broccoli.
4.37 from 19 votes

Healthy Teriyaki Chicken Rice Bowls

These healthy teriyaki chicken rice bowls come together in under 20 minutes! Fresh ginger, garlic, tamari to make it gluten-free, and honey to naturally sweeten things up. Ditch the takeout this week, and make this healthier recipe instead!
Print Pin Rate
Prep Time: 5 minutes
Cook Time: 15 minutes
Total Time: 20 minutes
Servings: 4 servings

Ingredients

  • 1 pound chicken breast, cut into 1-inch pieces
  • 1 tablespoons avocado oil
  • pinch of salt
  • 1-inch piece fresh ginger, peeled and grated
  • 3 garlic cloves, minced
  • 1/4 cup tamari, or soy sauce
  • 1 tablespoons lemon juice
  • 1 teaspoon sesame oil, optional
  • 2 tablespoons honey
  • 1 tablespoon corn starch
  • 3 tablespoons water

For serving:

  • 2 cups cooked rice
  • 1 crown broccoli, steamed
  • sliced green onions
  • sesame seeds

Instructions

  • Heat olive oil in a large pan over medium heat, add in the chicken and sprinkle with salt. Cook chicken for 2-3 minutes per side or until cooked through. Transfer to a bowl and set aside.
  • Reduce heat to low, add in the ginger and garlic, cook for 1 minute or until fragrant. Add in the tamari or soy sauce, lemon juice, sesame oil, and honey, mix together. 
  • In a separate bowl, whisk together the cornstarch and water until the cornstarch has dissolved. Transfer corn starch and water to the sauce along with the cooked chicken. 
  • Stir until sauce thickens, about 3-4 minutes. Divide between four bowls with rice and broccoli, then top with sliced green onions and sesame seeds.

Notes

  • Storage: Store the rice and vegetables in a separate container than the teriyaki chicken. Place them both in airtight containers in the fridge for up to 3 days. 
  • Nutrition

    Calories: 300kcal

    OTHER HEALTHY RECIPES YOU’LL LOVE

    These 3-ingredient gluten-free bagels are truly magic! No yeast, kneading, rising, or boiling in water required. Just three simple ingredients, and these bagels are ready to eat in 30 minutes!

    gluten-free bagels on a baking sheet with cream cheese on the side.

    I like to think I know a thing or two about bagels. Not only were they my favorite food growing up, but I currently live in Brooklyn – home of the BEST BAGELS in the WORLD! So ya, I’ve had some really good bagels. A bagel should be toasty on the outside, fluffy on the inside, easy to slice through, and ready for toasting – and these gluten-free bagels are just that.

    Now I’m sure you’re wondering – Sam, why bother making your own bagels if you can just buy literally the world’s best bagels from that place down the street. Well, I’ll tell you exactly why – because I can’t find a single good gluten-free bagel! They’re near impossible to track down. And the ones I do find are either too dense or extremely overpriced (or both). So I quickly realized if I wanted a gluten-free bagel, I’d just have to make it myself. And that, friends, is how the magic 3-ingredient gluten-free bagel was born!

    3 gluten-free bagels stacked on top of each other.

    What You’ll Need to Make 3-Ingredient Gluten-Free Bagels

    Gluten-Free All Purpose Flour – Your gluten-free flour must contain xanthan gum! If it doesn’t, add 1/2 teaspoon of xanthan gum to this recipe. Gluten-free all purpose flours I use and recommend are Bob’s Red Mill Gluten-Free Baking Flour and King Arthur Gluten-Free Flour, both of which contain xanthan gum. I used the King Arthur flour in these bagels and they turned out perfect!

    Baking Powder – We replace the yeast found in traditional bagel recipes with baking powder. Baking powder makes it so we don’t have to wait for our bagel dough to rise before baking. Instead, we can simply shape, then bake these bagels right away – super easy!

    Greek Yogurt – Any plain and unsweetened Greek yogurt will work in this gluten-free bagels recipe! I even used Kite Hill’s non-dairy Greek yogurt to make my bagels dairy-free.

    gluten-free bagels on a plate with cream cheese on the side.

    Adjust This Recipe to Your Dietary Needs

    Make it Vegan: To make vegan and gluten-free bagels, use a vegan greek yogurt and leave off the egg wash.

    gluten-free bagels on a baking sheet with cream cheese on the side.
    4.04 from 78 votes

    Magic 3-Ingredient Gluten-Free Bagels

    These 3-ingredient gluten-free bagels are truly magic! No yeast, kneading, rising, or boiling in water required. Just three simple ingredients, and these bagels are ready to eat in 30 minutes!
    Print Pin Rate
    Prep Time: 10 minutes
    Cook Time: 20 minutes
    Total Time: 30 minutes
    Servings: 6 bagels

    Ingredients

    • 2 cups gluten-free all purpose flour, see Noted
    • 2 teaspoons baking powder
    • pinch of salt
    • 1-2 cups plain unsweetened Greek yogurt, dairy-free if necessary

    For topping:

    • 1 large egg
    • 1 teaspoon water
    • pinch of salt
    • everything bagel seasoning, sesame seeds, poppy seeds, etc.

    Instructions

    • Preheat oven to 400° Fahrenheit and line a baking sheet with parchment paper.
    • In a large bowl, whisk together the gluten-free all purpose flour, baking powder, and salt. Then, add in 1 cup of Greek yogurt and stir until a shaggy dough forms.
    • Using your hands, mix and form the dough into a smooth ball. If the dough seems too dry and won’t come together in a ball, add in more Greek yogurt – you may have to use an additional 1 cup of yogurt to reach the desired consistency.
    • Divide dough into 6 equal parts and shape each part into a ball. Use your thumbs to make a hole in the center of each ball, then gently pull to form a ring resembling a bagel.
    • Transfer bagels to the prepared baking sheet. Make the egg wash by whisking together the egg, water, and salt in a small bowl. Brush each bagel with egg wash and top with whatever toppings you’d like (or leave plain).
    • Bake bagels for 20-22 minutes, rotating baking sheet halfway through baking, until bagels are uniformly golden brown. Let cool slightly before slicing, topping, and eating.

    Notes

  • Gluten-Free All Purpose Flour: Your gluten-free flour must contain xanthan gum, if it doesn’t add 1/2 teaspoon of xanthan gum to this recipe.
  • Gluten-free bagels will stay fresh in an airtight container in the fridge for up to 3 days. Or, you can freeze them for up to 3 months! Because of the yogurt, these do not keep well at room temperature.
  • Nutrition

    Calories: 300kcal

    Irresistibly crispy pizza smashed potatoes! I took two of my favorite food groups and combined them into one delicious appetizer. Fun and easy to make, with only a handful of simple ingredients!

    overhead image of pizza smashed potatoes on a baking sheet.

    What You’ll Need to Make Pizza Smashed Potatoes

    Baby Potatoes – These adorable little spuds come in all sorts of colors and shapes, and really any will work in this recipe. When selecting your baby potatoes, I recommend grabbing a bag that all look pretty similar in size, to ensure they roast up evenly! I used these to make my pizza smashed potatoes, and they were delicious.

    Pizza Sauce – Either homemade or store-bought pizza sauce works! I used store-bought canned pizza sauce, to make this recipe extra quick and easy. But, if you’re up for the task, go ahead and whip up a homemade sauce – I’ll cheer you on!

    Grated Cheese – Mozzarella cheese is the most common pizza topping, but there are plenty of other tasty options out there! I used a freshly grated goat cheese with a lower lactose content, because I’m sensitive to dairy. But feel free to use any kind of grated cheese you’d like! A freshly grated parmesan, provolone, or pecorino romano all taste amazing!

    pizza smashed potatoes on a plate with beer on the side.

    Tips and Tricks

    • Avoid over-boiling your baby potatoes in the first step. Over-boiling/cooking will make them too soft, and they won’t hold their shape when smashed. Therefore, boil potatoes until just fork tender, then strain!
    • You can make these pizza smashed potatoes in the air fryer! To do that, follow the recipe up to the point of roasting. Then, instead of roasting them in the oven, cook them in the air fryer at 400° Fahrenheit for 15-20 minutes.
    • Prep this recipe ahead of time, then pop it in the oven 20 minutes before serving! This is a great game day, potluck, or dinner party app. It’s super hands off, and everyone LOVES them!
    holding up a pizza smashed poatoes.

    Adjust This Recipe to Your Dietary Needs

    Make it Vegan/Dairy-Free: For vegan pizza smashed potatoes, replace the cheese with your favorite vegan/non-dairy cheese. Or, sprinkle with nutritional yeast and leave the cheese out altogether!

    close-up overhead image of pizza smashed potatoes with oregano.
    No ratings yet

    Pizza Smashed Potatoes

    Irresistibly crispy pizza smashed potatoes! I took two of my favorite food groups and combined them into one delicious appetizer. Fun and easy to make, with only a handful of simple ingredients!
    Print Pin Rate
    Prep Time: 5 minutes
    Cook Time: 45 minutes
    Total Time: 50 minutes
    Servings: 8 servings

    Ingredients

    • 2 pounds baby potatoes
    • salt, to taste
    • 2 tablespoons olive oil
    • 1 1/2 teaspoons garlic powder
    • 1 teaspoon onion powder
    • 1/2 cup pizza sauce
    • 1 cup grated cheese (parmesan, asiago, provolone, mozzarella, etc.)
    • pinch of dried oregano

    Instructions

    • Bring a large pot of water to a boil, then add in a big pinch of salt and the potatoes. Boil potatoes for about 15-20 minutes, or until easily pierced with a fork.
    • Preheat oven to 425° Fahrenheit.
    • Drain potatoes from water and let cool slightly, then transfer to a large baking sheet. Use a bowl, mug, or a heavy glass to smash each potato until they’re about ¼-inch thick.
    • Drizzle potatoes with olive oil, then sprinkle with garlic powder, onion powder, and a pinch of salt. Roast for 20-25 minutes, or until golden brown and crispy.
    • Remove potatoes from oven and top each smashed potato with about 2 teaspoons of sauce and a tablespoon of grated cheese. Then, finish each potato off with a sprinkling of dried oregano, and roast for an additional 5-10 minutes or until cheese is melted and bubbly.

    Notes

  • Store leftover potatoes in an airtight container in the fridge for up to 4 days! To reheat, either microwave on high for 1-2 minutes, or put them back in the oven for 5-7 minutes.
  • Nutrition

    Calories: 300kcal