Tag

healthy breakfast

Browsing

We brought our toddler apple picking last weekend and I currently swimming in apples over here! Just SO many apples. We of course made my healthy gluten-free apple crisp as soon as we got home. I’ve also been making caramelized apples to go over yogurt and oatmeal bowls (so good OMG!). But we still have more apples than we know what to do with! *Enter the apple pie smoothie.*

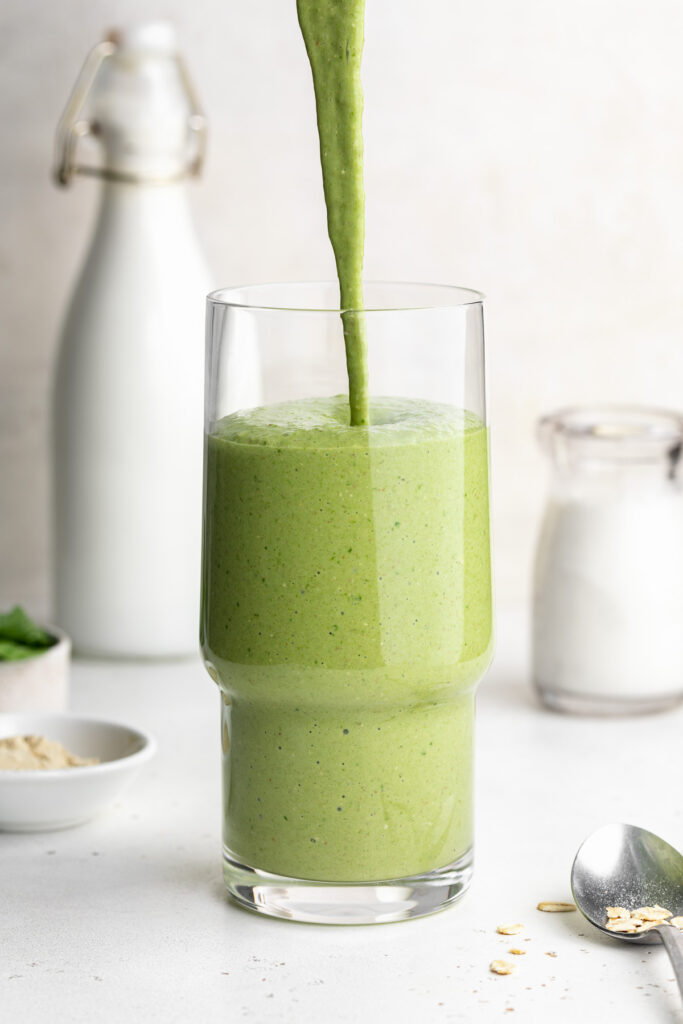
It’s true what they say… an apple a day keeps the doctor away! This smoothie starts with one whole apple, plain yogurt, and a scoop of protein powder for extra protein. The end results is a creamy and perfectly sweet high protein smoothie that tastes just like apple pie. It’s nutritious, deeply satisfying, and guaranteed to keep you full until your next meal!

apple pie smoothie in a glass with whipped cream.

Why You’ll Love This Recipe

This healthy apple pie protein smoothie is the perfect blend of flavors for a cozy, yet refreshing treat. It’s packed with protein, naturally sweetened, and full of fall flavors that make you feel like you’re enjoying a slice of apple pie. Plus, it’s gluten-free, dairy-free, and takes just a few minutes to whip up!

What You Need to Make This Healthy Apple Pie Smoothie

Apple: A fresh apple adds natural sweetness, fiber, and a classic apple pie flavor.

Plain Yogurt (Non-Dairy): This adds creaminess and a boost of protein while keeping the smoothie dairy-free. I recommend Cocojune organic plain unsweetened coconut yogurt, it’s perfectly thick and creamy! Though you can use regular yogurt if preferred.

Milk (Almond Milk): This helps to blend the smoothie and adds a touch of nuttiness from the almond milk. Any milk can work depending on your dietary needs.

Unflavored Protein Powder or Collagen Peptides: Boosts protein content to keep you full longer. Unflavored protein powder blends seamlessly with the apple pie flavors. I use and love the Garden of Live vegan protein powder in most of my protein smoothies!

Rolled Oats or Almond Butter: Adds creaminess and thickness to the smoothie. You can swap with almond butter for extra creaminess or keep it grain-free.

Cinnamon: The spice that gives this smoothie its signature apple pie flavor.

Honey or Maple Syrup (Optional): For a little extra sweetness if needed, especially if your apple isn’t very sweet.

apple pie smoothie with a straw.

Can I Prep This Apple Pie Smoothie Ahead of Time?

Yes! You can prep the ingredients the night before by chopping the apple and measuring out the other ingredients. Store them in the fridge, then blend them together in the morning. If you want to make the smoothie ahead of time, blend it and store it in an airtight jar in the fridge for up to 24 hours. Just give it a good shake before drinking!

Tips and Tricks For the Best Smoothie

  • For a thicker, creamier smoothie either use a frozen apple instead of a fresh one, or add half of a frozen banana to the blender along with all of the other ingredients.
  • Blend your smoothie for longer to ensure a smooth texture without any lumps.
  • Add ice cubes if you like your smoothie extra cold, or freeze the almond milk into cubes for added creaminess!

Adjust This Recipe to Your Dietary Needs

  • Make it Vegan: Use non-dairy yogurt and plant-based protein powder to make this smoothie 100% vegan.
  • Grain-Free: Skip the oats and use almond butter for added creaminess and healthy fats.
  • Make it Nut-Free: Substitute almond milk with oat milk, and use oats instead of almond butter. It’s that easy!
Apple pie protein smoothie in a glass with whipped cream and cinnamon on top.
5 from 1 vote

Apple Pie Protein Smoothie

This healthy apple pie protein smoothie is just what you need for a delicious, protein-packed, fall-inspired treat. It’s made with 7 simple ingredients, is gluten-free, dairy-free, high in protein, and can easily be adapted to fit any dietary needs!
Print Pin Rate
Prep Time: 5 minutes
Total Time: 5 minutes
Servings: 1 serving

Equipment

  • blender

Ingredients

  • 1 medium apple cored and cut
  • 1/2 cup plain yogurt (I used non-dairy coconut yogurt)
  • 1/4 cup milk (I used almond milk)
  • 1 scoop unflavored protein powder or collagen peptides
  • 1 tablespoon rolled oats or 1/2 tablespoon almond butter
  • 1/2 teaspoon cinnamon
  • 1/2 tablespoon honey or maple syrup optional

Instructions

  • Add all ingredients to a blender and blend until smooth, then enjoy immediately!

Nutrition

Serving: 1smoothie | Calories: 313kcal | Carbohydrates: 47g | Protein: 22.5g | Fat: 6g | Sugar: 28g

Looking for a way to boost your milk supply? Try this nourishing green lactation smoothie! Loaded with fruits, veggies, healthy fats, and plenty of protein.

lactation smoothie being poured into a glass.

As a first-time breastfeeding mom, I’m always looking for ways to increase my milk supply. And after lots and lots of research, I found the best way to increase my supply was through food. Aside from simply making sure I’m eating enough foods, there are certain foods that can actually boost milk production! So I took as many of those foods as possible (oats, greens, flaxseeds, brewer’s yeast) and added them to this lactation smoothie in a way that actually tastes good.

Nourishing green lactation smoothie with a metal straw.

What You’ll Need to Make a Nourishing Green Lactation Smoothie

Banana – A whole frozen banana makes this smoothie ultra-creamy, and gives it just a hint of natural sweetness. If you don’t like banana, you can use 1 cup of frozen mango instead!

Spinach – Dark leafy greens, such as spinach, are a great source of iron and calcium, which are essential for boosting your milk supply. Fresh spinach will have the most nutrients, but if you don’t have any, frozen spinach will also do the trick.

Oats – Look up any lactation recipe, and it’ll likely have oats in it. Oats are a go-to ingredient for increasing breast milk production. This is because oats are high in iron, and act as a complex carbohydrate – two vital components to a lactating mama’s diet!

Almond Butter – I add a healthy fat to all my smoothie recipes, which helps slow down the body’s digestion rate of the fruit, allowing us to absorb as many nutrients and hold onto as much protein as possible. Almond butter is a delicious healthy fat option in this lactation smoothie! Though feel free to use any nut butter you’d like – peanut, cashew, pecan, etc.

Brewer’s Yeast – Another lactation essential is brewer’s yeast! Brewer’s yeast is a known glactagogue, and thought by many to help increase milk supply. It’s totally flavorless, and a great addition to this smoothie recipe. Here’s a link to the brewer’s yeast I’ve been using and loving!

Overhead image of a nourishing green lactation smoothie with oats and spinach on the side.

Optional Add-Ins

Give your nourishing green lactation smoothie a boost with any of the following…

  • Chia Seeds – more healthy fats, omega-3s, and fiber.
  • Hemp Seeds – extra protein, healthy fats, omega-3s, and omega-6s.
  • Protein Powder – I love this Aloha Vanilla Protein Powder!
  • Honey – for an extra bit of sweetness.
  • Frozen Cauliflower – because why not?! more veggies!

Nourishing Green Lactation Smoothie

0 from 0 votes
Recipe by Samantha Course: Breakfast, SnacksDifficulty: Easy
Servings

1

serving
Prep time

5

minutes
Cooking time

0

minutes
Total time

5

minutes

Looking for a way to boost your milk supply? Try this nourishing green lactation smoothie! Loaded with fruits, veggies, healthy fats, and plenty of protein.

Ingredients

  • 1 frozen banana

  • 1/2 cup frozen strawberries

  • small handful fresh spinach

  • 2 tablespoons oats

  • 1 tablespoon almond butter

  • 1 tablespoon brewer’s yeast

  • 1 teaspoon ground flaxseed

  • 1 scoop vanilla protein powder, optional

  • 1 cup water or milk, I used unsweetened almond milk

Directions

  • Add all ingredients to a blender and blend until smooth.

Did you make this recipe?

Share it and tag @samdoesherbest on Instagram!

Like this recipe?

Follow us @samdoesherbest on Pinterest

These 3-ingredient gluten-free bagels are truly magic! No yeast, kneading, rising, or boiling in water required. Just three simple ingredients, and these bagels are ready to eat in 30 minutes!

gluten-free bagels on a baking sheet with cream cheese on the side.

I like to think I know a thing or two about bagels. Not only were they my favorite food growing up, but I currently live in Brooklyn – home of the BEST BAGELS in the WORLD! So ya, I’ve had some really good bagels. A bagel should be toasty on the outside, fluffy on the inside, easy to slice through, and ready for toasting – and these gluten-free bagels are just that.

Now I’m sure you’re wondering – Sam, why bother making your own bagels if you can just buy literally the world’s best bagels from that place down the street. Well, I’ll tell you exactly why – because I can’t find a single good gluten-free bagel! They’re near impossible to track down. And the ones I do find are either too dense or extremely overpriced (or both). So I quickly realized if I wanted a gluten-free bagel, I’d just have to make it myself. And that, friends, is how the magic 3-ingredient gluten-free bagel was born!

3 gluten-free bagels stacked on top of each other.

What You’ll Need to Make 3-Ingredient Gluten-Free Bagels

Gluten-Free All Purpose Flour – Your gluten-free flour must contain xanthan gum! If it doesn’t, add 1/2 teaspoon of xanthan gum to this recipe. Gluten-free all purpose flours I use and recommend are Bob’s Red Mill Gluten-Free Baking Flour and King Arthur Gluten-Free Flour, both of which contain xanthan gum. I used the King Arthur flour in these bagels and they turned out perfect!

Baking Powder – We replace the yeast found in traditional bagel recipes with baking powder. Baking powder makes it so we don’t have to wait for our bagel dough to rise before baking. Instead, we can simply shape, then bake these bagels right away – super easy!

Greek Yogurt – Any plain and unsweetened Greek yogurt will work in this gluten-free bagels recipe! I even used Kite Hill’s non-dairy Greek yogurt to make my bagels dairy-free.

gluten-free bagels on a plate with cream cheese on the side.

Adjust This Recipe to Your Dietary Needs

Make it Vegan: To make vegan and gluten-free bagels, use a vegan greek yogurt and leave off the egg wash.

gluten-free bagels on a baking sheet with cream cheese on the side.
4.03 from 77 votes

Magic 3-Ingredient Gluten-Free Bagels

These 3-ingredient gluten-free bagels are truly magic! No yeast, kneading, rising, or boiling in water required. Just three simple ingredients, and these bagels are ready to eat in 30 minutes!
Print Pin Rate
Prep Time: 10 minutes
Cook Time: 20 minutes
Total Time: 30 minutes
Servings: 6 bagels

Ingredients

  • 2 cups gluten-free all purpose flour, see Noted
  • 2 teaspoons baking powder
  • pinch of salt
  • 1-2 cups plain unsweetened Greek yogurt, dairy-free if necessary

For topping:

  • 1 large egg
  • 1 teaspoon water
  • pinch of salt
  • everything bagel seasoning, sesame seeds, poppy seeds, etc.

Instructions

  • Preheat oven to 400° Fahrenheit and line a baking sheet with parchment paper.
  • In a large bowl, whisk together the gluten-free all purpose flour, baking powder, and salt. Then, add in 1 cup of Greek yogurt and stir until a shaggy dough forms.
  • Using your hands, mix and form the dough into a smooth ball. If the dough seems too dry and won’t come together in a ball, add in more Greek yogurt – you may have to use an additional 1 cup of yogurt to reach the desired consistency.
  • Divide dough into 6 equal parts and shape each part into a ball. Use your thumbs to make a hole in the center of each ball, then gently pull to form a ring resembling a bagel.
  • Transfer bagels to the prepared baking sheet. Make the egg wash by whisking together the egg, water, and salt in a small bowl. Brush each bagel with egg wash and top with whatever toppings you’d like (or leave plain).
  • Bake bagels for 20-22 minutes, rotating baking sheet halfway through baking, until bagels are uniformly golden brown. Let cool slightly before slicing, topping, and eating.

Notes

  • Gluten-Free All Purpose Flour: Your gluten-free flour must contain xanthan gum, if it doesn’t add 1/2 teaspoon of xanthan gum to this recipe.
  • Gluten-free bagels will stay fresh in an airtight container in the fridge for up to 3 days. Or, you can freeze them for up to 3 months! Because of the yogurt, these do not keep well at room temperature.
  • Nutrition

    Calories: 300kcal

    This berry breakfast crisp tastes so indulgent, it might as well be dessert! But don’t worry, it’s entirely gluten-free, dairy-free, and refined sugar-free. It’s super healthy with plenty of plant-based protein and fiber which will leave you feeling full until your next meal!

    overhead image of berry breakfast crisp with coconut yogurt on top.

    What You’ll Need To Make Berry Breakfast Crisp

    Fresh Berries – Use any kind(s) of fresh berries you’d like! I used a combo of fresh strawberries, blueberries, and raspberries – and OMG they were delicious. However, you can totally use whatever berry’s in season, or whatever you have on-hand. You could even use frozen berries if you’d like, just keep in mind they’ll yield more liquid once baked, resulting in a watery filling.

    Rolled Oats – It’s super important you use rolled oats, instead of whole or steel cut oats. Rolled oats are flattened then toasted, and bake up beautifully in this berry breakfast crisp.

    Almond Flour – Either almond flour or almond meal will work in this gluten-free breakfast recipe. I use and love the Bob’s Red Mill Almond Flour, as well as Anthony’s Almond Flour. And if you’re interested in other almond flour breakfast recipes, check out my almond flour pancakes or almond flour banana bread – both are incredible!

    Coconut Oil – A tablespoon of solid coconut oil gives the crumble atop this berry breakfast crisp its crumbly texture. If your coconut oil is liquid at room temperature (this happens when the weather’s warm), then simply place it in the fridge or freezer for 5-10 minutes before using. Also, if you don’t have any coconut oil, you can use a tablespoon of cold butter or ghee instead.

    close-up image of berry breakfast crisp with coconut yogurt on top.

    Tips and Tricks

    • Remember, this recipe makes a single serving. Therefore, you’ll want to double, triple, or even quadruple the recipe when baking for others!
    • Finish off this berry breakfast crisp with a scoop of vanilla yogurt! I topped mine with a dollop of Cocojune’s unsweetened coconut yogurt and it was perfectly creamy and delicious. Though if you’re eating this for dessert, feel free to top it off with a scoop of vegan vanilla ice cream instead – YUM!
    • You can easily prep this healthy breakfast recipe the night before if you’d like. To do this, assemble the berries and crumble, then cover and refrigerate overnight. Then, in the morning, bake it off as instructed and enjoy a warm berry crisp for breakfast!

    Adjust This Recipe To Your Dietary Needs

    Make it Paleo: For a paleo crisp, replace the rolled oats with finely chopped nuts and/or coconut flakes!

    Make it Nut-Free: To make this a nut-free breakfast recipe, replace the almond flour with one tablespoon of brown rice flour or all purpose flour.

    Berry Breakfast Crisp (for one!)

    0 from 0 votes
    Recipe by Samantha Course: BreakfastDifficulty: Easy
    Servings

    1

    servings
    Prep time

    5

    minutes
    Cooking time

    15

    minutes
    Total time

    20

    minutes

    This berry breakfast crisp tastes so indulgent, it might as well be dessert! But don’t worry, it’s entirely gluten-free, dairy-free, and refined sugar-free. It’s super healthy with plenty of plant-based protein and fiber which will leave you feeling full until your next meal!

    Ingredients

    • For the berries:
    • 1 cup fresh berries (strawberries, blueberries, raspberries, etc)

    • 1 teaspoon maple syrup

    • 1/4 teaspoon vanilla extract

    • For the crumble:
    • 1/4 cup rolled oats

    • 2 tablespoons almond flour or meal

    • pinch of salt

    • 1 tablespoon coconut oil, solid

    • 1 tablespoon maple syrup

    Directions

    • Preheat oven to 350° Fahrenheit.
    • Add all berry ingredients to a bowl and toss to evenly coat, then transfer into small oven-safe dish.
    • Mix all crumble ingredients together in same bowl as the berries, then sprinkle over top of the berries.
    • Bake for 15-20 minutes, or until lightly golden brown and bubbly. Serve warm with additional maple syrup and/or a scoop of vanilla yogurt.

    Recipe Video

    Notes

    • Make this an apple breakfast crisp by replacing the fresh berries with fresh sliced apples!

    Did you make this recipe?

    Share it and tag @samdoesherbest on Instagram!

    Like this recipe?

    Follow us @samdoesherbest on Pinterest

    Super healthy and delicious almond flour banana bread! Made with whole, good-for-you ingredients, perfectly sweet, and totally irresistible. Toast up a slice of this grain-free, dairy-free, and refined sugar-free banana bread as a comforting, yet nutritious breakfast, snack, or dessert.

    overhead image of almond flour banana bread

    What You’ll Need To Make Almond Flour Banana Bread

    Almond Flour – The one and only flour we use in this grain-free recipe is almond flour. Almond flour is a favorite among low-carb, gluten-free, and paleo recipes. It yields little-to-no flavor and, when done right, bakes up beautifully soft and tender. If you don’t already have a bag of almond flour in your pantry, I highly recommend you go pick some up. I’ve tried pretty much every brand of almond flour out there, and my favorite so far is this Anthony’s Almond Flour. Though whichever brand of almond flour you decide to use in this recipe, make sure it’s blanched almond flour, and not almond meal.

    Coconut Sugar – A quarter cup of coconut sugar is all you’ll need to sweeten up this healthy dessert recipe! The bananas yield some natural sweetness of their own, and a touch of coconut sugar helps bring that out. If you don’t have coconut sugar, you can use brown sugar in its place.

    Bananas – About two very ripe bananas should do the trick here! Or, however many mashed bananas you need to equal one cup. And while I feel like this goes without saying, make sure your bananas are super ripe for this recipe. You can tell a banana is ripe when it’s beginning to form large brown spots all around the outside peel.

    Chocolate Chips – While optional, chocolate chips make this almond flour banana bread extra indulgent and delicious! If you don’t have chocolate chips, you can easily use one cup of chopped chocolate instead. I recommend semi-sweet chocolate or dark chocolate for this recipe. And if you’re looking to keep your entire loaf paleo, use your favorite paleo chocolate chips, such as these Hu Kitchen Chocolate Gems.

    almond flour banana bread sliced

    Tips and Tricks

    • Instead of greasing your loaf pan, line it with parchment paper. Also, cut your parchment paper larger than the loaf pan, leaving its edges sticking out from the sides of your banana bread. This’ll make it easier to lift and remove your bread from its baking pan!
    • Leave the almond flour banana bread to cool completely (about an hour) before slicing. Then, once cool, I recommend slicing the bread all at once, before storing. Lastly, store the slices in an airtight container at either room temperature for 3 days, in the fridge for 7 days, or in the freezer for up to 3 months!
    • For the ultimate slice of banana bread that’ll leave your tastebuds singing, toast it before eating! Then, once toasted, top that baby off with some vegan butter, ghee, peanut butter, and/or almond butter. Let me tell ya, toasted almond flour banana bread makes for the perfect afternoon snack or nightcap.
    the inside of almond flour banana bread

    Adjust This Recipe To Your Dietary Needs

    Make it Vegan: For a vegan grain-free banana bread, try replacing the eggs with three flax eggs. One flax egg equals one tablespoon of ground flax seed meal mixed into three tablespoons of water. While I haven’t tried this vegan option myself yet, I’m sure it’d work just fine!

    Make it Added Sugar-Free: Because the bananas are so naturally sweet, you can totally leave the coconut sugar out of this healthier dessert recipe.

    Almond Flour Banana Bread

    4 from 3 votes
    Recipe by Samantha Course: Snacks, Breakfast, DessertDifficulty: Easy
    Servings

    10

    slices
    Prep time

    10

    minutes
    Cooking time

    40

    minutes
    Total time

    50

    minutes

    Super healthy and delicious almond flour banana bread! Made with whole, good-for-you ingredients, perfectly sweet, and totally irresistible. Toast up a slice of this grain-free, dairy-free, and refined sugar-free banana bread as a comforting, yet nutritious breakfast, snack, or dessert.

    Ingredients

    • 2 1/2 cups almond flour

    • 1/4 cup coconut sugar

    • 1 teaspoon baking soda

    • 1/2 teaspoon baking powder

    • 1 teaspoon cinnamon

    • 2 tablespoons coconut oil, melted

    • 1 cup mashed banana (about 2 very ripe bananas)

    • 3 eggs

    • 1 teaspoon vanilla extract

    • 1 cup chocolate chips, optional

    Directions

    • Preheat oven to 350° Fahrenheit and line a 9×5-inch loaf pan with parchment paper.
    • Whisk together the almond flour, coconut sugar, baking soda, baking powder, and cinnamon in a large bowl.
    • Add in the melted coconut oil, mashed banana, eggs, and vanilla extract – mix until fully combined. Fold in chocolate chips if using, until evenly dispersed throughout batter.
    • Transfer batter to prepared loaf pan and bake for 40-50 minutes or until a toothpick inserted down the center of the bread comes out clean. Remove from the oven and transfer to a wire cooling rack, cool bread completely (about 1 hour) before slicing.

    Recipe Video

    Did you make this recipe?

    Share it and tag @samdoesherbest on Instagram!

    Like this recipe?

    Follow us @samdoesherbest on Pinterest