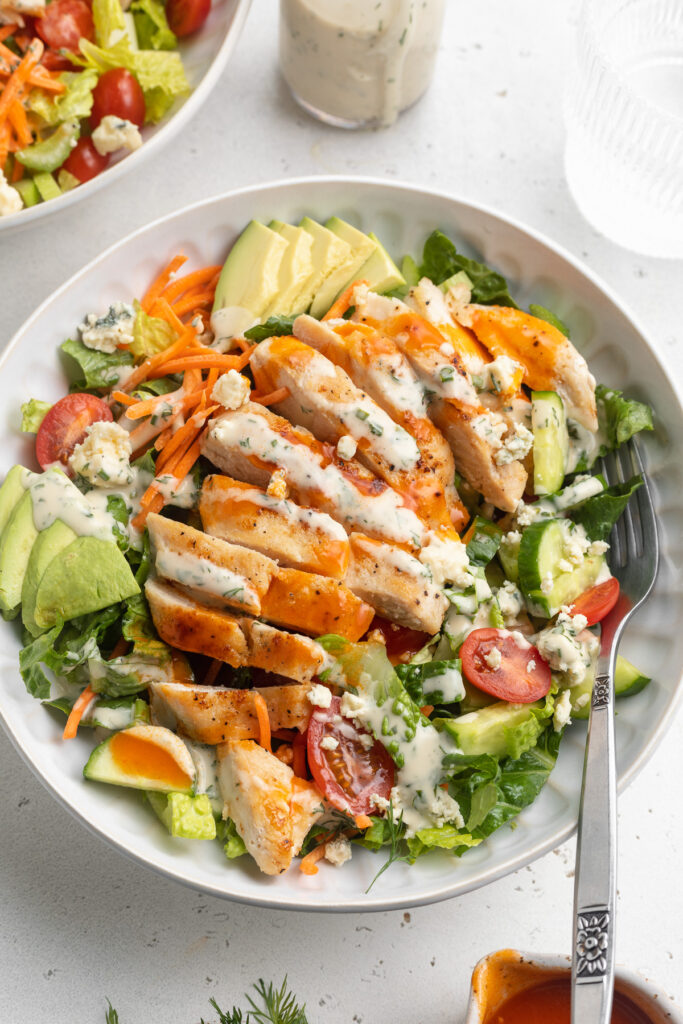
Tag

healthy

Browsing

This hearty Mexican soup is full of fresh, delicious flavor! The perfect quick and easy dinner recipe to throw together on a busy weeknight. Requires only a handful of simple ingredients, cooked in one pot, in just 30 minutes!

overhead image of Mexican soup with avocado, cilantro, sour cream, and tortillas on top.

What You’ll Need to Make Mexican Soup

Chicken – This recipe calls for chicken breasts, but really any cut of chicken will work. My one recommendation when it comes to buying your chicken, is to make sure it’s boneless and skinless. This’ll make the cooking and dicing process much easier! Also, for a vegan/vegetarian Mexican soup, check out the “Adjust This Recipe to Your Dietary Needs” section below.

Chicken Broth – I used chicken bone broth in my Mexican soup for an extra boost of nutrients. However, any chicken broth, or even chicken bouillon dissolved in water will do the trick. And if you don’t have chicken broth, feel free to use vegetable broth instead.

Taco Seasoning – Two tablespoons of taco seasoning load this soup up with TONS of delicious flavor! This addition makes this recipe even easier to throw together. Though if you don’t have taco seasoning, feel free to use a combo of your favorite Mexican spices. I love smoked paprika, cumin, garlic powder, onion powder, and dried oregano.

Jalapeño – While optional, I love throwing in a diced jalapeño for extra flavor and spice! However, for a mild soup, try just half a jalapeño. Or, feel free to leave it out altogether.

mexican chicken soup in a bowl with a spoon.

Tips and Tricks

  • I highly recommend doubling this recipe! Leftover Mexican soup tastes just as good, and is easy to reheat and enjoy all week long. Heck, you can even freeze it for up to three months!
  • For a heartier meal, add rice! I love adding in a cup or two of cooked rice to my soup. And to keep things super easy, I typically opt for a pre-cooked microwaveable rice.
  • You can also make this Mexican soup in the Instant Pot! To do that, use the sauté function to cook up with veggies. Then, add the remaining ingredients, seal the lid and cook on high pressure for 15 minutes. After 15 minutes, remove the chicken, dice it up, then add it back into your soup – that’s it!
close-up overhead image of Mexican soup with avocado, cilantro, sour cream, and tortillas on top.

Adjust This Recipe to Your Dietary Needs

Make it Vegan/Vegetarian: For a vegan or vegetarian Mexican soup, replace the chicken with two cans of your favorite beans – I love either black beans or navy beans! Also, replace the chicken broth with vegetable broth.

Make it Gluten-Free: While mostly gluten-free, make sure the taco seasoning you use is 100% gluten-free as well!

overhead image of Mexican soup with avocado, cilantro, sour cream, and tortillas on top.
No ratings yet

One-Pot Mexican Soup

This hearty Mexican soup is full of fresh, delicious flavor! The perfect quick and easy dinner recipe to throw together on a busy weeknight. Requires only a handful of simple ingredients, cooked in one pot, in just 30 minutes!
Print Pin Rate
Prep Time: 5 minutes
Cook Time: 20 minutes
Total Time: 25 minutes
Servings: 5 servings

Ingredients

  • 2 tablespoons olive oil
  • 1/2 yellow onion, chopped
  • 1 celery stalk, chopped
  • 1 carrot, chopped
  • 3 garlic cloves, minced
  • 1 quart chicken broth
  • 1 (14-ounce) can crushed tomatoes
  • 1-2 pounds chicken breast
  • 2 tablespoons taco seasoning
  • salt, to taste

Instructions

  • Heat olive oil in a large pot over medium heat, Add in the onion, celery, carrots, garlic, and jalapeño. Cooked 4-5 minutes, or until veggies are tender.
  • Add in chicken broth, crushed tomatoes, chicken, taco seasoning, and salt.
  • Bring to a boil then reduce heat to a simmer, cook uncovered for 20 minutes. Remove chicken from pot, dice into ½-inch pieces, then transfer back into pot. Stir to combine then serve warm with fresh cilantro, lime juice, avocado, sour cream, and tortilla chips.

Nutrition

Calories: 300kcal

Crispy on the outside, soft and fluffy on the inside – PERFECT air fryer baked potato! Three ingredients, a few simple steps, and 30 minutes is all this easy air fryer recipe requires. This foolproof method yields flawless baked potatoes every time.

close-up overhead image of an air fryer baked potato with butter and chives on top.

What You’ll Need to Make an Air Fryer Baked Potato

Russet Potato – Four medium russet potatoes fit comfortably in most air fryer baskets. Start by scrubbing and rinsing each potato well before cooking. Potatoes grow literally IN the dirt, so they’re pretty filthy and should be washed thoroughly!

Oil – Olive or avocado oil work best, but really any kind of oil will cook your air fryer baked potato to perfection! The only rule here is to really lather up each potato in oil, this’ll guarantee an ultra-crispy skin.

Salt – Plenty (and I meant plenty) of salt! Cover each potato in a large pinch of salt before cooking. Since salt is the only seasoning here, it’s important to use it liberally.

overhead image of a loaded air fryer baked potato with chives on the side.

Tips and Tricks

  • Pierce each potato all over with a fork before cooking! This’ll create vent holes in your potato, ensuring it cooks perfectly and evenly all the way through.
  • Enjoy your air fryer baked potato however you’d like. For a loaded baked potato, check out the section below!
  • Store leftover baked potatoes in an airtight container in the fridge for up to 5 days. To reheat, simply pop in the microwave for 1 minute, or back into the air fryer for 5 minutes at 400° Fahrenheit.
a loaded air fryer baked potato with sour cream, bacon, and chives on top.

Make a Loaded Air Fryer Baked Potato

For a loaded air fryer baked potato, add…

  • Butter
  • Shredded Cheese
  • Chives
  • Sour Cream
  • Black Pepper
  • Crispy Bacon
  • & anything else your heart desires!

Adjust This Recipe to Your Dietary Needs

Make it Vegan: If you’re looking to jazz up this recipe the vegan way, top your baked potato with vegan butter, vegan sour cream, and a sprinkling of nutritional yeast – YUM!

Make it Dairy-Free: For a dairy-free air fryer baked potato, top it with a drizzle of olive oil instead of butter, the result is just as creamy and delicious.

close-up overhead image of an air fryer baked potato with butter and chives on top.
5 from 1 vote

Perfect Air Fryer Baked Potato

Crispy on the outside, soft and fluffy on the inside – PERFECT air fryer baked potato! Three ingredients, a few simple steps, and 30 minutes is all this easy air fryer recipe requires. This foolproof method yields flawless baked potatoes every time.
Print Pin Rate
Prep Time: 5 minutes
Cook Time: 35 minutes
Total Time: 40 minutes
Servings: 4 servings

Ingredients

  • 4 medium russet potatoes, washed well then dried
  • 2 tablespoons olive oil, or avocado oil
  • salt, to taste

Instructions

  • Pierce each potato with a fork all over its surface.
  • Rub each potato with oil, then sprinkle all over with a generous pinch of salt.
  • Place potatoes in air fryer basket, then cook at 400° Fahrenheit for 35 minutes, flipping potatoes halfway through cooking.
  • Remove potatoes from air fryer basket, slice down the center and split each potato open exposing the inside flesh. Top with butter, shredded cheese, sour cream, chives, crispy bacon, additional salt, and black pepper.

Nutrition

Calories: 300kcal

More Easy Air Fryer Recipes

Quick and easy white chicken chili made in the Instant Pot! Full of flavor, and deliciously creamy. Whip up this Instant Pot white chicken chili in under 30 minutes!

close-up overhead image of Instant Pot white chicken chili with cilantro and avocado on top

What You’ll Need to Make Instant Pot White Chicken Chili

Chicken – Duh! Two boneless and skinless chicken breasts are the main characters of this show. However, if you don’t have chicken breasts, you can certainly use one to two pounds of any chicken part. Boneless and skinless chicken thighs would work great in this chili recipe, too!

White Beans – A can of drained and rinsed white beans make for a heartier soup. They cook up perfectly soft and creamy in the Instant Pot, and absorb a ton of flavor. Any kind of white bean will work too! I used cannellini beans, but navy, great northern, or even lima beans would taste just as delicious.

Jalapeño – One jalapeño adds loads of flavor, but very (and I mean VERY) little spice! If you’re worried about any spice, use just half a jalapeño instead. Or, if you’re like me, and loooove spice – use two or three whole jalapeños in this Instant Pot white chicken chili recipe!

Cream Cheese – Melt some cream cheese into the pot for an ultra creamy, and velvety smooth soup! Cream cheese also adds a slight bit of tanginess to this chili, which is just to-die-for.

Instant Pot white chicken chili in a bowl with lime wedges on the side.

Tips and Tricks

  • Serve this easy weeknight meal however you’d like! I love mine with fresh avocado, cilantro, a squeeze of lime juice, and tortilla chips. And not just any tortilla chips, but these Siete Grain-Free Tortilla Chips – yum!
  • If the cream cheese and sour cream won’t melt in the last step, then turn your Instant Pot back on to the sauté setting. This’ll heat the pot up and help melt the creams!
  • Store leftover Instant Pot white chicken chili in an airtight container in the fridge for up to four days. Or, to enjoy weeks later, freeze this chili for up to three months! To reheat, simply transfer to the fridge for a few hours, then reheat in a pot until warm throughout.
close-up image of Instant Pot white chicken chili in a bowl with avocado and cilantro on top.

Adjust This Recipe to Your Dietary Needs

Make it Vegan/Vegetarian: For a fully vegan or vegetarian white chili recipe, then replace the chicken with an additional can of white beans. Also, sub the chicken broth for vegetables broth – it’s that easy!

Make it Dairy-Free: Use your favorite dairy-free cream cheese and dairy-free sour cream in this Instant Pot white chicken chili. Or, replace both of those things with a can of full-fat coconut milk, just as creamy and delicious!

overhead image of Instant Pot white chicken chili with cilantro and avocado on top
No ratings yet

Instant Pot White Chicken Chili

Quick and easy white chicken chili made in the Instant Pot! Full of flavor, and deliciously creamy. Whip up this Instant Pot white chicken chili in under 30 minutes!
Print Pin Rate
Prep Time: 5 minutes
Cook Time: 20 minutes
Total Time: 25 minutes
Servings: 4 servings

Ingredients

  • 2 tablespoons olive oil
  • 1 yellow onion, chopped
  • 4 garlic cloves, minced
  • 1 jalapeño, seeded and chopped
  • 1 teaspoon cumin
  • 1 teaspoon paprika
  • 1/2 teaspoon chili powder
  • 1/2 teaspoon salt
  • 1/4 teaspoon black pepper
  • 1 (15-ounce) can white beans, drained and rinsed
  • 2 boneless and skinless chicken breasts
  • 1 (4-ounce) can diced green chiles, undrained
  • 1 quart chicken broth
  • 1/2 cup sour cream or unsweetened plain Greek yogurt
  • 1/4 cup cream cheese
  • 1/2 cup fresh cilantro, chopped

For serving:

  • Tortilla chips
  • Additional fresh cilantro
  • Lime wedges
  • Avocado, sliced

Instructions

  • Turn Instant Pot to sauté setting and add in olive oil. Once oil is hot, add in the onion, garlic, and jalapeno. Sauté for 2-3 minutes or until veggies are tender.
  • Add the cumin, paprika, chili powder, salt, and black pepper, then cook for just 1 minute.
  • Add in the drained beans, chicken breast, diced green chiles, and chicken broth (in that order). Secure the lid and cook on high pressure for 15 minutes, then manually release the steam.
  • Remove chicken from Instant Pot and shred with two forks before adding back into the pot. While chili is still hot, add in the sour cream, cream cheese, and fresh cilantro then stir to combine. Serve warm with tortilla chips, additional cilantro, fresh avocado, and lime wedges.

Nutrition

Calories: 300kcal

This fully loaded harvest bowl is packed with seasonal ingredients, fresh flavor, and finished off with a dreamy maple dijon vinaigrette! Perfect to meal prep ahead of a busy week, or quickly throw together as an easy meal in under 30 minutes.

maple dijon dressing being poured over a harvest bowl

What You’ll Need to Make a Harvest Bowl

Sweet Potato – Peel and cube two sweet potatoes before roasting. Or, if you’d like, replace the sweet potato with your favorite squash. Peeled and cubed butternut squash, sliced acorn squash, or even sliced delicata squash would all taste great in this harvest bowl!

Chicken – Two boneless and skinless chicken breasts are lightly seasoned, then roasted to perfection! For a vegan option, see the “make it vegan” section below.

Quinoa – Any variety of quinoa is jam-packed with health benefits! It’s full of nutrients, antioxidants, anti-inflammatory compounds, fiber, and is a complete protein. Talk about a superfood, eh? Feel free to use whatever kind of quinoa you have handy – white, red, black, or rainbow – they all taste great. Or, if you don’t have quinoa, you can replace it with cooked brown rice, wild rice, buckwheat, farro, or barley.

Kale – Similar to the quinoa, any variety of kale will taste delicious in your harvest bowl. So, use whatever you can get your hands on – curly kale, dino (lacinato) kale, red kale, or even baby kale. Though if using baby kale, no need to massage it, just add straight to your bowl, then toss in dressing.

close-up image of sliced chicken over a meal prep harvest bowl.

Tips and Tricks

  • Don’t skip massaging the kale! This step is super important to achieve nice, and tender kale. Skipping this step will result in tough, and hard-to-chew kale, just all around unappetizing!
  • I highly, HIGHLY, recommend doubling up on the maple dijon salad dressing. It’s seriously the star of this harvest bowl, and you’ll regret not making more. Also, leftovers stay fresh in a sealed container in the fridge for up to three weeks!

Adjust This Recipe to Your Dietary Needs

Make it Vegan: For a healthy, high protein vegan meal, leave out the chicken. Then, either double up on the sweet potatoes, or replace the chicken with a can of drained then rinsed chickpeas!

Make it Paleo/Grain-Free: Simply leave off the quinoa and you’ve got yourself a totally paleo and grain-free harvest bowl.

two meal prep containers showcasing this harvest bowl recipe.

How to Meal Prep This Harvest Bowl

  1. Roast the sweet potatoes and chicken.
  2. Cook the quinoa.
  3. Make the maple dijon dressing.
  4. Massage the kale.
  5. Divide the massaged kale, cooked quinoa, roasted sweet potatoes and chicken, sliced apples, fried cranberries, and sliced almonds between four meal prep containers.
  6. Store remaining dressing separately.
  7. When ready to eat, remove one of your meal prep containers from the fridge and drizzle with some extra maple dijon dressing – enjoy!
a harvest bowl with a fork
5 from 2 votes

Harvest Bowl (easy to meal prep!)

These fully loaded harvest bowls are packed with seasonal ingredients, fresh flavor, and finished off with a dreamy maple dijon vinaigrette! Perfect to meal prep ahead of a busy week, or quickly throw together as an easy meal in under 30 minutes.
Print Pin Rate
Prep Time: 10 minutes
Cook Time: 20 minutes
Total Time: 30 minutes
Servings: 4 servings

Ingredients

  • 2 sweet potatoes, peeled and cut into 1-inch cubes
  • 1-2 pounds boneless and skinless chicken breast
  • 1 tablespoon avocado oil
  • salt and black pepper, to taste
  • 2 cups kale, finely chopped
  • 1 cup cooked quinoa
  • 1 apple, sliced
  • 1/4 cup dried cranberries
  • 1/4 cup sliced almonds or pumpkin seeds

For the maple dijon dressing:

  • 1/2 cup olive oil
  • 1/4 cup apple cider vinegar
  • 2 tablespoons Dijon mustard
  • 1 tablespoon maple syrup
  • 1 garlic clove, minced
  • 1 teaspoon salt

Instructions

  • Preheat oven to 425° Fahrenheit. Place sweet potatoes and chicken breast on a baking sheet, then drizzle with avocado oil, and sprinkle with salt and black pepper. Toss potatoes to coat, then roast for 20 minutes, tossing potatoes halfway through.
  • While chicken and potatoes roast, make the dressing by adding all dressing ingredients to a bowl and whisking to combine.
  • Place kale in a bowl with half of the dressing, then toss and massage dressing into the kale with your hands.
  • Once potatoes are tender, remove from the oven and assemble bowls with all ingredients – roasted sweet potatoes, massaged kale, chicken, quinoa, apples, dried cranberries, and sliced almonds. Store with remaining dressing on the side, then top with dressing right before eating.

Nutrition

Calories: 300kcal

Learn how to make the best vegan pumpkin spice latte at home! Better (and cheaper) than Starbucks, my pumpkin spice latte recipe is delicious, completely vegan, and refined sugar-free.

vegan pumpkin spice latte being poured into a mug

Ahh, the pumpkin spice latte. It’s perhaps the most beloved beverage of the Fall season, and for good reason! It’s deliciously sweet and spicy, and cozying up with one on a cool Fall day just feels right. People seem to really love the Starbucks version, but it’s loaded with sugar, sodium, preservatives and other ingredients, which you can see here. It’s also super expensive (almost $6 for a venti), so making this healthier version at home just seems like the better option!

What You’ll Need to Make a Healthy Vegan Pumpkin Spice Latte

  • Milk: Regular milk works fine, but I used almond milk. Check out the section below for alternative dairy options.
  • Pumpkin Puree: Sweet and savory, pumpkin puree plays a starring role in Thanksgiving desserts and drinks, including this fall-favorite latte. Make sure you’re buying pure pumpkin puree, and not pumpkin pie filling!
  • Maple Syrup: My pumpkin spice latte recipe only uses natural maple syrup to sweeten it, instead of refined sugars.
  • Vanilla Extract: Many recipes do not call for vanilla, but to me, it’s a must for added depth of flavor.
  • Pumpkin Pie Spice: Pumpkin pie spice is a delicious combination of cinnamon, nutmeg, ginger, cloves, an allspice that works really well with this recipe.
  • Espresso or Strong Coffee: If you need a major boost to get you going in the morning, I definitely suggest making this with 2 shots of espresso, but brewed, strong coffee works fine too!
two pumpkin spice lattes in mugs with a mini pumpkin on the side.

Adjust This Recipe to Your Dietary Needs

  • Make it Dairy-Free: You can use regular milk if you’d like, but for this recipe I used almond milk. Others prefer coconut milk or oatmilk – the choice is yours!
  • Make it Caffeine-Free: If you need caffeine-free, use your favorite strong decaf variety.

Tips on Making Pumpkin Spice Latte

  • You can use granulated organic sugar instead of maple syrup if you don’t want to go the refined sugar-free route. 
  • If you don’t have pumpkin pie spice, you can use ½ teaspoon cinnamon and a pinch each of nutmeg, ground ginger and ground cloves.
overhead image of two pumpkin spice lattes with cinnamon sticks on top.
5 from 1 vote

Pumpkin Spice Latte (Vegan, Refined Sugar-Free)

Learn how to make the best vegan pumpkin spice latte at home! Better (and cheaper) than Starbucks, my vegan pumpkin spice latte recipe is delicious, much easier and quicker to make, and completely vegan and refined sugar-free.
Print Pin Rate
Prep Time: 5 minutes
Cook Time: 5 minutes
Total Time: 10 minutes
Servings: 1 serving

Ingredients

  • 2 cups milk I used almond milk
  • 2 tablespoons pumpkin puree
  • 2 tablespoons maple syrup or any liquid sweetener
  • 1 teaspoon vanilla extract
  • 1/2 teaspoon pumpkin pie spice
  • 2 shots espresso or ½ cup hot coffee

Instructions

  • Heat milk in a small saucepan over low heat.
  • Once simmering, add in the pumpkin puree, maple syrup, vanilla extract, and pumpkin pie spice. Whisk vigorously for about 30 seconds or until frothy then remove from heat.
  • Divide the espresso or coffee between two mugs, then pour the pumpkin-spiced milk over the top.

Notes

  • Optional: top it off with vegan whipped cream or a cinnamon stick!
  • Nutrition

    Serving: 1serving

    MORE DELICIOUS & HEALTHY DRINK RECIPES