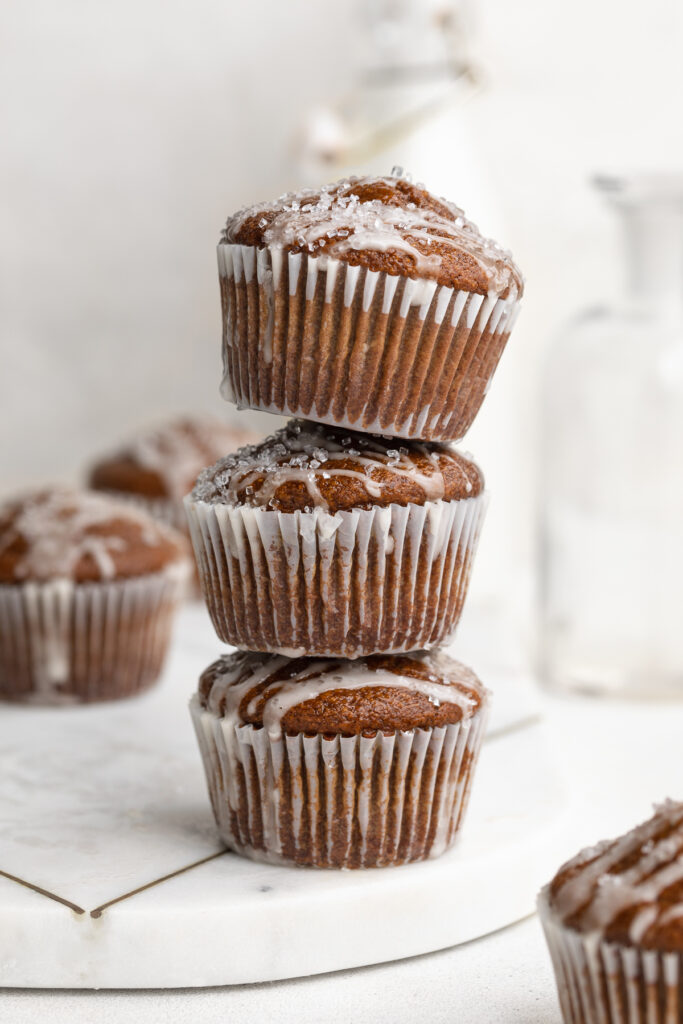
Tag

healthy

Browsing

Easy, healthy, and extra delicious Italian stuffed zucchini boats! This low-carb meal comes together in under 30 minutes, with only 5 (!!!) ingredients. The ultimate lazy, yet super healthy dinner recipe.

overhead image of zucchini boats on a plate with white wine on the side.

What You’ll Need to Make Stuffed Zucchini Boats

Zucchini – This summer vegetable is super cheap and easy to find! Start by slicing a zucchini in half, then removing the seeds and some of the flesh from inside. You’ll be left with two zucchini “boats,” ready to be filled with our delicious Italian sausage in sauce.

Italian Sausage – Feel free to use whatever kind of Italian sausage you’d like! Though make sure it’s uncooked and removed from its casings before cooking. As it cooks, break the sausage up with a wooden spoon until no longer pink. Italian sausage is packed with herbs and spices, adding even more flavor to this already super flavorful dish.

Marinara Sauce – I use and love Rao’s marinara sauce for when I don’t feel like making it myself. Rao’s is perfectly tangy, has tons of flavor, with just a hint of sweetness. However, you can totally use your favorite jarred marinara sauce for this recipe. Or, if you have some time to spare, go ahead and throw together a homemade sauce to use instead.

Dried Italian Seasoning – The final step before cooking these zucchini boats is sprinkling them with a little bit of dried Italian seasoning. I love the flavor this packs, but it’s totally optional if you’re not feeling up to it or don’t have any on-hand.

overhead image of zucchini boats in a baking dish.

Tips and Tricks

  • Finish off these Italian stuffed zucchini boats with fresh-grated parmesan cheese! It rounds out the Italian flavors in this dish, and make it that much more delicious. Also, who doesn’t love a little bit of cheese?!
  • You can easily prep-then-freeze this dish ahead of time! To do this, follow each step of the recipe, up to cooking it. Then, cover the baking dish with plastic wrap and aluminum foil, before freezing for up to three months. When ready to eat, simply defrost, then bake as instructed.
  • This is a great, healthy meal to prep for a crowd! Simply double or triple the amounts listed in the recipe below, and you can feed a whole army (ok …maybe not an entire army, but you get the point). I love throwing this quick and easy zucchini recipe together for friends and family, it’s a total crowd-favorite!
close-up image of zucchini boat being cut into with a fork.

Adjust This Recipe to Your Dietary Needs

Make it Gluten-Free: These zucchini boats are already gluten-free! However, to be absolutely certain they don’t contain any traces of gluten, check your sausage and marinara sauce packaging to make sure those ingredient are entirely gluten-free.

Make it Dairy-Free: For a dairy-free version of this recipe, replace the parmesan cheese with nutritional yeast!

Make it Vegan: Replace the sausage with your favorite vegan meat substitute, and cook it with an additional teaspoon of dried Italian seasoning. Then, similar to the dairy-free version, top with nutritional yeast instead of parmesan cheese.

close up image of stuffed zucchini boats in a baking dish with fresh basil on top.
No ratings yet

Italian Stuffed Zucchini Boats

Easy, healthy, and extra delicious Italian stuffed zucchini boats! This low-carb meal comes together in under 30 minutes, with only 5 (!!!) ingredients. The ultimate lazy, yet super healthy dinner recipe.
Print Pin Rate
Prep Time: 5 minutes
Cook Time: 25 minutes
Total Time: 30 minutes
Servings: 4 servings

Ingredients

  • 2 large zucchini, cut in half lengthwise
  • salt and black pepper, to taste
  • 1 tablespoon avocado oil
  • 1 pound sweet or spicy Italian sausage (casings removed)
  • 1 teaspoon dried Italian seasoning, optional
  • grated parmesan cheese, for serving

Instructions

  • Preheat oven to 400° Fahrenheit.
  • Using a spoon, scoop out and remove the seeds and a little bit of the flesh from each zucchini half.
  • Sprinkle zucchini with salt and black pepper, then place inside a large baking dish and set aside.
  • Heat avocado oil in a large skillet over medium heat, then add in the Italian sausage and cook until no longer pink. Break up the meat as it cooks, should take about 5 minutes.
  • Add marinara sauce to the skillet, reduce heat to low and simmer sausage in sauce for 2-3 minutes.
  • Spoon the sauce mixture into the cavity of each zucchini half, then evenly sprinkle with Italian seasoning. Bake for 20-25 minutes or until sauce is bubbly and zucchini is tender. Serve warm with parmesan cheese and fresh basil.

Nutrition

Calories: 300kcal

How to make pickles in a matter of minutes! This quick, homemade pickle brine is loaded with flavor, and made to preserve freshness. These pickles are perfectly salty, and extra crunchy!

three jars of pickles line up on a table.

What You’ll Need

Cucumbers – Either pickling cucumbers, Persian cucumbers, or an English cucumber will work! For pickling or Persian cucumbers, I recommend cutting them into spears before pickling. Though for an English cucumber, those are better sliced into 1/4-inch rounds. I use and recommend pickling cucumbers because they maintain their shape and satisfying crunch, even after pickled. However, Persian or an English cucumber still taste just as delicious using this method!

Fresh Dill – You simply can’t make pickles without fresh dill! A few sprigs of this herb help to lock in freshness and pack in tons of delicious flavor.

Garlic – Three whole cloves of garlic truly take this recipe to the next level! The pickling liquid aids in mellowing out that tangy garlic flavor, leaving you with the best essence of garlic throughout your pickles. And if you’re like me (a garlic LOVER), feel free to throw in a few extra cloves!

overhead image of pickles with garlic and fresh dill.

Vinegar – Vinegar plus water is the base of any pickling liquid. I’ve tried this recipe with pretty much every type of vinegar out there. Apple cider vinegar, white wine vinegar, red wine vinegar, white vinegar, rice wine vinegar – you name it, I’ve tried it! And while they all taste delicious, apple cider and white wine vinegars are my personal favorites. Though use whichever you have on-hand and/or whichever you prefer.

Salt – For extra salty pickles, add two whole teaspoons of salt to your brine. Or, for a more mild pickle, add just one teaspoon of salt. I like ultra-savory pickles – you know, the ones that make your mouth water just thinking about them – so two teaspoons did the trick for me!

Yellow Mustard Seed – While optional, a pinch of whole yellow mustard seeds add a hint of spice. A few seeds go a long way, packing in tons of flavor!

a pickle being lifted out of a jar of pickles.

Tips and Tricks on How to Make Pickles

  • Clean/rinse out your mason jars well before adding in your pickles. A clean glass jar will reduce the risk of any unwanted bacteria growing while your pickles, well… pickle. The best way to achieve an extra-clean mason jar is by rinsing it out with boiling hot water – this’ll kill most, if not all bacteria!
  • Homemade pickles will last up to three month in the fridge! And remember, the longer these pickles sit in their brine, the tastier they’ll be. But if you live in my house, you’ll know these don’t last more than ONE WEEK.
  • Feel free to switch up the ingredients in this recipe however you’d like! For spicy pickles, add in a pinch of red pepper flakes. Or, for sweet pickles, sprinkle in a teaspoon of sugar.

*These homemade pickles are gluten-free, dairy-free, vegan, and paleo!

three jars of pickles with garlic and salt on the side.
5 from 1 vote

How to Make Pickles

How to make pickles in a matter of minutes! This quick, homemade pickle brine is loaded with flavor, and made to preserve freshness. These pickles are perfectly salty, and extra crunchy!
Print Pin Rate
Prep Time: 3 minutes
Cook Time: 2 minutes
Total Time: 7 minutes
Servings: 10 servings

Ingredients

  • 3-4 small pickling cucumbers, cut into spears (or 1 English cucumbers, cut into 1/4-inch rounds)
  • 4-5 sprigs fresh dill
  • 3 garlic cloves, peeled and smashed
  • 1 cup water
  • 1 cup vinegar, such as white vinegar or apple cider vinegar
  • 1-2 teaspoons salt
  • 1/2 teaspoon whole yellow mustard seeds

Instructions

  • Place cut cucumber, fresh dill, garlic cloves, and whole yellow mustard seed into one large glass jar, or separate into 2 smaller glass jars.
  • Heat water, vinegar, and salt in a small saucepan over medium heat until salt has dissolved completely.
  • Pour water mixture into jar(s) until cucumbers are completely covered. Secure jar with lid, then refrigerate for at least 24 hours before eating.

Nutrition

Calories: 300kcal

Crunchy peanut butter balls covered in chocolate! Perfectly sweet, surprisingly healthy, and super easy to make. This no-bake dessert is the perfect summer treat when it’s too hot to turn on the oven!

crunchy peanut butter balls stacked on parchment paper with milk on the side.

What You’ll Need to Make Crunchy Peanut Butter Balls

Creamy Peanut Butter – Unsweetened, creamy peanut butter is the base of this easy dessert recipe. Check your peanut butter labels closely and make sure it doesn’t contain any sugar! Added sugar in the peanut butter would totally throw off the sweetness in this recipe. For unsweetened peanut butter, I love both Trader Joe’s and Teddie’s brand.

Maple Syrup – Really any liquid sweetener will work in these peanut butter balls. Maple syrup, along with honey and date syrup, are the three least processed options which is why I always use and recommend them. Though is you don’t have those, you can use agave nectar instead. Or, for a sugar-free dessert option, check the “Make it Sugar-Free” section below!

Almond Flour – This gluten-free, low-carb flour is one of my favorites! It’s healthy, super easy to find, and virtually flavorless. The almond flour is also super helpful in holding these dessert balls together, so don’t go without it.

Crispy Rice Cereal – One cup of crispy rice cereal gives these peanut butter balls their unexpected crunch! Feel free to use whichever brand you like best. Or, for an even healthier option, use one cup of puffed quinoa instead.

overhead image of crunchy peanut butter balls on an upside-down pie pan.

Tips and Tricks

  • Don’t feel like dipping in chocolate? Save major time and energy my melting the chocolate, then simply drizzling over the top of each ball!
  • For an extra salty plus sweet combo, finish off these crunchy no-bake peanut butter balls with a pinch of flaky sea salt! A bit of salt balances out the sweetness, and adds an extra layer of crunch.
  • These treats are best stored in the refrigerator! The freezer works too, but the fridge helps them hold their shape while also maintaining their crunchiness. But whatever you do, don’t store them at room-temperature, and especially not in the summertime because they will melt!
a stack of no-bake peanut butter balls, one with a bite taken out.

Adjust This Recipe To Your Dietary Needs

Make it Nut-Free: For a nut-free no-bake dessert, sub sunflower seed butter for the peanut butter and 3 tablespoons of coconut flour in place of the almond flour! Still just as delicious, and totally nut-free friendly.

Make it Sugar-Free: Replace the maple syrup in this recipe with your favorite liquid sugar-free sweetener.

close-up image of crunchy peanut butter balls.
5 from 3 votes

Crunchy No-Bake Peanut Butter Balls

Crunchy peanut butter balls covered in chocolate! Perfectly sweet, surprisingly healthy, and super easy to make. This no-bake dessert is the perfect summer treat when it’s too hot to turn on the oven!
Print Pin Rate
Prep Time: 15 minutes
Total Time: 10 minutes
Servings: 16 balls

Ingredients

  • 1 cup creamy peanut butter, unsweetened
  • 1/3 cup maple syrup
  • 1 teaspoon vanilla extract
  • 1/2 cup almond flour
  • 1 cup crispy rice cereal

For dipping/drizzling:

  • 1 cup chocolate chips
  • 1 teaspoon coconut oil

Instructions

  • Mix together the creamy peanut butter, maple syrup, and vanilla extract in a large bowl.
  • Add in almond flour and crispy rice cereal, mix to combine.
  • Scoop and roll tablespoon-sized balls of the peanut butter ball mixture between the palms of your hands. Repeat this process until no more mixture remains, should make about 12 crunchy peanut butter balls.
  • Place balls in freezer for 10-15 minutes, and add chocolate chips and coconut oil to a small bowl. Microwave chocolate in 30 second increments until fully melted.
  • Once crunchy peanut butter balls are chilled, dip or drizzle with melted chocolate before placing back in the freezer. Freeze for at least 10 minutes before eating, then store in the fridge.

Nutrition

Calories: 300kcal

Quick, easy, and full of flavor – air fryer salmon patties with a creamy dill sauce! The perfect healthy, gluten-free, and dairy-free dinner recipe. Comes together in a few simple steps, and in just 15 minutes!

Overhead image of air fryer salmon patties on a plate over rice and lettuce with creamy dill sauce on top.

What You’ll Need to Make Air Fryer Salmon Patties

Canned Salmon – I used two cans of wild sockeye salmon in my patties, but any canned salmon will work. Canned salmon is an easy addition to this already super easy meal. It’s also a great source of lean protein, vitamin B12, iron, potassium, and vitamin D. However, these air fryer salmon patties are so delicious, no one will ever guess how healthy they are!

Breadcrumbs – I used gluten-free panko breadcrumbs, but any unflavored/unseasoned breadcrumbs will taste great! Panko breadcrumbs are lighter and will yield a crispier patty. Or, if you don’t have breadcrumbs, you can use 1/3 cup of almond flour in its place.

Mayonnaise – This creamy condiment comes in handy in both the salmon patties and the creamy dill sauce. If not a mayo fan, you can use unsweetened greek yogurt instead!

creamy dill sauce being poured over air fryer salmon patties.

Tips and Tricks

  • For an even crisper salmon patty, coat the outside in additional breadcrumbs. Then, place in the air fryer and coat with a drizzle of oil before cooking. The end result will be golden brown, soft on the inside, and crispy on the outside air fryer salmon patties!
  • Enjoy this recipe however you’d like. I served mine over lettuce and rice, with a drizzle of that creamy dill sauce. Though these would also taste amazing as a salmon burger between two buns!
overhead image of air fryer salmon patties on a platter.

Adjust This Recipe To Your Dietary Needs

Make it Egg-Free: While I haven’t tested this option myself, you may be able to replace the eggs in this recipe with flax eggs. Or, try this Bob’s Red Mill Egg Replacer as a substitute. Also, be sure to use an egg-free mayo!

Make it Gluten-Free: For a gluten-free dinner recipe, use gluten-free breadcrumbs like I did! Then, serve these air fryer salmon patties over a bed of your favorite veggies and rice.

close-up image of air fryer salmon patties on a plate with rice and cucumbers.
No ratings yet

Air Fryer Salmon Patties with Creamy Dill Sauce

Quick, easy, and full of flavor – air fryer salmon patties with a creamy dill sauce! The perfect healthy, gluten-free, and dairy-free dinner recipe. Comes together in a few simple steps, and in just 15 minutes!
Print Pin Rate
Prep Time: 5 minutes
Cook Time: 8 minutes
Total Time: 13 minutes
Servings: 8 salmon patties

Ingredients

  • 2 (7.5 ounce) cans canned salmon, drained
  • 2 eggs
  • 1/2 cup breadcrumbs, I used gluten-free panko breadcrumbs
  • 2 tablespoons mayonnaise
  • 1 green onion, finely chopped
  • 1 tablespoon fresh dill, chopped
  • 1/2 teaspoon paprika
  • 1/4 teaspoon salt

For the dill sauce:

  • 1/2 cup mayonnaise
  • 1-2 tablespoons lemon juice
  • 3 tablespoons fresh dill, chopped

Instructions

  • Mix together all salmon patty ingredients in a large bowl until fully combined.
  • Scoop ¼ cup of the mixture into the palms of your hands and gently form a 1-inch thick patty. Repeat this process with remaining mixture, should form 8 salmon patties.
  • Lightly grease air fryer tray or basket, then place salmon patties into the air fryer and cook at 390° Fahrenheit for 8 minutes, pausing to flip halfway through.
  • Make the dill sauce by adding all ingredients to a small bowl and whisking until smooth, then spoon over salmon patties.

Nutrition

Calories: 300kcal

Cool and refreshing Asian cucumber salad! Full of flavor, and easy to throw together in a few simple steps. The perfect side dish or healthy lunch recipe.

overhead image of asian cucumber salad on a plate with a spoon

What You’ll Need To Make Asian Cucumber Salad

Mini Cucumbers – Six mini seedless cucumbers are the star of this recipe. I cut mine into fun little spirals for my salad, but you can simply slice them instead. If slicing, I recommend a mandolin to help slice the cucumbers as thin as possible.

Fresh Ginger – Fresh ginger goes a long way in this Asian cucumber salad! Start by cutting about a 1-inch piece from a knob of whole ginger. Then, peel your ginger with either a spoon or a vegetable peeler. Once peeled, run the ginger along a microplane or the fine side of a box grater.

Rice Vinegar – For a hint of acidity, rice vinegar tastes best. However, if you don’t have any, feel free to use white wine vinegar or apple cider vinegar in its place.

Sriracha – While optional, I recommend a tiny drop of sriracha to round out the flavors in this recipe. For a mild version, start with just 1/2 teaspoon. Or, for a spicy Asian cucumber salad, add upwards of 1-2 teaspoons.

close-up image of asian cucumber salad on a plate

How to Cut Cucumbers

  1. Cut 1/4-inch of each end of a mini cucumber.
  2. Place two chopsticks on either side of the cucumber.
  3. Then, make thin (about 1/8-inch) diagonal cuts along the cucumber, stopping when your knife hits the chopsticks.
  4. Flip cucumber over and make the same exact cuts, in the same direction, on the other side.
  5. Lastly, cut each the cucumber in half, then add them to a bowl for this recipe!

Adjust This Recipe To Your Dietary Needs

Make it Gluten-Free: For a 100% gluten-free Asian cucumber salad, use tamari in place of the soy sauce. Tamari tastes just like soy sauce, but unlike soy sauce, is certified gluten-free!

Make it Vegan: Use maple syrup in place of the honey for a completely vegan side dish.

asian cucumber salad on a plate with sriracha on the side
3.74 from 41 votes

Asian Cucumber Salad

Cool and refreshing Asian cucumber salad! Full of flavor, and easy to throw together in a few simple steps. The perfect side dish or healthy lunch recipe.
Print Pin Rate
Prep Time: 5 minutes
Total Time: 5 minutes
Servings: 4 servings

Ingredients

  • 6 mini cucumbers, spiralized (see Notes) or thinly sliced
  • 1 teaspoon salt
  • 1-inch piece fresh ginger, peeled and grated
  • 1 garlic clove, peeled and grated
  • 2 tablespoons rice vinegar
  • 1 tablespoon honey or maple syrup
  • 1 tablespoon soy sauce
  • 1 teaspoon sesame oil
  • 1 teaspoon sriracha, optional
  • 3 scallions, thinly sliced
  • pinch of sesame seeds

Instructions

  • Place cucumber in a large bowl and sprinkle with salt, then let sit for 10-15 minutes while you make the dressing.
  • Whisk together the ginger, garlic, rice vinegar, honey, soy sauce, maple syrup, and sriracha in a small bowl.
  • Check on the cucumbers, and drain the water that’s gathered at the bottom of the bowl.
  • Add dressing, scallions, and sesame seeds to the cucumbers and toss to coat. Either serve immediately or let marinate in the fridge for a few hours.

Notes

  • How to Cut “Spiralized” Cucumber: Cut off each end of a cucumber, then place two chopsticks on either long side of the cucumber. Then, make thin diagonal cuts along the cucumber, stopping when your knife hits the chopsticks. Flip cucumber over and make the same cuts on the other side. Last, slice each cucumber in half, now they’re ready for this recipe!
  • Nutrition

    Calories: 300kcal