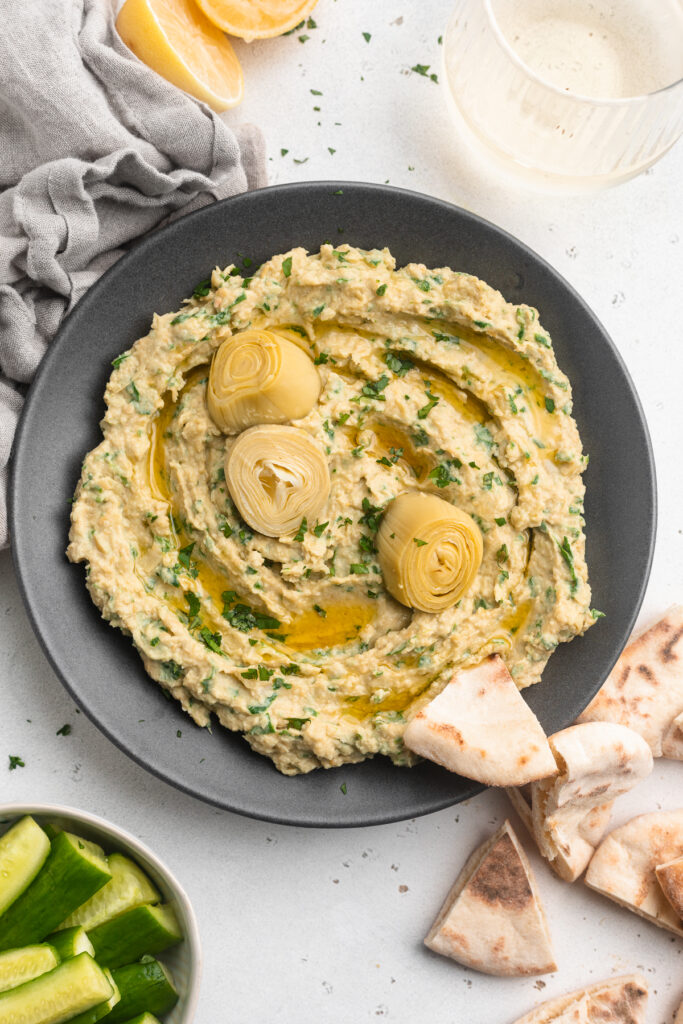
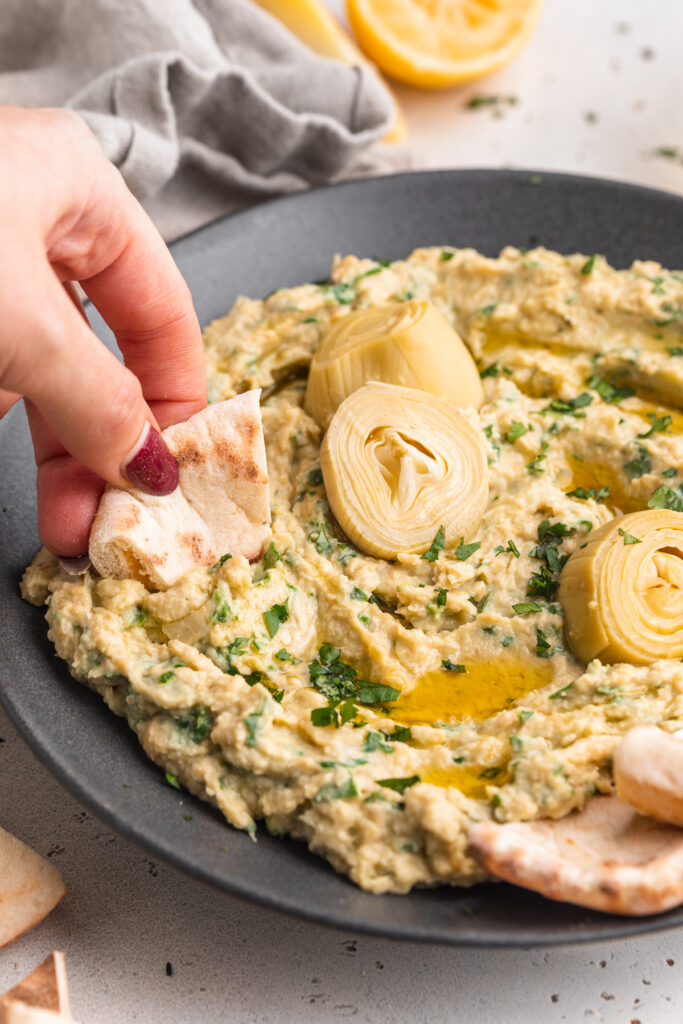
Tag

healthy

Browsing

A healthier take on the classic caramel brulĂ©e latte! Made with non-dairy milk and sweetened with coconut sugar, this warming latte rivals Starbucks’ version. Super easy to make in the comfort of your own home, with a handful of ingredients you likely already have on-hand.

two mugs of caramel brulée latte with milk on the side.

What You’ll Need to Make This Healthy Caramel BrulĂ©e Latte

Butter – I used Miyoko’s vegan butter to keep this latte recipe vegan-friendly! It melts beautifully into the caramel sauce, giving it that smooth, buttery flavor. However, you can certainly use regular butter if you’d like!

Coconut Sugar – This natural sweetener is unrefined and lower on the glycemic index (meaning less of a spike in blood sugar). It also has a slightly deeper flavor, which only adds to the flavor of our caramel sauce! Though if you don’t have any coconut sugar, feel free to use regular sugar or even brown sugar instead.

Milk – I used non-dairy cashew milk in my healthy caramel brulĂ©e latte, and it was perfectly creamy and delicious! But really any milk will work, so go ahead and use whatever you have at home.

Espresso – Either one shot of espresso, or 1/4 cup of strong coffee will do the trick. Or, if you’re like me and can’t get enough caffeine in your life, make it a double and add an extra shot of espresso!

Tips and Tricks

  • Keep a close eye on your caramel sauce while it cooks! The sugar can burn quickly, and needs to be stirred frequently. So I recommend tending to it the entire 5 minutes it cooks – trust me, it’ll be worth it!
  • For a salted caramel brulĂ©e latte, top yours off with a tiny pinch of flaky salt! I go crazy for a good salty/sweet combo, and that little pinch of salt goes a long way.
  • Turn this recipe into an iced latte by serving it over ice! To do this, I recommend letting your hot caramel milk come to room temperature first, as well as your espresso.

Adjust This Recipe to Your Dietary Needs

Make it Vegan: That’s easy – just use all the vegan swaps I outlined above!

Make it Decaf: For a caffeine-free version, use your favorite decaf espresso or decaf coffee in your latte.

close-up image of a caramel brulée latte with extra caramel on top
4.34 from 3 votes

Healthy (& vegan!) Caramel Brulée Latte

A healthier take on the classic caramel brulĂ©e latte! Made with non-dairy milk and sweetened with coconut sugar, this warming latte rivals Starbucks’ version. Super easy to make in the comfort of your own home, with a handful of ingredients you likely already have on-hand.
Print Pin Rate
Cook Time: 5 minutes
Total Time: 5 minutes
Servings: 1 serving

Ingredients

For the caramel sauce:

  • 1/2 cup butter, I used vegan butter
  • 1/2 cup coconut sugar, or regular sugar

For the latte:

  • 1 cup milk, I used non-dairy milk
  • 2 tablespoons caramel sauce
  • 1/2 teaspoon vanilla extract
  • 1 shot espresso, or 1/4 cup strong coffee

Instructions

  • Make the caramel sauce by melting butter and sugar in a small saucepan over medium heat, stirring frequently. Once butter has melted, cook for an additional 4-5 minutes, stirring constantly until dark brown and bubbling.
  • Combine milk, 2 tablespoons of caramel sauce, and vanilla extract in a small saucepan over low heat. Bring to a simmer, then whisk until frothy.
  • Add espresso or strong coffee to a mug, then pour milk mixture over the top. Top with whipped cream an extra drizzle of caramel sauce.

Nutrition

Calories: 300kcal

Fluffy and perfectly spicy healthy gingerbread muffins! The perfect festive snack, that comes together in the blender. Oats, molasses, and ground ginger make these gingerbread muffins healthy AND delicious!

glunte-free gingerbread muffins piled on top of a marble board.

What You’ll Need to Make Gluten-Free Gingerbread Muffins

Old Fashioned Rolled Oats – It’s super important you use old fashioned/rolled oats in this recipe. Avoid instant, steel-cut, or Irish oats. The first step involves grinding these oats into a flour in your blender. When doing this, try to grind them as fine as possible. Finely ground oats will result in fluffier muffins!

Apple Sauce – I used apple sauce in these gingerbread muffins, because it yields little to no flavor. However, if you don’t have apple sauce, feel free to substitute it with 1/2 cup mashed banana. Mashed banana will give these muffins a slight banana flavor, which if you like banana, I’m sure you won’t mind.

Molasses – Any and all gingerbread recipes contain molasses, which is how they get their signature dark-brown color. Don’t skip the molasses, it’s super important for both the flavor and structure of these muffins.

Ground Ginger – Wouldn’t be gingerbread muffins without some ginger! This recipe packs in tons of that spicy ginger flavor, which I personally LOVE. However, if you want a more subtle ginger flavor, go ahead and use just 1/2 teaspoon ground ginger instead.

three gluten-free gingerbread muffins stacked on top of each other.

Tips and Tricks

  • Use a large cookie scoop or 1/4-cup measuring cup to fill your muffin tin. This’ll ensure even-sized muffins, with that beautiful dome on top!
  • For extra sweetness, top your muffins with a simple 2-ingredient powdered sugar glaze. To make it, whisk together 1/2 cup powdered sugar with 2-3 tablespoons milk. Once smooth, use a spoon to drizzle glaze over cooled gluten-free gingerbread muffins.
  • Store these muffins in an airtight container at room temperature for up to 3 days. Or, to make them last longer, pop them in the freezer for up to 3 months!

Adjust This Recipe to Your Dietary Needs

Make it Vegan: While I haven’t tested it myself, you can try replacing the eggs with either two flax eggs or by using your favorite vegan egg replacer. I’ve used this Bob’s Red Mill Egg Replacer in a number of other recipes and have always loved it!

gingerbread muffin with a bite taken out.
4.03 from 34 votes

Gluten-Free Gingerbread Muffins

Fluffy and perfectly spicy gluten-free gingerbread muffins! The perfect festive snack, that comes together in the blender. Oats, molasses, and ground ginger make these gluten-free gingerbread muffins healthy AND delicious!
Print Pin Rate
Prep Time: 5 minutes
Cook Time: 20 minutes
Total Time: 25 minutes
Servings: 10 muffins

Ingredients

  • 2 cups old fashioned rolled oats
  • 1/2 cup apple sauce, unsweetened
  • 1/2 cup maple syrup
  • 1/4 cup molasses
  • 2 eggs
  • 2 teaspoons vanilla extract
  • 2 teaspoons baking powder
  • 2 teaspoons cinnamon
  • 1 1/2 teaspoons ground ginger
  • 1/2 teaspoon nutmeg
  • 1/2 teaspoon salt

Instructions

  • Preheat oven to 350° Fahrenheit and line a muffin tin with muffin liners.
  • Add oats to a blender and blend until it’s ground into a flour.
  • Add in remaining ingredients, then blend until a smooth batter forms.
  • Transfer ½ cup batter into each muffin mold, then bake for 20-25 minutes or until a toothpick inserted down the center of one muffin comes out clean. Remove from oven and transfer muffins to a wire cooling rack, let cool before eating.

Nutrition

Calories: 300kcal

Turn those leftover mashed potatoes into crispy, pan-fried cakes! A super simple recipe for crispy on the outside, soft of the inside mashed potato cakes. These are hands-down the best way to give those leftovers a second life!

mashed potato cakes on a plate with chive-onion dip on the side and chives on top.

What You’ll Need to Make Mashed Potato Cakes

Cold Mashed Potatoes – No need to reheat those leftover mashed potatoes! Simply add them to a bowl, cold, with the rest of the ingredients. Any kind of mashed potatoes works here, so use whatever you have in your fridge.

Flour – All purpose flour helps these mashed potato cakes hold their shape. I used gluten-free all purpose flour to make my cakes gluten-free, but either works!

Eggs – Two large eggs work to hold this recipe together. They’re super important, so don’t leave ’em out!

Sour Cream – Perfectly tangy and creamy, sour cream is the base of our chive-onion dip! Super cheap and easy to find, I almost always have a tub of sour cream on-hand. However, if you’d like, you can swap out the sour cream for plain unsweetened greek yogurt – just as tangy and delicious!

mashed potato cakes being dipped into chive-onion dip.

Tips and Tricks

  • Add a cup of your favorite shredded cheese for cheesy mashed potato cakes! Cheese is always a fun addition, and tastes delicious.
  • Cook these in the air fryer instead! To do this, lightly grease an air fryer tray or basket, then cook at 400° Fahrenheit for 15-20 minutes, pausing to flip the cakes halfway through.
  • Sprinkle in any additional seasonings you’d like! Doctor up your leftover mashed potatoes with your favorite herbs and/or spices. A pinch of garlic powder, onion powder, or even fresh chopped chives would all make great additions.
a stack of mashed potato cakes with chive onion dip on top.

Adjust This Recipe to Your Dietary Needs

Make it Gluten-Free: Replace the flour with gluten-free all purpose flour, I tested this recipe using Bob’s Red Mill Baking Flour and it turned out great!

Make it Dairy-Free: The mashed potato cakes are already dairy-free, but for a dairy-free dip, sub the sour cream for your favorite non-dairy sour cream. I love Kite Hill’s Sour Cream Alternative, or Forager’s Dairy-Free Sour Cream.

close-up image of mashed potato cakes on a plate.
No ratings yet

Leftover Mashed Potato Cakes with Chive-Onion Dip

Turn those leftover mashed potatoes into crispy, pan-fried cakes! A super simple recipe for crispy on the outside, soft of the inside mashed potato cakes. These are hands-down the best way to give those leftovers a second life!
Print Pin Rate
Prep Time: 5 minutes
Cook Time: 10 minutes
Total Time: 15 minutes
Servings: 6 servings

Ingredients

  • 2 cups cold mashed potatoes
  • 1 cup all purpose flour
  • 2 eggs
  • salt and black pepper, to taste
  • 3 tablespoons avocado oil or olive oil

For the chive-onion dip:

  • 1/2 cup sour cream
  • 1 tablespoon fresh chives, chopped
  • 1 teaspoon lemon juice
  • 1/2 teaspoon onion powder
  • small pinch of salt

Instructions

  • In a large bowl, mix together the mashed potatoes, flour, eggs, salt, and black pepper.
  • Heat oil in a large skillet over medium heat. Once hot, drop in ÂĽ cup of potato batter and slightly flatten to create a pancake. Cook 4-5 minutes per side, or until golden brown, then repeat with remaining batter.
  • Make the onion-chive dip by adding all ingredients to a bowl and whisking to combine. Serve mashed potato cakes warm with dipping sauce.

Nutrition

Calories: 300kcal

Fresh and crunchy shaved Brussels sprout salad, finished off with an out-of-this-world maple dijon dressing! A quick and easy side dish, comes together in just 10 minutes. A gluten-free salad, with nut-free and vegan options!

brussels sprout salad in a a bowl with serving utensils.

What You’ll Need to Make Brussels Sprout Salad

Brussels Sprouts – You can either buy shaved Brussels sprouts, or shave them yourself with a mandoline or sharp knife. If using a mandoline, cut off the the stem end of each sprout, then run the sprout down the mandoline to thinly slice. Or, if using a knife, remove the stem end then place the sprout on its side on a cutting board, then make thin slices through the sprout. Once shaved, your sprouts are ready to add to this delicious salad!

Pomegranate Arils/Seeds – First thing I want to note is that pomegranate arils are the exact same thing as pomegranate seeds. When buying your pomegranate for this salad, you have two options, you can either purchase the seeds out of the pomegranate, or you can purchase a whole pomegranate and remove the seeds yourself. I always opt for the latter option because it’s so much cheaper, and super easy to do! For help on how to cut a pomegranate, check out my step-by-step tutorial HERE.

Walnuts – Chopped walnuts add the perfect crunch to this recipe! Walnuts are creamy and buttery, and simply so good in this salad. However, if you don’t have walnuts, feel free to use any nut you have on-hand! Others I recommend are pine nuts, chopped pecans, or even unsalted pumpkin seeds.

Soft Cheese – Any soft cheese will taste great in this Brussels sprout salad! I used a soft chèvre goat cheese, and it was perfectly tangy and delicious. Though crumbled feta, blue cheese, or even freshly grated parmesan cheese work perfectly too.

dressing being poured over brussels sprout salad.

Tips and Tricks

  • This is the perfect make-ahead side dish for holiday parties or potlucks! The flavors get better with time, so go ahead and dress the salad then let it sit in the fridge until ready to serve. I just wouldn’t recommend letting it sit for more than 4 hours before eating, at that point, it’ll begin to lose its crunch.
  • Have fun with this recipe! Don’t be shy, switch up ingredients based on your preferences. Sub pears for the apples, blueberries for the pomegranate, and use any kind of cheese you’d like!
close-up image of brussels sprout salad in a bowl.

Adjust This Recipe to Your Dietary Needs

Make it Vegan: For a vegan Brussels sprout salad, either replace the cheese with your favorite vegan soft “cheese,” or leave the cheese out altogether, it’ll still be delicious and full of flavor!

Make it Nut-Free: Simply leave out the walnuts, or replace them with unsalted pumpkin or sunflower seeds.

Add Protein: Take this from a side dish to the main course by adding some lightly seasoned chicken (grilled or oven-roasted is best), or bulk it up with a can of your favorite white beans!

overhead image of brussels sprout salad with walnuts, pomegranate seeds, and goat cheese on the side.
5 from 1 vote

Brussels Sprout Salad

Fresh and crunchy shaved Brussels sprout salad, finished off with an out-of-this-world maple dijon dressing! A quick and easy side dish, comes together in just 10 minutes. A gluten-free salad, with nut-free and vegan options!
Print Pin Rate
Prep Time: 10 minutes
Total Time: 10 minutes
Servings: 6 servings

Ingredients

For the salad:

  • 4 cups thinly sliced Brussels sprouts
  • 1 apple, thinly sliced
  • 1/2 cup pomegranate arils (seeds)
  • 1/3 cup walnuts, roughly chopped (pecans or pine nuts work too!)
  • 1/4 cup dried cranberries
  • 1/4 cup soft cheese, crumbled (goat cheese, feta, gorgonzola, etc)

For the dressing:

  • 1/3 cup olive oil
  • 2 tablespoons apple cider vinegar
  • 1 tablespoon Dijon mustard
  • 1 tablespoon maple syrup
  • 1 garlic clove, minced
  • 1/2 teaspoon salt

Instructions

  • Add all salad ingredients to a large bowl and toss.
  • Add all dressing ingredients to a small bowl and whisk to combine.
  • Pour dressing over salad, then either let sit in fridge for up to 3 hours, or serve immediately.

Nutrition

Calories: 300kcal

This hearty Mexican soup is full of fresh, delicious flavor! The perfect quick and easy dinner recipe to throw together on a busy weeknight. Requires only a handful of simple ingredients, cooked in one pot, in just 30 minutes!

overhead image of Mexican soup with avocado, cilantro, sour cream, and tortillas on top.

What You’ll Need to Make Mexican Soup

Chicken – This recipe calls for chicken breasts, but really any cut of chicken will work. My one recommendation when it comes to buying your chicken, is to make sure it’s boneless and skinless. This’ll make the cooking and dicing process much easier! Also, for a vegan/vegetarian Mexican soup, check out the “Adjust This Recipe to Your Dietary Needs” section below.

Chicken Broth – I used chicken bone broth in my Mexican soup for an extra boost of nutrients. However, any chicken broth, or even chicken bouillon dissolved in water will do the trick. And if you don’t have chicken broth, feel free to use vegetable broth instead.

Taco Seasoning – Two tablespoons of taco seasoning load this soup up with TONS of delicious flavor! This addition makes this recipe even easier to throw together. Though if you don’t have taco seasoning, feel free to use a combo of your favorite Mexican spices. I love smoked paprika, cumin, garlic powder, onion powder, and dried oregano.

Jalapeño – While optional, I love throwing in a diced jalapeño for extra flavor and spice! However, for a mild soup, try just half a jalapeño. Or, feel free to leave it out altogether.

mexican chicken soup in a bowl with a spoon.

Tips and Tricks

  • I highly recommend doubling this recipe! Leftover Mexican soup tastes just as good, and is easy to reheat and enjoy all week long. Heck, you can even freeze it for up to three months!
  • For a heartier meal, add rice! I love adding in a cup or two of cooked rice to my soup. And to keep things super easy, I typically opt for a pre-cooked microwaveable rice.
  • You can also make this Mexican soup in the Instant Pot! To do that, use the sautĂ© function to cook up with veggies. Then, add the remaining ingredients, seal the lid and cook on high pressure for 15 minutes. After 15 minutes, remove the chicken, dice it up, then add it back into your soup – that’s it!
close-up overhead image of Mexican soup with avocado, cilantro, sour cream, and tortillas on top.

Adjust This Recipe to Your Dietary Needs

Make it Vegan/Vegetarian: For a vegan or vegetarian Mexican soup, replace the chicken with two cans of your favorite beans – I love either black beans or navy beans! Also, replace the chicken broth with vegetable broth.

Make it Gluten-Free: While mostly gluten-free, make sure the taco seasoning you use is 100% gluten-free as well!

overhead image of Mexican soup with avocado, cilantro, sour cream, and tortillas on top.
No ratings yet

One-Pot Mexican Soup

This hearty Mexican soup is full of fresh, delicious flavor! The perfect quick and easy dinner recipe to throw together on a busy weeknight. Requires only a handful of simple ingredients, cooked in one pot, in just 30 minutes!
Print Pin Rate
Prep Time: 5 minutes
Cook Time: 20 minutes
Total Time: 25 minutes
Servings: 5 servings

Ingredients

  • 2 tablespoons olive oil
  • 1/2 yellow onion, chopped
  • 1 celery stalk, chopped
  • 1 carrot, chopped
  • 3 garlic cloves, minced
  • 1 quart chicken broth
  • 1 (14-ounce) can crushed tomatoes
  • 1-2 pounds chicken breast
  • 2 tablespoons taco seasoning
  • salt, to taste

Instructions

  • Heat olive oil in a large pot over medium heat, Add in the onion, celery, carrots, garlic, and jalapeño. Cooked 4-5 minutes, or until veggies are tender.
  • Add in chicken broth, crushed tomatoes, chicken, taco seasoning, and salt.
  • Bring to a boil then reduce heat to a simmer, cook uncovered for 20 minutes. Remove chicken from pot, dice into ½-inch pieces, then transfer back into pot. Stir to combine then serve warm with fresh cilantro, lime juice, avocado, sour cream, and tortilla chips.

Nutrition

Calories: 300kcal