
This dairy-free clam chowder is irresistibly creamy, without any actual cream! This easy one-pot recipe is loaded with clams and restaurant-quality flavor.
Clam chowder was one of those dishes that I quit cold-turkey when I went dairy-free. It was by no means easy, but it had to be done. Dairy-free clam chowder simply doesn’t exist on a menu anywhere (at least that I’m aware of). To me, and all my other non-dairy friends out there, I feel sorry for us!
I grew up in New England, and creamy clam chowders were a major part of my summer diet. Everywhere I went, if clam chowder was on the menu – I was ordering a cup! I was such a big chowder-enthusiast that at one point I participated in a clam chowder contest. I was a taste-tester by the way, as this was looooong before my recipe developer/food blogger days. So I guess, yes, you could say I’m a bit of a clam chowder aficionado of sorts. I don’t mean to brag, but like, you get it. Therefore, I’d say I’m a bit (ok more than a bit *hair flip*) qualified to be providing you with this dairy-free clam chowder recipe today.
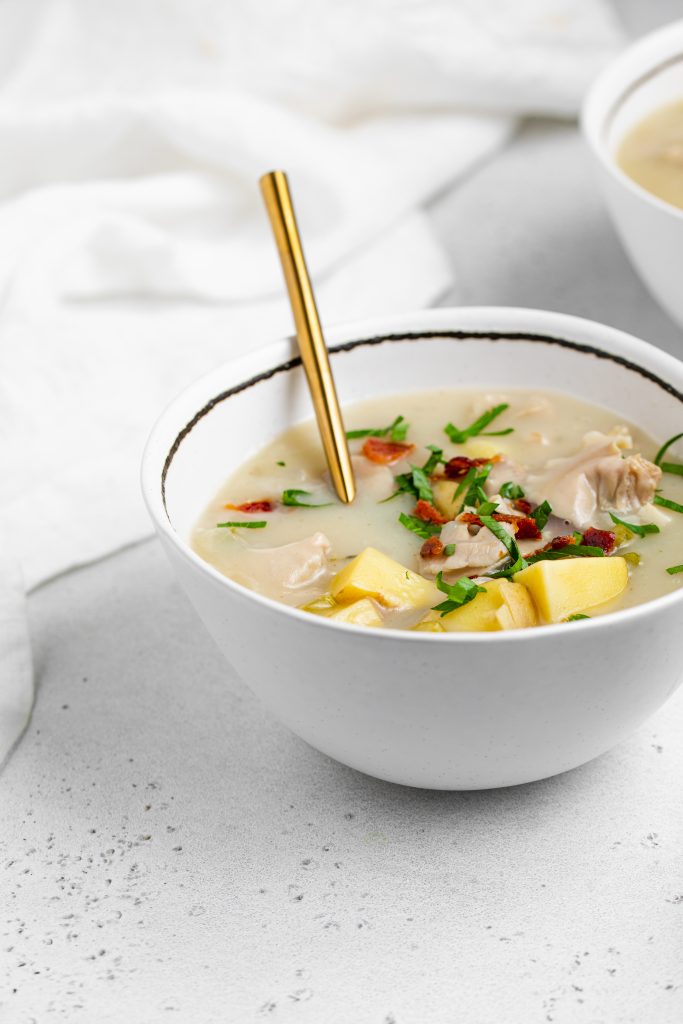
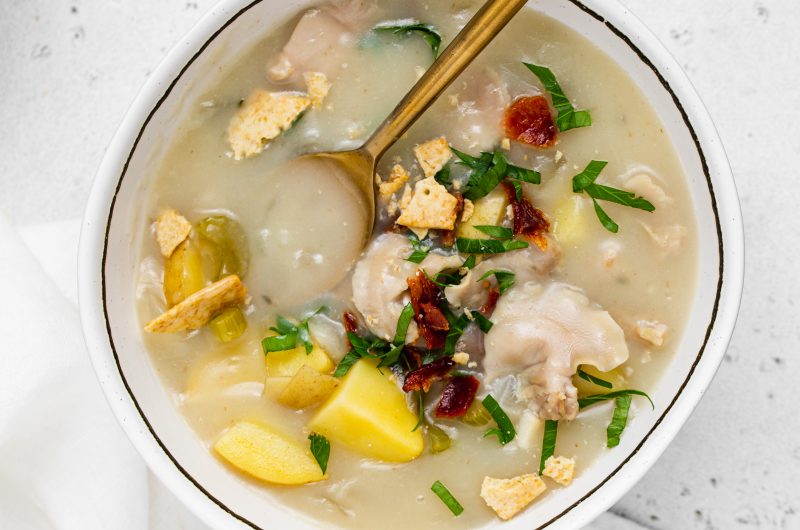
Plenty of clams, chunks of tender potatoes, and a handful of fresh herbs are enveloped in a creamy chowder base. This dairy-free clam chowder tastes incredible with a sprinkling of fresh parsley and crushed gluten-free crackers on top – YUM!
What You Need To Make Dairy-Free Clam Chowder
Bacon – Consider this our secret ingredient! Bacon adds the perfect savory, almost smokey flavor to this recipe. You’ll start by crisping up the bacon in your pot. Then, removing the bacon and cooking the rest of the dish in the pot with its delicious rendered fat. You can either enjoy the bacon separately, or crumble it on top of your finished chowder. I personally love the latter and enjoy coming across little pieces of bacon throughout my dairy-free clam chowder.
Clam Juice – If you’ve never made clam chowder before, you’re probably not familiar with clam juice. I mean, clam chowder is the only reason I’ve ever purchased clam juice in my life. Don’t let the sound of this ingredient fool you, it contributes a subtle briny flavor to this recipe. If you can’t find clam juice, you can use an additional cup of chicken stock instead.
Canned Clams – These are surprisingly easy to find at most grocery stores! You can use either chopped or whole clams in this chowder. The kind you’d order at a restaurant most often contain chopped clams. However, I think both taste equally as great in this dairy-free clam chowder recipe.
Adjust This Recipe To Your Diet
- Make it Paleo: Use arrowroot starch instead of cornstarch for a paleo clam chowder.
- Make it Whole30: Similar to paleo, use arrowroot starch instead of corn starch and make sure that your dairy-free milk is Whole30 compliant!
Dairy-Free Clam Chowder
Course: MainCuisine: New EnglandDifficulty: Intermediate6
servings30
minutes30
minutesThis dairy-free clam chowder is irresistibly creamy, without any actual cream! This easy one-pot recipe is loaded with clams and restaurant-quality flavor.
Ingredients
4 slices bacon
2 celery stalks, chopped
1 yellow onion, chopped
1 garlic clove, minced
4 tablespoons corn starch, see Notes
1 cup chicken stock
1 (8 ounce) bottle clam juice
3 yellow potatoes, peeled and cubed
1 sprig fresh thyme, see Notes
1/2 teaspoon salt
1 bay leaf
3 (6.5 ounce) cans whole or chopped clams
1 cup dairy-free milk
Fresh chopped parsley, for serving
Directions
- Cook bacon in a large pot or dutch oven until crispy, then remove and set aside on a paper towel-lined plate.
- Add chopped celery and onion to the pot and cook over medium heat until soft, about 5 minutes. Then add in the garlic and cook for just 1 minute.
- Add in the corn starch and mix until well combined, pour in the chicken stock and clam juice, then add in the potatoes, thyme, salt, and bay leaf. Bring to a boil then reduce to a simmer and cook for 15-20 minutes or until potatoes are easily pierced with a fork.
- Pour in canned clams (with juice) and dairy-free milk, simmer for 3-5 minutes then taste and adjust seasoning as desired. Served with crumbled bacon and fresh parsley.
Recipe Video
Notes
- Corn Starch: You can use arrowroot starch instead if you’d like.
- Fresh Thyme: If you don’t have fresh thyme, you can use 1 teaspoon of dried thyme instead.
Did you make this recipe?
Share it and tag @samdoesherbest on Instagram!
Like this recipe?
Follow us @samdoesherbest on Pinterest
")


")


")


