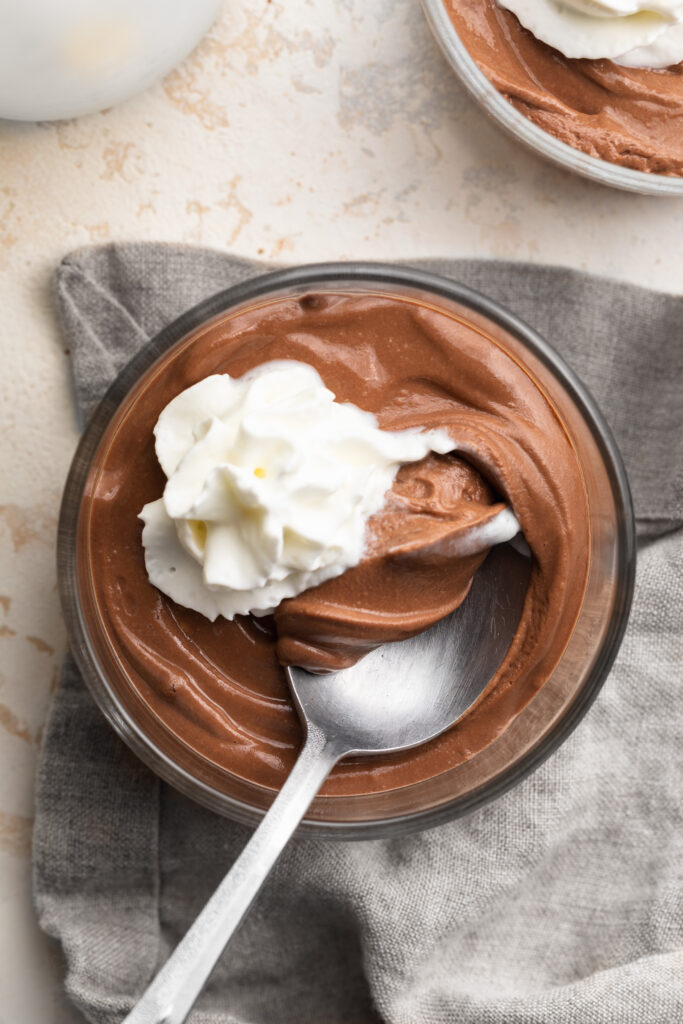
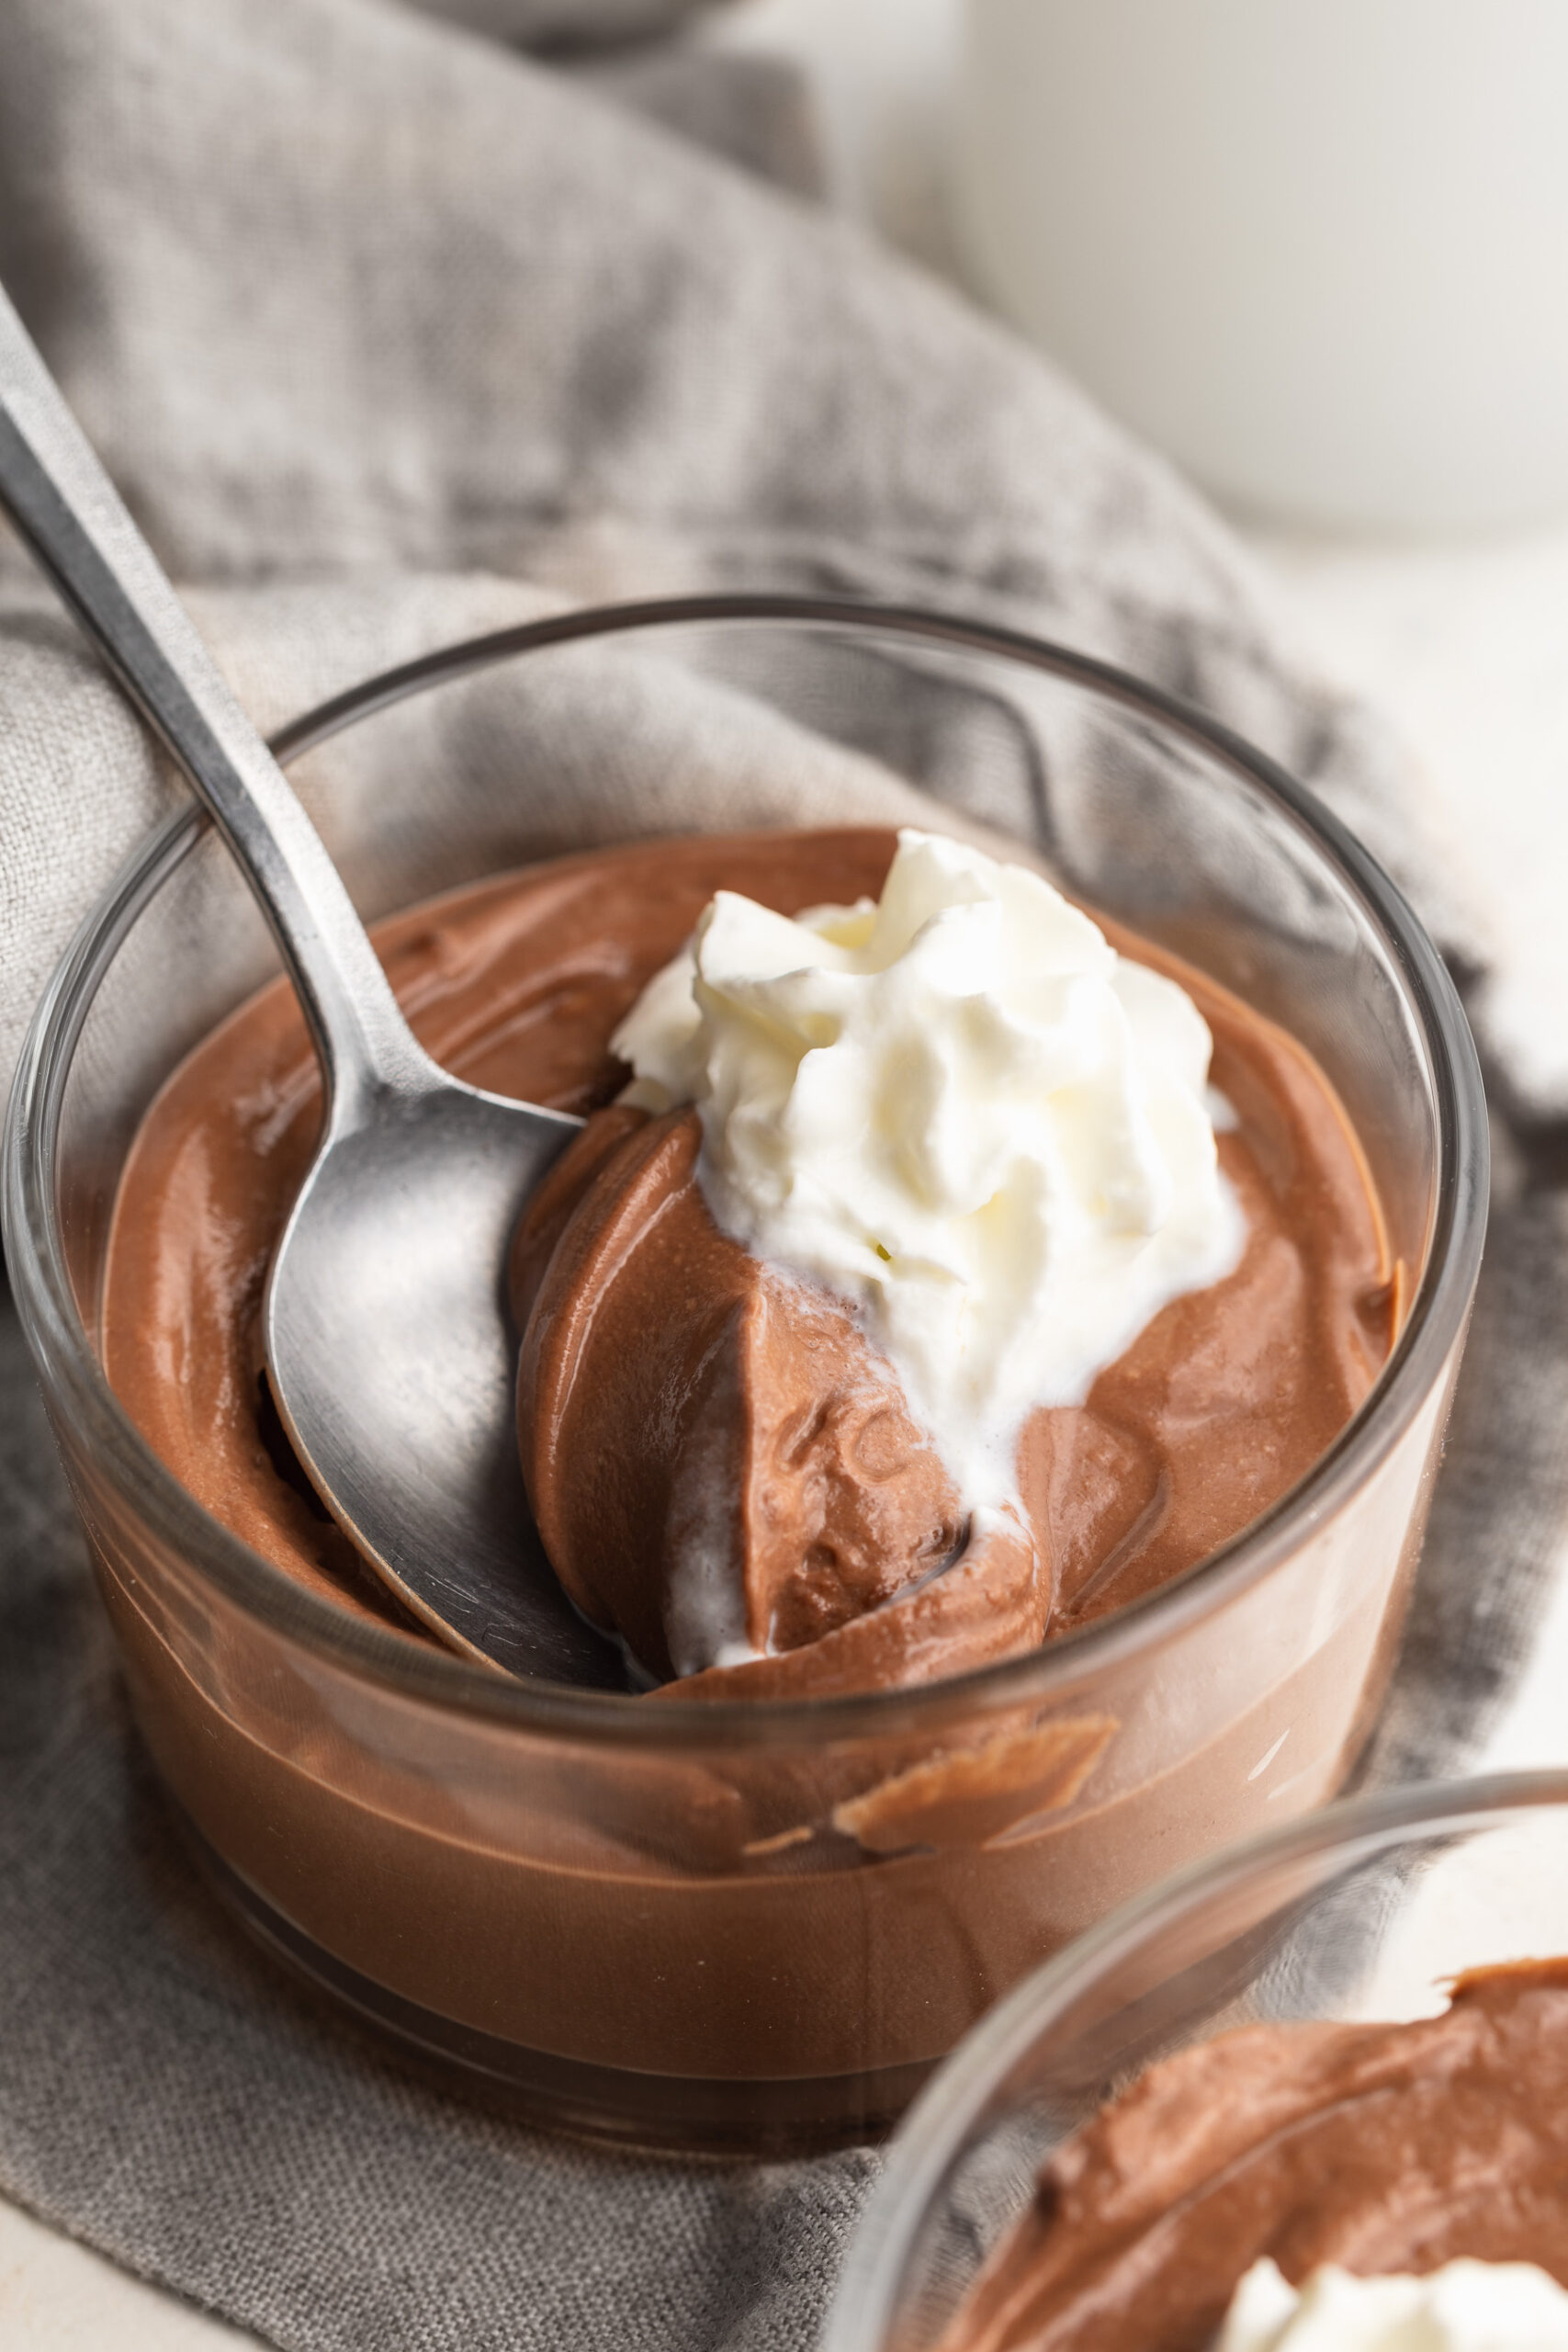
I must admit, my sweet tooth has been out of control lately! But lucky for me, I have plentyyy of healthier sweet treats in my archives to satisfy it. I’ve been making my cottage cheese cookie dough pretty much once a week, and 4-ingredient protein brownies whenever I get the chance. And now, I prep and store this cottage cheese chocolate mousse in my fridge at all times. It’s just the perfect balance between light and indulgent, chocolatey yet not too sweet – and of course, super easy to make! And the best part? It packs in over 30 grams of protein per serving. Now that’s a sweet treat you can enjoy and feel good about!
Why You’ll Love This Cottage Cheese Chocolate Mousse
High-protein dessert with 30g protein per serving!
Made with just 4 simple ingredients, and naturally sweetened with maple syrup.
Super easy to make in just a few minutes!
Thick, creamy texture just like classic chocolate mousse.
Perfect for a healthy dessert or snack.
The 4-ounce meal prep jars I use to store my cottage cheese chocolate mousse are linked here.
Frequently Asked Questions
What kind of protein powder did you use?
I used the Aloha Chocolate Protein Powder (use this link for 20% off your order!) and it makes a perfectly thick and airy chocolate mousse – with tons of protein.
How much protein is in this chocolate mousse?
Each serving contains about 30 grams of protein and just 300 calories, depending on the cottage cheese and protein powder you use.
Can I make this sugar-free?
Yes. You can replace the maple syrup with a sugar-free liquid sweetener such as monk fruit or stevia. Just adjust the amount to taste since sweetness levels vary.
How long does this stay good in the fridge?
Store the mousse in an airtight container in the refrigerator for up to 4 days. The texture may thicken slightly as it chills, so give it a quick stir before serving if needed.
No ratings yet
4-Ingredient Cottage Cheese Chocolate Mousse
This cottage cheese chocolate mousse is a creamy, high-protein dessert made with just 4 simple ingredients! Each serving has over 30 grams of protein, making it a satisfying and healthy treat. Blended until smooth and chilled to perfection, this easy chocolate mousse is just as rich and delicious as the classic version!
Quick stats: 15g protein per serving · 3 ingredients · No ice cream maker needed · Ready in 6 hours
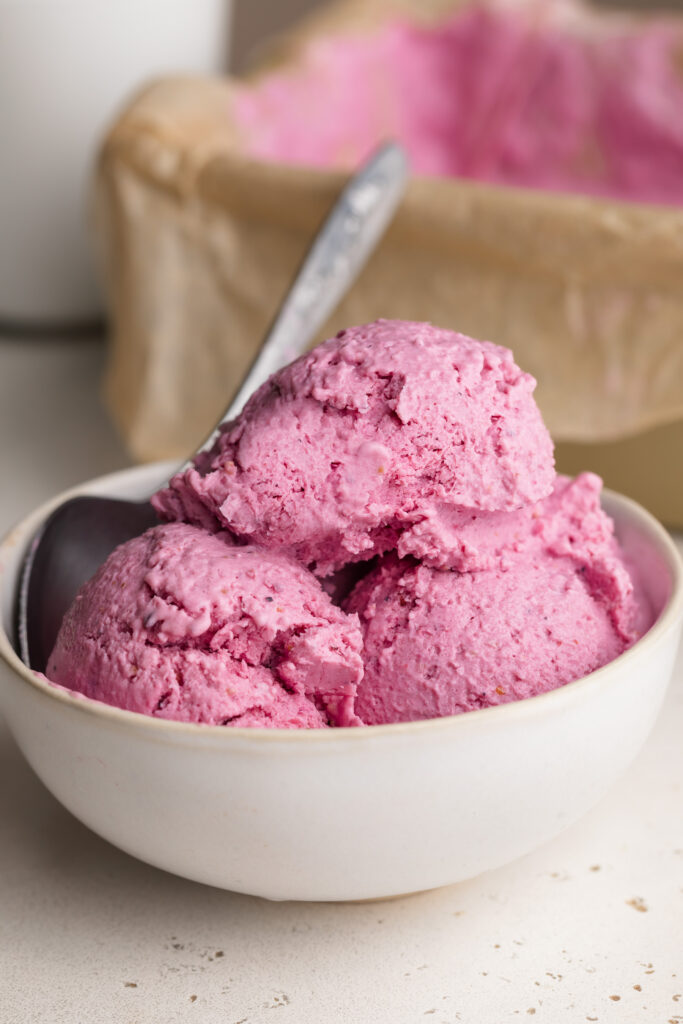
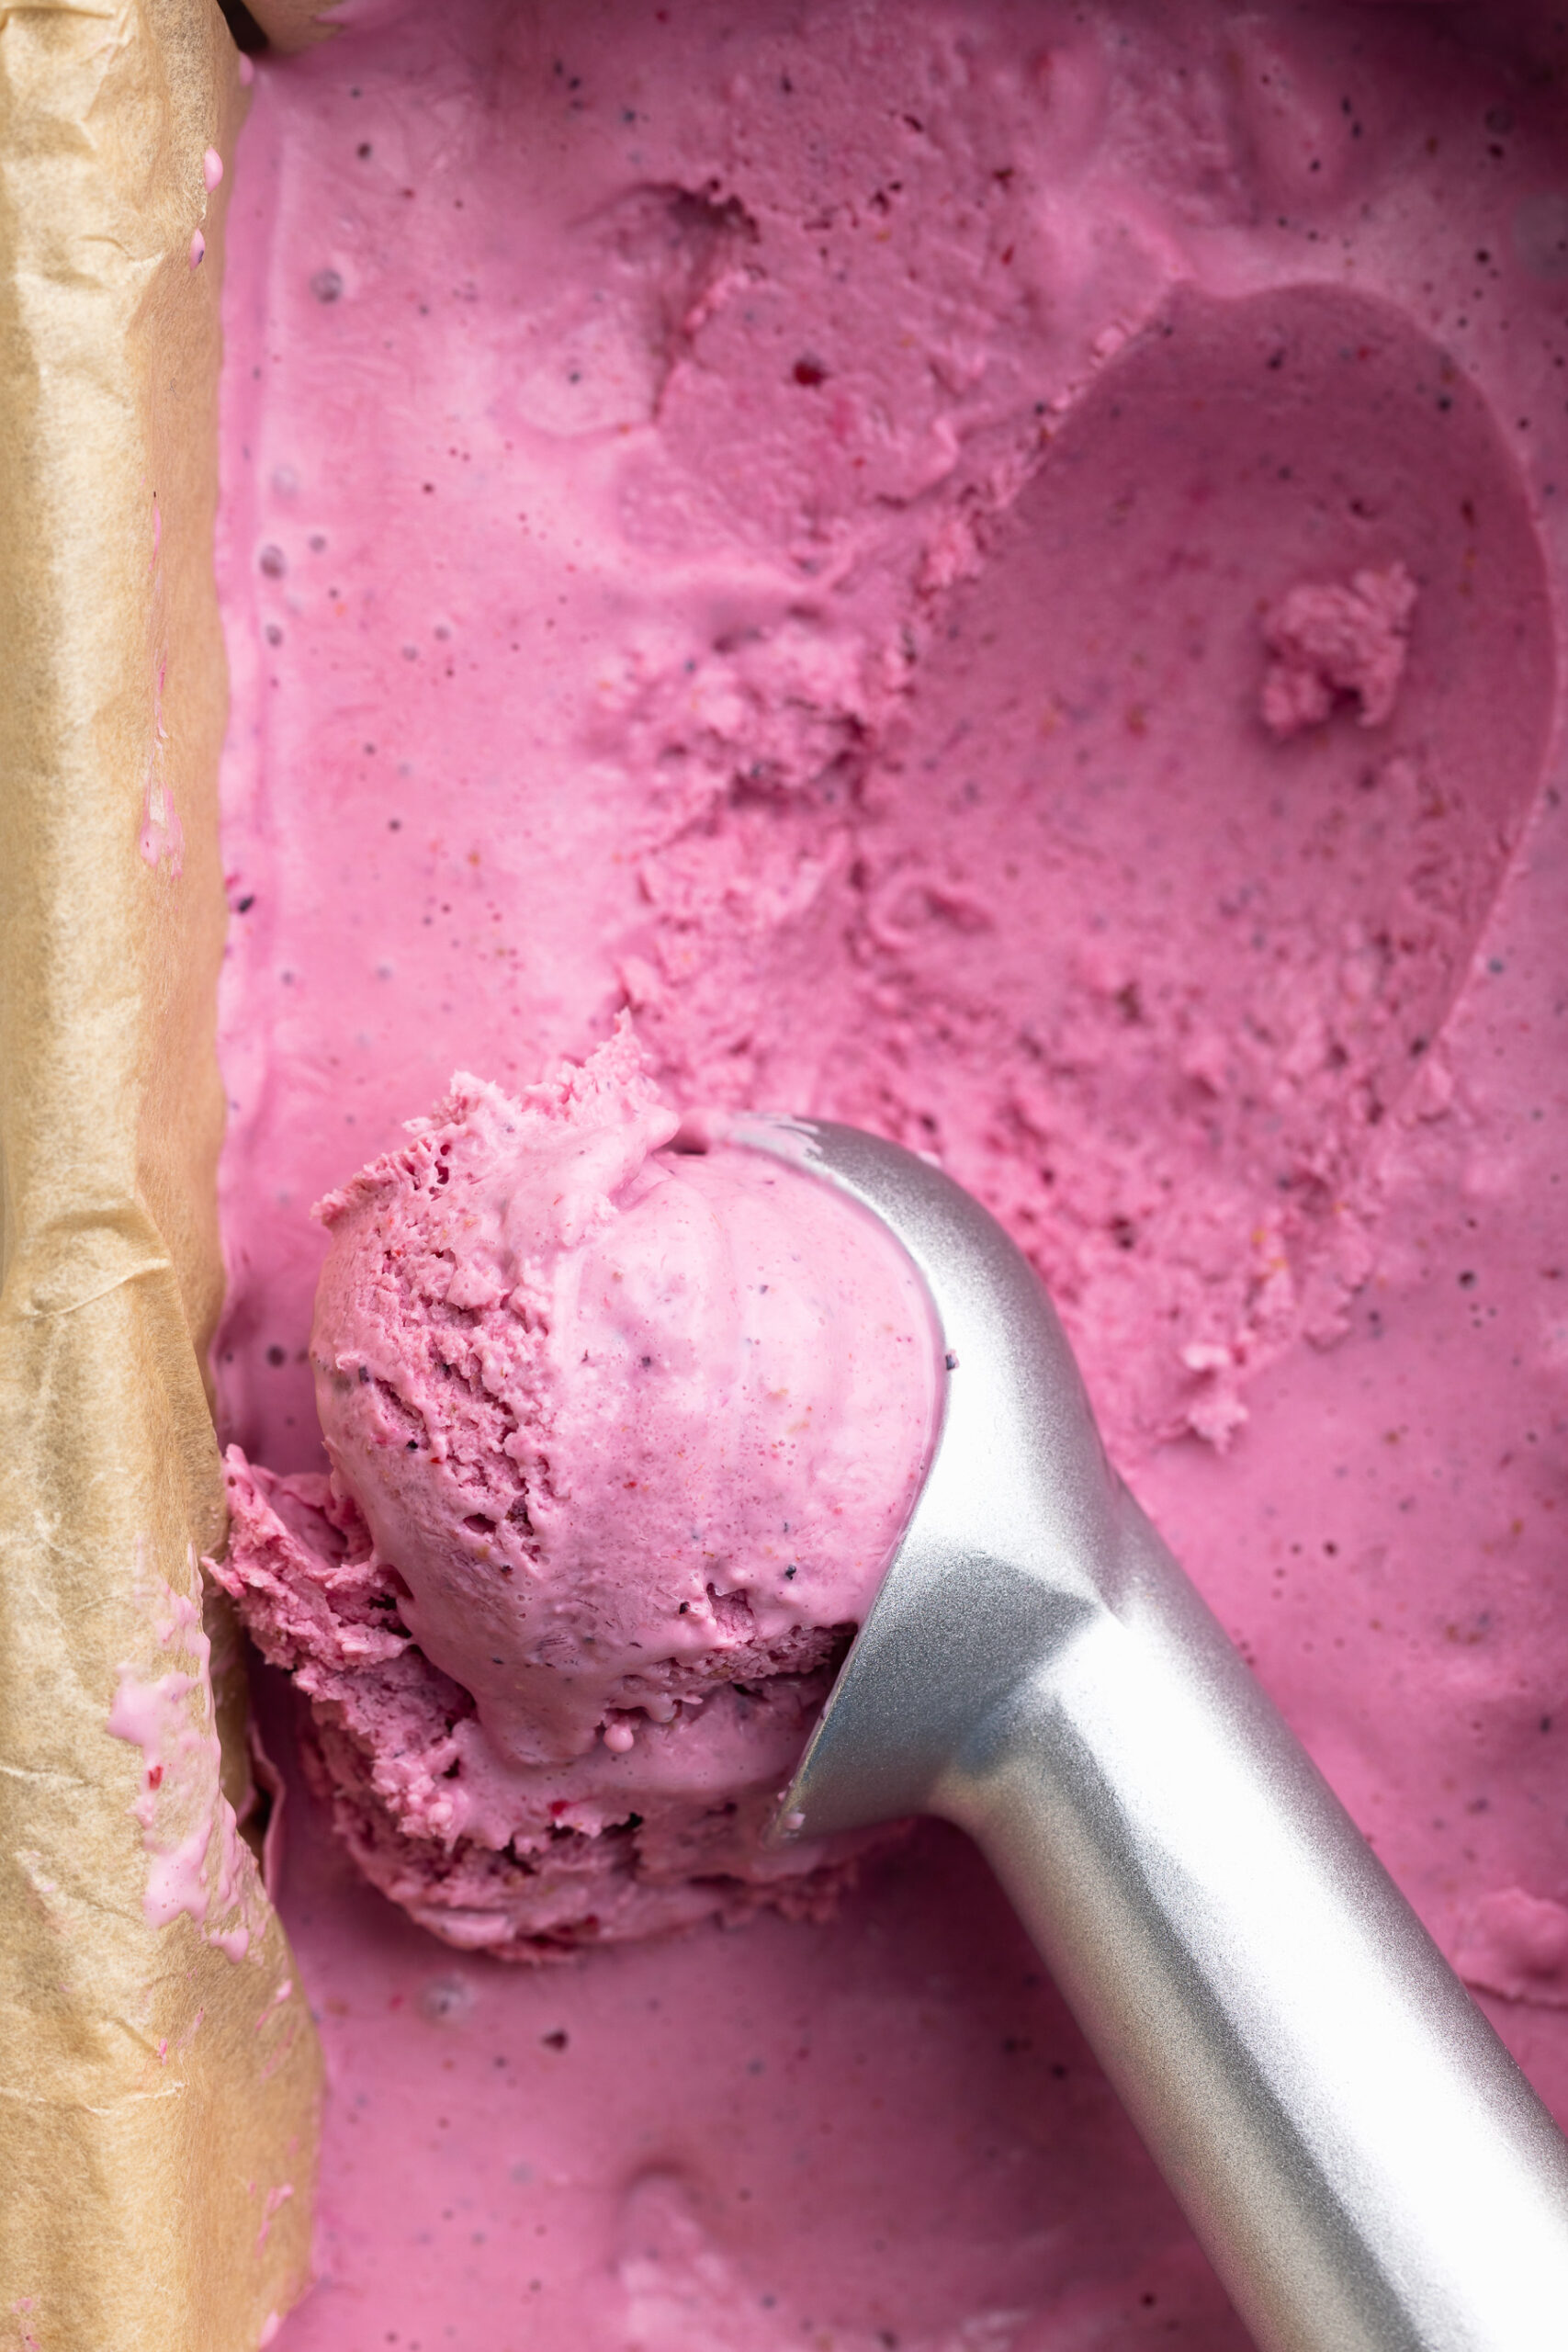
If you’ve been on TikTok or Instagram lately, you’ve probably seen cottage cheese ice cream everywhere — and for good reason. This 3-ingredient cottage cheese ice cream is creamy, naturally sweet, packed with protein, and shockingly easy to make. No churning, no ice cream maker, no fancy equipment. Just a blender, a container, and your freezer. If you’re already a fan of my cottage cheese cookie dough, you already know how magical this ingredient can be in a sweet recipe.
I’ve been making this on repeat all summer, and it has completely replaced my store-bought ice cream habit. With 15 grams of protein per serving, it satisfies my sweet tooth and keeps me full — which is honestly the dream. Whether you’re following a high-protein diet, trying to eat a little healthier, or just craving something cold and delicious, this recipe is for you. (And if you’re on a high-protein kick, you’ll also want to bookmark my 4-ingredient protein brownies and 3-ingredient protein cookies — they’re just as easy and just as good.)
Why You’ll Love This Cottage Cheese Ice Cream
Only 3 ingredients. Cottage cheese, mixed berries, and a touch of honey or maple syrup. That’s it. No hidden ingredients, no weird additives — just real food!
Seriously high in protein. With 15 grams of protein per serving, this ice cream works as hard as you do. It’s the ultimate healthy treat that actually keeps you satisfied.
Incredibly easy to make. Toss everything in a blender, pour it into a container, and let the freezer do the work. Prep time is under 5 minutes — I promise!
No ice cream maker required! No special equipment needed whatsoever. A blender and a freezer-safe container are all you need.
Healthy and wholesome. Made with real ingredients and naturally sweetened, this ice cream is low in added sugar and free from the artificial stuff you find in most store-bought pints.
Perfect for satisfying cravings. This isn’t a sad “diet food” situation. It’s genuinely creamy, sweet, and delicious — and it really does taste like ice cream.
Frequently Asked Questions
How much protein does one serving of cottage cheese ice cream contain?
This recipe makes approximately 4 servings, and each serving contains about 15 grams of protein — almost entirely from the cottage cheese. For reference, a serving of traditional ice cream typically has just 3–4 grams of protein. That’s a pretty incredible upgrade for something that tastes this good!
Can I make this added sugar-free?
Absolutely! If you want to skip the added sugar entirely, you have a couple of options. First, you can simply leave out the honey or maple syrup — the natural sweetness from the berries may be enough for you, especially if you’re using ripe, sweet fruit. Alternatively, you can sweeten with a few pitted Medjool dates blended right into the mixture for a completely natural, whole-food sweetener with zero added sugar.
How long does this stay good in the freezer for?
Stored in an airtight container, this cottage cheese ice cream keeps well in the freezer for up to 1 month. For the absolute best texture and flavor, try to enjoy it within the first week or two. Since cottage cheese is high in water content, the ice cream can get a bit icier over time. Just a heads up: every time you pull it out and let it thaw, then refreeze it, the texture can become a little more crystallized, so try to avoid too many thaw-refreeze cycles.
Flavor Variations
The beauty of this recipe is how endlessly customizable it is. Once you’ve nailed the base, the flavor possibilities are truly unlimited! Here are some of my favorites:
🍓 Strawberry Cheesecake Swap the mixed berries for 1 cup of fresh or frozen strawberries and add ½ teaspoon of pure vanilla extract. The vanilla plays up the natural tang of the cottage cheese, making it taste incredibly close to strawberry cheesecake.
🍫 Chocolate Berry Add 2 tablespoons of unsweetened cocoa powder to the blender along with your mixed berries. The result is a rich, fudgy chocolate-berry ice cream that feels indulgent but is still packed with protein.
🥜 Peanut Butter & Honey Skip the berries and blend in 2–3 tablespoons of natural peanut butter along with your honey. Stir in a handful of chocolate chips before freezing. This one is wildly addictive.
🍋 Lemon Blueberry Use 1 cup of blueberries (fresh or frozen), swap the honey for maple syrup, and add the zest of one lemon and a tablespoon of lemon juice. Bright, refreshing, and absolutely delicious.
🍑 Peach Mango Replace the mixed berries with ½ cup frozen peaches and ½ cup frozen mango chunks. The tropical sweetness of the mango pairs perfectly with the creamy cottage cheese base.
🍪 Cookies & Cream Skip the berries and blend the cottage cheese with maple syrup and a splash of vanilla. Once the mixture is in your container, stir in crushed chocolate sandwich cookies before freezing. A total crowd-pleaser.
Tips for the Creamiest Cottage Cheese Ice Cream
Use full-fat cottage cheese. I know I said it already, but it’s worth repeating — full-fat is non-negotiable if you want creamy (not icy) results.
Blend until completely smooth. Don’t rush this step. Blend on high until there are zero lumps or curds remaining. The smoother the base, the creamier the final texture.
Let it thaw properly before scooping. Pulling it straight from the freezer will make it rock solid. Give it a full 10 minutes (sometimes more!) on the counter before attempting to scoop.
Store it right. Press a piece of plastic wrap directly onto the surface of the ice cream before sealing your container. This helps prevent ice crystals from forming on top.
Try it in a Ninja Creami. If you have one, this recipe works amazingly well in the Ninja Creami. Freeze the blended mixture overnight, then run it through the Creami for an ultra-creamy, soft-serve-like texture.
Made this recipe? I’d love to see it! Tag me on Instagram @samdoesherbest or TikTok @samdoesherbest — I repost my favorites! And if you loved it, please leave a ⭐⭐⭐⭐⭐ rating below. It means the world and helps other readers find this recipe!
5 from 2 votes
3-Ingredient Cottage Cheese Ice Cream
This 3-ingredient cottage cheese ice cream is creamy, naturally sweet, and packed with 15 grams of protein per serving. No ice cream maker needed — just a blender and your freezer. It's the easiest, healthiest way to satisfy an ice cream craving!
Add the cottage cheese, mixed berries, and honey (or maple syrup) to a blender. Blend until completely smooth and creamy with no lumps remaining.
Pour the mixture into a large freezer-safe container and spread evenly. Transfer to the freezer for at least 6 hours, or until frozen solid.
When ready to serve, remove from the freezer and let sit at room temperature for at least 10 minutes, or until soft enough to scoop. Scoop into bowls and enjoy!
Video
Notes
Use full-fat cottage cheese for the creamiest texture. Low-fat versions are more watery and can result in an icy consistency.
Store in an airtight container in the freezer for up to 1 month. Press plastic wrap directly onto the surface before sealing to prevent ice crystals.
Let thaw for at least 10 minutes before scooping — it freezes very solid!
Ninja Creami tip: Freeze the blended mixture overnight, then run through the Creami for an ultra-creamy, soft-serve texture.
The self-proclaimed protein cookie queen (hi, it’s me!) is at it again with yet another quick, easy, and ttoally delicious protein cookie recipe! My single serve protein cookie was such a big hit, I received soooo many requests to make a full batch version. Well, I present to you – a rich, chewy, slightly fudgy, protein-packed cookie made with just 3 ingredients! Honestly, if I hadn’t tried them myself, I’d think these 3 ingredient protein cookies were too good to be true. They’re just as delicious as any other cookie, but pack in a whopping 20 grams of protein each!
Why You’ll Love These 3-Ingredient Protein Cookies
Ridiculously simple – only three main ingredients and 10 minutes in the oven!
Naturally healthy – made with real food, no refined sugars and totally gluten-free.
High-protein & satisfying – perfect for post-workout snack or quick breakfast treat.
Totally customizable – add your favorite mix-ins like chocolate chips, nuts, or dried fruit.
Can I use almond butter instead of peanut butter? Yes! Almond butter, cashew butter, or sunflower seed butter all work beautifully – just use the same amount.
How much protein is in each cookie? Each cookie contains around 20 grams of protein, depending on your protein powder brand and mix-ins.
Recipe Variations and Substitutions
Chocolate Lovers: Fold in ¼ cup dark chocolate chips or cacao nibs.
Nut-Free/Vegan: Use sunflower seed butter and dairy-free protein powder.
Low-Sugar: Swap chocolate chips for chopped nuts or unsweetened shredded coconut.
Spice It Up: Add a pinch of cinnamon, nutmeg, or pumpkin spice for seasonal flavor!
Sam’s Recipe Tips
Mash the banana very well for an even and smooth batter!
If the dough is too dry, add 1–2 teaspoons of non-dairy milk.
For crispier edges, flatten the cookies a little more before baking.
Store leftovers in an airtight container for up to 3 days or freeze for up to 3 months.
5 from 1 vote
3-Ingredient Protein Cookies (20g protein each!)
These 3 ingredient protein cookies are soft, chewy, naturally sweet, and packed with protein for the perfect healthy snack or post-workout treat! Made with banana, peanut butter, and protein powder, they’re quick to make, totally customizable, and naturally gluten-free and dairy-free. If you’re looking for an easy high-protein cookie recipe that tastes amazing and comes together in minutes, this is it!
Preheat oven to 350° Fahrenheit and line a baking sheet with parchment paper.
Mash the banana in a bowl until mostly smooth, then mix in the peanut butter and protein powder.
Fold in the chocolate chips or any mix-in you’d like, then scoop 2 tablespoon-sized mounds of cookie dough onto the parchment paper. Slightly wet your hands, then use them to gently press and flatten each cookie slightly.
Bake the cookies for 10 minutes, or until lightly golden brown around the edges, then remove from the oven and transfer to a wire cooling rack before serving or storing.
All aboard the cottage cheese train! It’s no secret cottage cheese is trending, and I honestly never understood why until I finally decided to hop on the trend. I started with my cottage cheese cookie dough, then gave 3-ingredient cottage cheese pizza crust a try (*spoiler alert* it’s amazing!), and now here we are – my first every cottage cheese dip. And because I’m all about easy recipes, this cottage cheese buffalo dip is made with just 3 ingredients. I whipped it (literally) together in a food processor in just a few minutes for a high-protein appetizer or snack that’s perfect for game day or really… any day!
Why You’ll Love This Recipe
Only 3 ingredients – no complicated steps, just blend and enjoy!
High protein & healthy – thanks to the cottage cheese, this dip has less calories and more protein than traditional buffalo dips.
Game day ready – perfect for football parties, holiday gatherings, or a quick snack.
Customizable – adjust the spice level by adding more or less hot sauce.
How Much Protein is in This Cottage Cheese Buffalo Dip?
This recipe makes about 2 cups of dip, and each ½ cup serving contains roughly 14 grams of protein. That means you can snack on this buffalo dip and get a solid protein boost. It’s a fun way to upgrade a party dip into something nourishing and satisfying!
Frequently Asked Questions
Can I heat this dip? Yes! You can warm it gently on the stove or in the microwave. Just stir occasionally so it stays smooth and creamy. You can even sprinkle it with shredded cheese before baking for extra cheesy goodness!
What can I use instead of cottage cheese? Greek yogurt works as a substitute, though it won’t be quite as thick or creamy. Cream cheese can also be used, but it will reduce the protein content.
Can I add chicken to it? Absolutely! For a more classic buffalo chicken dip vibe, stir in shredded cooked chicken before serving (or after blending).
Sam’s Recipe Tips
Use full-fat cottage cheese for the creamiest texture.
If you like extra heat, stir in a pinch of cayenne or crushed red pepper flakes.
For added flavor, top with chopped chives or a sprinkle of blue cheese crumbles.
This creamy, spicy, and protein-packed cottage cheese buffalo dip is made with just three simple ingredients and comes together in under 5 minutes. It’s the ultimate healthy snack or game day appetizer that pairs perfectly with crunchy veggies, chips, or crackers. With cottage cheese as the base, this dip is loaded with protein while still being light and creamy.
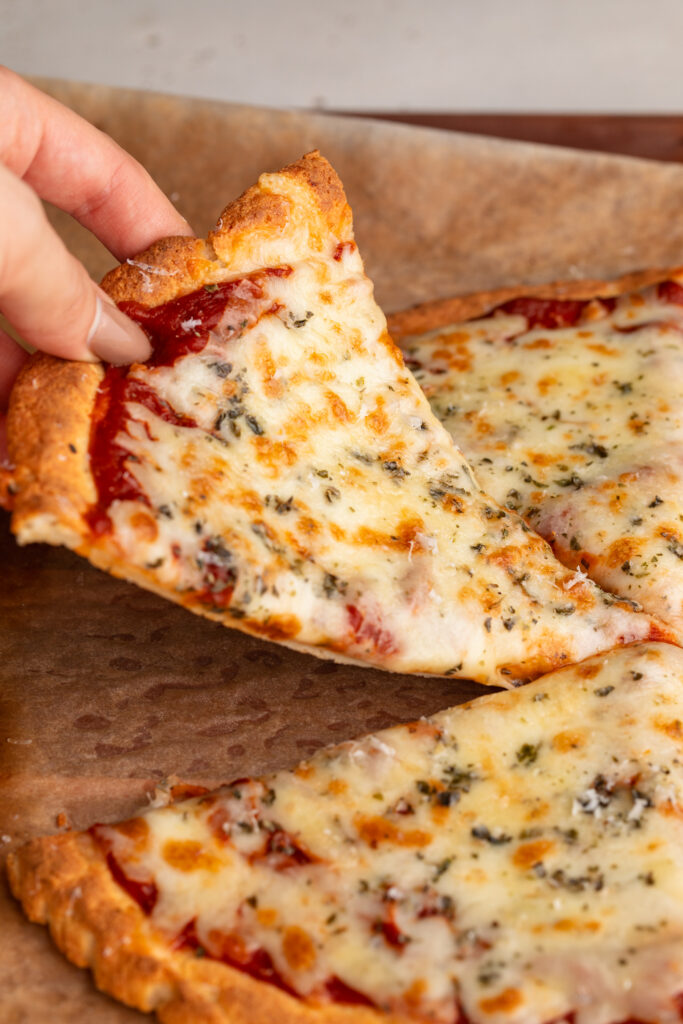
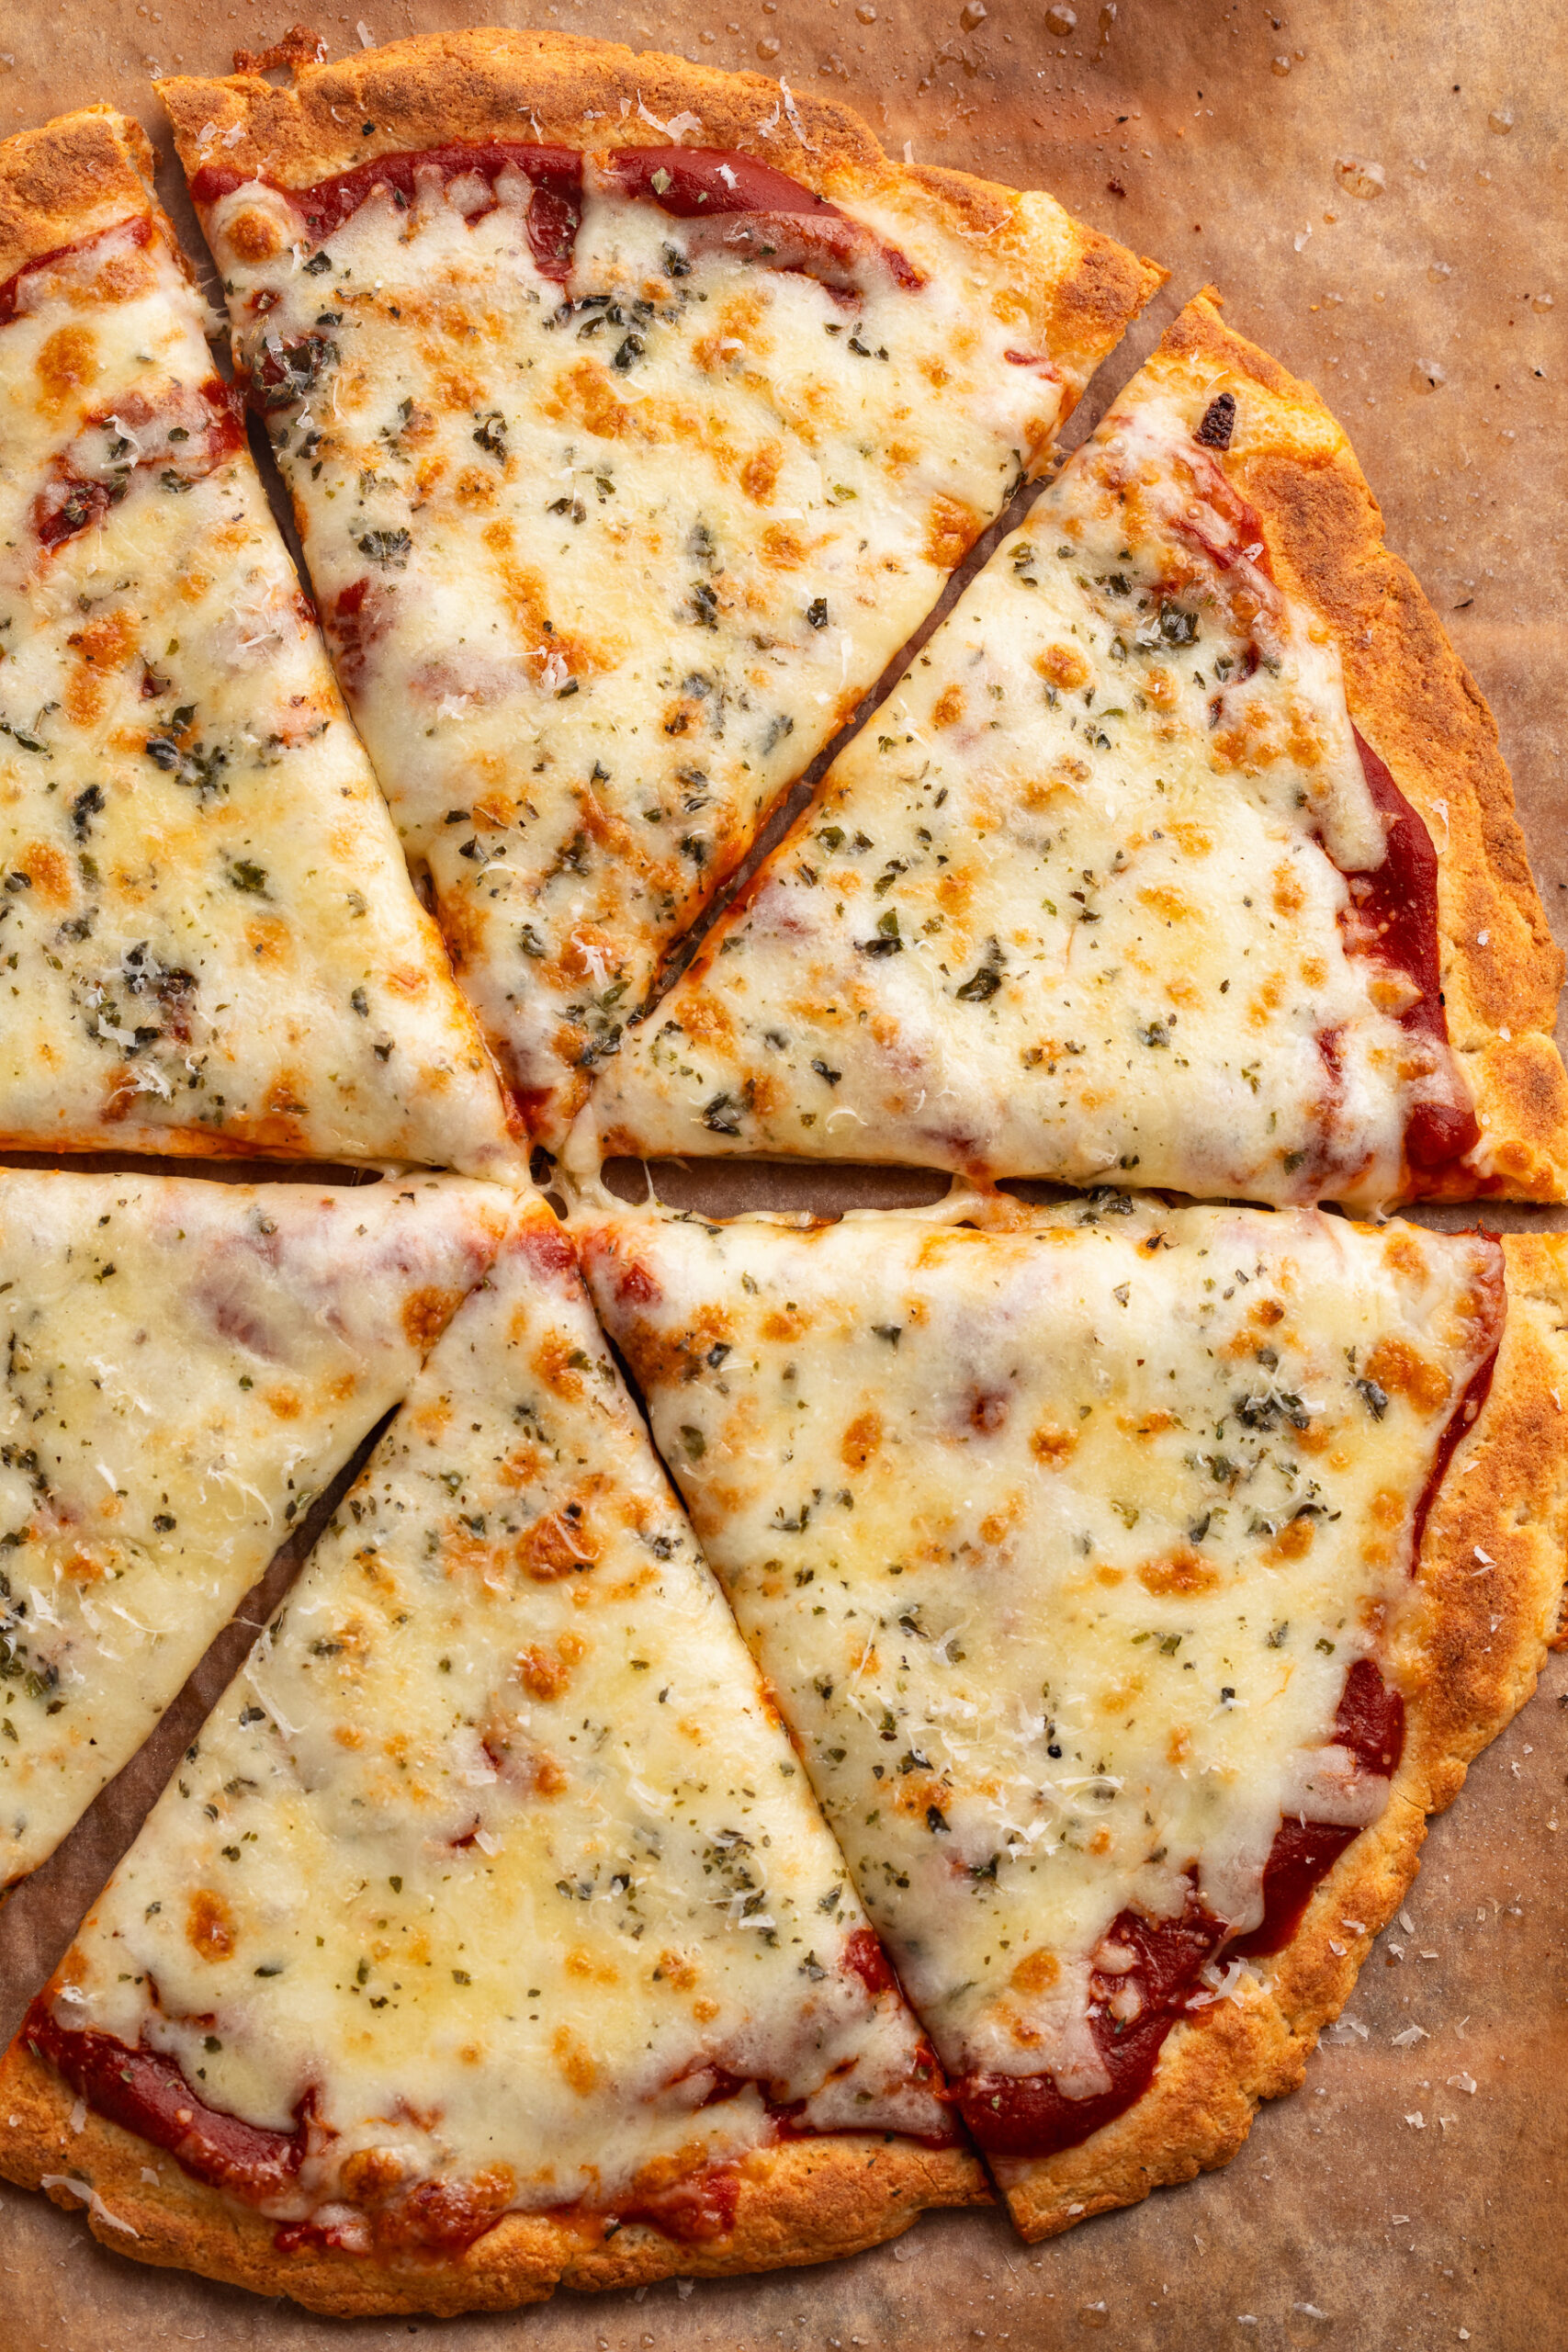
The cottage cheese craze finally got to me! It started a few months ago with my 5-ingredient cottage cheese cookie dough which shocked me (and many of you!) with just how GOOD it is. Now we’ve moved onto a savory cottage cheese recipe, in the form of pizza! This cottage cheese pizza crust is just as light and crisp as your favorite pizza crust, but packs in a bonus 20 grams (!!!) of protein per serving. It’s also made with just 3 simple ingredients. Homemade pizza dough has truly never been easier (or healthier)!
Why You’ll Love This Recipe
This 3-ingredient cottage cheese pizza crust is soft, slightly chewy, and packs in extra protein with every slice. Made with just cottage cheese, flour, and baking powder, it’s a simple and satisfying base for your favorite pizza toppings. Whether you’re using a pizza oven or a standard oven, this recipe comes together fast and can be made gluten-free too!
Frequently Asked Questions
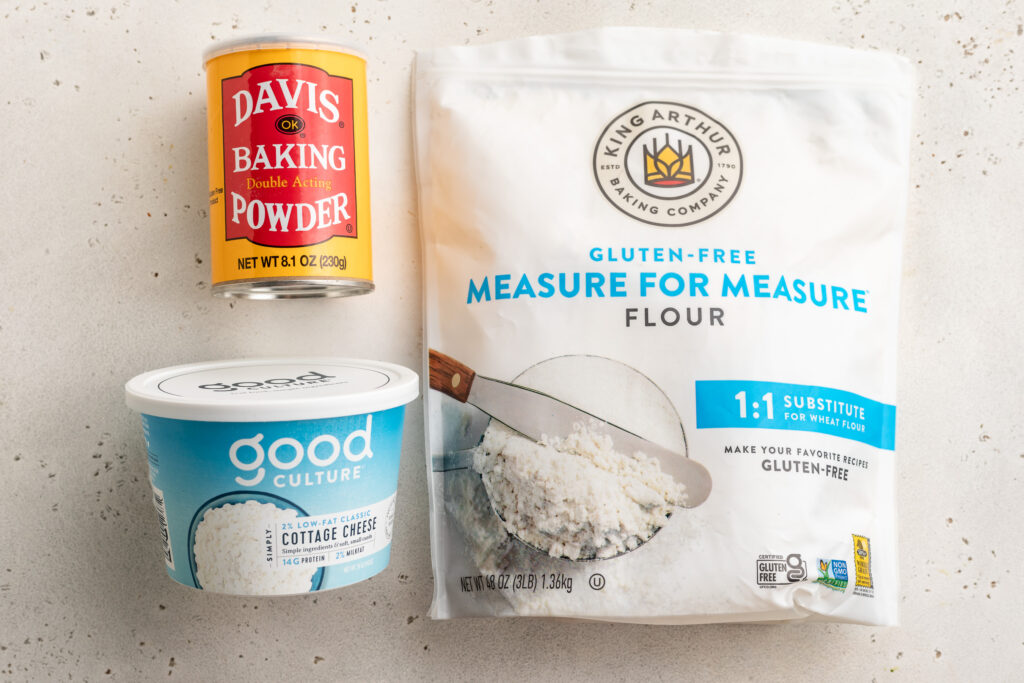
What kind of cottage cheese works best in this recipe? Use full-fat or low-fat cottage cheese for best results—both blend smoothly and add richness. Make sure to blend it well until completely smooth for the ideal dough texture. I’ve used both the good culture cottage cheese and organic valley cottage cheese to make this pizza, and both turned out great!
Can I use Greek yogurt instead of cottage cheese? Greek yogurt can work in a pinch, but the dough will be slightly more wet and may need additional flour. For best results and structure, stick with cottage cheese.
Sam’s Recipe Tips
Blend it smooth: Don’t skip blending the cottage cheese. It ensures your dough is cohesive and easier to work with.
Grease that surface: Whether using a pizza stone or parchment-lined baking sheet, lightly greasing helps the crust crisp up and prevents sticking.
Get creative: Top with your favorite sauces, veggies, or even extra protein like grilled chicken or turkey pepperoni for a balanced meal.
This cottage cheese pizza crust is a higher-protein, healthier alternative to traditional pizza dough! With only three simple ingredients and the option to make it gluten-free, it's the perfect customizable base for your favorite homemade pizza. Whether you're after a quick weeknight dinner or a fun weekend meal, this recipe has everything you need to land in your weekly rotation!
1cupall purpose flour(I used gluten-free all purpose flour)
1teaspoonbaking powder
For topping:
1/4cuppizza sauce
1/2cupshredded cheese
Whatever toppings you'd like!
Instructions
If using a standard oven:
Preheat your oven to 450° Fahrenheit and line a baking sheet with parchment paper, then lightly grease the top of the parchment paper with oil.
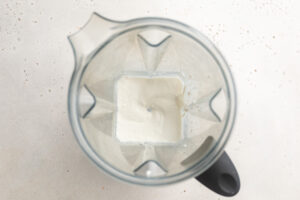
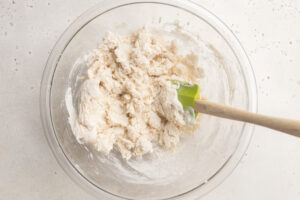
Add the cottage cheese to a blender or food processor and blend until completely smooth.
Mix together the all purpose flour and baking powder in a large bowl, then add in the cottage cheese and mix (you might need to use your hands) until it comes together into a ball of dough.
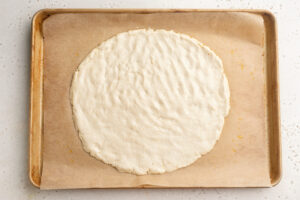
Transfer the dough to your prepared baking sheet and press/roll it into a 12-inch circle.
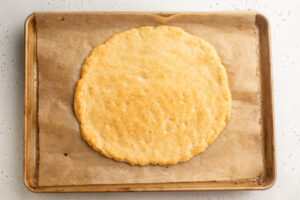
Place the pizza crust in the oven and par-bake for 10-12 minutes, then remove it from the oven and add your toppings.
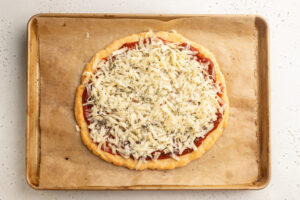
Turn the oven to high broil then pop the pizza back into the oven for an additional 1-2 minutes, or until the cheese is golden brown and bubbly. Remove the pizza from the oven and let it cool slightly before slicing and serving.
If using a pizza oven:
Preheat your pizza oven to New York-style (635°Fahrenheit).
Add the cottage cheese to a blender or food processor and blend until completely smooth.
Mix together the all purpose flour and baking powder in a large bowl, then add in the cottage cheese and mix (you might need to use your hands) until it comes together into a ball of dough.
Lightly grease your pizza stone with oil, then transfer the dough to the stone and press/roll it into a 12-inch circle.
Place the pizza crust into the oven and par-bake for 6 minutes, then remove it from the oven and add your toppings.
Place the pizza oven on broil, then pop the pizza back into the oven for an additional 1-2 minutes, or until the cheese is golden brown and bubbly. Remove the pizza from the oven and let it cool slightly before slicing and serving.
Notes
Nutrition info does not include pizza sauce, cheese, or toppings.
")
")
")


")