Pregnancy cravings are something I take very seriously. And this week’s cravings?? Cheez its! Or really just anything with cheese – ha! (I’ve also been obsessed with my 3-ingredient gluten free bagel bites slathered with tons of cream cheese – YUM!) Though because classic Cheeze-Its are not gluten-free, I decided to make this entirely gluten-free version with just 3 ingredients. They’re crispy, salty, extra cheesy, and honestly much better than the real thing.
Why You’ll Love These Gluten-Free Cheez-Its
Simple Ingredients: Only three main ingredients needed!
Gluten-Free Goodness: Perfect for those with gluten sensitivities, or looking for a healthier version of their favorite cracker.
Deliciously Cheesy: These gluten free cheez its are packed with REAL cheddar cheese, for even better flavor!
Frequently Asked Questions
Are Cheez-Its gluten-free?
Traditional Cheez-Its contain wheat and are not gluten-free. This homemade version uses gluten-free flour, making them suitable for those avoiding gluten.
Do I need to use a food processor?
While a food processor makes the process easier, you can also use a pastry cutter, a fork, or your hands to combine the ingredients.
How do I store these gluten-free crackers?
Store the cooled crackers in an airtight container at room temperature for up to a week.
Can I make these dairy-free?
Yes, you can substitute the cheddar cheese with a dairy-free cheese alternative and use plant-based butter. Keep in mind that the flavor and texture may vary slightly.
Sam’s Recipe Tips
Cheese Choice: Use freshly shredded sharp cheddar for the best flavor and texture.
Rolling the Dough: Rolling the dough between parchment paper prevents sticking and makes for easier cleanup!
Uniform Size: Cutting the crackers into uniform sizes ensures even baking. You can cut these crackers into whatever shape you’d like though.
5 from 3 votes
3-Ingredient Gluten Free Cheez-Its
These homemade gluten free cheez its are crispy, cheesy, and made with just 3 simple ingredients. They're the perfect easy snack that’s gluten-free, kid-friendly, and way better than store-bought. Whip up a batch in under 30 minutes for a satisfying, cheesy crunch everyone will love!
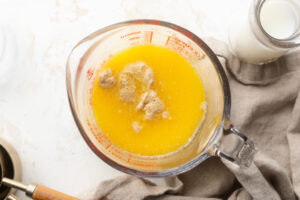
Add the all purpose gluten-free flour, shredded cheddar cheese, cold butter, and a pinch of salt to a food processor. Pulse until a dry and crumbly mixture comes together (it should resemble breadcrumbs).
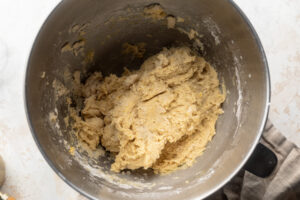
Pour in 3 tablespoons of cold water, then pulse a few more times until the dough comes together in the ball. If the dough still seems too dry, add in the remaining 1-2 tablespoons of cold water.
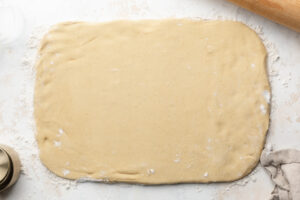
Transfer the dough to a large sheet of parchment paper and place another sheet of parchment paper on top of the dough. Roll out the dough between the parchment paper until it’s about 1/8-inch thick.
Remove the top sheet of parchment paper and cut the dough into 1-inch crackers. Poke a small hole into the center of each cracker and sprinkled the crackers with crackers with flaky sea salt.
Then, transfer the dough (still on top of the parchment paper) to a large baking sheet and bake for 12-15 minutes, or until the crackers are lightly golden brown. Allow the crackers to cool completely before serving or storing.
We all need a solid vanilla cupcake recipe in our back pocket when the occasion arises. For me, this occasion my son’s upcoming 2nd birthday party (time flies!). But for you, this could be a birthday party, baby shower, holiday party, or a simple Tuesday night when you’re craving something sweet.
Now you might be wondering, what makes these gluten-free cupcakes the best ever?? Well, for one very simple reason. They taste identical to their non gluten-free counterparts. Meaning, those with celiac disease or a gluten allergy/intolerance can enjoy these perfect vanilla cupcakes with everyone else. So no one will feel left out or dissatisfied!
Why You’ll Love This Recipe
Pantry Staples: This recipe’s ingredients are all items you may have right on hand in your pantry which will make this a super easy vanilla cupcake recipe to put together!
Classic Vanilla Cupcake Taste: This gluten-free cupcake tastes exactly like a classic vanilla cupcake so no need to worry about anyone missing out on this sweet treat!
Versatile and Customizable: Feel free to use dairy-free milk and dairy-free butter for these cupcakes! You can also use egg replacement to make these vegan! If taking this option, I recommend the Earth Balance Vegan Buttery Sticks and Elmhurst Almond Milk. You can also add any cupcake toppings like sprinkles, cupcake jams or toppers to make them special for any birthday or holiday event!
What You’ll Need
All Purpose Gluten-Free Flour: I swear by the Bob’s Red Mill Gluten-Free 1-to-1 Baking Flour for all my gluten-free baking needs. It does a perfect job at keeping your bakes together, and mimicking the taste and texture of regular all purpose flour. Though you can definitely use whatever brand of all purpose gluten-free flour you prefer! I’ve also tried King Arthur and Nature’s Promise gluten-free flour blends, and they work great as well. Make sure your gluten-free flour contains xanthan gum. If not, add 1/2 teaspoon of xanthan gum to the dry ingredients.
Butter: I used non-dairy butter, but any butter will work in this recipe. Salted or unsalted butter won’t make much of a difference either, so use whichever you have on-hand! Just remember to bring it to room temperature first, so that it’s soft.
Sugar: White sugar or cane sugar both work well in these gluten-free vanilla cupcakes. You can try using either coconut sugar or maple sugar in its place for a slightly healthier recipe, though I haven’t had the chance to test these options myself yet.
Eggs: These eggs will be the binder that holds the batter together for these cupcakes. Make sure that they’re room temperature. Room-temperature eggs are important because they’ll ensure that your cupcakes rise and have a nice fluffy texture!
Vanilla Extract: this will add the perfect balance of sweetness and warm vanilla flavor these vanilla cupcakes need.
Milk: Feel free to use your favorite non-dairy milk if you’d like! The milk will also help to make sure your cupcakes have a nice fluffy texture!
How to Make The Best Gluten-Free Vanilla Cupcakes
Prepare your dry and wet ingredients: Whisk together the gluten-free flour, baking powder, baking soda, and salt. In a separate bowl, beat together the butter and sugar with either a hand or stand mixer until fluffy. Beat in one egg at a time, then add the vanilla extract.
Bake Your Cupcakes: Once you’ve slowly combined your wet and dry ingredients into a batter, fill your cupcake liners and bake cupcakes for 18-20 minutes or until a toothpick inserted into the center of a cupcake comes out clean.
Frost Your Cupcakes: Make the frosting by adding all of the frosting ingredients to a large bowl and beating with either a hand or stand mixer until light and fluffy. Once they’ve cooled, decorate with frosting and sprinkles if you’d like!
Pack & Store: Store cupcakes in an airtight container at room temperature for up to 3 days.
Top Tips
Beat the butter and sugar together really well in the third step of this recipe. The goal is to introduce as much air to the mixture as possible. This will result in a lighter and fluffier gluten-free vanilla cupcakes!
Use an ice cream scoop or large cookie scoop to fill your cupcake molds. This simple trick makes filling your vanilla cupcake tin much quicker and easier. This also guarantees even-sized cupcakes that will bake at the exact same rate!
Sub the vanilla frosting for a cream cheese frosting instead! To do this, replace the butter with 1/4 cup butter plus 1/2 cup softened cream cheese. Whip all ingredients together just as you would the vanilla frosting, then spread over your cooled gluten-free vanilla cupcakes.
Adjust This Recipe To Your Dietary Needs
Make it Dairy-Free: Use dairy-free butter and non-dairy milk to make these gluten-free anddairy-free vanilla cupcakes! If taking this option, I recommend the Earth Balance Vegan Buttery Sticks and Elmhurst Almond Milk.
Make it Vegan: For vegan vanilla cupcakes, follow the same modifications as you would for the dairy-free version above. Then, use your favorite vegan egg replacement in place of the eggs – I recommend this one from Bob’s Red Mill.
5 from 3 votes
Best Ever Gluten-Free Vanilla Cupcakes
I don't mean to brag, but these gluten-free vanilla cupcakes are truly the best ever! Perfectly soft, fluffy, sweet, and moist (sorry if that word makes you cringe!). Whip up a batch of these gluten-free cupcakes for your next party as a fun treat even gluten-eaters will love.
Preheat oven to 350° Fahrenheit and line a cupcake pan with cupcake liners.
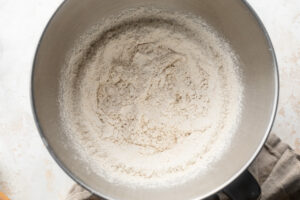
In a medium bowl, whisk together the gluten-free flour baking powder, baking soda, and salt.
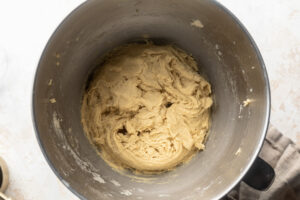
In a large bowl, beat together the butter and sugar with either a hand or stand mixer until fluffy. Beat in one egg at a time, then add in the vanilla extract.
With your mixer on low speed, add 1/3 of the flour mixture into the butter mixture, then about half of the milk. Then, add in another 1/3 of the flour mixture, then the remaining milk, then the remaining flour mixture.
Once batter is fully combined, transfer ¼ cup of batter into each cupcake mold. Bake cupcakes for 18-20 minutes or until a toothpick inserted into the center of a cupcake comes out clean.
Remove cupcakes from oven and transfer to a wire rack to cool completely before frosting.
Make the frosting by adding all frosting ingredients to a large bowl and beating with either a hand or stand mixer until light and fluffy.
Once cupcakes have cooled, decorate with frosting and sprinkles if you’d like.
Video
Notes
Make sure your gluten-free flour contains xanthan gum. If not, add 1/2 teaspoon of xanthan gum to the dry ingredients.Store cupcakes in an airtight container at room temperature for up to 3 days.
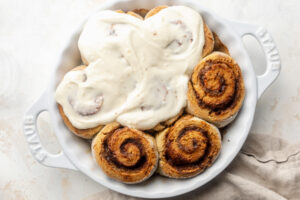
These homemade gluten-free cinnamon rolls creates deliciously sweet and fluffy buns with pull-apart edges and a soft cinnamon sugar center. With a perfectly tender texture, these cinnamon rolls are sure to be a hit, great for Christmas brunch or any special occasion and can also be made dairy-free!
Maybe I just have a sweet tooth, but I don’t know if there’s anything better than homemade freshly baked cinnamon rolls fresh out of the oven! These gluten-free cinnamon rolls are tender, soft, sweet, fluffy and taste absolutely incredible. Perfect for your holiday mornings, brunch, or any occasion!
Why You’ll Love These Gluten-Free Cinnamon Rolls
Soft & Fluffy Texture: These gluten-free cinnamon rolls straight out of the oven will leave you wanting more!
Sweet & Warm Filling: Who doesn’t love a good cinnamon flavor? These cinnamon rolls combined with the spice of cinnamon & the sweetness of brown sugar creates the perfect filling!
Great For Sharing: This is the perfect gluten-free dessert to share with your families and friends!
What You’ll Need To Make Gluten-Free Cinnamon Rolls
Gluten-Free Bread Flour: I recommend using King Arthur Gluten-Free Bread Flour (I buy it on Amazon). If you can’t find gluten-free bread flour, then you can use gluten-free all purpose baking flour in its place. However, bread flour yields fluffier and softer rolls!
Yeast: You’ll need to get your hands on some active dry yeast which will give a beautiful rise to these cinnamon rolls.
Eggs: Eggs will hold the batter together and ensure the perfect texture.
Milk & butter: I used non-dairy but if you don’t want dairy-free rolls, just use regular milk and butter!
Sugar& Powdered Sugar: I used regular white sugar, but see “Tips” section for alternatives.
Cinnamon: What’s a cinnamon roll without the cinnamon? This will be key for the filling!
Baking Powder: This will help along with the yeast to give a beautiful rise to the gluten-free cinnamon rolls!
Vanilla Extract: Along with the sugar, this will enhance the sweet flavor that will make these cinnamon rolls so good!
How To Make Homemade Gluten-Free Cinnamon Rolls
Make The Dough: Start by warming your milk to about 110° Fahrenheit in a medium bowl. With the electric mixer running on medium speed, slowly add the milk mixture into the flour mixture. Add the eggs once the wet and dry ingredients are almost completely combined. Continue mixing to incorporate the eggs into the dough.
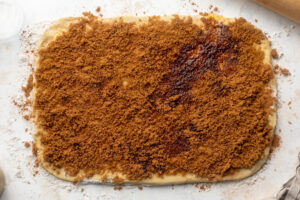
Make The Filling: Combine your filling ingredients and add the filling to the dough first by spreading the softened butter over the dough in an even layer. Then, evenly sprinkle the brown sugar on top of the butter and the cinnamon on top of the brown sugar.
Bake The Cinnamon Rolls: Once the oven is hot, bake the cinnamon rolls for 25-30 minutes or until they’re golden brown on top.
Tips & Adjustments When Making These Gluten-Free Cinnamon Rolls
Sugar Substitutions: If you want to make these homemade gluten-free cinnamon rolls lower in sugar, you can sub the white sugar & powdered sugar with Lankanto.
Egg Replacements: Want to make these cinnamon rolls vegan? You can try using silken tofu, flax eggs or powdered egg replacers instead of regular eggs!
Room Temperature Butter: The secret to super tender homemade cinnamon rolls is room-temperature butter beaten into the dough. This technique works best if the butter is very soft.
Storage: These rolls will stay good at room-temperature for up to 2 days, in the fridge for up to a week, and in the freezer for up to 2 months.
FAQ’S
Can I Make These Vegan?: Yes! Feel free to replace the eggs with silken tofu, flax eggs, or your favorite egg replacer instead!
Do I Need To Start Over If My Yeast & Milk Mixture Do Not Become Frothy?: Yes, the mixture frothing ensures that the cinnamon rolls will rise properly before baking and once completed ensures that your cinnamon rolls have that soft and fluffy texture.
Can I Add Extra Mix-Ins?: Yes! Feel free to add any of your favorite nuts or spices to the filling!
5 from 4 votes
Gluten-Free Cinnamon Rolls
This gluten-free cinnamon rolls recipe creates deliciously sweet and fluffy buns with pull-apart edges and a soft cinnamon sugar center. With a perfectly tender texture, these cinnamon rolls can also be made dairy-free!
Start by warming your milk in a medium bowl to about 110° Fahrenheit. Do this in either the microwave for about 30-40 seconds, or over low heat on the stove for 2 minutes.
Once milk is warm, add the active dry yeast, sugar, and melted butter. Give it a gently whisk to combine, then let that sit for a couple minutes while you continue on with the recipe.
To the bowl of an electric mixer fitted with the dough hook attachment, add the gluten-free bread flour, baking powder, baking soda, and salt. Turn the mixer on low until the dry ingredients are combined.
With the electric mixer running on medium speed, slowly add the milk mixture into the flour mixture. Once the wet and dry ingredients are almost completely combined, add in one egg at a time. Continue mixing to incorporate the eggs into the dough.
Once the eggs are incorporated, turn the mixer on high speed and mix the dough for 5 minutes, until the dough is smooth and comes together in a ball.
Generously flour a work surface with the gluten-free bread flour, then press the dough on top of the flour and press/roll into a 9×13-inch rectangle.
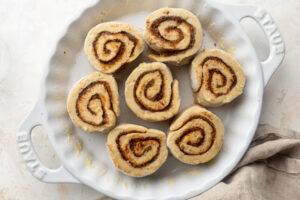
Add the filling by spreading the softened butter over the dough in an even layer. Then, evenly sprinkle the brown sugar on top of the butter and the cinnamon on top of the brown sugar. Carefully take the long end and roll the dough up into a tight log. Slice the log into 7-8 cinnamon rolls, each about 2 inches thick.
Then, place the cinnamon rolls in a greased 9×9-inch baking dish and tightly cover the dish with plastic wrap. Place the rolls in a warm place (by a window, in a proving drawer, in the oven with the light on, etc) to rise for about 1 hour.
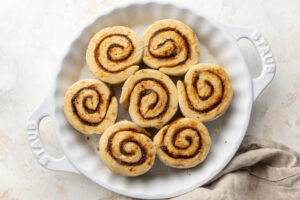
After the hour is up, remove the plastic wrap from the baking dish and preheat your oven to 350° Fahrenheit. Once the oven is hot, bake the cinnamon rolls for 25-30 minutes or until they’re golden brown on top. Remove the rolls from the oven and let them cool while you make the icing.
To make the cream cheese frosting, add the cream cheese, butter, powdered sugar, and vanilla extract to the bowl of an electric mixer and beat until it’s smooth and fluffy. Spread the frosting on top of your cinnamon rolls and ENJOY!
Video
Notes
Storage: These rolls will stay good at room-temperature for up to 2 days, in the fridge for up to a week, and in the freezer for up to 2 months.*Nutrition facts reflect that of one plain cinnamon roll, without cream cheese frosting.
Sweet and Salty Perfection: The combination of salty pretzels, rich toffee, and creamy chocolate creates the ultimate flavor balance.
Simple Ingredients: With only 5 pantry staples, this recipe is both accessible and fuss-free.
Customizable: Switch up the toppings or pretzel shapes to match your preferences or dietary needs.
What You’ll Need to Make Chocolate Toffee Pretzel Bark
Here’s a breakdown of the ingredients and why they shine in this recipe:
Mini Pretzels: Provide a salty, crunchy base for the bark. Use gluten-free pretzels to make the recipe gluten-free friendly. I used the Snyder’s Gluten-Free Mini Pretzels and they worked perfectly in this recipe!
Coconut Sugar: A natural sweetener that adds deep caramel notes to the toffee while being a healthier alternative to white sugar. I buy my coconut sugar in bulk on Amazon because I use it in so many of my recipes!
Butter (or Non-Dairy Butter): The fat needed to create the toffee layer. Use vegan butter for a dairy-free option. I recommend Miyoko’s vegan butter in this recipe.
Chocolate Chips: Melted chocolate ties everything together. Opt for dairy-free chocolate chips to keep the recipe vegan. I used Guittard’s Extra Dark Chocolate Chips for a more intense chocolate flavor. YUM!
Flaky Salt (optional): A sprinkle of flaky salt enhances the sweet-and-salty flavor profile and adds a touch of elegance.
How to Make Pretzel Bark
Prepare the Base: Preheat your oven to 400°F and line a baking sheet with aluminum foil. Arrange pretzels in a single, even layer across the baking sheet.
Make the Toffee: In a small saucepan, melt the butter and coconut sugar over medium heat, stirring often. Once melted, continue to cook for 4-5 minutes until the mixture is dark brown and bubbling. Remove from heat and whisk in vanilla extract.
Pour Over Pretzels: Slowly pour the toffee over the pretzels, ensuring an even coating. Bake for 5 minutes until the toffee sets.
Add Chocolate Layer: Melt the chocolate chips in the microwave or over a double boiler. Remove the pretzels from the oven, let cool for 1-2 minutes, then spread the melted chocolate over the toffee layer.
Cool and Set: Allow the bark to cool at room temperature for 30 minutes, then transfer to the fridge for 6 hours or freezer for 3 hours. Once fully set, remove the bark from the pan, peel away the foil, and break into pieces.
Adjust This Recipe to Your Dietary Needs
Make it Vegan: Use dairy-free butter and vegan chocolate chips.
This chocolate toffee pretzel bark combines crunchy pretzels, rich caramelized toffee, and smooth chocolate for a sweet-and-salty treat that’s impossible to resist. This recipe is gluten-free, dairy-free, and vegan-friendly, sweetened with coconut sugar, and made with just five simple ingredients. Whether you’re making it for the holidays, gifting it to a friend, or enjoying it yourself, this quick and easy bark is sure to impress!
Preheat oven to 400° Fahrenheit and line a large baking sheet with aluminum foil. Arrange the pretzels in an even layer on the baking sheet.
Melt butter and sugar in a small saucepan over medium heat, stirring frequently. Once the butter has melted, cook the toffee for another 4-5 minutes, stirring constantly until dark brown and bubbling.
Remove from the heat, whisk in the vanilla extract then immediately slowly and evenly pour the toffee over the pretzels. Place the pretzels and toffee in the oven and bake for 5 minutes.
While the bark bakes, melt the chocolate in the microwave or over a double boiler until completely smooth. Remove the pretzels and caramel from the oven, let them cool for 1-2 minutes or until no longer bubbling, then slowly pour the melted chocolate over top of the toffee and gently spread into an even layer.
Leave the chocolate toffee pretzels bark to cool at room temperature for about 30 minutes, then transfer to either the fridge for 6 hours or the freezer for 3 hours. Remove the bark from the pan, peel away the foil, and break into large chunks.
Video
Notes
The nutritional info for this recipe was calculated using gluten-free pretzels, non-dairy butter, coconut sugar, and extra dark chocolate chips.
Sweet, tart, and warm – my caramelized apples recipe is an easy-to-make healthy Fall dessert, perfect to eat with a scoop of ice cream. It’s gluten-free, dairy-free, and even vegan too!
How to Make Caramelized Apples
Yay, more apple-based recipes! I have so many I need to use after all that apple picking I did in September, so hopefully this simple recipe can come in handy for you this Fall, too.
For this recipe, the apples are sautéed in butter, sugar, and cinnamon until tender and caramelized. They can then be added to sweet or savory dishes from pancakes to roasted pork loin, or be eaten directly with a scoop of vanilla ice cream on top.
What Does Caramelization Mean?
One thing to keep in mind that often gets confused is that caramelized apples are not caramel apples! Caramelization is actually the browning of sugar used in cooking for the resulting sweet nutty flavor and brown color.
What You’ll Need to Make Caramelized Apples
Apples – Use 2-3 gala, granny smith, or any other firm cooking apple.
Butter – I used non-dairy.
Sugar – I used coconut sugar, but white sugar or brown sugar would also taste great!
Cinnamon
Tips and Tricks
What Are The Best Apples to Use For Caramelization?
The best apples to use for this recipe are a firm apples such as Granny Smith, Fuji, Gala or Honeycrisp. Most people prefer Granny Smith because they are tart, which pairs perfectly with the sweet buttery caramelized sauce. It’s not a good idea to use a softer apple because they will fall apart while cooking.
What to make with caramelized apples?
Caramelized apples can be used on top of ice cream, on your pancakes, or as a pie filling. You can also use caramelized apples in savory dishes like chicken or turkey if you enjoy a sweeter taste to your meals. But honestly, you can use caramelized apples on almost anything you want!
How to Store Caramelized Apples?
Once cooled, place it in a jar with a tight fitting lid and refrigerate. It should keep for up to 1 week in the refrigerator.
5 from 4 votes
Healthier Caramelized Apples
Sweetly tart and thoroughly warming, my vegan and refined sugar free caramelized apples recipe is an easy-to-make healthy Fall dessert, perfect to eat with a scoop of icecream.


")


