Tag

dairy-free

Browsing

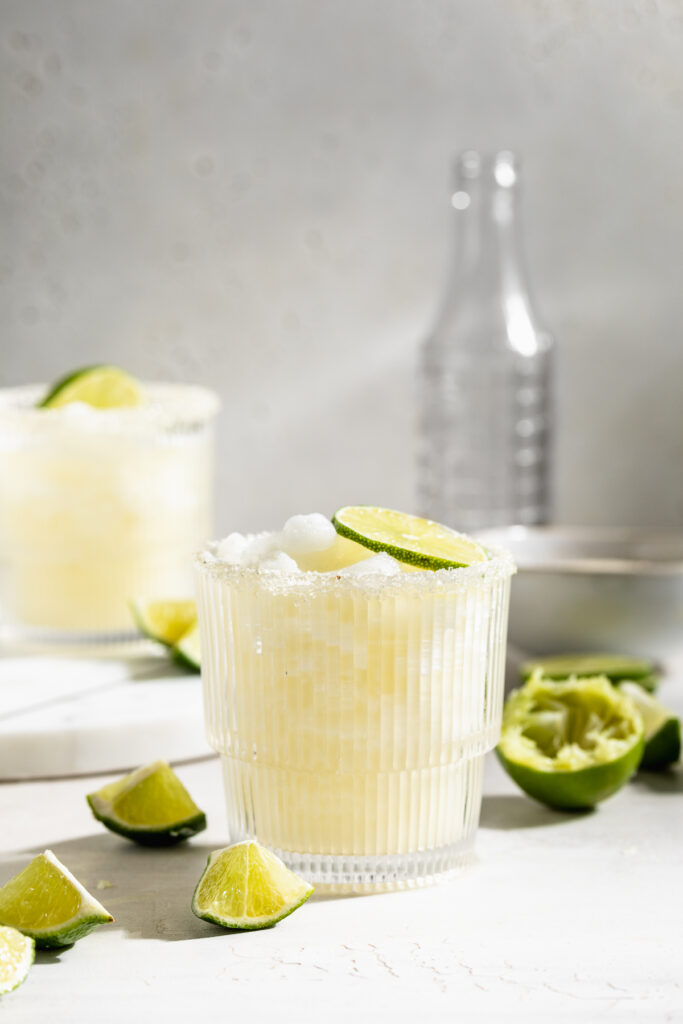
Cool and refreshing frozen daiquiri, with a secret ingredient! My Mom’s famous recipe for this best EVER frozen cocktail. Just four ingredients, perfectly sweet, and totally delicious.

two frozen daiquiris with fresh limes on the side

The Secret Ingredient: Coconut Rum

A few weeks ago, my Mom had the genius idea to swap out regular rum in her frozen daiquris for coconut rum. And boy, it made allllll the difference! A hint of coconut in this tropical cocktail left everyone asking “what is that?! that’s DELICIOUS!” It’s sort of like a cross between a classic daiquiri and a piña colada. The coconut is light, not at all overpowering, and simply perfect.

My Mom – a fan of the finer things in life – uses an exclusive small-batch brand of coconut rum. But let me tell you, I recreated her recipe with this Bacardi Coconut Rum (purchased for $15!) and my frozen daiquiris tasted just as good!

closeup image of a frozen daiquiri with limes on the side.

What Else You’ll Need to Make a Frozen Daiquiri

Lime Juice – Fresh squeezed is best! My Mom insists on using freshly-squeezed juice in all of her cocktails. And I must admit, fresh squeezed lime juice makes a world of a difference in these frozen daiquiris!

Simple Syrup or Agave – Feel free to use whichever you have on-hand! I used agave nectar because it’s what I had leftover from these Skinny Strawberry Margaritas.

Ice – This one seems pretty self-explanatory, ha! Though I will say, if you’d like a frozen strawberry daiquri instead, replace the ice with two cups of frozen strawberries.

Blender – I own and LOVE my Vitamix blender. It’s super powerful, and there truly isn’t anything it can’t blend. However, any blender will work to blend this frozen cocktail. You could even use a Nutribullet for easier cleanup!

overhead image of a frozen daiquiri with a lime on top.

Adjust This Recipe to Your Dietary Needs

Make it Sugar-Free: For a sugar-free option, replace the simple syrup with your favorite sugar-free liquid sweetener.

Make it a Mocktail: Turn this into a delicious non-alcoholic frozen beverage by using equal parts coconut water in place of the coconut rum!

frozen daiquiri with fresh limes on the side.
3 from 3 votes

Mom’s BEST Frozen Daiquiri

Cool and refreshing frozen daiquiris, with a secret ingredient! My Mom’s famous recipe for this best EVER frozen cocktail. Just four ingredients, perfectly sweet, and totally delicious.
Print Pin Rate
Prep Time: 3 minutes
Total Time: 3 minutes
Servings: 2 daiquiris

Ingredients

  • 4 ounces coconut rum
  • 2 ounces lime juice
  • 1 1/2 ounces simple syrup (or agave)
  • 2 cups ice

Instructions

  • Add all ingredients to a blender and blend until smooth, serve immediately.

Nutrition

Calories: 300kcal

How to make pickles in a matter of minutes! This quick, homemade pickle brine is loaded with flavor, and made to preserve freshness. These pickles are perfectly salty, and extra crunchy!

three jars of pickles line up on a table.

What You’ll Need

Cucumbers – Either pickling cucumbers, Persian cucumbers, or an English cucumber will work! For pickling or Persian cucumbers, I recommend cutting them into spears before pickling. Though for an English cucumber, those are better sliced into 1/4-inch rounds. I use and recommend pickling cucumbers because they maintain their shape and satisfying crunch, even after pickled. However, Persian or an English cucumber still taste just as delicious using this method!

Fresh Dill – You simply can’t make pickles without fresh dill! A few sprigs of this herb help to lock in freshness and pack in tons of delicious flavor.

Garlic – Three whole cloves of garlic truly take this recipe to the next level! The pickling liquid aids in mellowing out that tangy garlic flavor, leaving you with the best essence of garlic throughout your pickles. And if you’re like me (a garlic LOVER), feel free to throw in a few extra cloves!

overhead image of pickles with garlic and fresh dill.

Vinegar – Vinegar plus water is the base of any pickling liquid. I’ve tried this recipe with pretty much every type of vinegar out there. Apple cider vinegar, white wine vinegar, red wine vinegar, white vinegar, rice wine vinegar – you name it, I’ve tried it! And while they all taste delicious, apple cider and white wine vinegars are my personal favorites. Though use whichever you have on-hand and/or whichever you prefer.

Salt – For extra salty pickles, add two whole teaspoons of salt to your brine. Or, for a more mild pickle, add just one teaspoon of salt. I like ultra-savory pickles – you know, the ones that make your mouth water just thinking about them – so two teaspoons did the trick for me!

Yellow Mustard Seed – While optional, a pinch of whole yellow mustard seeds add a hint of spice. A few seeds go a long way, packing in tons of flavor!

a pickle being lifted out of a jar of pickles.

Tips and Tricks on How to Make Pickles

  • Clean/rinse out your mason jars well before adding in your pickles. A clean glass jar will reduce the risk of any unwanted bacteria growing while your pickles, well… pickle. The best way to achieve an extra-clean mason jar is by rinsing it out with boiling hot water – this’ll kill most, if not all bacteria!
  • Homemade pickles will last up to three month in the fridge! And remember, the longer these pickles sit in their brine, the tastier they’ll be. But if you live in my house, you’ll know these don’t last more than ONE WEEK.
  • Feel free to switch up the ingredients in this recipe however you’d like! For spicy pickles, add in a pinch of red pepper flakes. Or, for sweet pickles, sprinkle in a teaspoon of sugar.

*These homemade pickles are gluten-free, dairy-free, vegan, and paleo!

three jars of pickles with garlic and salt on the side.
5 from 1 vote

How to Make Pickles

How to make pickles in a matter of minutes! This quick, homemade pickle brine is loaded with flavor, and made to preserve freshness. These pickles are perfectly salty, and extra crunchy!
Print Pin Rate
Prep Time: 3 minutes
Cook Time: 2 minutes
Total Time: 7 minutes
Servings: 10 servings

Ingredients

  • 3-4 small pickling cucumbers, cut into spears (or 1 English cucumbers, cut into 1/4-inch rounds)
  • 4-5 sprigs fresh dill
  • 3 garlic cloves, peeled and smashed
  • 1 cup water
  • 1 cup vinegar, such as white vinegar or apple cider vinegar
  • 1-2 teaspoons salt
  • 1/2 teaspoon whole yellow mustard seeds

Instructions

  • Place cut cucumber, fresh dill, garlic cloves, and whole yellow mustard seed into one large glass jar, or separate into 2 smaller glass jars.
  • Heat water, vinegar, and salt in a small saucepan over medium heat until salt has dissolved completely.
  • Pour water mixture into jar(s) until cucumbers are completely covered. Secure jar with lid, then refrigerate for at least 24 hours before eating.

Nutrition

Calories: 300kcal

Crunchy peanut butter balls covered in chocolate! Perfectly sweet, surprisingly healthy, and super easy to make. This no-bake dessert is the perfect summer treat when it’s too hot to turn on the oven!

crunchy peanut butter balls stacked on parchment paper with milk on the side.

What You’ll Need to Make Crunchy Peanut Butter Balls

Creamy Peanut Butter – Unsweetened, creamy peanut butter is the base of this easy dessert recipe. Check your peanut butter labels closely and make sure it doesn’t contain any sugar! Added sugar in the peanut butter would totally throw off the sweetness in this recipe. For unsweetened peanut butter, I love both Trader Joe’s and Teddie’s brand.

Maple Syrup – Really any liquid sweetener will work in these peanut butter balls. Maple syrup, along with honey and date syrup, are the three least processed options which is why I always use and recommend them. Though is you don’t have those, you can use agave nectar instead. Or, for a sugar-free dessert option, check the “Make it Sugar-Free” section below!

Almond Flour – This gluten-free, low-carb flour is one of my favorites! It’s healthy, super easy to find, and virtually flavorless. The almond flour is also super helpful in holding these dessert balls together, so don’t go without it.

Crispy Rice Cereal – One cup of crispy rice cereal gives these peanut butter balls their unexpected crunch! Feel free to use whichever brand you like best. Or, for an even healthier option, use one cup of puffed quinoa instead.

overhead image of crunchy peanut butter balls on an upside-down pie pan.

Tips and Tricks

  • Don’t feel like dipping in chocolate? Save major time and energy my melting the chocolate, then simply drizzling over the top of each ball!
  • For an extra salty plus sweet combo, finish off these crunchy no-bake peanut butter balls with a pinch of flaky sea salt! A bit of salt balances out the sweetness, and adds an extra layer of crunch.
  • These treats are best stored in the refrigerator! The freezer works too, but the fridge helps them hold their shape while also maintaining their crunchiness. But whatever you do, don’t store them at room-temperature, and especially not in the summertime because they will melt!
a stack of no-bake peanut butter balls, one with a bite taken out.

Adjust This Recipe To Your Dietary Needs

Make it Nut-Free: For a nut-free no-bake dessert, sub sunflower seed butter for the peanut butter and 3 tablespoons of coconut flour in place of the almond flour! Still just as delicious, and totally nut-free friendly.

Make it Sugar-Free: Replace the maple syrup in this recipe with your favorite liquid sugar-free sweetener.

close-up image of crunchy peanut butter balls.
5 from 3 votes

Crunchy No-Bake Peanut Butter Balls

Crunchy peanut butter balls covered in chocolate! Perfectly sweet, surprisingly healthy, and super easy to make. This no-bake dessert is the perfect summer treat when it’s too hot to turn on the oven!
Print Pin Rate
Prep Time: 15 minutes
Total Time: 10 minutes
Servings: 16 balls

Ingredients

  • 1 cup creamy peanut butter, unsweetened
  • 1/3 cup maple syrup
  • 1 teaspoon vanilla extract
  • 1/2 cup almond flour
  • 1 cup crispy rice cereal

For dipping/drizzling:

  • 1 cup chocolate chips
  • 1 teaspoon coconut oil

Instructions

  • Mix together the creamy peanut butter, maple syrup, and vanilla extract in a large bowl.
  • Add in almond flour and crispy rice cereal, mix to combine.
  • Scoop and roll tablespoon-sized balls of the peanut butter ball mixture between the palms of your hands. Repeat this process until no more mixture remains, should make about 12 crunchy peanut butter balls.
  • Place balls in freezer for 10-15 minutes, and add chocolate chips and coconut oil to a small bowl. Microwave chocolate in 30 second increments until fully melted.
  • Once crunchy peanut butter balls are chilled, dip or drizzle with melted chocolate before placing back in the freezer. Freeze for at least 10 minutes before eating, then store in the fridge.

Nutrition

Calories: 300kcal

Quick, easy, and full of flavor – air fryer salmon patties with a creamy dill sauce! The perfect healthy, gluten-free, and dairy-free dinner recipe. Comes together in a few simple steps, and in just 15 minutes!

Overhead image of air fryer salmon patties on a plate over rice and lettuce with creamy dill sauce on top.

What You’ll Need to Make Air Fryer Salmon Patties

Canned Salmon – I used two cans of wild sockeye salmon in my patties, but any canned salmon will work. Canned salmon is an easy addition to this already super easy meal. It’s also a great source of lean protein, vitamin B12, iron, potassium, and vitamin D. However, these air fryer salmon patties are so delicious, no one will ever guess how healthy they are!

Breadcrumbs – I used gluten-free panko breadcrumbs, but any unflavored/unseasoned breadcrumbs will taste great! Panko breadcrumbs are lighter and will yield a crispier patty. Or, if you don’t have breadcrumbs, you can use 1/3 cup of almond flour in its place.

Mayonnaise – This creamy condiment comes in handy in both the salmon patties and the creamy dill sauce. If not a mayo fan, you can use unsweetened greek yogurt instead!

creamy dill sauce being poured over air fryer salmon patties.

Tips and Tricks

  • For an even crisper salmon patty, coat the outside in additional breadcrumbs. Then, place in the air fryer and coat with a drizzle of oil before cooking. The end result will be golden brown, soft on the inside, and crispy on the outside air fryer salmon patties!
  • Enjoy this recipe however you’d like. I served mine over lettuce and rice, with a drizzle of that creamy dill sauce. Though these would also taste amazing as a salmon burger between two buns!
overhead image of air fryer salmon patties on a platter.

Adjust This Recipe To Your Dietary Needs

Make it Egg-Free: While I haven’t tested this option myself, you may be able to replace the eggs in this recipe with flax eggs. Or, try this Bob’s Red Mill Egg Replacer as a substitute. Also, be sure to use an egg-free mayo!

Make it Gluten-Free: For a gluten-free dinner recipe, use gluten-free breadcrumbs like I did! Then, serve these air fryer salmon patties over a bed of your favorite veggies and rice.

close-up image of air fryer salmon patties on a plate with rice and cucumbers.
No ratings yet

Air Fryer Salmon Patties with Creamy Dill Sauce

Quick, easy, and full of flavor – air fryer salmon patties with a creamy dill sauce! The perfect healthy, gluten-free, and dairy-free dinner recipe. Comes together in a few simple steps, and in just 15 minutes!
Print Pin Rate
Prep Time: 5 minutes
Cook Time: 8 minutes
Total Time: 13 minutes
Servings: 8 salmon patties

Ingredients

  • 2 (7.5 ounce) cans canned salmon, drained
  • 2 eggs
  • 1/2 cup breadcrumbs, I used gluten-free panko breadcrumbs
  • 2 tablespoons mayonnaise
  • 1 green onion, finely chopped
  • 1 tablespoon fresh dill, chopped
  • 1/2 teaspoon paprika
  • 1/4 teaspoon salt

For the dill sauce:

  • 1/2 cup mayonnaise
  • 1-2 tablespoons lemon juice
  • 3 tablespoons fresh dill, chopped

Instructions

  • Mix together all salmon patty ingredients in a large bowl until fully combined.
  • Scoop ¼ cup of the mixture into the palms of your hands and gently form a 1-inch thick patty. Repeat this process with remaining mixture, should form 8 salmon patties.
  • Lightly grease air fryer tray or basket, then place salmon patties into the air fryer and cook at 390° Fahrenheit for 8 minutes, pausing to flip halfway through.
  • Make the dill sauce by adding all ingredients to a small bowl and whisking until smooth, then spoon over salmon patties.

Nutrition

Calories: 300kcal

Perfectly smooth and creamy vegan ice cream – no fancy equipment required! Only three ingredients, this super easy plant-based recipe comes together in just two steps. The BEST sweet (but not too sweet) summertime treat!

hand holding a cone of vegan ice cream

What You’ll Need To Make No-Churn Vegan Ice Cream

Full-Fat Coconut Milk – Two cans (must be canned!) of full-fat coconut milk are the base of this creamy vegan ice cream recipe. I use and love the Native Forest Coconut Milk, but any unsweetened full-fat coconut milk should work. Other brands I recommend are Thai Kitchen and A Taste of Thai Coconut Milk.

Sweetened Condensed Coconut Milk – I used Nature’s Charm Sweetened Condensed Coconut Milk in my ice cream and it turned out perfect! However, I’m sure any brand of sweetened condensed coconut milk will work. And it doesn’t have to be coconut milk either, your sweetened condensed milk can be made of any non-dairy milk!

Vanilla Extract – A touch of vanilla extract for that deliciously sweet vanilla flavor! For an extra fancy ice cream, you can add a touch of vanilla bean paste as well.

Pinch of Salt – While not totally necessary, a pinch of salt helps to bring out the sweetness of this recipe! You’re gonna have to trust me on this one, a tiny pinch of salt goes a long way here. I highly recommend giving it a try!

vegan vanilla ice cream inside a loaf pan

Adjust The Flavors

Make it Vegan Chocolate Ice Cream: For a chocolate version, add 1/2 cup cocoa powder into the blender. And, for double chocolate (because why the heck not?!) swirl in some mini chocolate chips before freezing.

Add Cookie Dough: If you’re a cookie dough ice cream lover like me, sprinkle small scoops of this Healthy Cookie Dough into the coconut milk mixture right before freezing.

Make it Vegan Coffee Ice Cream: Blend a quarter cup of instant coffee powder in with the rest of the ingredients for a caffeinated twist!

4.12 from 9 votes

No-Churn Vegan Vanilla Ice Cream

Perfectly smooth and creamy vegan ice cream – no fancy equipment required! Only three ingredients, this super easy plant-based recipe comes together in just two steps. The BEST sweet (but not too sweet) summertime treat!
Print Pin Rate
Prep Time: 5 minutes
Total Time: 5 minutes
Servings: 8 servings

Ingredients

  • 2 (14-ounce) cans full-fat coconut milk
  • 1 (11.2-ounce) can sweetened condensed coconut milk
  • 1 teaspoon vanilla extract
  • small pinch of salt

Instructions

  • Add all vegan vanilla ice cream ingredients to a blender and blend until smooth.
  • Transfer to a lined loaf pan or large container, then freeze for 6 hours. Thaw for at least 10 minutes before serving.

Nutrition

Calories: 300kcal