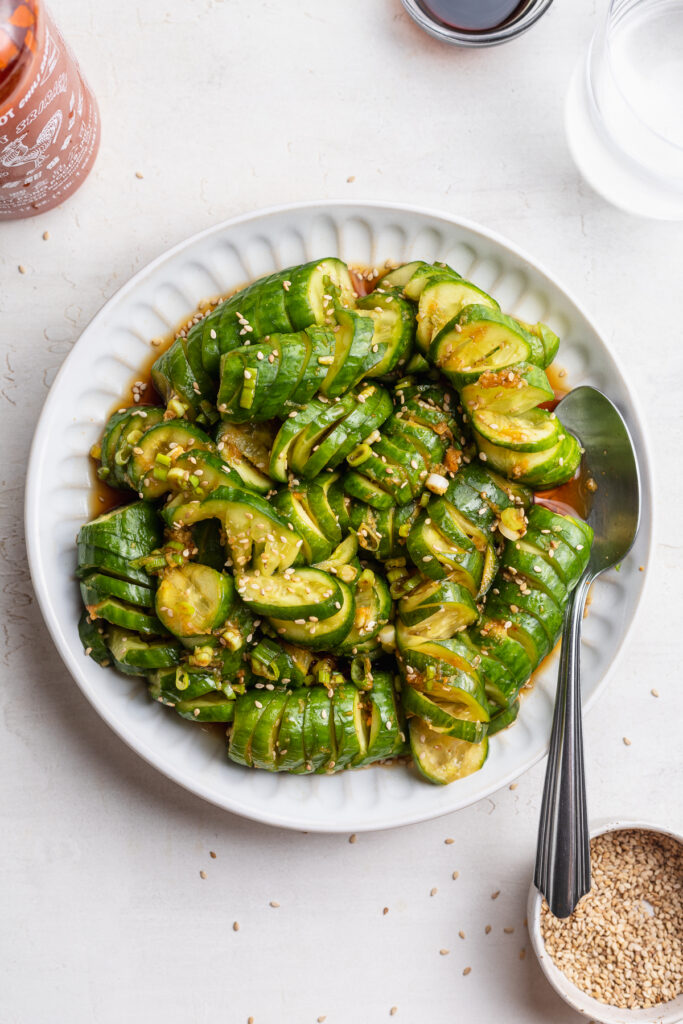
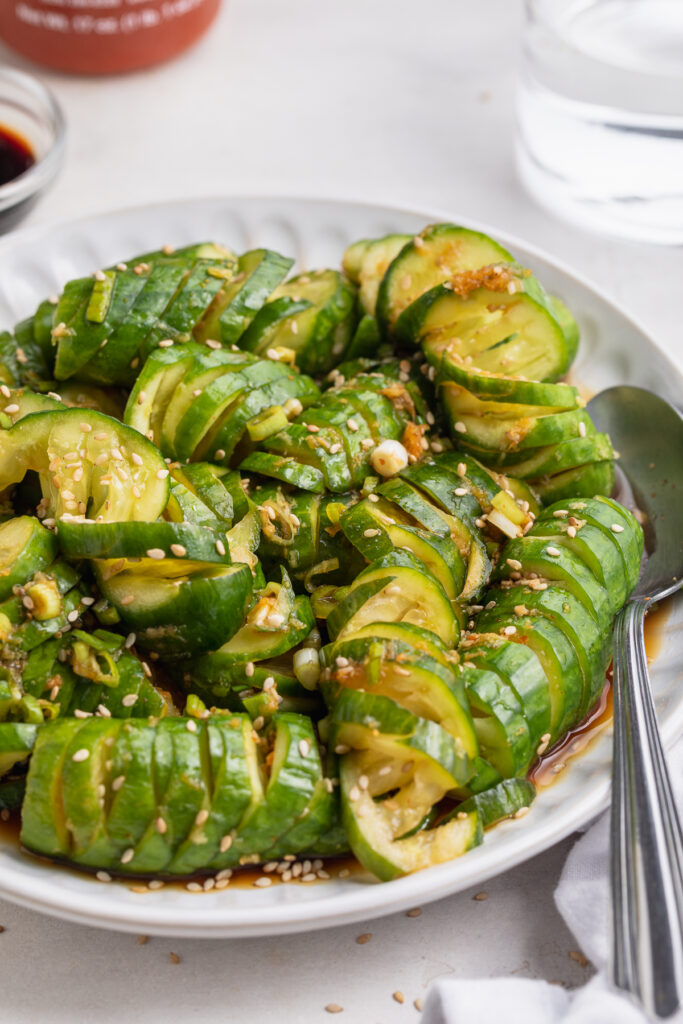
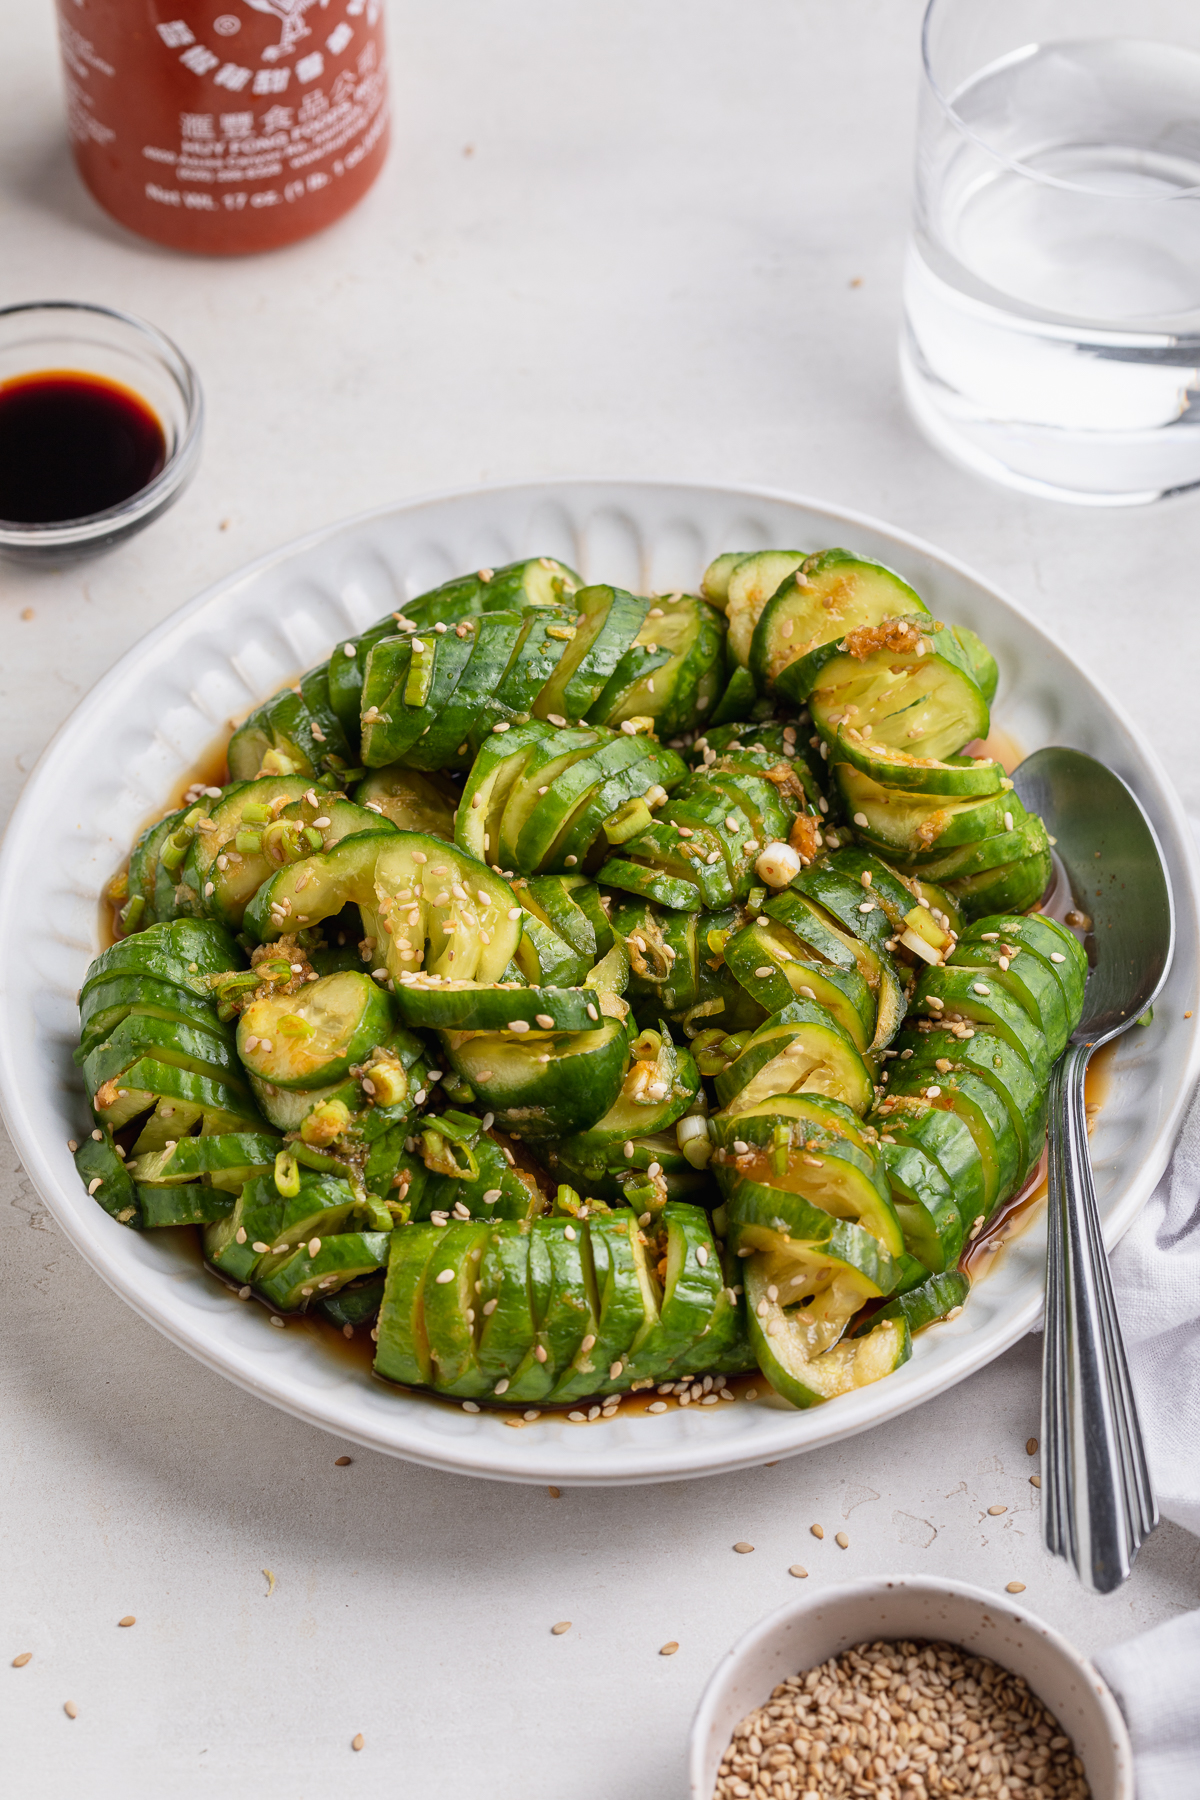
Tag

dairy-free

Browsing

These s’mores bars are something else! A buttery graham cracker base followed by a lush layer of chocolate is topped off with toasty marshmallows. These s’mores bars will blow you away with how delicious and addictive they are – all while gluten-free!

gluten-free s'mores bars stacked on top of each other.

What You Need To Make S’mores Bars

Oat Flour – You can either purchase oat flour from the store or easily make it yourself at home. To make oat flour, start by adding 1 and 1/2 cups of rolled oats to a blender or food processor. Then, blend the oats for a few seconds or until ground into a powder. Once ground, you now have oat flour to use in this gluten-free recipe!

Chocolate Chips – Any chocolate chips or even a chopped chocolate bar will work in these s’mores bars. I used the Enjoy Life Mini Chips since they are vegan and nut-free, though you can use any vegan chocolate you’d like. And if you’re not vegan, feel free to use whatever chocolate you have on-hand! (P.S. you should always have chocolate on-hand.)

Marshmallows – I prefer mini marshmallows for simply how cute and satisfying they look all lined up on top of these s’mores bars. However, the standard size marshmallows will work just fine. The key to perfectly toasty and golden brown marshmallows is sticking them under the broiler for about 1 minute. It’s super important you keep an eye on the bars during this final trip in the oven, as the broiler has a tendency to burn things in literal seconds. Therefore, watch your vegan marshmallow-y treats and pull them out once they’ve achieved your desired level of toasty-ness!

close-up overhead image of s'mores bars.

Adjust This Recipe To Your Diet

Don’t Have Oat Flour? If you don’t have oats and/or oat flour, you can replace it with an equal amount of either brown rice flour or all purpose flour in this recipe.

Add Dairy: Use regular melted butter in place of the vegan butter in this recipe.

s'mores bars on a baking sheet with graham crackers on the side.

Tips For Making S’mores Bars

  • Be sure to leave the bars to cool on the baking sheet for at least 15 minutes after you take them out of the oven! These s’mores bars are surprisingly delicate, so leaving them to cool will ensure they stick together when handled.
  • Use a greased knife to quickly and easily slice the bars. To do this, take a sharp knife and either spray it with spray cooking oil or drizzle it with some coconut oil. Once greased, cut into the bars and wipe down the knife between each slice!
  • I highly recommend storing this vegan and gluten-free dessert in the fridge or freezer during the summer months. Due to the butter and chocolate, they are at risk of melting if left to sit out in too high of a temperate. Therefore, to avoid that risk, it’s best to just keep these babies in the fridge to enjoy them at your leisure!
overhead image of s'mores bars.
5 from 3 votes

S’mores Bars (Vegan, Gluten-Free)

These s’mores bars are something else! A buttery graham cracker base followed by a lush layer of chocolate is topped off with toasty marshmallows. These s’mores bars will blow you away with how delicious and addictive they are – all while being vegan and gluten-free!
Print Pin Rate
Prep Time: 10 minutes
Cook Time: 20 minutes
Total Time: 30 minutes
Servings: 12 bars

Ingredients

  • 1 1/4 cups oat flour, see Notes
  • 1/4 cup tapioca flour, or corn starch
  • 1/2 teaspoon baking powder
  • 1/4 cup maple syrup
  • 2 1/2 tablespoons butter, melted (I used vegan butter)
  • 1/2 teaspoon vanilla extract
  • 1 cup chocolate chips
  • 2 cups marshmallows

Instructions

  • Preheat oven to 350° Fahrenheit.
  • Mix together the oat flour, tapioca flour, and baking powder in a bowl.
  • Add in the maple syrup, melted vegan butter, and vanilla extract, mix everything to combine.
  • Transfer to a lined 9×9 baking sheet, press into an even layer, then bake for 12-15 minutes or until golden brown.
  • Remove from the oven and sprinkle evenly with chocolate chips, then place back into the oven for 1 minute or until chocolate has melted.
  • Remove from the oven once more, spread the chocolate into an even layer, then top with marshmallows. Place in the oven on broil for 1 minute (watch closely to make sure it doesn’t burn!) or until marshmallows are lightly toasted.
  • Let cool in the pan for 15-20 minutes before slicing.

Notes

  • Oat Flour: You can easily make your own oat flour by blending rolled oats in a blender until a powder forms and no large oat chunks remain!
  • Nutrition

    Calories: 300kcal

    More Delicious Vegan and Gluten-Free Desserts

    Tender, juicy, and intensely flavorful chicken scarpariello with crispy rosemary baby potatoes! A complete, healthy, and wholesome dinner recipe just about anyone can throw together.

    overhead image of chicken scarpariello with crispy potatoes on a plate with white wine on the side.

    What You’ll Need To Make Chicken Scarpariello with Crispy Rosemary Potatoes

    Baby Potatoes – I love baby potatoes for how creamy they are! These crispy rosemary potatoes bake up ultra crispy on the outside, while smooth and buttery on the inside. Either yellow or red baby potatoes will taste great in this recipe. And if you can’t find baby potatoes, you can sub standard yellow or red potatoes in their place.

    Chicken Thighs – Feel free to use either bone-in or boneless, skin-on or skinless chicken thighs in this recipe! Bone-in and skin-on chicken thighs will yield a bit more flavor, while boneless and skinless will be easier to eat. Both options have their pros and cons, so go ahead and use whichever your prefer / can get your hands on.

    Italian Sausage – You’ll need uncooked Italian sausage links for this chicken scarpariello. Most come pre-cooked, so be sure the ones you buy are raw. And when it comes to either hot or sweet Italian sausage, use whichever’s your favorite! I used sweet sausages for a perfectly mild, but still flavorful dinner recipe.

    Dry White Wine – When picking out a dry white cooking wine, look for a bottle with “dry” or “crisp” in the description. Sauvignon Blanc and Pinot Grigio are my cooking wine go-tos. And don’t worry, all of the alcohol will get cooked off in this meal, leaving you with it’s bright and fresh flavor.

    chicken scarpariello in a skillet with fresh parsley on top

    Tips and Tricks

    • Do NOT touch the handle of your hot skillet once you’ve removed it from the oven! I’ve made this mistake more than once, and still have the scars to show for it. I highly recommend buying and placing one of these covers on your skillet handle as soon as you take it out of the oven.
    • Serve this chicken scarpariello with whatever you’d like! The crispy rosemary potatoes are the perfect side, but feel free to replace them with mashed potatoes, cooked rice, or even pasta. Or, for a low-carb option, roast up some broccoli and/or cauliflower in place of the potatoes.
    • Use a large skillet with high sides to make this meal. The key is using something large enough to fit eight chicken breasts, three sausages, and the white wine sauce. If you don’t have a skillet large enough for this recipe, use a dutch oven instead!
    sauce being poured over chicken scarpariello on a plate.

    Adjust This Recipe To Your Dietary Needs

    Make it Non-Alcoholic – For a recipe without any alcohol, replace the white wine with an extra cup of chicken stock, and an extra tablespoon of fresh lemon juice.

    Make it Paleo – Make yourself a paleo chicken scarpariello by taking the non-alocoholic option above, and replacing the baby potatoes with white sweet potatoes. Totally grain-free, gluten-free, sugar-free, low-carb, and paleo-friendly!

    overhead image of chicken scarpariello in a skillet with crispy potatoes on the side.
    No ratings yet

    Chicken Scarpariello with Crispy Rosemary Potatoes

    Tender, juicy, and intensely flavorful chicken scarpariello with crispy rosemary baby potatoes! A complete, healthy, and wholesome dinner recipe just about anyone can throw together.
    Print Pin Rate
    Prep Time: 10 minutes
    Cook Time: 30 minutes
    Total Time: 40 minutes
    Servings: 6 servings

    Ingredients

    For the crispy potatoes:

    • 1 pound baby potatoes
    • 2 tablespoons avocado oil
    • salt and black pepper, to taste
    • 1 sprig fresh rosemary, leaves removed from stem

    For the chicken scarpariello:

    • 8 chicken thighs
    • salt and black pepper, to taste
    • 3 tablespoons olive oil
    • 4 hot or sweet Italian sausage links
    • 1 large yellow onion, chopped
    • 1/2 red bell pepper, chopped
    • 8 garlic cloves, minced
    • 2 sprigs fresh rosemary
    • 1/2 cup pickled peppadew peppers, drained
    • 1 cup dry white wine
    • 1 cup chicken stock
    • 1 lemon, juiced
    • fresh chopped parsley, for serving

    Instructions

    • Preheat oven to 400° Fahrenheit. Place all potato ingredients on a large baking sheet and toss to combine. Bake for 25-20 minutes or until super crispy, flipping potatoes halfway through.
    • Make the chicken scarpariello by patting each chicken thigh dry with a paper towel, then season generously with salt and black pepper.
    • Heat olive oil in a large skillet over medium-high heat, cook sausages in skillet for 2-3 minutes per side of until golden brown (but not yet fully cooked). Remove sausage form skillet and set aside.
    • Place chicken thighs in hot skillet with the skin-side facing down. Sear chicken thighs for 5-8 minutes, or until golden brown, but also not yet fully cooked through. Remove chicken thighs from skillet and set aside.
    • Add onions, bell pepper, and garlic to the skillet – cook until soft and very fragrant, about 8 minutes.
    • Add rosemary, pickled peppers, white wine, and chicken stock to the skillet and bring to a boil. Whisk and continue to cook until liquid has slightly reduced.
    • Place sausages and chicken back into the skillet with the sauce, then transfer to the oven and cook for about 10-15 minutes or until chicken is cooked through. Remove from oven along with the potatoes, pour lemon juice over chicken, then serve over roasted potatoes with fresh chopped parsley.

    Nutrition

    Calories: 300kcal

    My Mom’s famous watergate salad recipe will blow your mind! A pistachio whipped cream base, with plenty of chopped fruit and mini marshmallows. I grew up on this best EVER no-bake dessert, my favorite for summer parties or barbecues!

    overhead image of watergate salad in a glass with a cherry on top

    What You’ll Need To Make Watergate Salad

    Pistachio Pudding Mix – Any brand of pistachio pudding mix will taste delicious in this pistachio-flavored dessert! Use whatever you can find, whether that’s instant, low-sugar, etc.

    Whipped Cream – For a dairy-free version, sub regular whipped cream for coconut whipped cream in this no-bake dessert recipe. I went the dairy-free route this time and used a tub of So Delicious Coconut Whipped Cream in my watergate salad. This is the only tweak I made from my Mom’s original recipe!

    Fruit Cocktail – I think the fruit cocktail is my favorite part of this entire recipe. Chunks of peaches, pears, grapes, pineapple, and cherries swirled into the pistachio whipped cream base. My sister and I used to fight over who got the most cherries in their serving of watergate salad growing up. If ya ask me, those fruit cocktail cans never have enough maraschino cherries in ’em!

    Crushed Pineapple – Crushed pineapple, sometimes labeled as “pineapple tidbits,” give this dessert its perfect texture. Smooth, creamy, light, and fluffy with just a little something to bite down on! If you can’t find crushed pineapple, you can finely chop up a can of cut pineapple instead.

    Mini Marshmallows – My Mom always made her watergate salad with these rainbow mini marshmallows, but I couldn’t find any near me so I used the classic white mini marshmallows instead. The rainbow kind contribute a bit more fruity flavor, but the classic kind are just as delicious! Feel free to use whichever you prefer, or have on-hand.

    one glass of watergate salad with chopped pistachios and a cherry on top.

    Adjust This Recipe To Your Dietary Needs

    Make it Vegan – Make this watergate salad vegan by using a tub of coconut whipped cream, and vegan mini marshmallows. I tested this recipe with these Dandie’s Vegan Marshmallows and couldn’t even taste the difference!

    two glasses of watergate salad with cherries on top
    4.67 from 3 votes

    Mom’s FAMOUS Watergate Salad

    My Mom’s famous watergate salad recipe will blow your mind! A pistachio whipped cream base, with plenty of chopped fruit and mini marshmallows. I grew up on this best EVER no-bake dessert, my favorite for summer parties or barbecues!
    Print Pin Rate
    Prep Time: 5 minutes
    Total Time: 5 minutes
    Servings: 12 servings

    Ingredients

    • 1 (3.4 ounce) box pistachio pudding mix
    • 1 (9 ounce) tub whipped cream, or coconut whipped cream to make it dairy-free
    • 1 (15 ounce) can fruit cocktail, drained
    • 1 (20 ounce) can crushed pineapple, drained
    • 2 cups mini marshmallows

    Instructions

    • Mix together pistachio pudding mix and whipped cream in a large bowl until fully combined.
    • Add in drained fruit cocktail, crushed pineapple, and mini marshmallows. Leave to set in fridge for at least one hour, then serve cold.

    Nutrition

    Calories: 300kcal

    A perfectly sweet, light, and fluffy marshmallow fruit dip! Comes together in a few simple steps with only four ingredients. This fruit dip is both gluten-free and dairy-free, perfect recipe for potlucks and/or summer parties!

    overhead image of marshmallow fruit dip in a bowl with berries and sliced pears.

    What You’ll Need To Make Marshmallow Fruit Dip

    Egg Whites – Use your favorite method to separate four egg whites from their yolks. I use this method to separate my eggs, which takes some practice but doesn’t require any special kitchen tools. And don’t discard your egg yolks! Instead, save and add them to your morning scramble for extra vitamins and minerals.

    Sugar – Either cane sugar or white sugar will work in this recipe. I used unbleached cane sugar, for the simple fact that it’s less processed than white sugar. However, feel free to use whichever sugar you have on-hand. And for a paleo option, check out the “adjust this recipe to your dietary needs” section below!

    Cream of Tartar – I know what you’re thinking …cream-of-what?? Cream of tartar is a white powder, found in either the baking or spice aisle of most grocery stores. It’s a stabilizer that gives this marshmallow fruit dip it’s ultra-fluffy texture. Sure, you can make this recipe without it, but your egg whites won’t whip up as nicely.

    Vanilla Extract – A touch of vanilla extract makes this fruit tip taste just like homemade marshmallow fluff! While you can certainly leave the vanilla out, it does add a nice hint of extra delicious flavor.

    strawberry being dipped into marshmallow fruit dip.

    Serve This Marshmallow Fruit Dip With…

    • Strawberries
    • Blueberries
    • Blackberries
    • Raspberries
    • Sliced Apples
    • Pears
    • Grapes
    • Pineapple
    • Melon
    • or whatever fruit you have on-hand!
    marshmallow fruit dip on a fresh strawberry, on a fork.

    Adjust This Recipe To Your Dietary Needs

    Make it Sugar-Free: For a sugar-free dessert recipe, replace the regular sugar with your favorite granular sugar substitute. I recommend either granular monk fruit sweetener, or swerve.

    Make it Paleo: Use coconut sugar for a paleo marshmallow fruit dip! If taking this option, your dip will appear a caramel/brown color, rather than the white you see in these photos.

    close-up image of marshmallow fruit dip with fresh berries.
    5 from 1 vote

    Marshmallow Fruit Dip (just 4 ingredients!)

    A perfectly sweet, light, and fluffy marshmallow fruit dip! Comes together in a few simple steps with only four ingredients. This fruit dip is both gluten-free and dairy-free, perfect recipe for potlucks and/or summer parties!
    Print Pin Rate
    Prep Time: 5 minutes
    Cook Time: 10 minutes
    Total Time: 15 minutes
    Servings: 12 servings

    Ingredients

    • 4 large egg whites
    • 1 cup sugar
    • 1/2 teaspoon cream of tartar
    • 1 teaspoon vanilla extract
    • fresh fruit, for serving

    Instructions

    • Place the egg whites, sugar, and cream of tarter in a large bowl.
    • Bring 2-inches of water in a saucepan to a simmer, then place the bowl on top of the saucepan. Do not let the bowl touch the water.
    • Whisk egg white mixture constantly for 3-4 minutes, or until thin, smooth, and sugar has completely dissolved. If you have a kitchen thermometer, check that the temperature has reached 160° Fahrenheit.
    • Remove bowl from saucepan, add in vanilla extract, then while still hot beat with a hand or stand mixer until super light and fluffy, about 5 minutes. Serve marshmallow dip alongside fresh fruit.

    Nutrition

    Calories: 300kcal

    Quick, easy, and insanely delicious 20-minute mongolian chicken! Inspired by the flavors in your favorite dish from your local Chinese restaurant – comes together in less time than it’d take you to order takeout.

    overhead image of mongolian chicken on a plate over cauliflower rice

    What You’ll Need To Make Mongolian Chicken

    Chicken Breast – Thinly slice two large, boneless and skinless chicken breasts against the grain. Once sliced, it’s ready to use in this recipe! And for extra crispy chicken pieces, we start by coating them in corn starch before cooking. However, if you don’t have any corn starch, you can use arrowroot starch or tapioca starch in its place. Or, you can skip this step altogether!

    Scallions – Slice three whole scallions (white and green part) however large or small you’d like. I typically slice mine in 2-inch pieces, since I love biting into large pieces of sautéed scallions in my mongolian chicken.

    Ginger – If using fresh, whole ginger, slice off a 1-inch knob of ginger and remove the skin. Then, run your piece of ginger along a microplane grater until its finely grated. Or, to save time, I recommend buying a jar of minced ginger, and using that in this recipe instead!

    Soy Sauce – Soy sauce is the classic addition to this Chinese-inspired recipe. However, if gluten-free, use tamari in place of the soy sauce. Or, for a slightly healthier version, use reduced sodium soy sauce instead!

    close-up image of mongolian chicken in a skillet

    Adjust This Recipe To Your Dietary Needs

    Make it Paleo: Turn this into an easy paleo dinner recipe by replacing the corn starch with tapioca starch, and using coconut aminos in place of the soy sauce. Then, serve your cooked chicken over cauliflower rice – yum.

    Make it Gluten-Free: For gluten-free mongolian chicken, make sure the corn starch you use is entirely gluten-free, and replace the soy sauce with an equal amount of tamari. Tamari is the gluten-free equivalent to soy sauce, and tastes exactly the same!

    overhead image of mongolian chicken in a skillet.

    Interested In More Chicken Recipes? Try These!

    No ratings yet

    20-Minute Mongolian Chicken

    Quick, easy, and insanely delicious 20-minute mongolian chicken! Inspired by the flavors in your favorite dish from your local Chinese restaurant – comes together in less time than it’d take you to order takeout.
    Print Rate
    Prep Time: 5 minutes
    Cook Time: 15 minutes
    Total Time: 20 minutes
    Servings: 4 servings

    Ingredients

    • 1 1/2 pounds chicken breast, thinly sliced
    • salt, to taste
    • 1/4 cup corn starch, or arrowroot starch
    • 3 tablespoons avocado oil
    • 3 scallions, sliced
    • 2 garlic cloves, minced
    • 1-inch piece fresh ginger, grated
    • 1 tablespoon corn starch
    • 1/2 cup vegetable broth
    • 1/4 cup soy sauce, or tamari if gluten-free

    Instructions

    • Season chicken breast with salt, then toss in corn starch to coat.
    • Heat avocado oil in a large skillet over medium-high heat, once hot add in the chicken – cook until golden brown and cooked through. Remove chicken from skillet and set aside.
    • Lower heat to medium and add in the garlic, ginger, and scallions. Cook until fragrant, about 2 minutes.
    • Whisk the corn starch into the vegetable broth, then pour into the skillet along with the soy sauce. Reduce heat to low and simmer until sauce has thickened.
    • Once thick, add chicken back into the skillet and toss in sauce, then serve.

    Video

    Nutrition

    Calories: 300kcal