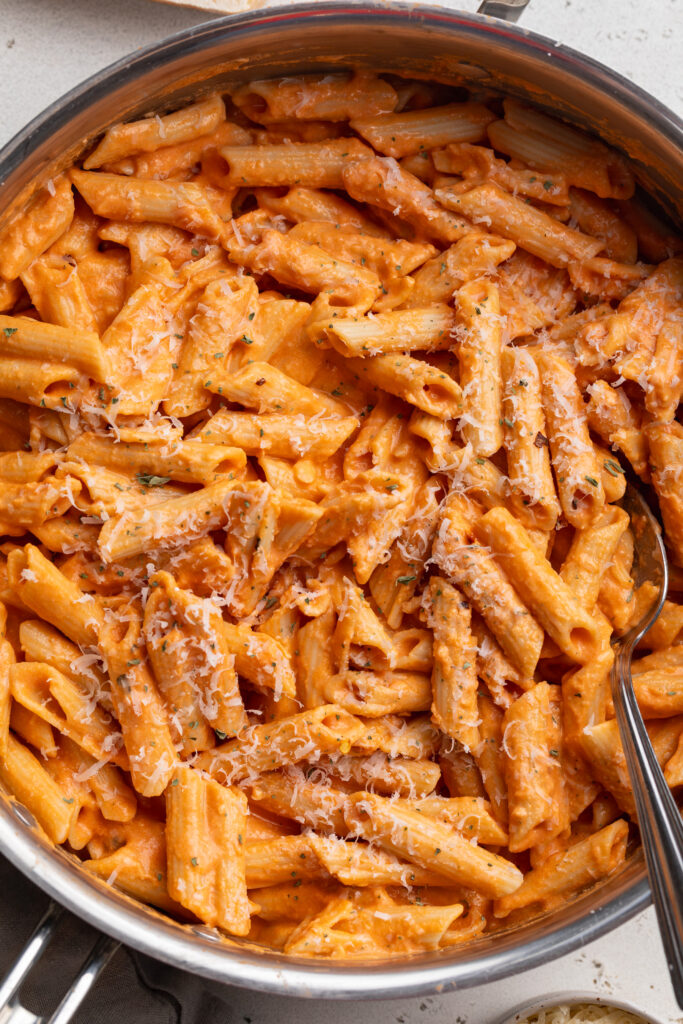
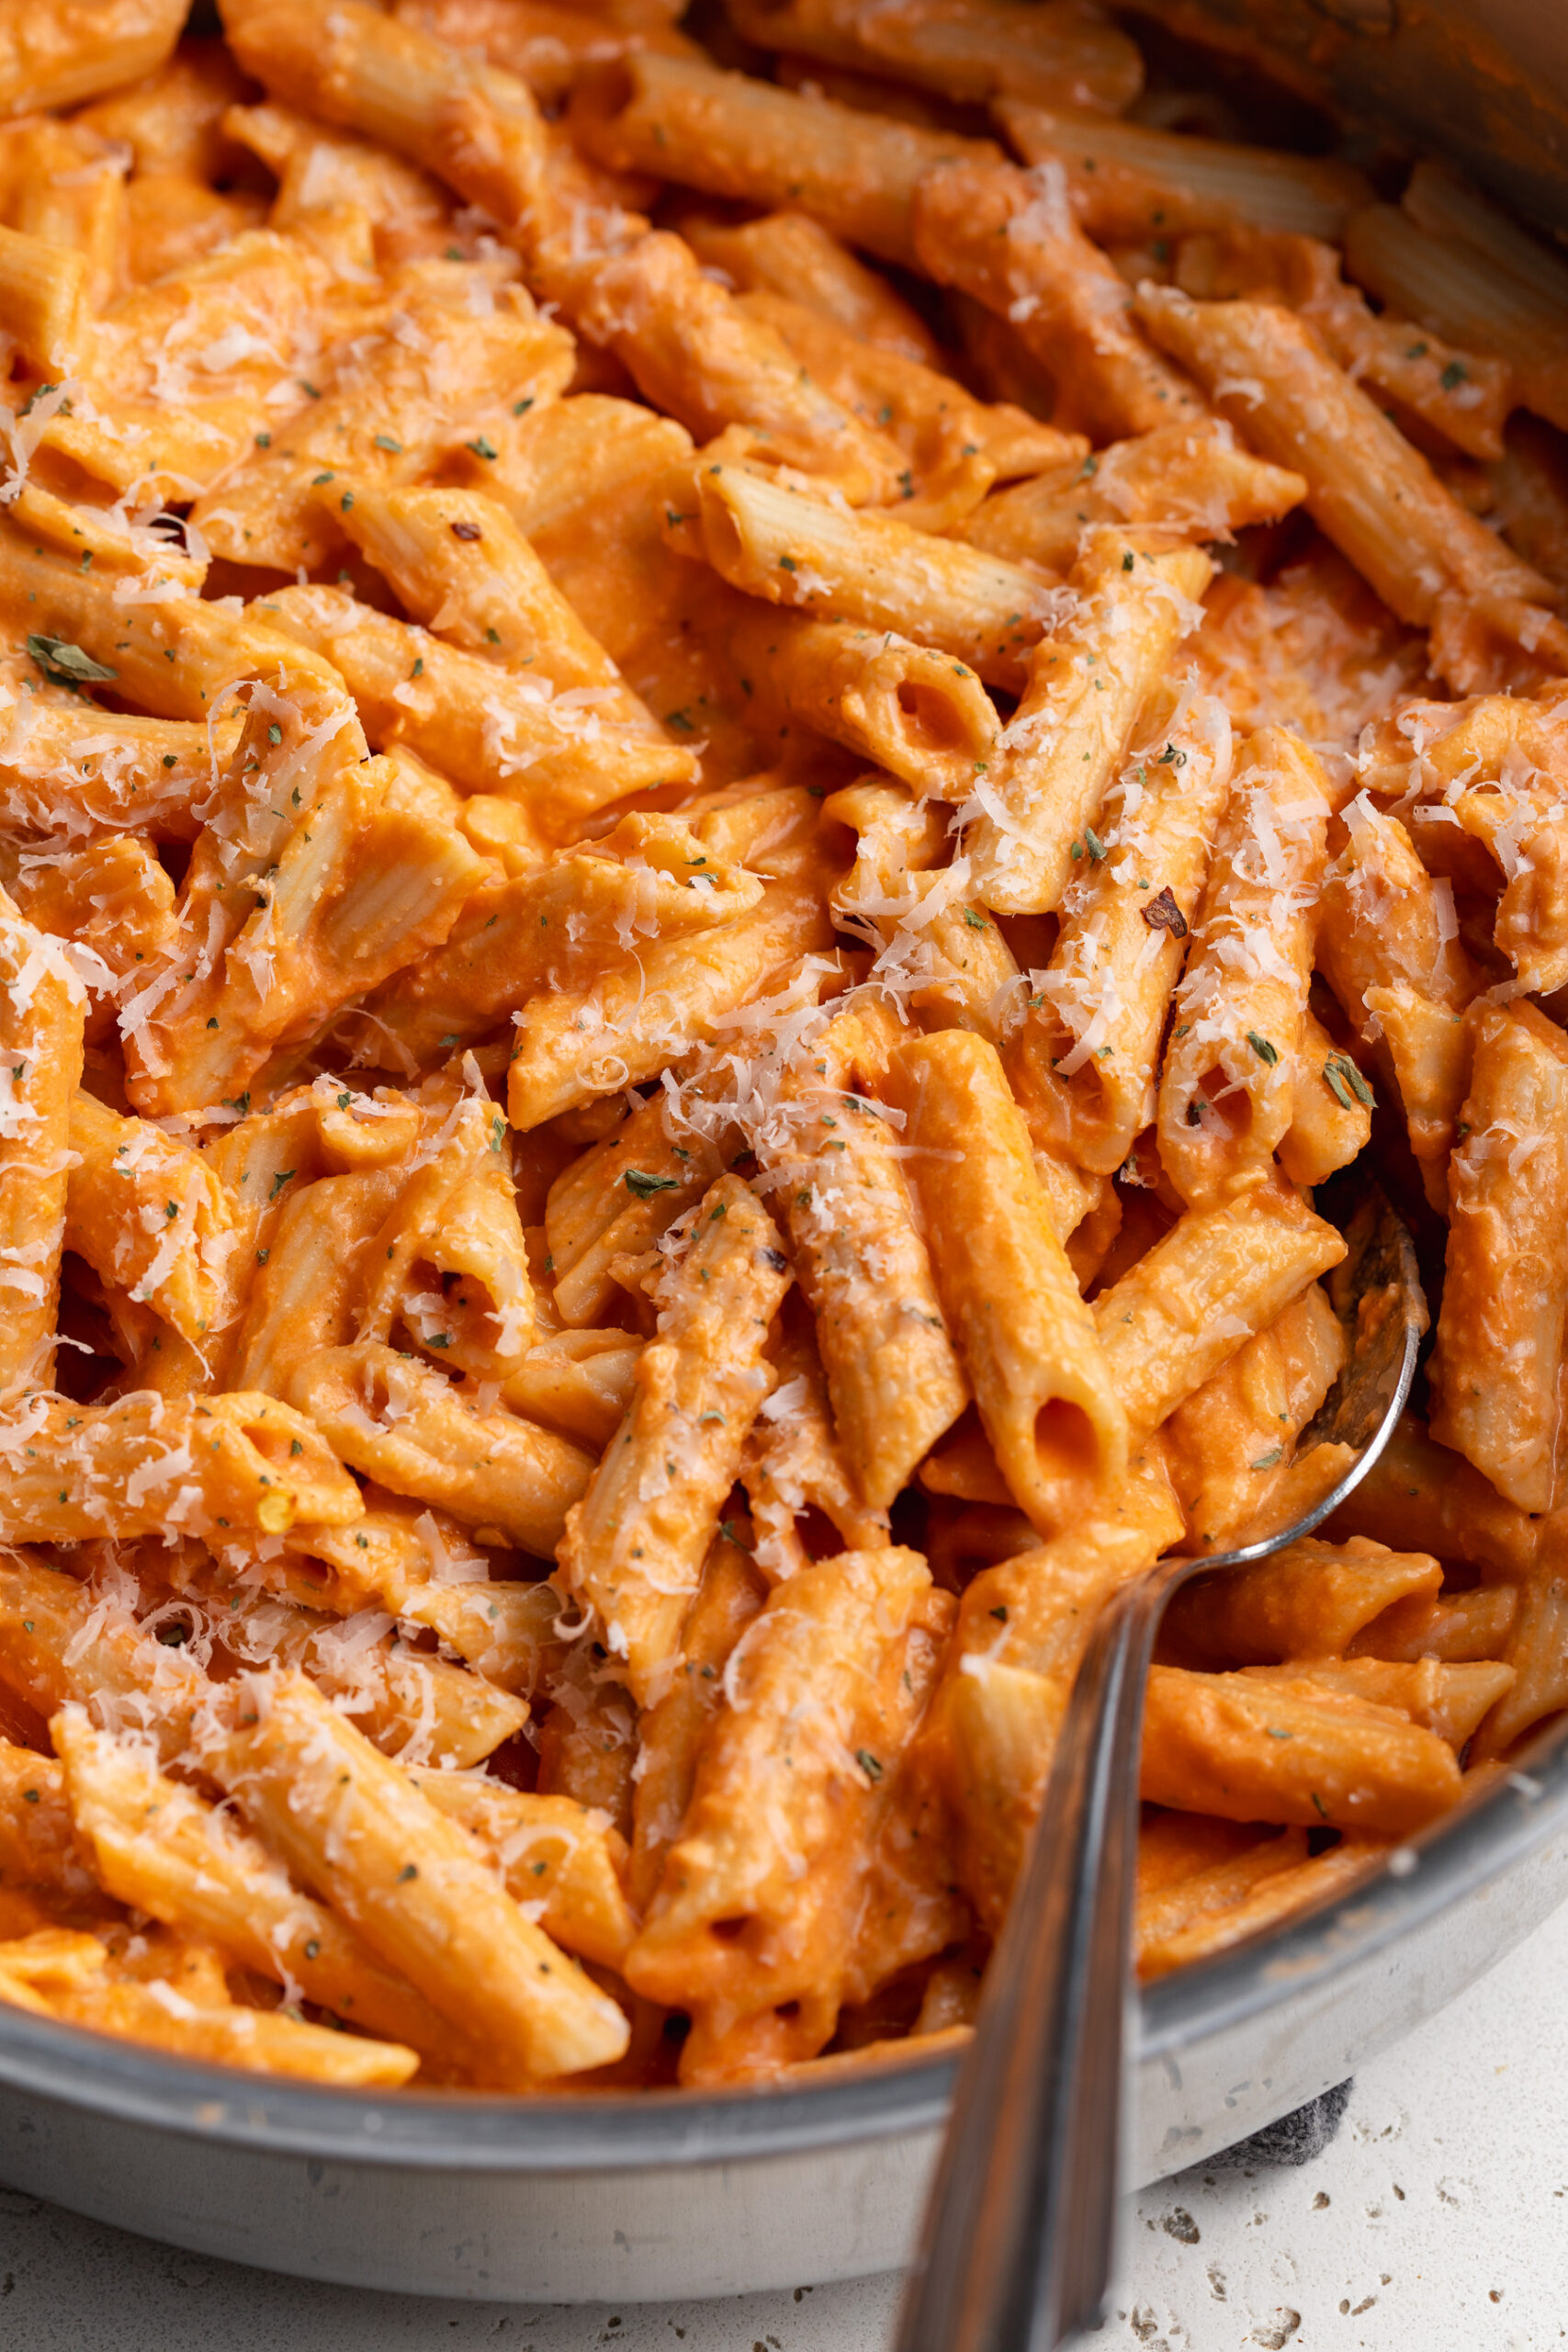
Tag

healthy

Browsing

Carrot cake for breakfast? Yes plz! These carrot cake baked oats have all the warm, cozy flavors of your favorite spring dessert – cinnamon, nutmeg, sweet grated carrots, crunchy walnuts – baked into a hearty, high-protein breakfast that you can meal prep on Sunday and enjoy all week long. And the Greek yogurt cream cheese frosting takes this recipe over the top!

What I love most about this recipe, besides the fact that it genuinely tastes like carrot cake, is how totally easy it is! Simply whisk, stir, bake, and that’s it. No mixer, no complicated steps, just one bowl and one baking dish standing between you and the best breakfast of your week! If you’re already a fan of my Meal Prep Protein Pancakes or my High-Protein Breakfast Biscuits, you’re going to absolutely love this one.

Why You’ll Love These Carrot Cake Baked Oats

  • Tastes just like carrot cake! Warm cinnamon and nutmeg, sweet shredded carrots, chewy raisins, crunchy walnuts, and that dreamy cream cheese frosting – every bite hits exactly like the real thing.
  • High in protein and fiber. Between the Greek yogurt in the batter, the eggs, and the fiber-packed oats and carrots, this is a breakfast that will actually keep you full and energized all morning long.
  • Perfect for meal prep. This recipe makes 9 generous squares. Bake it Sunday, store it in the fridge, and you’ve got a grab-and-go breakfast ready for the entire week – no reheating required if you enjoy it cold!
  • Super easy to make. One large bowl, one baking dish, a quick whisk and stir, and the oven does the rest. Start to finish, you’re looking at under an hour with minimal work.
  • Naturally sweetened. Maple syrup and the natural sweetness of the carrots and raisins do all the work here – no refined sugar needed!
overhead image of carrot cakes baked oats square on a plate with greek yogurt cream cheese frosting on top.

Recipe Variations and Substitutions

  • Milk: Any milk works here – dairy or non-dairy. Oat milk, almond milk, and coconut milk are all great options if you want to keep this dairy-free.
  • Greek Yogurt: Plain full-fat Greek yogurt gives the best texture and the most protein. You can swap for a dairy-free yogurt (coconut or cashew-based work well) if needed – just note the bake may come out slightly softer.
  • Maple Syrup: Honey works as a 1:1 swap. If you’d like to reduce the sweetness further, know that the carrots and raisins contribute natural sweetness, so you can comfortably cut the maple syrup back to 3 tablespoons.
  • Walnuts: Pecans are a delicious swap and give an even more classic carrot cake flavor. You can also leave the nuts out entirely for a nut-free version.
  • Raisins: These are totally optional! If you’re not a raisin fan, leave them out – the baked oats are just as delicious without them. Alternatively, try swapping them for dried pineapple or dried cranberries.
  • Frosting: If you’re short on time, a simple dollop of plain Greek yogurt on top works beautifully and still adds that creamy, tangy element that makes carrot cake so good. For a fully dairy-free frosting, use a thick coconut yogurt and dairy-free cream cheese.

Sam’s Recipe Tips

  • Grate your own carrots. Pre-shredded matchstick carrots from the store work in a pinch, but freshly grated carrots are finer, softer, and blend into the oats much more beautifully. A box grater takes just a couple of minutes and makes a real difference in the final texture.
  • Let it cool completely before frosting. I know it’s tempting to frost straight out of the oven, but if the baked oats are still warm, the frosting will melt and slide right off. Patience pays off here – let them cool fully, then frost generously.
  • Meal prep tip: store the frosting separately. If you’re making this for the week, cut the oats into squares and store them unfrosted in an airtight container in the fridge. Keep the frosting in a separate container and add a dollop to each square right before eating. This keeps everything fresh and prevents the oats from getting soggy.
  • Room temperature eggs matter. Cold eggs can cause the batter to look curdled or uneven. Pull them out of the fridge 20–30 minutes before you start, and your batter will come together much more smoothly.
  • Don’t overbake. The oats are done when the top looks set and a toothpick inserted into the center comes out clean. Overbaking can dry them out, so start checking at the 40-minute mark.
  • Freeze for later. These carrot cake baked oats freeze beautifully! Let them cool completely, cut into individual squares, and freeze in a single layer. Once frozen, transfer to an airtight bag or container. They’ll keep for up to 2 months – just microwave in 30-second intervals until warmed through.
carrot cakes baked oats square on a plate with greek yogurt cream cheese frosting on top.
No ratings yet

Healthy Carrot Cake Baked Oats with Greek Yogurt Cream Cheese Frosting

These carrot cake baked oats are a high-protein, meal prep-friendly breakfast that tastes just like your favorite spring dessert – warm cinnamon and nutmeg, sweet grated carrots, crunchy walnuts, and a dreamy Greek yogurt cream cheese frosting on top. Made in just one bowl with simple, wholesome ingredients, this easy recipe comes together in under an hour and makes 9 generous squares to last you the whole week! If you're looking for a healthy carrot cake baked oats recipe that's as nourishing as it is delicious, ya gotta give this one a try.
Print Pin Rate
Prep Time: 10 minutes
Cook Time: 40 minutes
Total Time: 50 minutes
Servings: 9 servings

Equipment

  • 1 9×9-inch baking pan
  • 2 large bowls
  • 1 hand or stand mixer

Ingredients

  • 1 cup milk
  • 1 cup Greek yogurt
  • 2 eggs at room temperature
  • 1/4 cup maple syrup
  • 1 teaspoon vanilla extract
  • 2 cups rolled oats
  • 2 teaspoons cinnamon
  • 1/2 teaspoon nutmeg
  • 1 cup grated carrots
  • 1/2 cup chopped walnuts
  • 1/2 cup raisins optional

For the frosting:

  • 1 cup Greek yogurt
  • 1/2 cup (4 ounces) cream cheese softened, at room temperature
  • 3-4 tablespoons maple syrup or honey
  • 1 teaspoon vanilla extract

Instructions

  • Preheat oven to 350° Fahrenheit and lightly grease the inside of a 9×9-inch baking dish.
  • Whisk together the milk, Greek yogurt, eggs, maple syrup, and vanilla extract in a large bowl.
  • Add in the rolled oats, cinnamon, nutmeg, carrots, walnuts, and raisins to the bowl and stir until everything is completely combined.
  • Pour the oat mixture into your prepared baking dish and bake for 40-45 minutes, or until the top is set and the oats are cooked through.
  • Remove the baked oats from the oven and let them cool completely. While the oats cool, make the frosting by adding the Greek yogurt, cream cheese, maple syrup, and vanilla extract to a bowl and use either a hand or stand mixer to whisk it together until light and fluffy.
  • Once the oats are completely cool, top with the frosting, cut into squares, and enjoy! Or, store the frosting separately, cut the oats into squares and store for an easy meal prep breakfast. Right before eating, top one serving of baked oats with a big dollop of frosting.

Nutrition

Serving: 1serving | Calories: 280kcal | Carbohydrates: 32g | Protein: 14g | Fat: 11g | Fiber: 3g | Sugar: 15g

If you loved my Cottage Cheese Cookie Dough, get ready — because this cottage cheese brownie batter is about to be your new obsession. Same concept, same creamy no-bake magic, but make it chocolate. We’re blending cottage cheese until it’s completely smooth (so you’d never know it’s in there!), then mixing in almond flour and chocolate protein powder for a thick, fudgy, brownie batter-like treat that’s packed with protein and ready in just 5 minutes!

And yes — it really does taste like brownie batter. Rich, chocolatey, and superrrr satisfying! Whether you eat it straight from the bowl with a spoon (trust me, I don’t judge), or use it as a dip for strawberries and pretzels, I promise you’re going to be making this on repeat. For more no-bake chocolate treats, you’ll also love my 4-Ingredient Protein Brownies and 3-Ingredient Protein Cookies!

Why You’ll Love This Recipe

  • High-Protein & Satisfying: Packed with protein from cottage cheese and chocolate protein powder, this brownie batter keeps you full and fueled — not just for a minute, but for real.
  • Quick & Easy: No baking, no cooking, no fuss. Just blend, mix, and dig in. Start to finish in 5 minutes.
  • Wholesome Ingredients: Made with simple, real-food ingredients that you can feel great about eating. No refined sugar – simply delicious!
  • Two Ways to Make It: Use chocolate protein powder for a protein boost, or swap in unsweetened cocoa powder if you prefer to keep it protein powder-free. Both versions are incredible!
overhead image of cottage cheese brownie batter in a small dish with a spoon.

What Makes This Cottage Cheese Brownie Batter Healthy?

This brownie batter is a genuinely nourishing treat, not just a “better than nothing” swap. Cottage cheese is the star ingredient, delivering a creamy texture along with a solid dose of protein and calcium — all without any of the heavy cream, butter, or eggs you’d find in traditional brownie batter. Maple syrup keeps the sweetness natural and free of refined sugar, while almond flour adds healthy fats, fiber, and a subtle nuttiness that perfectly complements the chocolate. Fold in some chocolate chips at the end and you’ve got something that feels indulgent but is actually doing something good for your body.

Recipe Substitutions

  • Almond Flour: Swap with oat flour or coconut flour if needed. If using coconut flour, start with just ¼ cup — it absorbs a lot more moisture than almond flour.
  • Maple Syrup: Honey, agave nectar, or any other liquid sweetener you love all work great here.
  • Chocolate Protein Powder: No protein powder? No problem! Use 2 tablespoons of unsweetened cocoa powder instead. The batter will be slightly less thick but just as chocolatey and delicious.
  • Chocolate Chips: Cacao nibs or dairy-free chocolate chips work perfectly if you need a dairy-free version.

Adjust This Recipe to Your Dietary Needs

  • Dairy-Free: Swap the cottage cheese for a thick, plain dairy-free yogurt (like coconut or cashew-based) and use dairy-free chocolate chips.
  • Nut-Free: Replace the almond flour with oat flour and make sure your chocolate chips are processed in a nut-free facility.
  • Keto-Friendly: Use a sugar-free liquid sweetener like monk fruit syrup in place of maple syrup, opt for low-carb chocolate chips, and swap almond flour for coconut flour.
  • Extra Protein: Use a high-quality chocolate protein powder instead of cocoa powder to bump the protein content up even further!
cottage cheese brownie batter scooped into a small cup.
No ratings yet

Cottage Cheese Brownie Batter

This cottage cheese brownie batter is a high-protein, no-bake treat that tastes just like the real thing – rich, fudgy, and deeply chocolatey but made with wholesome ingredients! Ready in just 5 minutes with 5 simple ingredients, it's the easiest healthy dessert you'll ever make. If you're looking for a healthier way to satisfy your chocolate cravings, this is the recipe you've been waiting for!
Print Pin Rate
Prep Time: 5 minutes
Total Time: 5 minutes
Servings: 6 servings

Equipment

  • 1 food processor or high speed blender
  • 1 small bowl

Ingredients

  • 1 cup cottage cheese
  • 1/4 cup maple syrup
  • 1 teaspoon vanilla extract optional
  • 1 cup almond flour
  • 1 scoop chocolate protein powder or 2 tablespoons cocoa powder
  • 1/2 cup chocolate chips

Instructions

  • Add the cottage cheese, maple syrup, and vanilla extract to a blender or food processor and blend until completely smooth.
  • Transfer the cottage cheese mixture to a bowl and mix in the almond flour and chocolate protein powder, then fold in the chocolate chips.
  • Serve immediately or store in an airtight container in the fridge for up to 5 days.

Nutrition

Serving: 1serving | Calories: 250kcal | Carbohydrates: 21g | Protein: 12g | Fat: 14g | Fiber: 3g | Sugar: 13g

The iconic spring time candy just got a major protein upgrade! Now I LOVE a Reese’s egg. Yes, even more than a peanut butter cup – the ratio of peanut butter to chocolate is simply so much better. But I don’t love the ingredients in a Reese’s egg. Which is exactly why I developed these protein Reese’s eggs. Just 4 ingredients, NO baking, high in protein, and super easy to make. And if you like this recipe, then you gotta give my healthy strawberry peanut butter cups a try this summer! Just as delicious and easy to make. 🙂

Why You’ll Love These Protein Reese’s Eggs

  • Just 4 ingredients. Peanut butter, vanilla protein powder, chocolate chips, and coconut oil. That’s the whole list — no powdered sugar, no fillers, no ingredients you can’t pronounce!
  • 8 grams of protein per egg. Every single egg pulls its weight. That’s more protein than most protein bars, in something that tastes like candy.
  • WAY healthier than the real thing. Store-bought Reese’s Eggs are packed with refined sugar, hydrogenated oils, and a long list of additives. These are made with real, wholesome ingredients you can actually feel good about eating.
  • No bake and SO easy. Mix, shape, freeze, dip. That’s the entire process. Prep time is under 10 minutes.
  • Perfect for Easter — or any time of year. Yes, these are egg-shaped and perfect for Easter baskets, but honestly I keep a batch in my freezer year-round. They’re that good.
  • Completely customizable. Use whatever chocolate you love — dark, semi-sweet, or sugar-free. Swap peanut butter for almond butter. Have fun and make them your own!
overhead image of protein reese's eggs with flaky salt on top.

Frequently Asked Questions

How much protein does each Reese’s Egg contain?

Each egg contains approximately 8 grams of protein, primarily from the vanilla protein powder and natural peanut butter. That’s a significant upgrade from store-bought Reese’s Eggs, which contain less than 3 grams of protein per egg. It also means these make a genuinely satisfying snack — not just a treat — that will actually keep you full!

Can I make these sugar-free?

Yes! This recipe is already very low in added sugar since the only sweetener comes from the protein powder and whatever is naturally present in your chocolate chips. To make them completely sugar-free, simply swap the chocolate chips for a sugar-free variety like Lily’s (sweetened with stevia) or Hu Kitchen chocolate (sweetened with coconut sugar, which is lower on the glycemic index). The peanut butter filling itself contains zero added sugar as long as you’re using an unsweetened, natural peanut butter.

What can I use instead of protein powder?

If you don’t have protein powder or prefer not to use it, there are a few great swaps. Coconut flour is the most popular alternative — use 2–3 tablespoons (it absorbs more moisture than protein powder, so use less). Almond flour also works well; use about 3–4 tablespoons for a similar texture. Keep in mind that skipping the protein powder will lower the protein content per egg significantly, but the flavor will still be delicious!

Tips for the Best Protein Reese’s Eggs

  • Use natural, drippy peanut butter. The kind where the oil separates at the top is ideal. Avoid thick, sugar-added peanut butters – they make the filling too stiff and overly sweet.
  • Don’t skip the freeze before dipping. Cold eggs = fast chocolate set = a cleaner, smoother shell. If the eggs aren’t frozen solid when you dip them, the chocolate will slide right off and pool on the parchment.
  • Add flaky sea salt on top. I know I already said it, but it genuinely takes these to another level. The saltiness against the sweet chocolate is everythingggg!
  • Use a fork for dipping. It gives you control and lets the excess chocolate drip off cleanly. If you have dipping tools, even better!
  • Make a double batch. These store in the freezer for up to 3 months in an airtight container. Future you will thank you!

More High-Protein Treats You’ll Love

Made these? I want to see them! Tag me on Instagram @samdoesherbest or TikTok @samdoesherbest — chocolate-covered creations always get a reshare. And if you loved this recipe, please leave a ⭐⭐⭐⭐⭐ rating below. It helps so much!

three protein reese's eggs stacked on top of each other.
5 from 1 vote

4-Ingredient Protein Reese’s Eggs

These 4-Ingredient Protein Reese's Eggs taste just like the classic Easter candy – but with 8 grams of protein per egg! Made with natural peanut butter, vanilla protein powder, chocolate chips, and coconut oil, they come together in just a few minutes with NO baking required. If you're looking for a healthy Reese's Eggs recipe that actually satisfies your chocolate-peanut butter craving, this is the one!
Print Pin Rate
Prep Time: 10 minutes
Freeze Time: 28 minutes
Total Time: 38 minutes
Servings: 10 eggs

Equipment

  • 2 small bowls
  • 1 small baking sheet

Ingredients

Peanut butter filling:

  • 1/2 cup creamy peanut butter unsweetened
  • 1/3 cup vanilla protein powder

Chocolate coating:

  • 1 cup chocolate chips
  • 1 tablespoon coconut oil

Instructions

  • Mix together the peanut butter and protein powder in a small bowl until a thick dough forms.
  • Scoop about 2 tablespoons of mixture per egg, shape into egg forms and place on a parchment-lined baking sheet. Freeze the eggs for about 10 minutes, or while you make the chocolate coating.
  • Melt the chocolate chips and coconut oil together in either the microwave or over a double boiler until completely smooth.
  • Dip each frozen egg in melted chocolate, coat fully, tap off excess, and return to the parchment-lined baking sheet.
  • Freeze for 10 minutes, or until the chocolate has set. Then, enjoy right away or store in the fridge for later!

Notes

  • Use natural, unsweetened peanut butter for best texture and flavor.
  • Sub coconut flour (2–3 tbsp) or almond flour (3–4 tbsp) in place of protein powder if needed.
  • Store in an airtight container in the fridge for up to 1 week or the freezer for up to 3 months.

Nutrition

Serving: 1egg | Calories: 180kcal | Carbohydrates: 11g | Protein: 8g | Fat: 13g | Fiber: 2g | Sugar: 4g

Quick stats: 15g protein per serving · 3 ingredients · No ice cream maker needed · Ready in 6 hours

If you’ve been on TikTok or Instagram lately, you’ve probably seen cottage cheese ice cream everywhere — and for good reason. This 3-ingredient cottage cheese ice cream is creamy, naturally sweet, packed with protein, and shockingly easy to make. No churning, no ice cream maker, no fancy equipment. Just a blender, a container, and your freezer. If you’re already a fan of my cottage cheese cookie dough, you already know how magical this ingredient can be in a sweet recipe.

I’ve been making this on repeat all summer, and it has completely replaced my store-bought ice cream habit. With 15 grams of protein per serving, it satisfies my sweet tooth and keeps me full — which is honestly the dream. Whether you’re following a high-protein diet, trying to eat a little healthier, or just craving something cold and delicious, this recipe is for you. (And if you’re on a high-protein kick, you’ll also want to bookmark my 4-ingredient protein brownies and 3-ingredient protein cookies — they’re just as easy and just as good.)

Why You’ll Love This Cottage Cheese Ice Cream

  • Only 3 ingredients. Cottage cheese, mixed berries, and a touch of honey or maple syrup. That’s it. No hidden ingredients, no weird additives — just real food!
  • Seriously high in protein. With 15 grams of protein per serving, this ice cream works as hard as you do. It’s the ultimate healthy treat that actually keeps you satisfied.
  • Incredibly easy to make. Toss everything in a blender, pour it into a container, and let the freezer do the work. Prep time is under 5 minutes — I promise!
  • No ice cream maker required! No special equipment needed whatsoever. A blender and a freezer-safe container are all you need.
  • Healthy and wholesome. Made with real ingredients and naturally sweetened, this ice cream is low in added sugar and free from the artificial stuff you find in most store-bought pints.
  • Perfect for satisfying cravings. This isn’t a sad “diet food” situation. It’s genuinely creamy, sweet, and delicious — and it really does taste like ice cream.
three scoop of cottage cheese ice cream in a bowl with a spoon.

Frequently Asked Questions

How much protein does one serving of cottage cheese ice cream contain?

This recipe makes approximately 4 servings, and each serving contains about 15 grams of protein — almost entirely from the cottage cheese. For reference, a serving of traditional ice cream typically has just 3–4 grams of protein. That’s a pretty incredible upgrade for something that tastes this good!

Can I make this added sugar-free?

Absolutely! If you want to skip the added sugar entirely, you have a couple of options. First, you can simply leave out the honey or maple syrup — the natural sweetness from the berries may be enough for you, especially if you’re using ripe, sweet fruit. Alternatively, you can sweeten with a few pitted Medjool dates blended right into the mixture for a completely natural, whole-food sweetener with zero added sugar.

How long does this stay good in the freezer for?

Stored in an airtight container, this cottage cheese ice cream keeps well in the freezer for up to 1 month. For the absolute best texture and flavor, try to enjoy it within the first week or two. Since cottage cheese is high in water content, the ice cream can get a bit icier over time. Just a heads up: every time you pull it out and let it thaw, then refreeze it, the texture can become a little more crystallized, so try to avoid too many thaw-refreeze cycles.

Flavor Variations

The beauty of this recipe is how endlessly customizable it is. Once you’ve nailed the base, the flavor possibilities are truly unlimited! Here are some of my favorites:

🍓 Strawberry Cheesecake Swap the mixed berries for 1 cup of fresh or frozen strawberries and add ½ teaspoon of pure vanilla extract. The vanilla plays up the natural tang of the cottage cheese, making it taste incredibly close to strawberry cheesecake.

🍫 Chocolate Berry Add 2 tablespoons of unsweetened cocoa powder to the blender along with your mixed berries. The result is a rich, fudgy chocolate-berry ice cream that feels indulgent but is still packed with protein.

🥜 Peanut Butter & Honey Skip the berries and blend in 2–3 tablespoons of natural peanut butter along with your honey. Stir in a handful of chocolate chips before freezing. This one is wildly addictive.

🍋 Lemon Blueberry Use 1 cup of blueberries (fresh or frozen), swap the honey for maple syrup, and add the zest of one lemon and a tablespoon of lemon juice. Bright, refreshing, and absolutely delicious.

🍑 Peach Mango Replace the mixed berries with ½ cup frozen peaches and ½ cup frozen mango chunks. The tropical sweetness of the mango pairs perfectly with the creamy cottage cheese base.

🍪 Cookies & Cream Skip the berries and blend the cottage cheese with maple syrup and a splash of vanilla. Once the mixture is in your container, stir in crushed chocolate sandwich cookies before freezing. A total crowd-pleaser.

Tips for the Creamiest Cottage Cheese Ice Cream

  • Use full-fat cottage cheese. I know I said it already, but it’s worth repeating — full-fat is non-negotiable if you want creamy (not icy) results.
  • Blend until completely smooth. Don’t rush this step. Blend on high until there are zero lumps or curds remaining. The smoother the base, the creamier the final texture.
  • Let it thaw properly before scooping. Pulling it straight from the freezer will make it rock solid. Give it a full 10 minutes (sometimes more!) on the counter before attempting to scoop.
  • Store it right. Press a piece of plastic wrap directly onto the surface of the ice cream before sealing your container. This helps prevent ice crystals from forming on top.
  • Try it in a Ninja Creami. If you have one, this recipe works amazingly well in the Ninja Creami. Freeze the blended mixture overnight, then run it through the Creami for an ultra-creamy, soft-serve-like texture.

Made this recipe? I’d love to see it! Tag me on Instagram @samdoesherbest or TikTok @samdoesherbest — I repost my favorites! And if you loved it, please leave a ⭐⭐⭐⭐⭐ rating below. It means the world and helps other readers find this recipe!

overhead image of cottage cheese ice cream being scooped with an ice cream scoop.
5 from 1 vote

3-Ingredient Cottage Cheese Ice Cream

This 3-ingredient cottage cheese ice cream is creamy, naturally sweet, and packed with 15 grams of protein per serving. No ice cream maker needed — just a blender and your freezer. It's the easiest, healthiest way to satisfy an ice cream craving!
Print Pin Rate
Prep Time: 5 minutes
Freeze Time: 6 hours
Total Time: 6 hours 5 minutes
Servings: 4 servings

Equipment

  • 1 blender or food processor
  • 1 freezer-safe airtight container

Ingredients

  • 2 cups whole milk cottage cheese
  • 1 cup mixed berries fresh or frozen
  • 3 tablespoons honey or maple syrup

Instructions

  • Add the cottage cheese, mixed berries, and honey (or maple syrup) to a blender. Blend until completely smooth and creamy with no lumps remaining.
  • Pour the mixture into a large freezer-safe container and spread evenly. Transfer to the freezer for at least 6 hours, or until frozen solid.
  • When ready to serve, remove from the freezer and let sit at room temperature for at least 10 minutes, or until soft enough to scoop. Scoop into bowls and enjoy!

Notes

  • Use full-fat cottage cheese for the creamiest texture. Low-fat versions are more watery and can result in an icy consistency.
  • Store in an airtight container in the freezer for up to 1 month. Press plastic wrap directly onto the surface before sealing to prevent ice crystals.
  • Let thaw for at least 10 minutes before scooping — it freezes very solid!
  • Ninja Creami tip: Freeze the blended mixture overnight, then run through the Creami for an ultra-creamy, soft-serve texture.

Nutrition

Serving: 1serving | Calories: 180kcal | Carbohydrates: 22g | Protein: 15g | Fat: 4g | Fiber: 1g | Sugar: 18g

The last think I have the energy for most nights is making a healthy and delicious dinner for my family. Which is exactly why I have super easy, minimal effort recipes like this burrito bowl casserole, 3-ingredient cottage cheese pizza crust, and 30-minute hunan chicken stir fry in my weekly dinner rotation. Less thought, effort, and prep means more time actually enjoying evenings with my little ones! And knowing that this recipe is packed with plenty of protein, veggie, and fibers makes me feel like I’m absolutely crushing it as a Mom. So if you’re also exhausted by just the thought of making a healthy, homemade meal for your family – give this flavorful casserole a try. Trust me when I tell you, your whole family will LOVE it!

Why You’ll Love This Burrito Bowl Casserole

  • Easy, minimal effort: everything comes together in one dish with simple ingredients and very little prep!
  • Packed with flavor: loaded with taco-seasoned beef, beans, rice, and melty cheese for that classic burrito taste.
  • Healthy and balanced: high in protein, fiber, and veggies to keep you full and satisfied!
  • Naturally gluten-free: made with wholesome, gluten-free ingredients.
  • Easily dairy-free: just skip the cheese or use your favorite dairy-free alternative.
  • Perfect for meal prep: great for leftovers and reheats beautifully.
  • Family-friendly: a crowd-pleasing dinner even my toddler loves!
close up image of a spoon in burrito bowl casserole.

Recipe Variations and Substitutions

  • Swap the protein: Use ground turkey, ground chicken, or even plant-based meat for a lighter or vegetarian option.
  • Make it vegan/vegetarian: Skip the meat and double the beans or add lentils for a plant-based, protein-rich version.
  • Change the grains: Substitute white rice with brown rice (add extra cooking time and liquid), or try quinoa for added protein and texture.
  • Use salsa instead of tomatoes: A cup of your favorite salsa adds even more flavor and spice with no extra effort!
  • Add extra veggies: Stir in zucchini, spinach, or mushrooms to boost the veggie and fiber content even more!
  • Top it your way: Serve with avocado, fresh cilantro, green onions, or a squeeze of lime for that classic burrito bowl feel.
  • Make it low-carb: Swap the rice for cauliflower rice (reduce liquid and baking time slightly).
overhead image of burrito bowl casserole with cheese and avocado on top.
No ratings yet

EASY Burrito Bowl Casserole

This easy burrito casserole is a healthy, flavor-packed dinner made with seasoned ground beef, rice, beans, and veggies – all baked in one dish! It’s high in protein, naturally gluten-free, and perfect for meal prep or busy weeknights. With minimal prep and simple ingredients, this burrito bowl casserole is a satisfying, family-friendly meal everyone will love!
Print Pin Rate
Prep Time: 15 minutes
Cook Time: 50 minutes
Total Time: 1 hour 5 minutes
Servings: 8 servings

Equipment

  • 1 large skillet
  • 1 9×14-inch baking dish

Ingredients

  • 1 tablespoon olive oil
  • 1 onion diced
  • 1 green bell pepper diced
  • 2 pounds lean ground beef
  • salt to taste
  • 1 packet taco seasoning
  • 3/4 cup water
  • 1 cup rice
  • 1 (15-ounce) can black beans drained and rinsed
  • 1 (14.5-ounce) can fire roasted diced tomatoes or 1 cup salsa
  • 1 1/2 cups chicken broth or water
  • 1 cup shredded cheddar cheese

Instructions

  • Preheat oven to 375° Fahrenheit.
  • Heat the olive oil in a large skillet over medium heat. Once the oil is hot, add in the diced onion and bell pepper. Sauté the onions and peppers until soft, about 5 minutes.
  • Add in the ground beef and salt, then break up the beef and cook until it’s no longer pink.
  • Reduce the heat to low, add in the taco seasoning and water, and simmer for 3-5 minutes until the sauce has thickened.
  • Transfer the beef mixture to a large 9×14-inch baking dish. Add the rice, black beans, frozen corn, fire roasted diced tomatoes, and chicken broth or water to the baking dish and stir to combine everything.
  • Cover the baking dish tightly with aluminum foil and bake for 45 minutes, or until the rice is cooked. Then, remove the foil, sprinkle cheese over the top of the casserole, and bake for an additional 5-10 minutes or until the cheese is melted and bubbly.
  • Remove the casserole from the oven, let it cool slightly before serving.

Nutrition

Serving: 1serving | Calories: 380kcal | Carbohydrates: 26g | Protein: 26g | Fat: 20g | Fiber: 4g | Sugar: 2g