Tag

snack

Browsing

Why You’ll Love These Protein Balls

Easy, No-Bake Snack: Made with just 5 simple ingredients and ready in minutes – no oven required!

Packed with Protein: Each ball contains 7 grams of protein, making them a perfect post-workout or midday snack.

Healthy & Dietary-Friendly: Gluten-free, dairy-free, vegan, and naturally sweetened with maple syrup.

Recipe Variations

  • Mix in Superfoods: Add chia seeds, flaxseeds, or hemp hearts for extra fiber and omega-3s.
  • Swap the Nut Butter: Use almond butter or cashew butter for a different flavor. For nut-free, use sunflower seed butter.
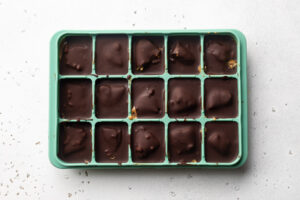
  • Boost the Chocolate: Dip the balls in melted dark chocolate and let them harden in the fridge for a chocolate-covered protein treat!

The Mixture is Too Dry, What Do I Do?

If the mixture is dry or crumbly, simply:

  • Add 1 tablespoon of water or almond milk at a time until the dough comes together.
  • Alternatively, add an extra tablespoon of peanut butter for more moisture and flavor.
Hand holding a cookie dough protein ball.

Adjust This Recipe to Your Dietary Needs

  • Make it Nut-Free: Swap peanut butter for sunflower seed butter and use oat flour instead of almond flour.
  • Make it Keto: Use almond flour instead of oats and a sugar-free maple syrup alternative.
  • Make it Grain-Free/Paleo: Skip the oats and use almond flour for a smooth, doughy texture.

Storage Instructions

  • Fridge: Store the protein balls in an airtight container in the fridge for up to 1 week.
  • Freezer: Freeze for up to 3 months. Let thaw for a few minutes before enjoying.

More Healthy Snack Recipes

If you love these no-bake protein balls, check out my other snack recipes like:

Enjoy these 5-ingredient cookie dough protein balls as a nutritious snack or dessert! 😋

cookie dough protein balls on a plate
No ratings yet

Cookie Dough Protein Balls

Satisfy your sweet tooth with these 5-ingredient cookie dough protein balls – the perfect no-bake snack! Packed with 7 grams of protein per ball, they’re gluten-free, dairy-free, and vegan, making them ideal for a healthy energy boost. Ready in minutes, they’re a delicious and nutritious way to fuel your day!
Print Pin Rate
Prep Time: 5 minutes
Total Time: 5 minutes
Servings: 8 servings

Equipment

  • 1 medium bowl

Ingredients

  • 1 cup rolled oats or almond flour
  • 1/4 cup vanilla protein powder
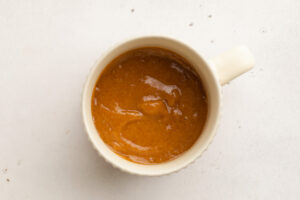
  • 1/4 cup peanut butter
  • 3 tablespoons maple syrup or honey
  • 1/4 cup dark chocolate chips
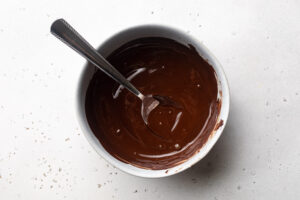
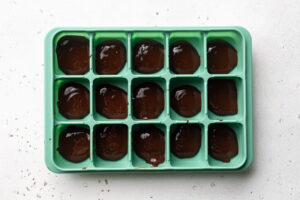
Instructions

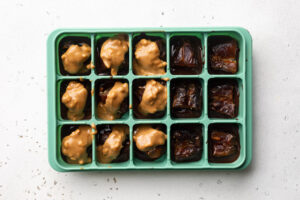
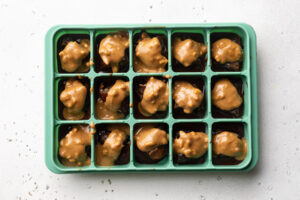
  • Add all ingredients to a medium bowl and stir until thoroughly combined.
  • Roll mixture into 1-inch balls.

Nutrition

Serving: 1serving | Calories: 145kcal | Carbohydrates: 16g | Protein: 7g | Fat: 6g | Sugar: 7g

I LOVE a single serve dessert! My go-to is usually either my single serve gluten-free cinnamon roll, or if I need some extra protein I’ll quickly throw together a single serve protein cookie. But lately, I’ve been alllll about this 3-ingredient peanut butter mug cake. I love that I can take it straight out of the microwave and onto the couch with me, and enjoy it warm (!!!) while I binge whatever show I’m watching that week. I typically enjoy it all on its own, but if I’m feeling crazy I’ll add a scoop of vanilla ice cream, a drizzle of chocolate, or even a handful of sprinkles! Please, have fun with this recipe, and most importantly – ENJOY!

Why You’ll Love This Recipe

  • Fast and Easy: Ready in under 5 minutes, this mug cake is perfect for a quick snack or dessert.
  • Simple Ingredients: Only 3 pantry staples are needed, making it budget-friendly and accessible.
  • Customizable: Add mix-ins or toppings to make it your own while still keeping it simple.

What You’ll Need to Make Peanut Butter Mug Cake

Egg: The egg acts as a binder, giving the mug cake its structure and fluffy texture. I wouldn’t recommend trying to replace the egg with something else, since it’s vital to holding this mug cake together.

Peanut Butter: Adds richness, a nutty flavor, and protein to the cake. Use creamy or natural peanut butter for best results. However, if you can’t have peanut butter use any nut, seed, or granola butter in its place!

Sugar: Sweetens the mug cake. Adjust the quantity based on your taste preference or use alternatives like coconut sugar for a refined sugar-free option!

3 ingredient peanut butter mug cake on a tea towel.

Here’s a link to the microwave-safe mug I used – on Amazon!

How to Make Peanut Butter Mug Cake

  1. Start by cracking an egg into a microwave-safe mug.
  2. Add the peanut butter and sugar, then mix well until smooth and lump-free.
  3. Microwave for 1 minute. Check the texture; if it’s undercooked, microwave for an additional 10 seconds.
  4. Allow to cool slightly, then enjoy it straight from the mug!

Topping/Mix-In Options

  • Chocolate Chips: Sprinkle a few on top before microwaving for a melty chocolate finish.
  • Banana Slices: Add a natural sweetness and pair perfectly with peanut butter.
  • Crushed Nuts: For extra crunch, sprinkle chopped peanuts or almonds on top.
  • Drizzles: Drizzle with honey, maple syrup, or melted chocolate after cooking.

Sam’s Recipe Tips

  • Microwave Timing: All microwaves vary in power. Start with 1 minute, then check and add time in 10-second increments if needed.
  • Texture: For a gooier center, slightly undercook the cake by a few seconds.
  • Peanut Butter: Natural peanut butter may result in a slightly denser texture but works perfectly. Stir well before using to incorporate the oils.
close up image of 3 ingredient peanut butter mug cake with a spoon.

Why This Recipe Stands Out

This mug cake is:

It’s a perfect quick dessert or snack that’s as easy as it is delicious!

3 ingredient peanut butter mug cake with extra peanut butter on top.
5 from 1 vote

3-Ingredient Peanut Butter Mug Cake

This 3-ingredient peanut butter mug cake is the ultimate quick and easy dessert, ready in just 5 minutes! Made with simple pantry staples, it’s naturally gluten-free, dairy-free, and customizable with your favorite toppings – perfect for satisfying your sweet tooth anytime.
Print Pin Rate
Prep Time: 3 minutes
Cook Time: 1 minute
Total Time: 4 minutes
Servings: 1 serving

Equipment

  • 1 microwave-safe mug

Ingredients

  • 1 large egg
  • 3 tablespoons creamy peanut butter unsweetened
  • 1-2 tablespoons sugar depending on how sweet you'd like it

Instructions

  • Add all ingredients to a microwave-safe mug and mix together until fully combined and smooth.
    3-Ingredient-Peanut-Butter-Mug-Cake-Step-1
  • Microwave the mug cake for 1 minute, then remove from the microwave and let cool for at least a few minutes before eating (it will be VERY hot!).
    3-Ingredient-Peanut-Butter-Mug-Cake-Step-2

Nutrition

Serving: 1mug cake | Calories: 400kcal | Carbohydrates: 24g | Protein: 18g | Fat: 29g | Sugar: 16g

We brought our toddler apple picking last weekend and I currently swimming in apples over here! Just SO many apples. We of course made my healthy gluten-free apple crisp as soon as we got home. I’ve also been making caramelized apples to go over yogurt and oatmeal bowls (so good OMG!). But we still have more apples than we know what to do with! *Enter the apple pie smoothie.*

It’s true what they say… an apple a day keeps the doctor away! This smoothie starts with one whole apple, plain yogurt, and a scoop of protein powder for extra protein. The end results is a creamy and perfectly sweet high protein smoothie that tastes just like apple pie. It’s nutritious, deeply satisfying, and guaranteed to keep you full until your next meal!

apple pie smoothie in a glass with whipped cream.

Why You’ll Love This Recipe

This healthy apple pie protein smoothie is the perfect blend of flavors for a cozy, yet refreshing treat. It’s packed with protein, naturally sweetened, and full of fall flavors that make you feel like you’re enjoying a slice of apple pie. Plus, it’s gluten-free, dairy-free, and takes just a few minutes to whip up!

What You Need to Make This Healthy Apple Pie Smoothie

Apple: A fresh apple adds natural sweetness, fiber, and a classic apple pie flavor.

Plain Yogurt (Non-Dairy): This adds creaminess and a boost of protein while keeping the smoothie dairy-free. I recommend Cocojune organic plain unsweetened coconut yogurt, it’s perfectly thick and creamy! Though you can use regular yogurt if preferred.

Milk (Almond Milk): This helps to blend the smoothie and adds a touch of nuttiness from the almond milk. Any milk can work depending on your dietary needs.

Unflavored Protein Powder or Collagen Peptides: Boosts protein content to keep you full longer. Unflavored protein powder blends seamlessly with the apple pie flavors. I use and love the Garden of Live vegan protein powder in most of my protein smoothies!

Rolled Oats or Almond Butter: Adds creaminess and thickness to the smoothie. You can swap with almond butter for extra creaminess or keep it grain-free.

Cinnamon: The spice that gives this smoothie its signature apple pie flavor.

Honey or Maple Syrup (Optional): For a little extra sweetness if needed, especially if your apple isn’t very sweet.

apple pie smoothie with a straw.

Can I Prep This Apple Pie Smoothie Ahead of Time?

Yes! You can prep the ingredients the night before by chopping the apple and measuring out the other ingredients. Store them in the fridge, then blend them together in the morning. If you want to make the smoothie ahead of time, blend it and store it in an airtight jar in the fridge for up to 24 hours. Just give it a good shake before drinking!

Tips and Tricks For the Best Smoothie

  • For a thicker, creamier smoothie either use a frozen apple instead of a fresh one, or add half of a frozen banana to the blender along with all of the other ingredients.
  • Blend your smoothie for longer to ensure a smooth texture without any lumps.
  • Add ice cubes if you like your smoothie extra cold, or freeze the almond milk into cubes for added creaminess!

Adjust This Recipe to Your Dietary Needs

  • Make it Vegan: Use non-dairy yogurt and plant-based protein powder to make this smoothie 100% vegan.
  • Grain-Free: Skip the oats and use almond butter for added creaminess and healthy fats.
  • Make it Nut-Free: Substitute almond milk with oat milk, and use oats instead of almond butter. It’s that easy!
Apple pie protein smoothie in a glass with whipped cream and cinnamon on top.
5 from 1 vote

Apple Pie Protein Smoothie

This healthy apple pie protein smoothie is just what you need for a delicious, protein-packed, fall-inspired treat. It’s made with 7 simple ingredients, is gluten-free, dairy-free, high in protein, and can easily be adapted to fit any dietary needs!
Print Pin Rate
Prep Time: 5 minutes
Total Time: 5 minutes
Servings: 1 serving

Equipment

  • blender

Ingredients

  • 1 medium apple cored and cut
  • 1/2 cup plain yogurt (I used non-dairy coconut yogurt)
  • 1/4 cup milk (I used almond milk)
  • 1 scoop unflavored protein powder or collagen peptides
  • 1 tablespoon rolled oats or 1/2 tablespoon almond butter
  • 1/2 teaspoon cinnamon
  • 1/2 tablespoon honey or maple syrup optional

Instructions

  • Add all ingredients to a blender and blend until smooth, then enjoy immediately!

Nutrition

Serving: 1smoothie | Calories: 313kcal | Carbohydrates: 47g | Protein: 22.5g | Fat: 6g | Sugar: 28g

I’ve been itching to develop more high protein snack recipes. So when I set out to create these snack boxes, I knew just who to call! My friend Natalia (find her on Instagram as @nutritionbynarlie) is the protein QUEEN. She’s also the most knowledgable person I know when it comes to nutrition. She helped me build the most well-rounded, nutrient dense, and high protein snack boxes possible. Each of these boxes contain a whopping 25 grams of protein! And don’t worry, we personally taste-tested every single box, and can vouch for their deliciousness. I really think you’re going to LOVE these high protein snack boxes that we put together!

overhead image of all four high protein snack boxes, each containing 25 grams of protein.

I purchased these meal prep glass containers on Amazon, linked HERE!

Which High Protein Snack Box is Right For You?

Back to Basics: This classic combination is simple yet effective. Boiled eggs provide a substantial protein boost, while almonds and cheddar cheese add extra protein and healthy fats. The berries offer a refreshing burst of antioxidants and natural sweetness.

Greek: Inspired by Greek cuisine, this box features salami and feta cheese for a savory protein punch. Greek yogurt pairs perfectly with cucumber and dill for a refreshing snack, while pistachios and figs add a delightful mix of crunch and sweetness.

American: This American-themed box combines turkey, Swiss cheese, and a pickle for a flavorful and protein-packed roll-up. The kettle corn popcorn and peanuts bring a nostalgic Crackerjack vibe, while the orange slices add a citrusy zing!

Dairy-Free: For those avoiding dairy, this box offers a delicious mix of hummus with gluten-free crackers, salami, turkey, almonds, and apple slices. It’s a well-rounded option that doesn’t compromise on flavor or nutrition!

Tips and Tricks

  • Save time during the week by preparing your high-protein snacks in advance. Boil eggs, slice veggies, and portion out nuts and cheese on the weekend so you can easily assemble your snack boxes each morning.
  • Keep things interesting by rotating different protein sources and accompaniments. This prevents snack fatigue and ensures you’re getting a range of nutrients.
  • Use small containers or silicone muffin cups to portion out your snacks. This helps you keep track of serving sizes and prevents overeating.
hand holding up Greek themed high protein snack box

Additional High Protein Snack Ideas

Looking to switch things up? Here are some other high-protein snacks that can be swapped into your boxes:

Cottage Cheese: A ½ cup serving contains about 14 grams of protein.
Protein Bars: Choose bars with at least 10 grams of protein and minimal added sugars.
Jerky: Beef, turkey, or chicken jerky provides a portable protein punch, with about 10 grams of protein per ounce.
Edamame: One cup of edamame contains about 17 grams of protein, making it a fantastic plant-based option.
Tuna Packs: A single serving tuna pack can offer up to 20 grams of protein, perfect for a quick and easy addition.

overhead image of the dairy-free high protein snack box
5 from 1 vote

High Protein Snack Boxes (4 ways!)

These high-protein snack boxes are perfectly balanced with protein, healthy fats, and complex carbs, making them an ideal choice for anyone on the go. Each box contains a whopping 25 grams of protein, ensuring you stay fuller and more satisfied for longer. Whether you’re heading to work, school, or the gym, these snack boxes will keep you energized and ready to tackle whatever comes your way.
Print Pin Rate

Ingredients

Back to Basics Snack Box

  • 2 boiled eggs
  • 1 ounce almonds
  • 1 ounce cheddar cheese, cubed
  • small handful fresh berries

Greek Snack Box

  • 3 slices salami, or Loza
  • 1 ounce feta cheese, cubed
  • 3 ounces Greek yogurt
  • 1/4 cup sliced cucumber
  • 1 ounce shelled pistachios
  • 2 figs, sliced in half

American Snack Box

  • 1 pickle
  • 1 ounce sliced turkey
  • 1 slice Swiss cheese
  • 1 ounce kettle corn popcorn
  • 1 ounce shelled peanuts
  • 1/2 orange, sliced

Dairy-Free Snack Box

  • 3 ounces hummus
  • 6-8 gluten-free crackers
  • 3 slices salami
  • 1 ounce sliced turkey
  • 1 ounce almonds
  • 1/2 apple, sliced

Instructions

  • Choose which snack box you’d like to make and prepare all ingredients.
  • Then, place ingredients into snack containers.
  • Seal the containers and store in the fridge for up to 4 days.

Think snickers can’t be healthy?? Think again! I’ve pretty much made it my life’s work to take unhealthy treats and make them healthy. Like my healthy gluten-free mug cake, and my healthy cookie dough bars (another no-bake dessert in constant rotation around here!). These 4-ingredient healthy snickers fit seamlessly into my healthier treats lineup. My recent nighttime routine has included getting my baby to bed, popping 3 or 4 of these healthy snickers out of the freezer, and cozying up on the couch while I savor every last bite. My husband’s also obsessed, so I’ve been doubling this recipe to make sure there’s plenty to go around!

For this recipe, you’ll want to start with a silicone ice cube tray. I purchased these ones (they come in a 2-pack) and have loved them so far! They’re also great for making ice cubes too, as the silicone helps the cubes slide right out. From there, you’ll need just four simple ingredients – chocolate, coconut oil, dates, and peanut butter. All relatively healthy ingredients, but they come together to create a treat that tastes seriously indulgent, but won’t hurt your stomach… no matter how many you eat! *wink wink*

overhead image of a healthy snicker with flaky sea salt on top.

What You’ll Need To Make These Healthy Snickers

Chocolate Chips: Opt for dairy-free or dark chocolate chips for a healthier option. These provide the rich, chocolatey coating for your snickers bites.

Coconut Oil: Coconut oil helps melt the chocolate chips and creates a smooth, glossy texture for your healthy candy bars.

Medjool Dates: These naturally sweet and chewy dates serve as the caramel-like layer in your snickers, providing natural sweetness and a satisfying texture.

Crunchy Peanut Butter: Choose your favorite brand of crunchy peanut butter to add nutty flavor and crunch to your guilt-free treats!

overhead image of healthy snickers bars with flaky sea salt on top.

Tips and Tricks

  • If your dates are too firm, soak them in warm water for 10-15 minutes before using. This will help soften them and make them easier to work with.
  • Using a silicone ice cube tray makes it easier to remove the snickers bites once they’re frozen. If you don’t have one, you can line a regular ice cube tray with plastic wrap for easy removal.
  • To ensure even distribution of ingredients, use a layering technique when assembling your healthy snickers bites. Start with a layer of melted chocolate, followed by a date and a dollop of peanut butter, then top with another layer of melted chocolate.
overhead image of healthy snickers cut in half with peanut butter inside.
5 from 2 votes

4-Ingredient Healthy Snickers

This healthy snickers recipe is the perfect healthier treat to satisfy your sweet tooth! Made with just 4 wholesome ingredients; chocolate chips, coconut oil, medjool dates, and crunchy peanut butter. They taste just like a snickers, but with a fraction of the sugar!
Print Pin Rate
Prep Time: 5 minutes
Total Time: 5 minutes
Servings: 15 snickers

Ingredients

  • 1 cup chocolate chips
  • 1 tablespoon coconut oil
  • 8 medjool dates, pits removed and cut in half
  • 1/4 cup crunchy peanut butter

Instructions

  • Melt the chocolate chips and coconut oil together in a small bowl in the microwave.
    healthy-snickers-step-1
  • Take a silicone ice cube tray and fill 15 cavities of the tray with 1/2 tablespoon each of the melted chocolate.
    healthy-snickers-step-2
  • Place one pitted date half into each cavity on top of the chocolate.
    healthy-snickers-step-3
  • Then, add about ½ a tablespoon of crunchy peanut butter to each ice cube cavity, on top of each date.
    healthy-snickers-step-4
  • Pour the remaining melted chocolate into each ice cube cavity, covering the dates and peanut butter completely.
  • Place the ice cube tray in the freezer for about 20 minutes, or until the chocolate has completely hardened. Remove the tray from the freezer and pop out the healthy snickers. Store snickers in the fridge or freezer for up to 3 months!
    healthy-snickers-step-6

Notes

  • Here’s a link to the silicone ice cube trays I used to make my healthy snickers! They worked wonders and were super easy to clean.