Tag

vegan

Browsing

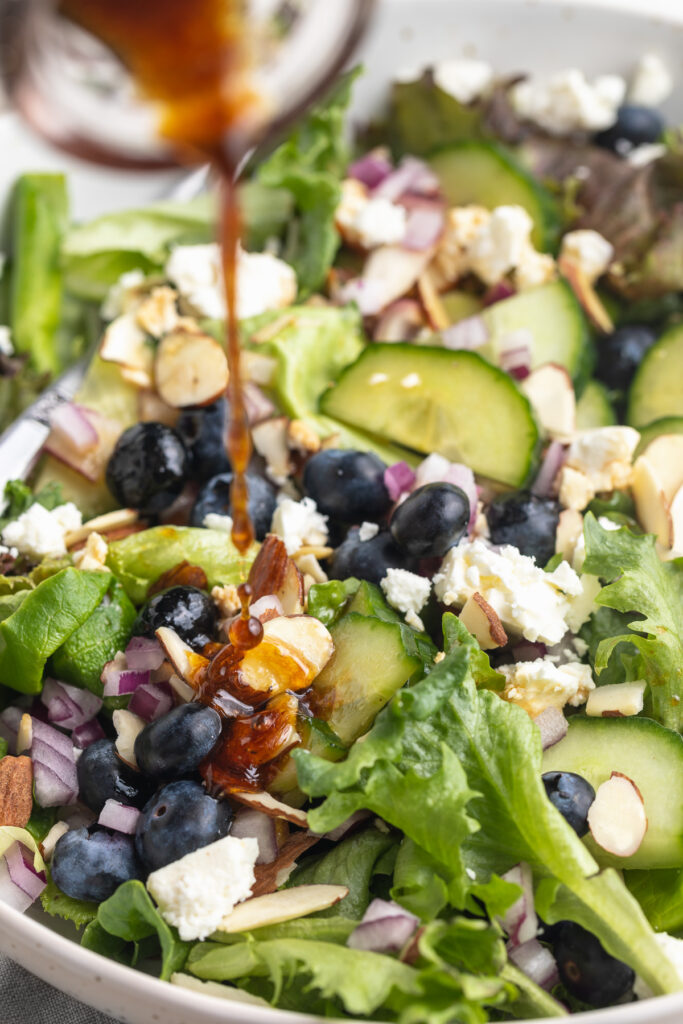
Fresh and seasonal spring mix salad with blueberries, almonds, feta cheese, and a simple honey vinaigrette! The perfect warm-weather lunch or side dish, loaded with healthy ingredients.

Overhead image of spring mix salad in a bowl with water on the side.

What You’ll Need To Make Spring Mix Salad

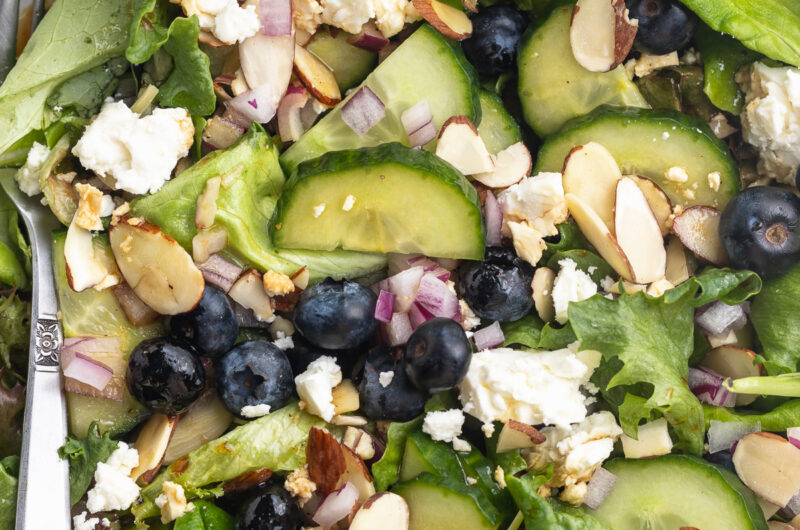
Spring Mix Lettuce – Spring mix is a simple assortment of dark leafy greens. Each brand makes theirs a little differently, but every batch of spring mix is flavorful and super healthy. If you can’t find any spring mix, you can certainly turn this into a spinach salad instead, with 5 ounces of fresh baby spinach.

Sliced Almonds – Every salad needs a little crunch! I love buttery, lightly toasted sliced almonds in my spring mix salad. However, if you don’t have any almonds, any chopped nut will go great in this recipe. Or for a nut-free version, add in some roasted sunflower seeds instead!

Feta Cheese – Some salty feta cheese takes this spring mix salad over the top! Add as much to your salad as your heart desires. Or, if you don’t have any feta, a nice soft goat cheese also tastes great here. And for a vegan or dairy-free option, simply leave the cheese out of the salad – still super tasty!

Honey – A touch of honey balances out the otherwise extremely savory vinaigrette. With plenty of balsamic vinegar, the vinaigrette needs a little sweetness to help mellow it out. And for a vegan version, replace the honey with two tablespoons of maple syrup.

Honey vinaigrette being poured over spring mix salad.

Tips and Tricks

  • Dress the salad right before serving! Avoid storing this salad already dressed, since the vinaigrette will cause the spring mix to wilt. So if prepping ahead of time, keep the honey vinaigrette on the side until ready to eat.
  • Have fun with this healthy salad recipe! This simple lunch or side dish is a great way to use up any fresh veggies or berries you might have on-hand. Strawberries taste delicious in place of the blueberries, and a yellow onion can be subbed in for the red onion.

Add Protein

For a heartier meal, add any of the following:

Spring Mix Salad with Blueberries, Almonds, Feta Cheese, and Honey Vinaigrette

5 from 1 vote
Recipe by Samantha Course: Sides, LunchDifficulty: Easy
Servings

6

side servings
Prep time

5

minutes
Cooking time

0

minutes
Total time

5

minutes

Fresh and seasonal spring mix salad with blueberries, almonds, feta, and a simple honey vinaigrette! The perfect warm-weather lunch or side dish, loaded with healthy ingredients.

Ingredients

  • 1 5-ounce package spring mix lettuce

  • 1 cup fresh blueberries

  • 1/2 English cucumber, chopped

  • 1/2 red onion, chopped

  • 1/2 cup sliced almonds

  • 1/4 cup feta cheese or goat cheese

  • For the honey vinaigrette:
  • 1/4 cup olive oil

  • 3 tablespoons balsamic vinegar

  • 2 tablespoons honey

  • 1/2 teaspoon salt

  • 1/2 teaspoon black pepper

Directions

  • Assemble all salad ingredients in a large bowl.
  • Make the dressing by adding all ingredients to a jar with a lid, secure the lid then shake until combined. Drizzle over spring mix salad and enjoy!

Recipe Video

Did you make this recipe?

Share it and tag @samdoesherbest on Instagram!

Like this recipe?

Follow us @samdoesherbest on Pinterest

The easiest Oreo mug cake, made with just 3 ingredients in 1 minute! This tiktok recipe went viral for a reason – because it’s so damn good. Whip up this fast and simple personal cake anytime you’re craving something sweet and delicious!

spoon scooping order mug cake out of a mug

What You’ll Need to Make Oreo Mug Cake

Oreos – I used gluten-free Oreos, but any Oreo will work! Have fun with this recipe, and use your favorite Oreo cookies. Double stuffed, golden, mint, etc. – all will taste delicious!

Milk – I used non-dairy milk, but just like the Oreos, any kind of milk will do!

Baking Powder – A little bit of baking powder gives this Oreo mug cake it’s cake-like texture. You can make the mug cake without it, but I wouldn’t recommend it. Just 1/4 teaspoon of this pantry-staple ingredient is all you’ll need.

overhead image of oreo mug cake with vanilla ice cream on top and milk on the side.

Tips and Tricks

  • Throw in any mix-ins you’d like! For a double chocolate mug cake, add in a tablespoon of mini chocolate chips. Or, if you’re feeling celebratory, a small handful of rainbow sprinkles are always a fun addition.
  • Top this Oreo mug cake with whatever you’d like. A scoop of ice cream, a dollop of whipped cream, or an extra crushed Oreo all taste incredible atop this personal cake!
  • Make sure you use a microwave-safe mug for this recipe! Not all mugs can be heated in the microwave. To check if your mug is safe to use, flip it over and check the bottom for the words “microwave safe.” If it doesn’t state that it’s microwave safe, it’s probably best to avoid using it in this recipe.
oreo mug cake with milk on the side.

Adjust This Recipe to Your Dietary Needs

Make it Vegan: For a vegan Oreo mug cake, simply use non-dairy milk in this recipe. Also, just so you know, all Oreos are actually completely vegan!

Make it Gluten-Free: Use gluten-free Oreos for a gluten-free mug cake!

3-Ingredient Oreo Mug Cake

4 from 4 votes
Recipe by Samantha Course: DessertDifficulty: Easy
Servings

1

serving
Prep time

1

minute
Cooking time

1

minute
Total time

2

minutes

The easiest Oreo mug cake, made with just 3 ingredients in 1 minute! This tiktok recipe went viral for a reason – because it’s so damn good. Whip up this fast and simple oreo mug cake anytime you’re craving something sweet and delicious!

Ingredients

  • 5 Oreos

  • 3 tablespoons milk

  • 1/4 teaspoon baking powder

Directions

  • In a large microwave-safe mug, mash together 4 of the Oreos and milk, until you achieve a cake batter-like texture.
  • Add in the baking powder and stir to combine.
  • Microwave on high for 1 minute, then break off large chunks from the extra Oreo and place those on top of your mug cake. Top with vanilla ice cream and/or whipped cream, then enjoy warm!

Recipe Video

Did you make this recipe?

Share it and tag @samdoesherbest on Instagram!

Like this recipe?

Follow us @samdoesherbest on Pinterest

These 3-ingredient gluten-free bagels are truly magic! No yeast, kneading, rising, or boiling in water required. Just three simple ingredients, and these bagels are ready to eat in 30 minutes!

gluten-free bagels on a baking sheet with cream cheese on the side.

I like to think I know a thing or two about bagels. Not only were they my favorite food growing up, but I currently live in Brooklyn – home of the BEST BAGELS in the WORLD! So ya, I’ve had some really good bagels. A bagel should be toasty on the outside, fluffy on the inside, easy to slice through, and ready for toasting – and these gluten-free bagels are just that.

Now I’m sure you’re wondering – Sam, why bother making your own bagels if you can just buy literally the world’s best bagels from that place down the street. Well, I’ll tell you exactly why – because I can’t find a single good gluten-free bagel! They’re near impossible to track down. And the ones I do find are either too dense or extremely overpriced (or both). So I quickly realized if I wanted a gluten-free bagel, I’d just have to make it myself. And that, friends, is how the magic 3-ingredient gluten-free bagel was born!

3 gluten-free bagels stacked on top of each other.

What You’ll Need to Make 3-Ingredient Gluten-Free Bagels

Gluten-Free All Purpose Flour – Your gluten-free flour must contain xanthan gum! If it doesn’t, add 1/2 teaspoon of xanthan gum to this recipe. Gluten-free all purpose flours I use and recommend are Bob’s Red Mill Gluten-Free Baking Flour and King Arthur Gluten-Free Flour, both of which contain xanthan gum. I used the King Arthur flour in these bagels and they turned out perfect!

Baking Powder – We replace the yeast found in traditional bagel recipes with baking powder. Baking powder makes it so we don’t have to wait for our bagel dough to rise before baking. Instead, we can simply shape, then bake these bagels right away – super easy!

Greek Yogurt – Any plain and unsweetened Greek yogurt will work in this gluten-free bagels recipe! I even used Kite Hill’s non-dairy Greek yogurt to make my bagels dairy-free.

gluten-free bagels on a plate with cream cheese on the side.

Adjust This Recipe to Your Dietary Needs

Make it Vegan: To make vegan and gluten-free bagels, use a vegan greek yogurt and leave off the egg wash.

gluten-free bagels on a baking sheet with cream cheese on the side.
4.03 from 77 votes

Magic 3-Ingredient Gluten-Free Bagels

These 3-ingredient gluten-free bagels are truly magic! No yeast, kneading, rising, or boiling in water required. Just three simple ingredients, and these bagels are ready to eat in 30 minutes!
Print Pin Rate
Prep Time: 10 minutes
Cook Time: 20 minutes
Total Time: 30 minutes
Servings: 6 bagels

Ingredients

  • 2 cups gluten-free all purpose flour, see Noted
  • 2 teaspoons baking powder
  • pinch of salt
  • 1-2 cups plain unsweetened Greek yogurt, dairy-free if necessary

For topping:

  • 1 large egg
  • 1 teaspoon water
  • pinch of salt
  • everything bagel seasoning, sesame seeds, poppy seeds, etc.

Instructions

  • Preheat oven to 400° Fahrenheit and line a baking sheet with parchment paper.
  • In a large bowl, whisk together the gluten-free all purpose flour, baking powder, and salt. Then, add in 1 cup of Greek yogurt and stir until a shaggy dough forms.
  • Using your hands, mix and form the dough into a smooth ball. If the dough seems too dry and won’t come together in a ball, add in more Greek yogurt – you may have to use an additional 1 cup of yogurt to reach the desired consistency.
  • Divide dough into 6 equal parts and shape each part into a ball. Use your thumbs to make a hole in the center of each ball, then gently pull to form a ring resembling a bagel.
  • Transfer bagels to the prepared baking sheet. Make the egg wash by whisking together the egg, water, and salt in a small bowl. Brush each bagel with egg wash and top with whatever toppings you’d like (or leave plain).
  • Bake bagels for 20-22 minutes, rotating baking sheet halfway through baking, until bagels are uniformly golden brown. Let cool slightly before slicing, topping, and eating.

Notes

  • Gluten-Free All Purpose Flour: Your gluten-free flour must contain xanthan gum, if it doesn’t add 1/2 teaspoon of xanthan gum to this recipe.
  • Gluten-free bagels will stay fresh in an airtight container in the fridge for up to 3 days. Or, you can freeze them for up to 3 months! Because of the yogurt, these do not keep well at room temperature.
  • Nutrition

    Calories: 300kcal

    The BEST of both worlds! Super easy and ultra delicious spinach artichoke hummus. One of my all-time favorite healthy snacks or appetizers!

    overhead image of spinach artichoke hummus with pita, cucumber, and white wine on the side.

    What You’ll Need to Make Spinach Artichoke Hummus

    Chickpeas – I used canned chickpeas, but feel free to soak and boil your own for this recipe. However, canned chickpeas makes things extra easy on you (which I highly recommend!).

    Tahini – Every good hummus recipe has tahini! Never heard of tahini? It’s just ground sesame seeds. It’s also super easy to find at most grocery stores, typically located in the ethnic food aisle. This is the tahini brand I use and love in this spinach artichoke hummus!

    Baby Spinach – Use fresh, not frozen spinach in this healthy snack recipe! Lucky for us, fresh spinach is loaded with good-for-you vitamins and minerals.

    Canned Artichoke Hearts – Either whole or quartered canned artichoke hearts will work. I used these Cento artichoke hearts, and they were delicious. Also, if you have any leftover artichoke hearts, they make a great addition to salads and charcuterie boards!

    pita being dipped into spinach artichoke hummus.

    Tips and Tricks

    • Once you add the spinach and artichokes, pulse the hummus only a few times. Too much pulsing will completely puree the spinach and artichokes. Instead, to achieve that finely chopped texture you get in a spinach artichoke dip, give your food processor just a few quick pulses.
    • Taste the hummus after the first step! This is the best time to adjust/add any seasonings you’d like. For an extra tangy hummus, add in a bit more lemon juice. Or, for a super garlicky hummus, add in another clove or two of garlic.
    • This spinach artichoke hummus dip will stay fresh in an airtight container in the fridge for up to 5 days. Enjoy it all week long with pita, pita chips, fresh veggies, or simply by the spoonful!
    overhead image of spinach artichoke hummus with pita on the side.

    This Recipe Is…

    Spinach Artichoke Hummus

    5 from 2 votes
    Recipe by Samantha Course: SnacksDifficulty: Easy
    Servings

    2

    cups
    Prep time

    5

    minutes
    Cooking time

    0

    minutes
    Total time

    5

    minutes

    The BEST of both worlds! Super easy and ultra delicious spinach artichoke hummus. One of my all-time favorite healthy snacks or appetizers!

    Ingredients

    • 1 (15 ounce) can chickpeas, drained and rinsed

    • 1/4 cup tahini

    • 1/4 cup olive oil

    • 2 tablespoons fresh lemon juice

    • 1 garlic clove, peeled

    • 1/2 teaspoon cumin

    • salt, to taste

    • 1 cup baby spinach

    • 1/2 cup canned artichoke hearts, drained

    Directions

    • Add chickpeas, tahini, olive oil, lemon juice, garlic, cumin, and salt to a food processor. Blend until completely smooth.
    • Add in baby spinach and artichoke heart, pule 5-6 times until spinach and artichokes are finely chopped, then serve.

    Recipe Video

    Did you make this recipe?

    Share it and tag @samdoesherbest on Instagram!

    Like this recipe?

    Follow us @samdoesherbest on Pinterest

    The easiest holiday treat of all time – Grinch fruit kabobs! Slide fruit onto skewers and you’ve got yourself a festive snack or dessert. Get the kids involved in this fun Christmas activity!

    grinch fruit kabobs on a plate with green grapes, strawberries, mini marshmallows, and skewers on the side.

    What You’ll Need to Make Grinch Fruit Kabobs

    Green Grapes – Green, not red grapes for this Grinch-themed treat!

    Banana – Slice your banana into 1/2-inch pieces before sliding onto your skewers.

    Strawberries – Hull your strawberries before using in this recipe! That basically just means remove the green leaves on top.

    Mini Marshmallows – The perfect little Santa hat topping!

    hand holding a grinch fruit kabob

    How to Store Them

    • Store these Grinch fruit kabobs in an airtight container in the fridge for one day. They may last longer than a day, but the banana will begin to oxidize and turn brown – not ideal! For best results, I recommend making them right before serving.
    close-up image of grinch fruit kabobs on a plate

    These Grinch Fruit Kabobs Are…

    Grinch Fruit Kabobs

    5 from 1 vote
    Recipe by Samantha Course: Snacks, DessertDifficulty: Easy
    Servings

    12

    servings
    Prep time

    5

    minutes
    Cooking time

    0

    minutes
    Total time

    5

    minutes

    The easiest holiday treat of all time – Grinch fruit kabobs! Slide fruit onto skewers and you’ve got yourself a festive snack or dessert. Get the kids involved in this fun holiday activity!

    Ingredients

    • Green grapes

    • Banana, sliced

    • Fresh strawberries, hulled

    • Mini marshmallows

    • Mini skewers or toothpicks

    Directions

    • Slide a grape onto a skewer, about 2-inches down from the top of the skewer.
    • Then, slide a banana slice on top of the grape, followed by a strawberry, followed by a mini marshmallow.
    • Continue this process with remaining ingredients.

    Recipe Video

    Did you make this recipe?

    Share it and tag @samdoesherbest on Instagram!

    Like this recipe?

    Follow us @samdoesherbest on Pinterest