Tag

coconut oil

Browsing

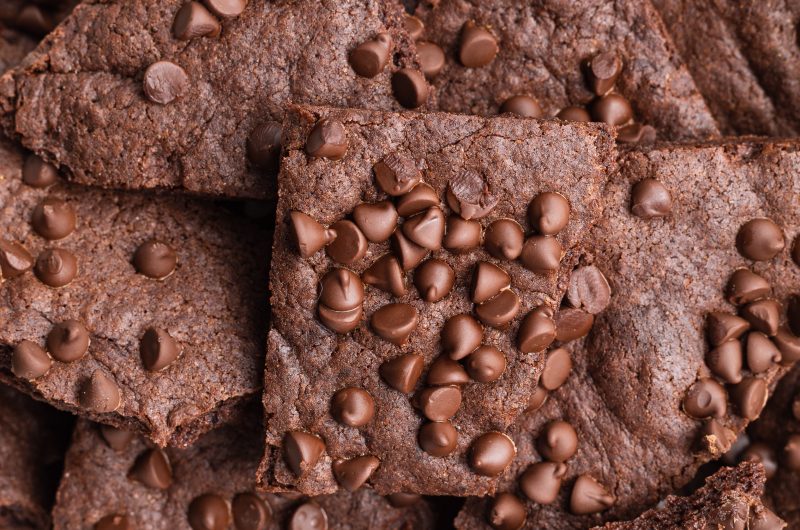
This gluten-free brownie brittle recipe is insanely crunchy and chocolatey! A fun twist on traditional brownies, you’ll quickly become addicted to this crispy treat. Surprisingly easy to make, pull this recipe out the next time you’re craving something sweet! Dairy-free & vegan option included!

One day, while I was elbow-deep in a bag of store-bought brownie brittle I thought, I can make this! And, better yet, I can make it gluten AND dairy-free. So that’s exactly what I did. I can’t lie though, during the recipe development phase I was worried that the whole baking process might be a bit too difficult. But to my surprise, it was SUPER easy! I even made this same brownie brittle recipe a few times, waiting for something to go wrong, but it never did. I got perfect brownie brittle every single time.

And just in case you’ve never had brownie brittle before – it tastes kinda like a chocolate-er, crunchier cocoa puff. Soft, fudgy brownies definitely have a special place in my heat …but so does this brownie brittle. It’s a totally different, exciting, and freaking delicious experience. I just love it, and I’m sure you will too!

What You Need To Make Gluten-Free Brownie Brittle

  • Sugar – If you know me by now, you know I use coconut sugar whenever possible. I made no exception for this brownie brittle recipe. Though you can use whatever kind of sugar you’d like!
  • Semisweet Chocolate Chips – I prefer Enjoy Life Semi-Sweet Mini chocolate chips for this recipe. They’re dairy-free, but taste JUST like regular chocolate chips. You can of course use whatever chocolate chips you’d like. You can even use one cup of a chopped semi-sweet chocolate bar.
  • Neutral Tasting Oil – I used melted coconut oil in my recipe, but vegetable, canola, avocado, or even olive oil will work. We’re simply looking for an oil that you won’t be able to taste in the brittle. So anything with a super mild flavor will do!
  • Egg Whites – Yup that’s right, get rid of those yolks! The egg yolks make things soft and sort of cake-like, which is what we’re trying to avoid in this brownie brittle recipe. So either chuck the yolks or save them for your morning scramble.
  • Gluten-Free Flour – I’ve been using Bob’s Red Mill 1:1 Baking Flour for a few months now and have nothing bad to say about it. It’s a solid gluten-free flour that never fails to get the job done. You can use any 1:1 gluten-free flour blend, just please make sure it contains xantham gum.

  • Espresso Powder or Instant Coffee Granules – Espresso powder will enhance the chocolate in this delicious brownie brittle recipe!

Adjust This Recipe To Your Dietary Needs

  • Make it Vegan: I haven’t tried it, but a vegan egg-substitute might work in this recipe. If you try it, please let me know how your brownie brittle turns out!

  • Add Gluten: You can use regular all-purpose flour in place of the gluten-free flour in this recipe.

Gluten-Free Brownie Brittle Recipe

4 from 3 votes
Recipe by Samantha Course: DessertCuisine: AmericanDifficulty: Easy
Servings

18

pieces
Prep time

5

minutes
Cooking time

30

minutes
Total time

35

minutes

This gluten-free and dairy-free brownie brittle is insanely crunchy and chocolatey! A fun twist on traditional brownies, you’ll quickly become addicted to this crispy treat. Surprisingly easy to make, pull this recipe out the next time you’re craving something sweet!

Ingredients

  • 1 Cup Sugar, see Notes

  • 1 Cup Semi-Sweet Chocolate Chips, divided

  • 1/4 Cup Neutral Tasting Oil, see Notes

  • 2 Egg Whites

  • 1/2 Teaspoon Vanilla Extract

  • 1 Cup + 2 Tablespoons Gluten-Free Flour

  • 3 Tablespoons Cocoa Powder

  • 1/4 Teaspoon Baking Soda

  • 1/2 Teaspoon Espresso Powder or Instant Coffee Granules

Directions

  • Preheat your oven to 350° Fahrenheit and line a large cookie sheet with parchment paper.
  • In a medium bowl, microwave 1/2 cup of chocolate and ¼ cup of oil in 30-second intervals until chocolate has completely melted. Then stir in the sugar. Brownie Brittle Process Photo 1
  • Add in the egg whites and vanilla extract, mix to combine. Then fold in the gluten-free flour, cocoa powder, baking soda, and espresso powder. Brownie Brittle Process Photo 2
  • Transfer batter to prepared baking sheet and spread into a thin layer (about 1/8-inch thick). Sprinkle with remaining chocolate chips and bake for 15 minutes. Brownie Brittle Process Photo 3
  • Remove from oven, slice into brownie brittle pieces, then bake for an additional 15 minutes. Brownie Brittle Process Photo 4
  • Remove from the oven, transfer to a wire cooling rack and let cool completely. Break apart into pieces and enjoy.Brownie Brittle Process Photo 5

Recipe Video

Notes

  • Sugar: I used coconut sugar, but you can use either regular white sugar or can sugar if you’d like.
  • Neutral Tasting Oil: Refined coconut oil, vegetable oil, canola oil, or olive oil will all work!

Did you make this recipe?

Share it and tag @samdoesherbest on Instagram!

Like this recipe?

Follow us @samdoesherbest on Pinterest

More Gluten-Free and Dairy-Free Desserts

These gluten-free pumpkin pancakes taste like Fall thanks to its warm pumpkin spices. They’re easy to make, fluffy, and perfect for a quick morning breakfast. Drizzle with maple syrup or use some of my suggested toppings for even tastier pumpkin pancakes!

Gluten-Free Pumpkin Pancakes

Pancakes are seriously one of my fav breakfast foods, and since Fall season is underway, I felt like it was appropriate to share my gluten-free pumpkin pancake recipe with you all! They are fluffy, sweet, warm, and especially delicious with maple syrup drizzled on top. What’s not to love?!

MAIN INGREDIENTS NEEDED TO MAKE Pumpkin Pancakes

  • Oat Flour or Gluten-Free Flour: The choice is yours, but I like to use Bob’s Red Mill Gluten-Free 1:1 Baking Flour. If you do not have a gluten sensitivity, you can use regular flour.

  • Brown or Coconut Sugar: Just a bit of brown sugar provides the perfect level of sweetness to the pancakes! You can also use coconut sugar for an even healthier option.

  • Baking Powder & Baking Soda: The baking powder is what helps to make these pancakes super fluffy! 

  • Pumpkin Spice: If you do not have pumpkin spice you can try making your own pumpkin spice by blending nutmeg, allspice, cinnamon, and ginger. 

  • Pumpkin Puree

  • Milk: I use almond milk, but you can use whichever non-dairy or dairy milk you prefer.

  • Egg

  • Coconut Oil

  • Lemon Juice

  • Cinnamon

  • Salt

What Toppings Go Best With These Gluten-Free Pumpkin Pancakes?

  • Maple Syrup (you could add chopped bacon bits to this, too)

  • Chocolate Chips

  • Coconut Whipped Cream

  • Nutella

  • Cinnamon-Spiced Apples

Gluten-Free Pumpkin Pancakes (Dairy-Free Option)

5 from 1 vote
Recipe by Samantha Course: BreakfastCuisine: AmericanDifficulty: Easy
Servings

4

servings
Prep time

10

minutes
Cooking time

5

minutes
Total time

15

minutes

These gluten-free pumpkin pancakes taste like Fall thanks to its warm pumpkin spices. They’re easy to make, fluffy, and perfect for a quick morning breakfast. Drizzle with maple syrup or use some of my suggested toppings for even tastier pumpkin pancakes!

Ingredients

  • 1/2 Cup Pumpkin Puree

  • 1 Cup Almond Milk (or regular)

  • 1 Whole Egg

  • 2 Tablespoons Coconut Oil (melted)

  • 1 Tablespoon Lemon Juice

  • 1 Cup Oat Flour or Gluten-Free All-Purpose Flour

  • 3 Tablespoons Coconut Sugar or Brown Sugar

  • 1 Teaspoon Baking Powder

  • 1 Teaspoon Pumpkin Pie Spice

  • 1/2 Teaspoon Baking Soda

  • 1/2 Teaspoon Cinnamon

  • 1/4 Teaspoon Salt

Directions

  • Whisk together the pumpkin puree, milk, egg, coconut oil, and lemon juice in a large bowl.
  • In a separate bowl, mix together the flour, sugar, pumpkin pie spice, baking powder, baking soda, cinnamon, and salt.
  • Add the flour mixture into the pumpkin mixture and stir until fully combined.
  • Heat griddle or skillet with a drop of coconut oil. 
  • Pour ¼ cup batter into skillet and cook until puffy and bubbling around the edges, around 2 minutes. Flip pancake and cook for another 30 seconds or until cooked through.
  • Continue cooking process with remaining batter, keep cooked pancakes warm in the oven then serve immediately.

Recipe Video

Notes

  • Storage: Store any leftover pancakes in an airtight container. You can store them in the fridge for up to 3 days, or in the freezer for up to 3 months. 

Did you make this recipe?

Share it and tag @samdoesherbest on Instagram!

Like this recipe?

Follow us @samdoesherbest on Pinterest

More Breakfast Recipes

This vegan butternut squash curry is the perfect weeknight dinner for the winter. Simmered with fragrant spices, red curry paste and coconut milk, it’s filling, flavorful, and can be cooked in under 20 minutes!

Vegan Butternut Squash Curry

Butternut squash is one of my favorite winter produces because you can use it in soo many ways! You can use it to make soups, salads, and fried rice. It’s also easy to work with. All you need to do is trim the ends of the squash and peel off the skin. If you are roasting them whole, (like my honeynut squash recipe) you don’t even need to peel the skin. For this butternut squash curry recipe, you’re going to need to dice the squash into cubes. You can check out my post on how to cut butternut squash if you need to learn how to do it safely and efficiently!

Main Ingredients Needed to Make Vegan Butternut Squash Curry

  • Butternut squash – You’ll need to get 1 small squash and dice it up

  • Coconut or olive oil

  • Chopped onion

  • Grated ginger

  • Red curry paste

  • Coconut milk

  • Spinach – optional, but works great with this dish

  • Tamari or soy sauce

  • Lime juice

  • Basmati rice, chopped cashews, fresh cilantro & lime wedges for serving

TIPS FOR MAKING THIS Butternut Squash Curry RECIPE

  • Add chickpeas or tofu to this dish for extra protein.

  • I used basmati rice for serving, but you can also serve it with white jasmine rice, quinoa, or millet.

  • I recommend using spinach in this recipe, but it’s totally optional. If you want to sub it with something else, you can use collard greens.

Vegan Butternut Squash Curry

5 from 1 vote
Recipe by Samantha Course: Main
Servings

4

servings
Prep time

15

minutes
Cooking time

15

minutes
Total time

30

minutes

This vegan butternut squash curry is the perfect weeknight dinner for the winter. Simmered with fragrant spices, red curry paste and coconut milk, it’s filling, flavorful, and can be made in under 20 minutes!

Ingredients

  • 3 Cups Butternut Squash (diced)

  • 1 Tablespoon Coconut Oil or Olive Oil

  • 1 Small Onion (chopped)

  • 1 Tablespoon Ginger (grated)

  • 2 Whole Garlic Cloves (grated)

  • 1 Pinch Salt

  • 2 Tablespoons Red Curry Paste

  • 1 14-ounce Full-Fat Coconut Milk

  • 1/2 Cup Water

  • 1 Teaspoon Sugar

  • 1 Handful Fresh Spinach (optional)

  • 1 Tablespoon Tamari or Soy Sauce

  • 2 Teaspoons Lime Juice

  • For serving:
  • Basmati Rice

  • Chopped Cashews or Peanuts

  • Fresh Cilantro

  • Lime Wedges

Directions

  • Heat coconut oil in a large skillet over medium heat then add in the onion and cook until golden brown, about 5 minutes.
  • Add in the grated ginger, garlic, butternut squash, and a big pinch of salt. Sauté for 2-3 minutes or until fragrant
  • Add in the red curry paste, coconut milk, water, and sugar. Reduce heat to a simmer, cover with lid and cook until butternut squash is fork tender, about 12-15 minutes.
  • Remove skillet from heat before stirring in the spinach, tamari, and lime juice. Give the curry a taste and adjust any seasoning as desired. Serve over rice with chopped nuts and fresh cilantro.

Recipe Video

Did you make this recipe?

Share it and tag @samdoesherbest on Instagram!

Like this recipe?

Follow us @samdoesherbest on Pinterest

More Squash-Based Recipes

Forget those box mixes! You can make these wholesome muffins from scratch with just basic grocery store ingredients. These gluten-free blueberry muffins are bursting with fresh blueberries and are deliciously soft on the inside. With only 11 ingredients and two bowls needed, this gluten-free blueberry muffin recipe is simple to follow with dairy-free and grain-free options.

Blueberry muffins are a classic recipe, and while this version is gluten-free, grain-free and dairy-free, you won’t be disappointed! Super easy and quick to make, they taste just like they came from your favorite bakery!

WHAT YOU NEED TO MAKE GLUTEN-FREE BLUEBERRY MUFFINS

Blueberries – Whether fresh or frozen, the ultimate staple to this recipe is, of course, blueberries!

Almond Flour – This gluten and grain-free flour is a staple in my kitchen. Almond flour has a very mild taste and gives these blueberry muffins their irresistibly soft texture!

Non-Dairy Milk – Although I used almond milk for this recipe, feel free to use other dairy-free products like oatmilk.

Honey or Maple Syrup – Naturally sweeten these blueberry muffins with honey or maple syrup to add a subtle but delicious flavor. It’s also much healthier than any refined sugar!

ADJUST THIS GLUTEN-FREE BLUEBERRY MUFFIN RECIPE TO YOUR DIET

  • Vegan: Use 3 flax eggs. They won’t be as big and fluffy, but will still taste delicious!

TIPS FOR MAKING GLUTEN-FREE BLUEBERRY MUFFINS

  • If you can’t find fresh blueberries, go ahead and use frozen.  

  • Use cupcake liners to keep the muffins from sticking to the pan.

  • To keep your muffins from getting “soggy bottoms,” allow the muffins to cool in the pan for a few minutes before placing on a cooling rack.

Gluten-Free Blueberry Muffins (Dairy-Free, Grain-Free)

0 from 0 votes
Recipe by Samantha Course: Breakfast, Dessert, SnacksCuisine: AmericanDifficulty: Easy
Servings

2

servings
Prep time

5

minutes
Cooking time

25

minutes
Total time

30

minutes

Forget those box mixes! You can make these wholesome muffins from scratch with just basic grocery store ingredients. These gluten-free blueberry muffins are bursting with fresh blueberries and are deliciously soft on the inside. With only 11 ingredients and two bowls needed, this gluten-free blueberry muffin recipe is simple to follow with dairy-free and grain-free options.

Ingredients

  • 1 ½ Cups Almond Flour

  • ½ Cup Tapioca Starch (corn or arrowroot starch might work, I haven’t tested it myself yet)

  • 1 Teaspoon Baking Powder

  • ¼ Teaspoon Salt

  • 3 Eggs 

  • ¼ Cup Coconut Oil, melted

  • ¼ Cup Honey or Maple Syrup

  • ¼ Cup Non-Dairy Milk

  • 1 Tablespoon Apple Cider Vinegar

  • 1 Teaspoon Vanilla Extract

  • 1 Cup Fresh Blueberries

Directions

  • Preheat the oven to 350F & grease or line a muffin pan.
  • Combine your dry ingredients – almond flour, tapioca starch, baking powder, & salt in a large bowl.
  • Add in your wet ingredients – eggs, coconut oil, honey or maple syrup, almond milk, vinegar, & vanilla extract and mix everything really well.
  • Fold in your fresh blueberries to your muffin batter until they’re incorporated.
  • Scoop out ¼-1/3 cup of batter into each muffin tin & bake for 20-25 minutes. These store best in the fridge – just pop in the toaster oven for a few minutes before enjoying.

Recipe Video

Notes

  • Use cupcake liners to keep the muffins from sticking to the pan.
  • Frozen blueberries are a bit more likely to tint the muffins as you mix them in, but the result won’t taste any less delicious!
  • To store, wait until the muffins get to room temperature before placing them in an airtight container in the freezer. 

Did you make this recipe?

Share it and tag @samdoesherbest on Instagram!

Like this recipe?

Follow us @samdoesherbest on Pinterest

OTHER HEALTHY BREAKFAST/DESSERT RECIPES

This healthy cookie dough is perfectly sweet and loaded with chocolate chips! With just 5 ingredients and in just 5 minutes, you’ll have a totally edible and good-for-you cookie dough. Sprinkle some of this healthy cookie dough over your favorite vegan ice cream for a healthier no-bake treat!

scoops of healthy cookie dough on a baking sheet

I’m sure we’ve all eaten raw cookie dough. I may or may not have purchased cookie dough in the past for the sole purpose of eating it raw. I know, don’t judge me! While I never thought twice about shoving spoonfuls of cookie dough in my mouth before it even had a chance to make it to the oven, there was always that little thought in the back of my mind like – this is SO not good for me. If anyone out there is like me and actually prefers raw cookie dough to the baked kind, then this recipe is for you!

This isn’t just any edible cookie dough recipe, it’s HEALTHY edible cookie dough. So healthy, in fact, that you could even enjoy it as an afternoon snack if you’d like! Protein-rich almond flour, a dash of natural maple syrup, and healthy fat-packed coconut oil make this edible cookie dough the most nutritious of its kind. I personally love whipping together a small batch of this stuff at around 3pm on a Tuesday when I am in dire need of a pick-me-up. This healthy cookie dough tastes indulgent without leaving you feeling like you overindulged. Trust me when I tell you this, you NEED this better-for-you sweet treat in your life. And lucky for you, with just five ingredients and five minutes you can have this healthy cookie dough in your life!

What You Need To Make Healthy Cookie Dough

Almond Flour – Almond flour is becoming easier and easier to find at the grocery store these days. I love almond flour for most of my gluten-free baked goods and treats. It also does a darn good job as the base in this recipe. If you don’t already have a bag of almond flour on hand, I highly recommend you go pick one up. And when you do, make sure this vegan and gluten-free cookie dough recipe is the first thing you make with it. Though be sure to purchase almond flour, and not almond meal. Almond meal is not as fine as the flour and will result in a grainier dough.

Coconut Oil – Coconut oil, like almond flour, is becoming increasingly easy to find at most major grocery stores. If you’re not a fan of that coconut flavor, try to use an ultra-refined coconut oil in this recipe. The refining process strips the oil of most, if not all of its flavor. If you don’t have coconut oil, you can easily use melted vegan butter or regular butter instead!

Vegan Chocolate Chips – I use and LOVE the Enjoy Life Mini Chocolate Chips for this recipe. Enjoy Life’s chocolate is entirely dairy, nut, and soy-free. Making it the ultimate addition to this healthier recipe. However, feel free to use your favorite vegan chocolate chips in this recipe. You can even chop up a vegan chocolate bar into chunks and add that to your healthy cookie dough!

Adjust This Recipe To Your Diet

  • Add Dairy: Use regular melted butter instead of coconut oil if you’re not vegan or dairy-free.
  • Make it Sugar-Free: Substitute the maple syrup for your favorite sugar-free syrup, or leave it out altogether. Also, be sure to use sugar-free or stevia-sweetened chocolate chips instead!

Healthy Cookie Dough (Vegan, Gluten-Free)

4 from 23 votes
Recipe by Samantha Russo Course: DessertCuisine: AmericanDifficulty: Easy
Servings

2

servings
Prep time

5

minutes
Cooking time

0

minutes
Total time

5

minutes

This healthy cookie dough is perfectly sweet and loaded with chocolate chips! With just 5 ingredients and in just 5 minutes, you’ll have a totally edible and good-for-you cookie dough. Sprinkle some of this healthy cookie dough over your favorite vegan ice cream for a healthier no-bake treat!

Ingredients

  • 1 1/4 cups almond flour

  • 3 tablespoons maple syrup

  • 3 tablespoons coconut oil or vegan butter, melted

  • 1 teaspoon vanilla extract

  • Pinch of salt

  • 1/4 cup vegan chocolate chips, see Notes

Directions

  • Stir together all ingredients except chocolate chips, until combined.
  • Fold in the chocolate chips and serve.

Recipe Video

Notes

  • I used mini vegan chocolate chips in this recipe, though you can use any kind of chocolate chips or chunks you’d like!

Did you make this recipe?

Share it and tag @samdoesherbest on Instagram!

Like this recipe?

Follow us @samdoesherbest on Pinterest

Other Healthier Dessert Recips