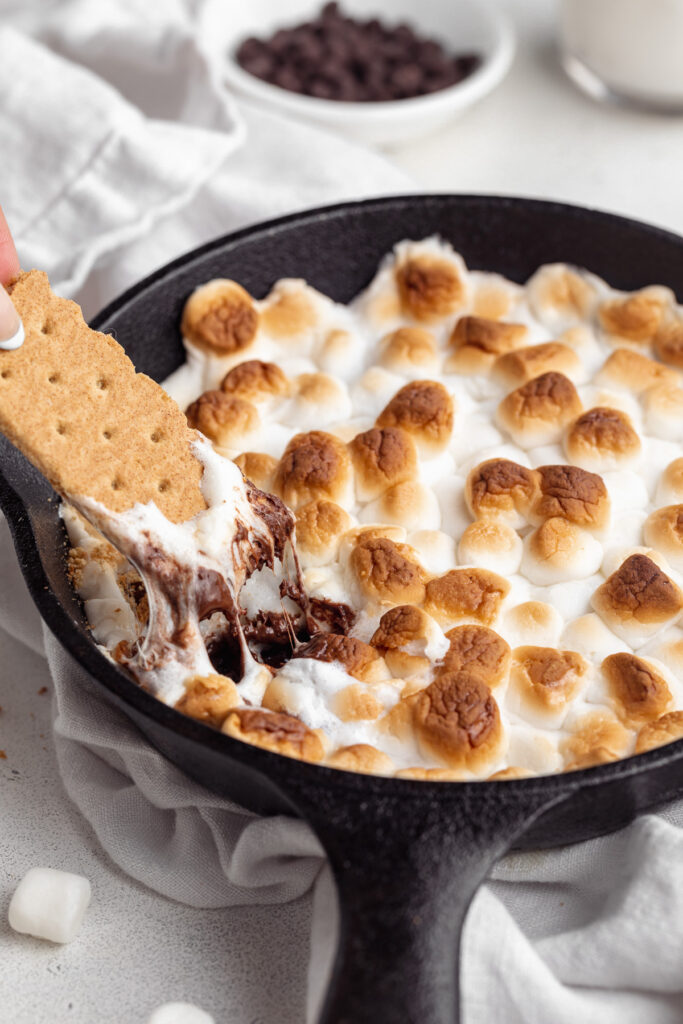
Tag

dairy-free

Browsing

Soft and perfectly sweet carrot cake cookies with a cream cheese icing! Gluten-free, dairy-free, and naturally sweetened with maple syrup. These healthy carrot cake cookies are the perfect springtime (or anytime) treat!

Healthy gluten-free carrot cake cookies on a baking sheet.

What You’ll Need to Make Carrot Cake Cookies

Oat Flour – Either homemade or store-bought oat flour will work in this cookie recipe! Oat flour replaces all purpose flour, making these cookies gluten-free.

Almond Butter – Smooth and unsweetened almond butter helps hold these cookies together. If you don’t have almond butter, you can use any other nut or seed butter you’d like. Cashew butter would make a great substitute here!

Maple Syrup – These healthy carrot cake cookies are naturally sweetened with maple syrup. The maple adds a touch of flavor, and the perfect amount of sweetness.

Shredded Carrots – Wash and peel about three large carrots, then run them down a box grater to make shredded carrots. Or, to make things even easier, simply buy pre-shredded carrots from the store for this dessert recipe!

Overhead image of healthy gluten-free carrot cake cookies on a baking sheet.

Tips and Tricks

  • Gently flatten each carrot cake cookie before baking. If you skip this step, they’ll bake up like round little balls. Therefore, for a more classic flat-looking cookie, give them a gentle press right before putting in the oven.
  • Allow your cookies to cool completely before icing! If the cookies are still too warm when iced, the cream cheese icing will melt and slide right off. (I’ve learned from my mistakes here – ha!)
  • These cookies are best stored in an airtight container at room temperature for up to 3 days. However, if you live in a warm client/are baking these in the summer – it’s best to store them in the fridge instead. If the cookies with cream cheese icing are left in too warm of an environment, the icing may melt and spoil.
close up image of a healthy gluten-free carrot cake cookie with a bite taken out.

Adjust This Recipe to Your Dietary Needs

Make it Dairy-Free: While the cookies themselves are already dairy-free, make a dairy-free cream cheese icing by subbing your favorite non-dairy cream cheese, butter, and milk.

Make it Vegan: For vegan carrot cake cookies, replace the egg with a flax egg, and take the dairy-free icing option above!

Close-up overhead image of carrot cake cookies on a baking sheet.
5 from 3 votes

Carrot Cake Cookies

Soft and perfectly sweet carrot cake cookies with a cream cheese icing! Gluten-free, dairy-free, and naturally sweetened with maple syrup. These healthy carrot cake cookies are the perfect springtime (or anytime) treat!
Print Pin Rate
Prep Time: 15 minutes
Cook Time: 12 minutes
Total Time: 27 minutes
Servings: 24 cookies

Equipment

  • 1 large bowl
  • 1 medium bowl
  • 1 large baking sheet

Ingredients

For the dry ingredients:

  • 1 cup rolled oats
  • 1 cup oat flour made by pulsing rolled oats in a blender until ground into a flour
  • 1/2 cup almond flour
  • 1 teaspoon baking soda
  • 1 1/2 teaspoons cinnamon
  • 1/4 teaspoon nutmeg
  • 1/4 teaspoon salt

For the wet ingredients:

  • 1/2 cup almond butter unsweetened
  • 1/2 cup maple syrup
  • 1/4 cup coconut oil melted (or butter)
  • 1 teaspoon vanilla extract
  • 1 egg at room temperature
  • 1 cup shredded carrots
  • 1/4 cup chopped walnuts or pecans unsalted
  • 1/4 cup raisins

For the cream cheese icing:

  • 1/4 cup cream cheese softened (I used non-dairy cream cheese)
  • 3 tablespoons butter softened (I used non-dairy butter)
  • 1 1/2 cups powdered sugar
  • 2-3 tablespoons milk (I used non-dairy milk)
  • 1/4 teaspoon vanilla extract

Instructions

  • Preheat oven to 350° Fahrenheit and line a baking sheet with parchment paper.
  • Add all dry ingredients to a large bowl and whisk to combine.
  • Then, in a separate bowl, add all the wet ingredients except the carrots, walnuts, and raisins, and whisk to combine.
  • Pour the wet ingredients into the dry ingredients and use mix until fully combined. Then, fold in the carrots, walnuts, and raisins.
  • Scoop tablespoon-sized balls of cookie dough onto your prepared baking sheet and slightly flatten each ball with the palm of your hand.
  • Bake for 10-12 minutes, or until golden brown around the edges. Then, transfer to a wire cooling rack to cool completely.
  • While cookies cool, make the cream cheese icing by adding all ingredients to a bowl and whisking until smooth and well-combined. Then, spread or pipe cream cheese icing on top of each cooled cookie.

Notes

Nutrition info is for one cookie out of 24 cookies and does not include the cream cheese icing.
  • These cookies are best stored in an airtight container at room temperature for up to 3 days. However, if you live in a warm client/are baking these in the summer – it’s best to store them in the fridge instead.

Nutrition

Serving: 1serving | Calories: 119kcal | Carbohydrates: 12g | Protein: 3g | Fat: 6g | Sugar: 5g

Fresh and seasonal spring mix salad with blueberries, almonds, feta cheese, and a simple honey vinaigrette! The perfect warm-weather lunch or side dish, loaded with healthy ingredients.

Overhead image of spring mix salad in a bowl with water on the side.

What You’ll Need To Make Spring Mix Salad

Spring Mix Lettuce – Spring mix is a simple assortment of dark leafy greens. Each brand makes theirs a little differently, but every batch of spring mix is flavorful and super healthy. If you can’t find any spring mix, you can certainly turn this into a spinach salad instead, with 5 ounces of fresh baby spinach.

Sliced Almonds – Every salad needs a little crunch! I love buttery, lightly toasted sliced almonds in my spring mix salad. However, if you don’t have any almonds, any chopped nut will go great in this recipe. Or for a nut-free version, add in some roasted sunflower seeds instead!

Feta Cheese – Some salty feta cheese takes this spring mix salad over the top! Add as much to your salad as your heart desires. Or, if you don’t have any feta, a nice soft goat cheese also tastes great here. And for a vegan or dairy-free option, simply leave the cheese out of the salad – still super tasty!

Honey – A touch of honey balances out the otherwise extremely savory vinaigrette. With plenty of balsamic vinegar, the vinaigrette needs a little sweetness to help mellow it out. And for a vegan version, replace the honey with two tablespoons of maple syrup.

Honey vinaigrette being poured over spring mix salad.

Tips and Tricks

  • Dress the salad right before serving! Avoid storing this salad already dressed, since the vinaigrette will cause the spring mix to wilt. So if prepping ahead of time, keep the honey vinaigrette on the side until ready to eat.
  • Have fun with this healthy salad recipe! This simple lunch or side dish is a great way to use up any fresh veggies or berries you might have on-hand. Strawberries taste delicious in place of the blueberries, and a yellow onion can be subbed in for the red onion.

Add Protein

For a heartier meal, add any of the following:

Close-up overhead image of spring mix salad in a bowl.
5 from 1 vote

Spring Mix Salad with Blueberries, Almonds, Feta Cheese, and Honey Vinaigrette

Fresh and seasonal spring mix salad with blueberries, almonds, feta, and a simple honey vinaigrette! The perfect warm-weather lunch or side dish, loaded with healthy ingredients.
Print Pin Rate
Prep Time: 5 minutes
Total Time: 5 minutes
Servings: 6 side servings

Ingredients

  • 1 5-ounce package spring mix lettuce
  • 1 cup fresh blueberries
  • 1/2 English cucumber, chopped
  • 1/2 red onion, chopped
  • 1/2 cup sliced almonds
  • 1/4 cup feta cheese or goat cheese

For the honey vinaigrette:

  • 1/4 cup olive oil
  • 3 tablespoons balsamic vinegar
  • 2 tablespoons honey
  • 1/2 teaspoon salt
  • 1/2 teaspoon black pepper

Instructions

  • Assemble all salad ingredients in a large bowl.
  • Make the dressing by adding all ingredients to a jar with a lid, secure the lid then shake until combined. Drizzle over spring mix salad and enjoy!

Nutrition

Calories: 300kcal

Perfect carrot cake muffins, made healthy! Gluten-free, dairy-free, and refined sugar-free, yet oh-SO delicious. These healthy carrot cake muffins come together in just one bowl, in about 30 minutes!

What You’ll Need to Make Healthy Carrot Cake Muffins

Oat Flour – You can either buy pre-ground oat flour, or simply grind oats into a flour yourself. I always make my oat flour myself because it’s cheaper, and super easy. To do this, place rolled oats into a blender and blend until a flour forms, and no large oats pieces remain.

Apple Sauce – If you don’t have any apple sauce, feel free to use 1/2 cup of mashed banana instead! Though if you do use apple sauce, please make sure it’s unflavored and unsweetened for this recipe.

Maple Syrup – These refined sugar-free carrot cake muffins are naturally sweetened with maple syrup. I love the flavor of maple syrup in these muffins, you won’t even miss the sugar. However, if you don’t have any maple syrup, you can use an equal amount of honey instead!

healthy carrot cake muffins with cream cheese icing on top and milk on the side.

Tips and Tricks

  • Avoid over-mixing the muffin batter! If you mix too much, your muffins will turn out tough, instead of soft and tender. Therefore, mix all ingredients until just combined, then stop.
  • Let these healthy carrot cake muffins cool completely before icing. I know it’s tempting to ice and eat these delicious little muffins right away. But if they’re too hot when iced, the icing will melt and slide right off. So practice some self-control, and leave them to cool for at least 20 minutes first!
  • These muffins are best stored at room temperature, in an airtight container, for up to three days. However, if you live in a warm climate (or are baking these in the summer), you may want to consider storing them in the fridge. If stored in a very warm place, the cream cheese icing may spoil.

Adjust This Recipe to Your Dietary Needs

Make it Vegan: While I haven’t tested this option myself just yet, you should be able to make these vegan carrot cake muffins by substituting the eggs for flax eggs! Or, use this Bob’s Red Mill Egg Replacer in place of the eggs in this recipe.

healthy carrot cake muffins with cream cheese icing on top, stacked on top of each other.
5 from 2 votes

Healthy Carrot Cake Muffins with Cream Cheese Icing

Perfect carrot cake muffins, made healthy! Gluten-free, dairy-free, and refined sugar-free, yet oh-SO delicious. These healthy carrot cake muffins come together in just one bowl, in about 30 minutes!
Print Pin Rate
Prep Time: 10 minutes
Cook Time: 20 minutes
Total Time: 30 minutes
Servings: 12 muffins

Ingredients

  • 2 eggs
  • 1/2 cup apple sauce, unsweetened
  • 1/2 cup maple syrup
  • 1/4 cup milk, I used non-dairy milk
  • 1 teaspoon vanilla extract
  • 2 cups oat flour
  • 1 teaspoon cinnamon
  • 1 teaspoon baking powder
  • 1/2 teaspoon baking soda
  • 1/4 teaspoon nutmeg
  • 1/4 teaspoon salt
  • 1 cup shredded carrots
  • 1/4 cup chopped walnuts or pecans
  • 1/4 cup raisins

For the cream cheese icing:

  • 1/4 cup softened cream cheese, I used non-dairy cream cheese
  • 3 tablespoons softened butter, I used non-dairy butter
  • 2 cups powdered sugar
  • 2-3 tablespoons milk, I used non-dairy milk
  • 1/4 teaspoon vanilla extract

Instructions

  • Preheat oven to 350° Fahrenheit and line a muffin tin with muffin liners.
  • In a large bowl, mix together the eggs, apple sauce, maple syrup, milk, and vanilla extract.
  • Add in the oat flour, cinnamon, baking powder, baking soda, nutmeg, and salt. Mix until everything is just combined.
  • Then, fold in the shredded carrots, chopped walnuts, and raisins until evenly distributed throughout the batter.
  • Bake muffins for 20-25 minutes, or until a toothpick inserted down the center of one muffin comes out clean. Remove muffins from oven and transfer to a wire cooling rack to cool completely.
  • While muffins cool, make the cream cheese icing by adding all ingredients to a bowl and whisking until smooth and well-combined. Then, spread or pipe cream cheese icing on top of each cooled muffin.

Nutrition

Calories: 300kcal

The easiest Oreo mug cake, made with just 3 ingredients in 1 minute! This tiktok recipe went viral for a reason – because it’s so damn good. Whip up this fast and simple personal cake anytime you’re craving something sweet and delicious!

spoon scooping order mug cake out of a mug

What You’ll Need to Make Oreo Mug Cake

Oreos – I used gluten-free Oreos, but any Oreo will work! Have fun with this recipe, and use your favorite Oreo cookies. Double stuffed, golden, mint, etc. – all will taste delicious!

Milk – I used non-dairy milk, but just like the Oreos, any kind of milk will do!

Baking Powder – A little bit of baking powder gives this Oreo mug cake it’s cake-like texture. You can make the mug cake without it, but I wouldn’t recommend it. Just 1/4 teaspoon of this pantry-staple ingredient is all you’ll need.

overhead image of oreo mug cake with vanilla ice cream on top and milk on the side.

Tips and Tricks

  • Throw in any mix-ins you’d like! For a double chocolate mug cake, add in a tablespoon of mini chocolate chips. Or, if you’re feeling celebratory, a small handful of rainbow sprinkles are always a fun addition.
  • Top this Oreo mug cake with whatever you’d like. A scoop of ice cream, a dollop of whipped cream, or an extra crushed Oreo all taste incredible atop this personal cake!
  • Make sure you use a microwave-safe mug for this recipe! Not all mugs can be heated in the microwave. To check if your mug is safe to use, flip it over and check the bottom for the words “microwave safe.” If it doesn’t state that it’s microwave safe, it’s probably best to avoid using it in this recipe.
oreo mug cake with milk on the side.

Adjust This Recipe to Your Dietary Needs

Make it Vegan: For a vegan Oreo mug cake, simply use non-dairy milk in this recipe. Also, just so you know, all Oreos are actually completely vegan!

Make it Gluten-Free: Use gluten-free Oreos for a gluten-free mug cake!

overhead image of oreo mug cake with a scoop of vanilla ice cream on top.
4.75 from 4 votes

3-Ingredient Oreo Mug Cake

The easiest Oreo mug cake, made with just 3 ingredients in 1 minute! This tiktok recipe went viral for a reason – because it’s so damn good. Whip up this fast and simple oreo mug cake anytime you’re craving something sweet and delicious!
Print Pin Rate
Prep Time: 1 minute
Cook Time: 1 minute
Total Time: 2 minutes
Servings: 1 serving

Ingredients

  • 5 Oreos
  • 3 tablespoons milk
  • 1/4 teaspoon baking powder

Instructions

  • In a large microwave-safe mug, mash together 4 of the Oreos and milk, until you achieve a cake batter-like texture.
  • Add in the baking powder and stir to combine.
  • Microwave on high for 1 minute, then break off large chunks from the extra Oreo and place those on top of your mug cake. Top with vanilla ice cream and/or whipped cream, then enjoy warm!

Nutrition

Calories: 300kcal

A wholesome and comforting rigatoni bolognese! Ground beef, sautéed veggies, red wine, tomatoes, and classic Italian seasoning. This delicious meal comes together in one pot, in under 30 minutes!

overhead image of rigatoni bolognese on a plate with red wine and chopped parsley on the side.

What You’ll Need to Make Rigatoni Bolognese

Ground Beef – I recommend a lean ground beef for this recipe! Also, remember to season it with plenty of salt in the first step.

Italian Seasoning – If you don’t already have Italian seasoning in your pantry, you MUST go get some. It’s a staple in my Italian home, and adds the perfect blend of dried herbs to whatever I’m cooking. Italian seasoning is essential in this rigatoni bolognese, so don’t even think about going without it!

Red Wine – A touch of dry red wine contributes tons of depth to this dish. However, if you don’t like or have red wine, you can use 1/2 cup of beef broth instead.

Rigatoni Pasta – Rigatoni is the perfect pairing to this homemade bolognese sauce! Its wide opening allows plenty of room for the sauce to fully wrap around each noodle. Though if you don’t have any rigatoni, feel free to use whatever pasta you have on-hand! Spaghetti bolognese is always delicious, too.

rigatoni bolognese on a plate with a fork and spoon.

Tips and Tricks

  • Want to make this rigatoni bolognese in the Instant Pot? Follow my Instant Pot bolognese recipe, then serve over rigatoni!
  • The longer you let the sauce simmer, the more flavorful it’ll be. This recipe requires just 15 minutes of simmering, but if you have the time – leave it to simmer even longer! You can simmer this sauce for up to an hour for TONS of flavor.
  • Prep a double batch of this bolognese and store half in the freezer for a later date! To freeze this sauce, let it cool completely then store in an airtight container. It stays fresh in the freezer for up to 3 months!
rigatoni bolognese on a plate with red wine and cheese on the side.

Adjust This Recipe to Your Dietary Needs

Make it Vegan/Vegetarian: For a vegetarian rigatoni bolognese, replace the ground beef with two cans of drained lentils!

Make it Gluten-Free: Use your favorite gluten-free rigatoni, I love this brand.

close-up image of rigatoni bolognese with parmesan cheese, toasted breadcrumbs, and chopped parsley on top.
4 from 3 votes

Classic Rigatoni Bolognese

A wholesome and comforting rigatoni bolognese! Ground beef, sautéed veggies, red wine, tomatoes, and classic Italian seasoning. This delicious meal comes together in one pot, in under 30 minutes!
Print Pin Rate
Prep Time: 10 minutes
Cook Time: 15 minutes
Total Time: 25 minutes
Servings: 4 servings

Ingredients

  • 1 tablespoon olive oil
  • 1 pound ground beef
  • salt, to taste
  • 1 onion, finely chopped
  • 1 celery stalk, finely chopped
  • 1 large carrot, finely chopped
  • 3 garlic cloves, minced
  • 1 teaspoon dried Italian seasoning
  • 1/2 teaspoon garlic powder
  • 1/2 teaspoon black pepper
  • 1/2 cup dry red wine, or beef broth
  • 1 (28 ounce) can crushed tomatoes
  • 1 pound rigatoni pasta
  • fresh grated parmesan cheese, for serving

Instructions

  • Heat olive oil in a large pot over medium-high heat. Add in the ground beef and a big pinch of salt. Cook until beef is no longer pink, breaking the beef apart with a spoon as it cooks.
  • Once beef is cooked through, add in the onion, celery, carrot, and garlic. Cook until veggies are soft, about 3 minutes.
  • Add in the Italian seasoning, garlic powder, black pepper, and red wine. Cook for about 5 minutes, using your spoon to scrape up any brown bits stuck to the bottom of the pot.
  • Pour in the jar of crushed tomatoes with its juices, reduce heat to a simmer, and simmer uncovered for 15 minutes.
  • While the bolognese simmers, cook rigatoni pasta according to package instructions until al dente. Drain pasta from water.
  • Remove bolognese sauce from heat, add in cooked pasta, and stir to coat pasta in sauce. Serve warm with fresh grated parmesan cheese on top.

Nutrition

Calories: 300kcal