Tag

Holiday

Browsing

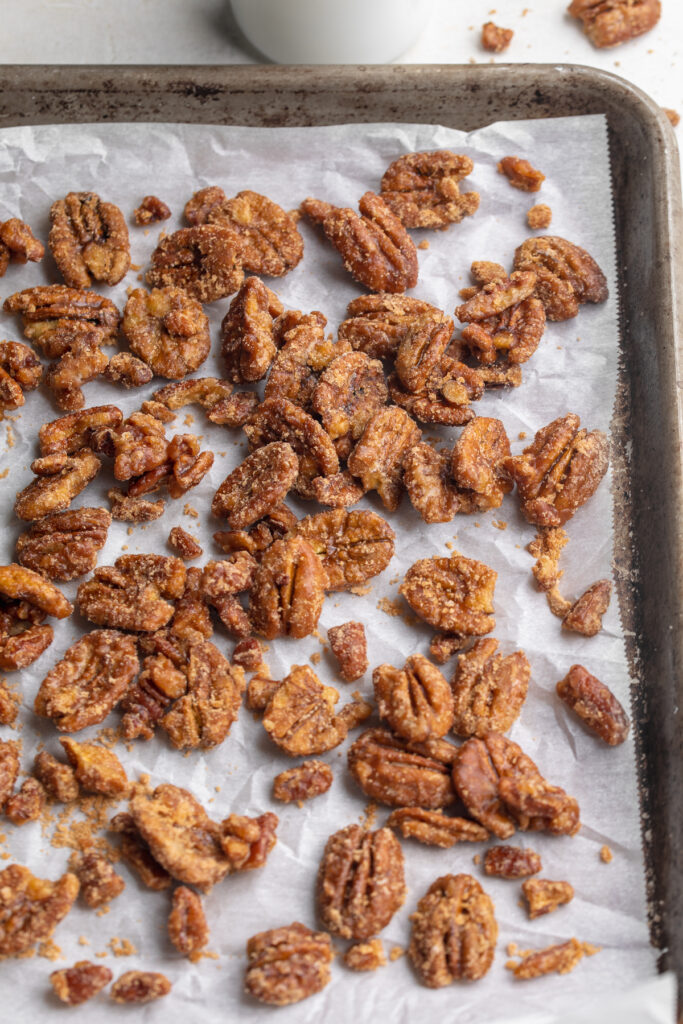
Just 3 ingredients to make these maple candied pecans! Perfectly sweet, crunchy, and totally delicious. Cooked on the stovetop in under 20 minutes!

maple candied pecans in a jar

What You’ll Need to Make Maple Candied Pecans

Pecans – Start with raw and unsalted pecans for this recipe. The cooking and flavoring of the pecans happens throughout this recipe, so it’s best to start with a blank canvas! Also, be sure to use whole pecan halves, not pecan pieces.

Maple Syrup – Just half a cup of maple syrup to sweeten these maple candied pecans! I love this unrefined sugar alternative, it’s healthier and tastes just as good. As the pecans cook, the maple syrup will begin to crystalize and coat the pecans, just like sugar would.

Salt – A pinch of salt to help round out those flavors! Salt seems like a counteractive addition to this recipe, but trust me, it brings it all together. And believe it or not, salt actually brings out the sweetness in this candy recipe!

maple candied pecans on a baking sheet

Tips and Tricks

  • Avoid cooking these maple candied pecans at a high temperature. High heat will quickly cause the maple syrup to burn, which could ruin your recipe. Therefore, maintain a simmer, and continue stirring the pecans every few minutes to avoid burning.
  • Have fun with this recipe! Throw in a pinch of cinnamon, or a dash of vanilla extract while the pecans cook. Or, for an extra festive addition, serve them with a handful of festive candies or sprinkles!
  • Maple candied pecans are best stored at room temperature, in an airtight container for up to one week. You can even store them in the fridge for up to one month, or the freezer for up to three months!
overhead image of maple candied pecans on a baking sheet.

This Recipe Is…

maple candied pecans tipped out of a jar
5 from 1 vote

Maple Candied Pecans

Print Pin Rate
Cook Time: 20 minutes
Total Time: 20 minutes
Servings: 2 cups

Ingredients

  • 2 cups raw pecan halves
  • 1/2 cup maple syrup
  • Small pinch of salt

Instructions

  • Add all ingredients to a large pan over medium heat. Stir and bring the maple syrup to a simmer. Once simmering, reduce the heat to low.
  • Continue cooking on low for 20 minutes, stirring every couple of minutes. After 20 minutes, the maple syrup should begin to crystalize and look like sugar coating the pecans.
  • Once syrup has crystalized, pour the pecans onto a parchment-lined baking sheet. Spread pecans into an even layer, then let cool completely before eating or storing.

Nutrition

Calories: 300kcal

Blissfully easy and delicious vegan hot chocolate dip! Made with just 3 ingredients, no cooking or baking required. This fool-proof dessert recipe is perfect for holiday parties or potlucks!

close-up image of vegan hot chocolate dip.

What You’ll Need to Make Vegan Hot Chocolate Dip

Vegan Whipped Cream – If not vegan, feel free to use regular ole’ whipped cream instead. However, I used Truwhip’s Vegan Whipped Topping and it tastes just like the real thing. I’ve also tested this recipe with So Delicious cocowhip, and it turned out fabulous! Or, for a healthier option, feel free to make a homemade coconut whipped cream. To do this, whip together the coconut cream (not the liquid part) from two cans of full-fat coconut milk with either a hand or stand mixer until light and fluffy. If taking this option, I recommend adding in at least 3 tablespoons of sugar to help sweeten this dessert dip!

Unsweetened Cocoa Powder – It’s super important to use unsweetened cocoa powder in this vegan hot chocolate dip recipe. If sweetened, you risk an overly sweet dip. Therefore, check the baking aisle at your grocery store for an unsweetened cocoa powder, such as this Hershey’s one.

Vanilla Extract – A splash of vanilla extract is the finishing touch to this vegan dessert recipe! It brings the hot chocolate flavor together, and is seriously so good.

vegan hot chocolate dip in a bowl with graham crackers.

Tips and Tricks

  • Don’t over-mix your dip! An over-mixed dip will turn runny, and lose its fluffiness. Simply stir until everything’s incorporated, then enjoy!
  • Feel free to prepare this vegan hot chocolate dip in advance! To do this, store in an airtight container in either the freezer for up to 2 months, or the fridge for up to 4 days. If freezing, simply transfer to the fridge a few hours before serving to thaw, then give it a quick stir.
  • Serve this chocolatey dessert dip however you’d like! I love mine with graham crackers and fresh strawberries. Though chocolate chip cookies, teddy grahams, apple slices, or even marshmallows all make for great dippers!
graham cracker being dipped into vegan hot chocolate dip.

Adjust This Recipe to Your Dietary Needs

Make it Paleo: For a paleo version, make a homemade coconut whipped cream and sweeten with either coconut sugar or a splash of maple syrup – YUM!

overhead image of vegan hot chocolate dip in a bowl with graham cracker, mini marshmallows, and chopped chocolate on the side.
5 from 1 vote

Vegan Hot Chocolate Dip

Blissfully easy and delicious vegan hot chocolate dip! Made with just 3 ingredients, no cooking or baking required. This fool-proof dessert recipe is perfect for holiday parties or potlucks!
Print Pin Rate
Prep Time: 5 minutes
Total Time: 5 minutes
Servings: 12 servings

Ingredients

  • 8 ounces vegan whipped cream
  • 3 tablespoons unsweetened cocoa powder
  • 1-3 tablespoons sugar, optional depending on how sweet you’d like it
  • 1/2 teaspoon vanilla extract

Instructions

  • Add all ingredients to a bowl, then whisk together until combined.
  • Serve with graham crackers, animal crackers, marshmallows, strawberries, apple slices, Oreos, etc.

Nutrition

Calories: 300kcal

Fluffy and perfectly spicy healthy gingerbread muffins! The perfect festive snack, that comes together in the blender. Oats, molasses, and ground ginger make these gingerbread muffins healthy AND delicious!

glunte-free gingerbread muffins piled on top of a marble board.

What You’ll Need to Make Gluten-Free Gingerbread Muffins

Old Fashioned Rolled Oats – It’s super important you use old fashioned/rolled oats in this recipe. Avoid instant, steel-cut, or Irish oats. The first step involves grinding these oats into a flour in your blender. When doing this, try to grind them as fine as possible. Finely ground oats will result in fluffier muffins!

Apple Sauce – I used apple sauce in these gingerbread muffins, because it yields little to no flavor. However, if you don’t have apple sauce, feel free to substitute it with 1/2 cup mashed banana. Mashed banana will give these muffins a slight banana flavor, which if you like banana, I’m sure you won’t mind.

Molasses – Any and all gingerbread recipes contain molasses, which is how they get their signature dark-brown color. Don’t skip the molasses, it’s super important for both the flavor and structure of these muffins.

Ground Ginger – Wouldn’t be gingerbread muffins without some ginger! This recipe packs in tons of that spicy ginger flavor, which I personally LOVE. However, if you want a more subtle ginger flavor, go ahead and use just 1/2 teaspoon ground ginger instead.

three gluten-free gingerbread muffins stacked on top of each other.

Tips and Tricks

  • Use a large cookie scoop or 1/4-cup measuring cup to fill your muffin tin. This’ll ensure even-sized muffins, with that beautiful dome on top!
  • For extra sweetness, top your muffins with a simple 2-ingredient powdered sugar glaze. To make it, whisk together 1/2 cup powdered sugar with 2-3 tablespoons milk. Once smooth, use a spoon to drizzle glaze over cooled gluten-free gingerbread muffins.
  • Store these muffins in an airtight container at room temperature for up to 3 days. Or, to make them last longer, pop them in the freezer for up to 3 months!

Adjust This Recipe to Your Dietary Needs

Make it Vegan: While I haven’t tested it myself, you can try replacing the eggs with either two flax eggs or by using your favorite vegan egg replacer. I’ve used this Bob’s Red Mill Egg Replacer in a number of other recipes and have always loved it!

gingerbread muffin with a bite taken out.
4.04 from 33 votes

Gluten-Free Gingerbread Muffins

Fluffy and perfectly spicy gluten-free gingerbread muffins! The perfect festive snack, that comes together in the blender. Oats, molasses, and ground ginger make these gluten-free gingerbread muffins healthy AND delicious!
Print Pin Rate
Prep Time: 5 minutes
Cook Time: 20 minutes
Total Time: 25 minutes
Servings: 10 muffins

Ingredients

  • 2 cups old fashioned rolled oats
  • 1/2 cup apple sauce, unsweetened
  • 1/2 cup maple syrup
  • 1/4 cup molasses
  • 2 eggs
  • 2 teaspoons vanilla extract
  • 2 teaspoons baking powder
  • 2 teaspoons cinnamon
  • 1 1/2 teaspoons ground ginger
  • 1/2 teaspoon nutmeg
  • 1/2 teaspoon salt

Instructions

  • Preheat oven to 350° Fahrenheit and line a muffin tin with muffin liners.
  • Add oats to a blender and blend until it’s ground into a flour.
  • Add in remaining ingredients, then blend until a smooth batter forms.
  • Transfer ½ cup batter into each muffin mold, then bake for 20-25 minutes or until a toothpick inserted down the center of one muffin comes out clean. Remove from oven and transfer muffins to a wire cooling rack, let cool before eating.

Nutrition

Calories: 300kcal

These gluten-free Christmas sugar cookies with baked-in sprinkles are so delicious that everyone will want a bite! With only a handful of pantry ingredients needed, baking these gluten-free Christmas cookies will surely get you into the holiday spirit. Perfect for gifts, parties, platters or all for yourself. Don’t forget to leave some for Santa!

Overhead image of a gluten-free Christmas cookie with red, green, and white sprinkles with a bite taken out.

What’s Christmas without festive sugar cookies to bring to parties, give as gifts, and leave out for Santa?! This homemade recipe is beyond any gluten-free Christmas cookie you’d find at the store. And baking them just really gets me into the holiday spirit! Bake these with your kids, friends, or partner while listening to Christmas music – it’s truly so much fun

Why You’ll Love This Gluten-Free Christmas Cookie Recipe

  • Fun For The Family: This is a great way to kick of your holiday season! Whether you’re measuring the sugar or your little ones are helping with the sprinkles, there’s room for everyone!
  • Easy and Quick: With a simple batter these cookies are ready for the oven and baked within 12 minutes.
  • Versatile and Customizable: Feel free to add chocolate chips, nuts, or crushed peppermint to the top of your cookies for a fun twist!

What You’ll Need To Make Gluten-Free Christmas Sugar Cookies

  • Butter: I used non-dairy butter to make these cookies dairy-free. Though whatever butter you use, make sure to soften it ahead of time!
  • Sugar: granulated sugar will work great for this recipe!
  • Eggs: These help bind the batter together, creating a soft classic christmas sugar cookie texture that will leave you wanting more!
  • Gluten-Free All Purpose Baking Flour: I use and love Bob’s Red Mill Gluten-Free Baking Flour for all my gluten-free baking recipes. Your gluten-free flour must contain xanthan gum. If it doesn’t, then add 1 teaspoon xanthan gum in with the dry ingredients.
  • Salt: This will help to bring the cookies together by providing a balance to the sweetness.
  • Christmas Sprinkles: If you don’t celebrate Christmas, feel free to use your favorite holiday sprinkles instead!
Close-up of a gluten-free Christmas cookie with a bite taken out.

How To Make The Best Gluten-Free Christmas Sugar Cookies

  • 1. Prepare Your Cookie Batter: Beat together your butter and sugar until light and creamy. Add your egg, and vanilla extract until well combined.
  • 2. Bake The Cookies: Scoop 2 tablespoons-sized balls of cookie dough and place them 2 inches apart on a baking sheet. Bake for 10-12 minutes.
  • 3. Remove and Cool: Remove cookies from the oven and let them cool on a cookie sheet for 5 minutes before transferring them to a wire rack to cool completely.

Tips, Tricks, and Storage

  • Making the Dough: It’s easier if you use a stand mixer or handheld mixer. But, if you want, I think it’s fun to do it by hand, just might take some extra elbow grease!
  • Make it Vegan: Okay, so usually I would swap the egg with a flax egg (1 tablespoon of ground flax meal mixed with warm water), but Bob’s Red Mill’s Egg Replacer might be the better option here. I haven’t tried this yet, but if you do, let me know in the comments!
  • Storage: Store the gluten-free Christmas cookies in an air tight container at room temperature for up to 5 days!

Additional Gluten- Free Holiday Favorites

overhead image of gluten-free christmas cookies
5 from 1 vote

Gluten-Free Christmas Sugar Cookies With Sprinkles

These gluten-free Christmas sugar cookies with baked-in sprinkles are soo delicious, everyone is going to want a bite! With only a handful of pantry ingredients needed, baking these Christmas cookies will surely get you into the holiday spirit. Perfect for gifts, parties, platters or all for yourself. Don't forget to leave some out for Santa!
Print Pin Rate
Prep Time: 10 minutes
Cook Time: 12 minutes
Total Time: 22 minutes
Servings: 16 cookies

Ingredients

  • 6 Tablespoons Softened Butter (Dairy or Non-Dairy)
  • 3/4 Cup Sugar
  • 1 Egg
  • 1 Teaspoon Vanilla Extract
  • 1 1/2 Cups Gluten-Free All Purpose Baking Flour, see Notes
  • 1 1/2 Teaspoons Baking Powder
  • 1/4 Teaspoon Salt
  • 1/2 Cup Sprinkles

Instructions

  • Preheat oven to 350° Fahrenheit and line a cookie sheet with parchment paper.
  • Beat the butter and sugar with either a hand or stand mixer until light and fluffy. Add in egg and vanilla extract, beat again to combine.
  • Add in the flour, baking powder, and salt. Beat together until a dough forms, then gently mix in the sprinkles until the sprinkles are evenly distributed throughout the dough.
  • Scoop 2 tablespoon-sized balls of cookie dough and place them about 2-inches apart on cookie sheet. Press down on each cookie to slightly flatten (they should be about 1-inch thick). Bake 10-12 minutes or until lightly golden around the edges.
  • Remove cookies from oven and let cool on cookie sheet for 5 minutes before transferring to a wire rack to cool completely.

Notes

Gluten-Free All Purpose Flour:Your gluten-free flour must contain xanthan gum. If it doesn’t, then add 1 teaspoon xanthan gum in with the dry ingredients.

Nutrition

Serving: 1cookie | Calories: 137kcal | Carbohydrates: 21g | Protein: 1.2g | Fat: 4.8g | Sugar: 12g

A flawless vegan charcuterie board, perfect for any occasion! An assortment of fresh fruits, veggies, crackers, bread, and vegan cheeses create the perfect spread. Have fun with this vegan charcuterie board, feel free to switch things up and make it your own!

half a vegan charcuterie board with glasses of white wine on the side

What You’ll Need

  • Hummus – Either homemade or store bought hummus will work on your charcuterie board! As much as I love a homemade hummus, I usually prefer to save myself a bit of time by buying pre-packaged hummus from the store. Whole Foods make a delicious hummus, as does Trader Joe’s and Hope Hummus!

  • Crackers – Any and all crackers are welcome on this snack board! I typically use gluten-free crackers to keep my spread gluten-free friendly. Though feel free to use whatever crackers you like best.

  • Nuts – Nuts are always an exciting, crunchy addition! You can get fancy here and purchase marcona almonds or flavored nuts for your board. Though I kept things simple with raw walnuts and pecans. I love using nuts on any charcuterie board, as they’re the perfect item to fill any empty space. Nuts are especially amazing on this vegan charcuterie board thanks to their high protein content and nutritional value, keeping things hearty yet healthy!

  • Vegan Cheese – This is a totally optional addition, but I have a few vegan cheese brands I love featuring on my charcuterie board! I’m pretty picky when it comes to non-dairy cheese though, and avoid any that taste too fake and/or are overly processed. Spero Foods make some of my all-time favorite vegan soft cheeses. Their herb cream cheese and goat cheese are perfect for this recipe! They’re all deliciously tangy, smooth, and incredible on crackers or toast. Though my runner-ups for this charcuterie board are Kite Hill vegan cheeses, and a handful of Myoko vegan cheese flavors.

How to Make a Vegan Charcuterie Board

  1. Begin every charcuterie board by prepping the ingredients you’ll be placing on your board. This includes washing fresh fruit, cutting bread, slicing cheese, etc. Once prepped, you’ll be able to see every element of your board and decide in which order you’d like to place them.


  2. Pick a large board or surface to lay everything on, then place small bowls around the board. These bowls don’t have to be in any particular pattern or order, so simply evenly space them around your board.


  3. Fill those small bowl with things like hummus, soft cheese, dips, olives, or really anything that would make a mess if placed directly on your board/surface.


  4. Now that your bowls are all filled, go in with remaining larger items such as crackers, sliced bread, and fruit – working with one ingredient at a time.


  5. Once the vegan charcuterie board looks mostly complete, then fill in any gaps with your small items (in this case, I used nuts). Continue doing this until your board is fully loaded and ready to be served!

Optional Add-Ons

There really is no wrong way to jazz up a charcuterie board, so any of the following would make delicious additions to your vegan board:

  • Pickles
  • Strawberries
  • Chocolate Squares
  • Dried Fruit
  • Jelly/Jam
  • Mustard
  • Sweet Peppers
  • Cherry Tomatoes
  • Apple Slices
  • Carrots
close-up image of vegan charcuterie board
5 from 1 vote

Vegan Charcuterie Board

A flawless vegan charcuterie board, perfect for any occasion! An assortment of fresh fruits, veggies, crackers, bread, and vegan cheeses create the perfect spread. Have fun with this vegan charcuterie board, feel free to switch things up and make it your own!
Print Pin Rate
Prep Time: 10 minutes
Total Time: 10 minutes
Servings: 12 servings

Ingredients

  • cucumber, sliced
  • olives
  • hummus
  • baguette, sliced
  • grapes
  • mandarin oranges, partially peeled
  • nuts (almonds, cashews, pecans, or walnuts)
  • radishes, sliced
  • vegan cheese, see Notes

Instructions

  • Prep all ingredients – wash fruits and veggies, slice or chop items, etc.
  • Lay down the surface you’ll be arranging your items on, then start by placing small bowls evenly throughout the surface. You’ll need about 3-4 bowls for your olives, hummus, and vegan cheese.
  • Fill the bowls, then begin arranging items on your surface, leaving smaller items like nuts for the end. Finish by filling any gaps on your charcuterie boards with nuts or any other ingredients that may fit.

Notes

  • Vegan Cheese: Vegan cheese brands I love are Spero Foods, Myoko, and Kite Hill!
  • Nutrition

    Calories: 300kcal

    More Vegan Recipes