Tag

peanut butter

Browsing

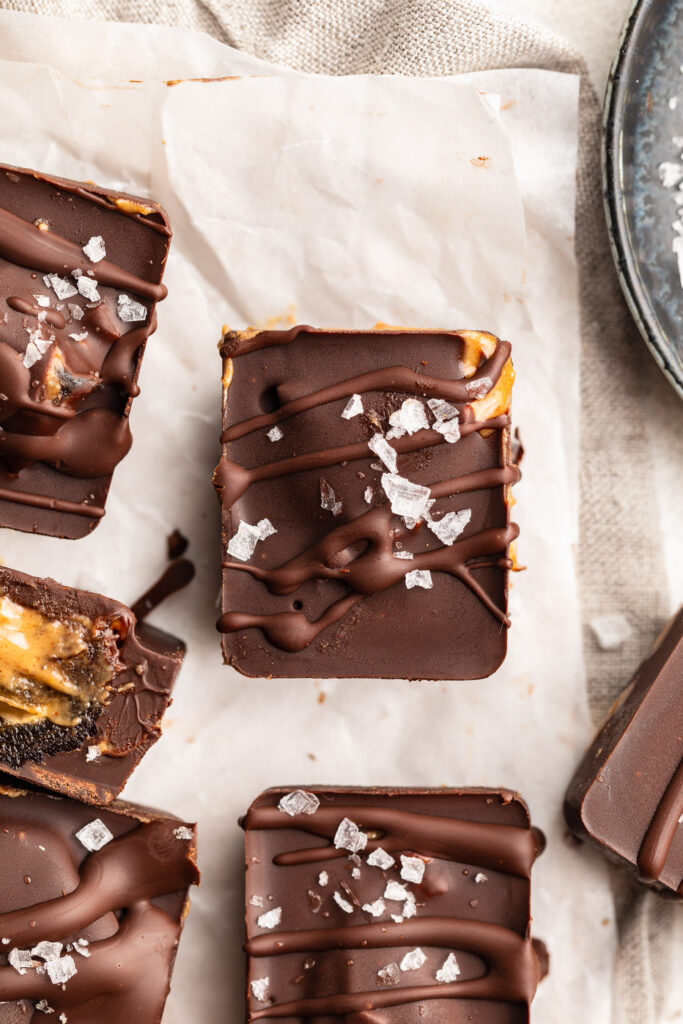
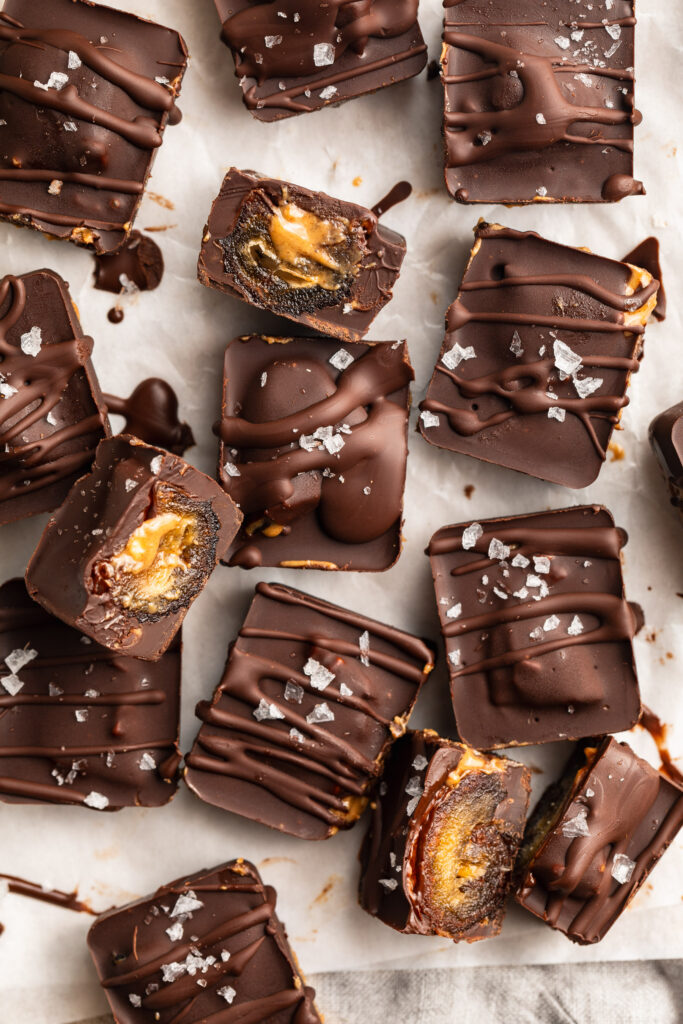
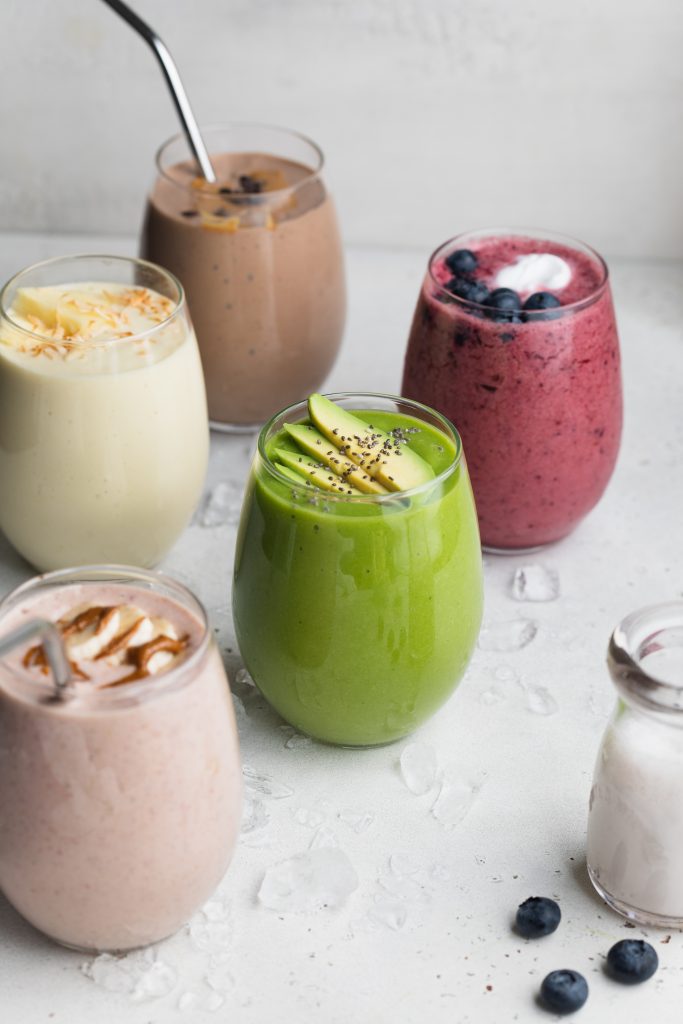
Here are the 5 smoothie recipes I make every week! They’re SUPER healthy, incredibly delicious, and come together in only a few minutes. These healthy smoothies are the perfect quick, easy, and portable breakfast or snack!

all 5 smoothies lined up in glasses with toppings on each

How to Make a (Delicious) Smoothie

  • Pick your frozen fruits. Every smoothie recipe starts with a curated selection of frozen fruit. The frozen fruit is what you’ll taste the most of in your smoothie, so make sure it’s a combination you’ll love!
  • Add in some healthy fats. Now that you have your fruit, it’s time to round the nutrition out with a bit of healthy fats. Healthy fats will slow the digestion of the naturally occurring sugar in fruit, which will stabilize your blood sugar and provide you with a long-term source of energy to get you through the morning! My favorite healthy fats for smoothies are unsweetened almond butter, avocado, or hemp seeds.
  • Consider adding fresh or frozen vegetables. Depending on which vegetable you choose to add to your smoothie, you most likely won’t be able to taste it at all! Spinach is always a great addition, yielding very little flavor yet TONS of nutrients. Or, steamed then frozen cauliflower is a perfect way to not only add nutrients to a smoothie, but helps to thicken it up as well.
  • Give it a boost with protein and/or powdered superfoods. I prefer unsweetened, unflavored, and plant-based protein in my smoothie recipes. However, feel free to use whichever protein powder is your favorite! Though in my chocolate peanut butter protein smoothie recipe, I highly recommend the Aloha Chocolate Protein Powder – it’s so darn good.
  • Select a liquid to blend. Any liquid will work! Water or milk will yield the least flavor, allowing the fruit to shine. Or, you can use juice for an even sweeter and fruitier smoothie if you’d like.
all 5 smoothies in cups with ice, blueberries, and almond milk on the side

Blenders 101

I’ve owned many blenders in my day, though these two have stood out the most:

  • Vitamix: I know …she’s expensive, but boy is she incredible! I purchase a refurbished Vitamix a few years ago after saving up for one. And let me tell ya, it was worth EVERY penny. There’s nothing the Vitamix can’t blend, it’s truly the most powerful blender on the market. So if you’re looking to splurge, the Vitamix is definitely the blender for you!
  • Nutribullet: The nutribullet is great for everyday use! It takes up very little counter space, and is super easy to clean. I had my first nutribullet for almost 10 years before it eventually died on me. And that was after daily use in a four-person household! Also, the larger cup is enough to blend up to two serving sizes. I really can’t recommend the nutribullet enough, it’s fairly priced and comes with a one year warranty.

Turn Any Smoothie Into a Smoothie Bowl

Turn any of the below smoothie recipes into a smoothie bowl! It’s seriously so easy, all you’ll need to do is start with half the amount of liquid listed in the recipe. Then, continue to add more liquid as needed or until it’s perfectly thick and smooth. Once smooth, transfer your smoothie to a bowl and top with some fresh fruit, a handful of granola, and maybe even a scoop of almond or peanut butter!

Can I Add Protein Powder To These Smoothie Recipes?

Yes! Feel free to add a scoop of your favorite vanilla or unflavored protein powder to any of these smoothie recipes. I almost always throw in a scoop of either Aloha vanilla protein powder and/or Further Foods unflavored collagen to boost the protein and overall nutrients in my smoothies!

close-up overhead image of all 5 smoothie recipes
5 from 2 votes

5 Healthy and DELICIOUS Smoothie Recipes

Here are the 5 smoothie recipes I make constantly! They’re SUPER healthy, incredibly delicious, and come together in only a few minutes. These healthy smoothies are the perfect quick, easy, and portable breakfast or snack!
Print Pin Rate
Prep Time: 5 minutes
Total Time: 5 minutes
Servings: 1 serving

Equipment

  • blender

Ingredients

Chocolate Peanut Butter Protein Smoothie

  • 1 1/2 frozen bananas
  • 1 scoop chocolate protein powder or 1 tablespoon unsweetened cocoa powder
  • 1 tablespoon peanut butter
  • 1 cup almond milk, or regular milk

Strawberry Banana Smoothie

  • 1 frozen banana
  • 1/2 cup frozen strawberries
  • 1 tablespoon almond or peanut butter, optional
  • 1 cup milk, I used almond milk

Glowing Green Smoothie

  • 1 cup frozen mango
  • 1/2 cup frozen peaches
  • 1 cup fresh spinach
  • 1/2 avocado
  • 1 cup water or milk

Tropical Smoothie

  • 1 cup frozen mango
  • 1/2 cup frozen pineapple
  • 1/2 cup plain yogurt, unsweetened
  • 1 cup coconut milk

Very Berry Smoothie

  • 1/2 cup frozen cherries
  • 1 cup frozen mixed berries
  • 1/2 cup plain yogurt, unsweetened
  • 1 cup water or milk

Instructions

  • Add all ingredients to a blender and blend until smooth.

Why You’ll Love This Recipe

  • Easy and Fast: Made with minimal ingredients and no baking required, this recipe comes together in minutes.
  • Healthier Dessert: Sweetened with maple syrup and packed with healthy fats from peanut butter and almond flour, this bark satisfies your sweet tooth while keeping it wholesome.
  • Customizable: You can switch up the flavors, toppings, and even the type of nut butter for a bark that’s truly your own.
Close up image of 4 ingredient peanut butter cup cookie dough bark.

What You’ll Need to Make Peanut Butter Cup Cookie Dough Bark

For the Cookie Dough Base:

  1. Almond Flour: The foundation of the bark, almond flour provides a soft, cookie-dough-like texture and is naturally gluten-free.
  2. Unsweetened Peanut Butter: Adds richness and flavor while binding the ingredients together. Make sure to use a drippy, natural peanut butter for the best results.
  3. Maple Syrup: Acts as the natural sweetener, giving the cookie dough a perfect touch of sweetness.

For the Chocolate Layer:

  1. Chocolate Chips: Melted chocolate creates a decadent top layer. I use Guittard Extra Dark Chocolate Chips in most of my recipes because they’re dairy-free, but rich and not-too-sweet.
  2. Chopped Peanuts (Optional): Add a delightful crunch and extra peanut flavor to the bark.

How to Make Peanut Butter Cup Cookie Dough Bark

  1. Prepare the Dough: In a medium bowl, mix together the almond flour, peanut butter, and maple syrup until a soft dough forms.
  2. Shape the Bark: Line a small baking sheet or large plate with parchment paper. Place the dough on the paper and spread it evenly with your hands to form a large, flat rectangle.
  3. Melt the Chocolate: Heat the chocolate chips in the microwave in 30-second intervals or over a double boiler, stirring until smooth.
  4. Assemble the Bark: Pour the melted chocolate over the dough, spreading it evenly to cover the entire surface. Sprinkle chopped peanuts on top, if desired.
  5. Freeze and Serve: Place the bark in the freezer for at least 1 hour. When ready to enjoy, remove from the freezer and break or cut into pieces.
Overhead image of 4 ingredient peanut butter cup cookie dough bark cut into large pieces.

Storage Tips

  • Refrigerator: Store the bark in an airtight container in the fridge for up to 1 week.
  • Freezer: Keep leftovers in the freezer for up to 1 month. Simply remove pieces as needed and let them sit at room temperature for 5-10 minutes before eating.

Switch Up the Flavors of This Recipe

  • Add a Drizzle: Drizzle melted peanut butter or caramel over the chocolate layer before freezing for added flavor.
  • Toppings Galore: Sprinkle with flaky sea salt (I love this Maldon Flaky Sea Salt), crushed pretzels, or cacao nibs for a fun twist.
  • Different Nut Butter: Swap peanut butter with almond or cashew butter for a subtle flavor variation.
5 from 1 vote

Peanut Butter Cup Cookie Dough Bark

This peanut butter cup cookie dough bark is a quick and easy treat that’s not only delicious but also healthy! Made with just 4 simple ingredients, it’s naturally gluten-free, dairy-free, and vegan, and sweetened with maple syrup. It’s perfect for when you’re craving something sweet and indulgent yet wholesome. Whether you’re making it for yourself, your family, or a special occasion, this bark is sure to be a hit!
Print Rate
Prep Time: 5 minutes
Freezing Time: 1 hour
Total Time: 1 hour 5 minutes
Servings: 6 servings

Equipment

  • 1 small bowl
  • 1 small baking sheet

Ingredients

  • 1 cup plus 2 tablespoons almond flour
  • 1/4 cup unsweetened creamy peanut butter
  • 3 tablespoons maple syrup
  • 3/4 cup chocolate chips melted
  • chopped peanuts (optional) for topping

Instructions

  • Mix together the almond flour, peanut butter, and maple syrup in a bowl.
  • Line a small baking sheet or large plate with parchment paper, then place the cookie dough mixture on top of the parchment paper. Spread and flatten the mixture with your hands to form a large piece of cookie dough bark.
  • Melt the chocolate chips, then pour the melted chocolate over the bark. Spread the chocolate into an even layer, then place the bark in the freezer for at least one hour.
  • When ready to eat, remove the peanut butter cup cookie dough bark from the freezer and either cut or break into large pieces. Enjoy right away or store leftover bark in the freezer for later!

Nutrition

Serving: 1serving | Calories: 293kcal | Carbohydrates: 21g | Protein: 8g | Fat: 21g | Sugar: 14g

This healthy homemade butterfingers recipe is made with just 5 simple ingredients! They’re gluten-free, dairy-free, and naturally sweetened for a better-for-your treat. They join my healthy candy lineup, right alongside healthy snickers, 3 ingredient homemade crunch bars, and healthy date caramels. These homemade butterfingers are perfect for anyone looking for a healthier version of a favorite candy bar!

healthy homemade butterfingers on parchment paper.

Why You’ll Love This Recipe

These healthy homemade butterfingers are a delicious and satisfying treat with just 5 simple ingredients. They’re a guilt-free version of the classic candy bar, made gluten-free, dairy-free, and with natural sweeteners like honey or maple syrup. Plus, they’re easy to make and perfect for storing in the freezer for a quick snack or dessert.

What You Need to Make Healthy Butterfingers

  • Peanut Butter: The rich, creamy base that gives these bars their signature nutty flavor. Choose a natural variety with no added sugar for a healthier option.
  • Honey or Maple Syrup: These natural sweeteners bring the perfect touch of sweetness while keeping the recipe refined-sugar free.
  • Corn Flakes: Adds the necessary crunch to replicate the crispy texture found in classic butterfingers. Make sure to choose gluten-free corn flakes if needed. The Real Cereal Organic Corn Flakes are the best ones I’ve found, they’re unsweetened and made with just 2 ingredients!
  • Chocolate Chips: Melting the chocolate for coating gives that irresistible outer layer, while dark chocolate keeps the sugar content lower.
  • Coconut Oil: Helps melt the chocolate smoothly and adds a subtle flavor boost. I use and love Nutiva Organic Coconut Oil in many of my recipes!

How to Make Healthy Homemade Butterfingers

Start by crushing the corn flakes and mixing them with peanut butter and honey to form a crispy, sweet mixture. Press it into a loaf pan to set in the freezer before dipping each bar in melted chocolate. Freeze them again for a crunchy, chocolate-covered treat that’s perfect for a healthier snack or dessert.

healthy homemade butterfingers stacked on top of each other,

Storage Tips

Once made, store your homemade butterfingers in an airtight container in the freezer for up to 3 months. This way, they’ll stay fresh and ready for whenever you need a sweet treat.

Adjust This Recipe to Your Dietary Needs

  • Make it Vegan: Swap the honey for maple syrup and use dairy-free chocolate chips.
  • Low Carb: Choose a sugar-free chocolate alternative and use a low-carb cereal.
  • Make it Nut-Free: Substitute the peanut butter with sunflower seed butter for a nut-free version.
close up image of healthy butterfingers cut in half.
No ratings yet

Healthy Homemade Butterfingers

This healthy homemade butterfingers recipe is made with just 5 simple ingredients. They're gluten-free, dairy-free, and naturally sweetened for a better-for-your treat. These homemade butterfingers are perfect for anyone looking for a healthier version of a favorite candy bar!
Print Pin Rate
Prep Time: 5 minutes
Freezing Time: 1 hour
Total Time: 1 hour 5 minutes
Servings: 12 servings

Equipment

  • 1 large bowl
  • 1 9×4-inch loaf pan
  • 1 small bowl

Ingredients

  • 1 cup peanut butter
  • 1/3 cup maple syrup or honey
  • 2 cups corn flakes
  • 1 cup chocolate chips
  • 2 teaspoons coconut oil

Instructions

  • Add the corn flakes to a large zip-top bag, seal the bag and crush the cereal into small pieces.
  • Add the peanut butter and honey or maple syrup to a large bowl and mix together to combine. Add the crushed corn flakes to the bowl and mix again to fully combine.
  • Transfer the mixture to a loaf pan lined with parchment paper, and press the cereal down into the pan to create an even layer. Place in the freezer to harden for at least 1 hour.
  • Remove the pan from the freezer and carefully lift the corn flake mixture out of the pan. Place on a cutting board and cut into 12 bars.
  • Melt the chocolate chips and coconut oil together, whisk to combine, and then dip each bar into the melted chocolate to completely coat. Remove the bar from the chocolate and set on a parchment-lined plate. Repeat this process with all 12 butterfingers until all are coated in chocolate.
  • Transfer the butterfingers to the freezer for about 10 minutes, or until the chocolate has hardened. Then, enjoy right away or store in an airtight container in the freezer for up to 3 months (if they last that long!).

Nutrition

Serving: 1serving | Calories: 241kcal | Carbohydrates: 22g | Protein: 6g | Fat: 15g | Sugar: 12g

It’s been a HOT summer so far. So hot in fact, that I’ve been avoiding turning on my oven unless absolutely necessary. But you guys know me by now, even without an oven I still need a little something sweet on-hand at all times. Healthy No-Bake Cookie Doughs Bars have been on repeat lately, and so have 4-Ingredient Healthy Snickers. And while both of those no bake desserts are delicious and ones I’d never get sick of, it was definitely time to switch things up!

These homemade crunch bars are made with just THREE ingredients. They’re totally vegan and gluten-free, and I’ll even include a paleo and keto option if you want to give those a try. They’re perfectly sweet, extra crunchy, and seriously SO easy to make!

overhead image of 3 ingredient no bake homemade crunch bars with sea salt on top.

Why These Are the Best Homemade Crunch Bars

These bars are not only simple to make but also healthier and more customizable than store-bought versions. By using high-quality ingredients, you avoid artificial flavors and preservatives. The addition of peanut butter gives extra creaminess and flavor, making these bars a delightful treat for all ages!

Ingredients and Substitutions

  • Chocolate Chips: Opt for dark chocolate for a less sweet version or semi-sweet for a classic candy bar taste. Vegan options like Guittard Extra Dark Baking Chips are perfect for dairy-free needs.
  • Peanut Butter: Can be substituted with any nut or seed butter. Ensure it’s creamy for the best texture.
  • Rice Cakes/Crisp Cereal: Gluten-free rice cakes or cereals ensure the bars are safe for those with gluten intolerances!
ingredients for healthy homemade crunch bars recipe.

How to Make Homemade Crunch Bars

  1. Line your pan with parchment paper to prevent sticking.
  2. Melt chocolate and peanut butter in the microwave, stirring every 30 seconds until smooth.
  3. Mix in crumbled rice cakes to combine.
  4. Spread mixture in the prepared pan and freeze until solid.
  5. Cut into squares and enjoy your homemade bars.

Storage Tips

Store these homemade crunch bars in an airtight container in the refrigerator for the best texture and shelf life. They can start to soften if left at room temperature for too long. Or, store them in the freezer for up to 3 months!

3 ingredient no bake healthy homemade crunch bar on a table.

Adjust This Recipe to Your Dietary Needs

  • Keto Option: Use sugar-free chocolate chips and replace rice cakes with crushed nuts or seeds.
  • Vegan Option: Ensure your chocolate chips are vegan-friendly. Brands like Enjoy Life are great choices.
  • Paleo Option: Use paleo-approved chocolate, like Hu Kitchen Chocolate Gems and replace rice cakes with chopped nuts or seeds for the crunch.

Tips and Tricks

  1. Microwave Melting: Microwave the chocolate and peanut butter in short bursts to prevent burning, or use a double boiler instead if you’d like.
  2. Layer Thickness: Spread the mixture evenly in the pan to ensure uniform bars.
  3. Add-Ins: Feel free to add a pinch of salt or vanilla extract to enhance the flavor. Or, finish the bars with flaky sea salt like I did – YUM!

By following these tips and utilizing high-quality ingredients, you’ll have delicious, homemade crunch bars that are perfect for any occasion!

overhead image of 3 ingredient no bake homemade crunch bars with sea salt on top.
5 from 8 votes

3 Ingredient Healthy Homemade Crunch Bars

This 3 ingredient homemade crunch bars recipe is the perfect vegan and gluten-free sweet treat! They’re no bake, totally delicious, and irresistibly crispy. These homemade candy bars are also much healthier than store-bought!
Print Pin Rate

Ingredients

  • 1 1/4 cups chocolate chips
  • 1/2 cup creamy peanut butter, unsweetened
  • 2 rice cakes, crumbled (or 1 cup rice crisp cereal)

Instructions

  • Line a 9-inch loaf pan with parchment paper.
  • Add the chocolate chips and creamy peanut butter to a bowl, then microwave in 30 second increments (stirring between each increment) until chocolate has melted.
  • Add in the crumbled rice cakes and mix everything together to combine.
  • Transfer the crunch bar mixture to your prepared loaf pan and spread into an even layer. Place the bars in the freezer until solid, about 1 hour, then remove and cut into squares.

Think snickers can’t be healthy?? Think again! I’ve pretty much made it my life’s work to take unhealthy treats and make them healthy. Like my healthy gluten-free mug cake, and my healthy cookie dough bars (another no-bake dessert in constant rotation around here!). These 4-ingredient healthy snickers fit seamlessly into my healthier treats lineup. My recent nighttime routine has included getting my baby to bed, popping 3 or 4 of these healthy snickers out of the freezer, and cozying up on the couch while I savor every last bite. My husband’s also obsessed, so I’ve been doubling this recipe to make sure there’s plenty to go around!

For this recipe, you’ll want to start with a silicone ice cube tray. I purchased these ones (they come in a 2-pack) and have loved them so far! They’re also great for making ice cubes too, as the silicone helps the cubes slide right out. From there, you’ll need just four simple ingredients – chocolate, coconut oil, dates, and peanut butter. All relatively healthy ingredients, but they come together to create a treat that tastes seriously indulgent, but won’t hurt your stomach… no matter how many you eat! *wink wink*

overhead image of a healthy snicker with flaky sea salt on top.

What You’ll Need To Make These Healthy Snickers

Chocolate Chips: Opt for dairy-free or dark chocolate chips for a healthier option. These provide the rich, chocolatey coating for your snickers bites.

Coconut Oil: Coconut oil helps melt the chocolate chips and creates a smooth, glossy texture for your healthy candy bars.

Medjool Dates: These naturally sweet and chewy dates serve as the caramel-like layer in your snickers, providing natural sweetness and a satisfying texture.

Crunchy Peanut Butter: Choose your favorite brand of crunchy peanut butter to add nutty flavor and crunch to your guilt-free treats!

overhead image of healthy snickers bars with flaky sea salt on top.

Tips and Tricks

  • If your dates are too firm, soak them in warm water for 10-15 minutes before using. This will help soften them and make them easier to work with.
  • Using a silicone ice cube tray makes it easier to remove the snickers bites once they’re frozen. If you don’t have one, you can line a regular ice cube tray with plastic wrap for easy removal.
  • To ensure even distribution of ingredients, use a layering technique when assembling your healthy snickers bites. Start with a layer of melted chocolate, followed by a date and a dollop of peanut butter, then top with another layer of melted chocolate.
overhead image of healthy snickers cut in half with peanut butter inside.
5 from 2 votes

4-Ingredient Healthy Snickers

This healthy snickers recipe is the perfect healthier treat to satisfy your sweet tooth! Made with just 4 wholesome ingredients; chocolate chips, coconut oil, medjool dates, and crunchy peanut butter. They taste just like a snickers, but with a fraction of the sugar!
Print Pin Rate
Prep Time: 5 minutes
Total Time: 5 minutes
Servings: 15 snickers

Ingredients

  • 1 cup chocolate chips
  • 1 tablespoon coconut oil
  • 8 medjool dates, pits removed and cut in half
  • 1/4 cup crunchy peanut butter

Instructions

  • Melt the chocolate chips and coconut oil together in a small bowl in the microwave.
    healthy-snickers-step-1
  • Take a silicone ice cube tray and fill 15 cavities of the tray with 1/2 tablespoon each of the melted chocolate.
    healthy-snickers-step-2
  • Place one pitted date half into each cavity on top of the chocolate.
    healthy-snickers-step-3
  • Then, add about ½ a tablespoon of crunchy peanut butter to each ice cube cavity, on top of each date.
    healthy-snickers-step-4
  • Pour the remaining melted chocolate into each ice cube cavity, covering the dates and peanut butter completely.
  • Place the ice cube tray in the freezer for about 20 minutes, or until the chocolate has completely hardened. Remove the tray from the freezer and pop out the healthy snickers. Store snickers in the fridge or freezer for up to 3 months!
    healthy-snickers-step-6

Notes

  • Here’s a link to the silicone ice cube trays I used to make my healthy snickers! They worked wonders and were super easy to clean.