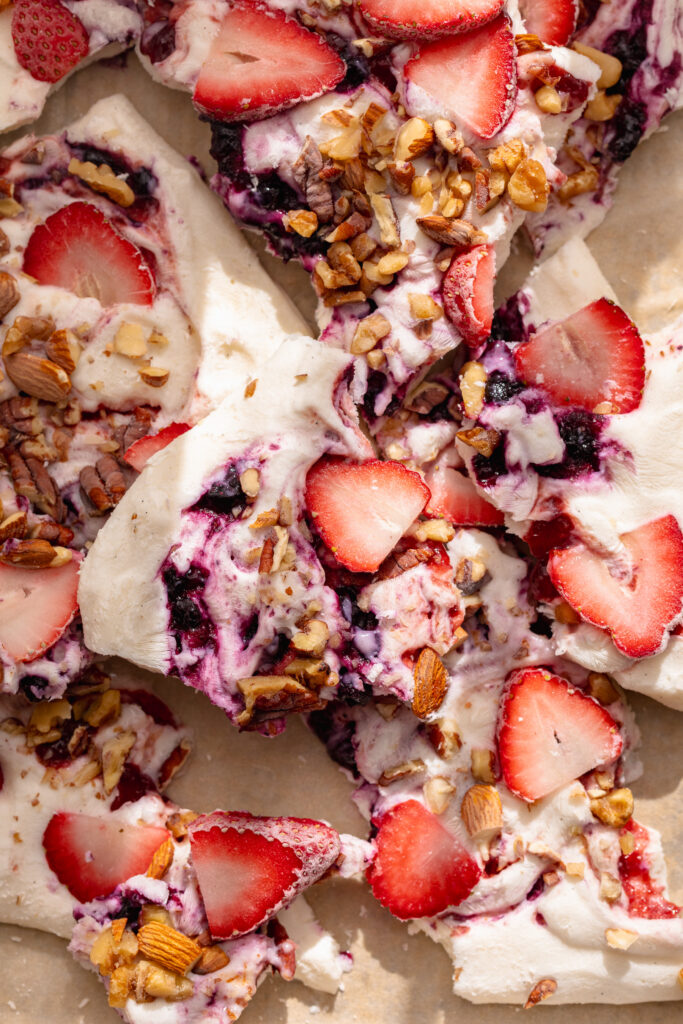
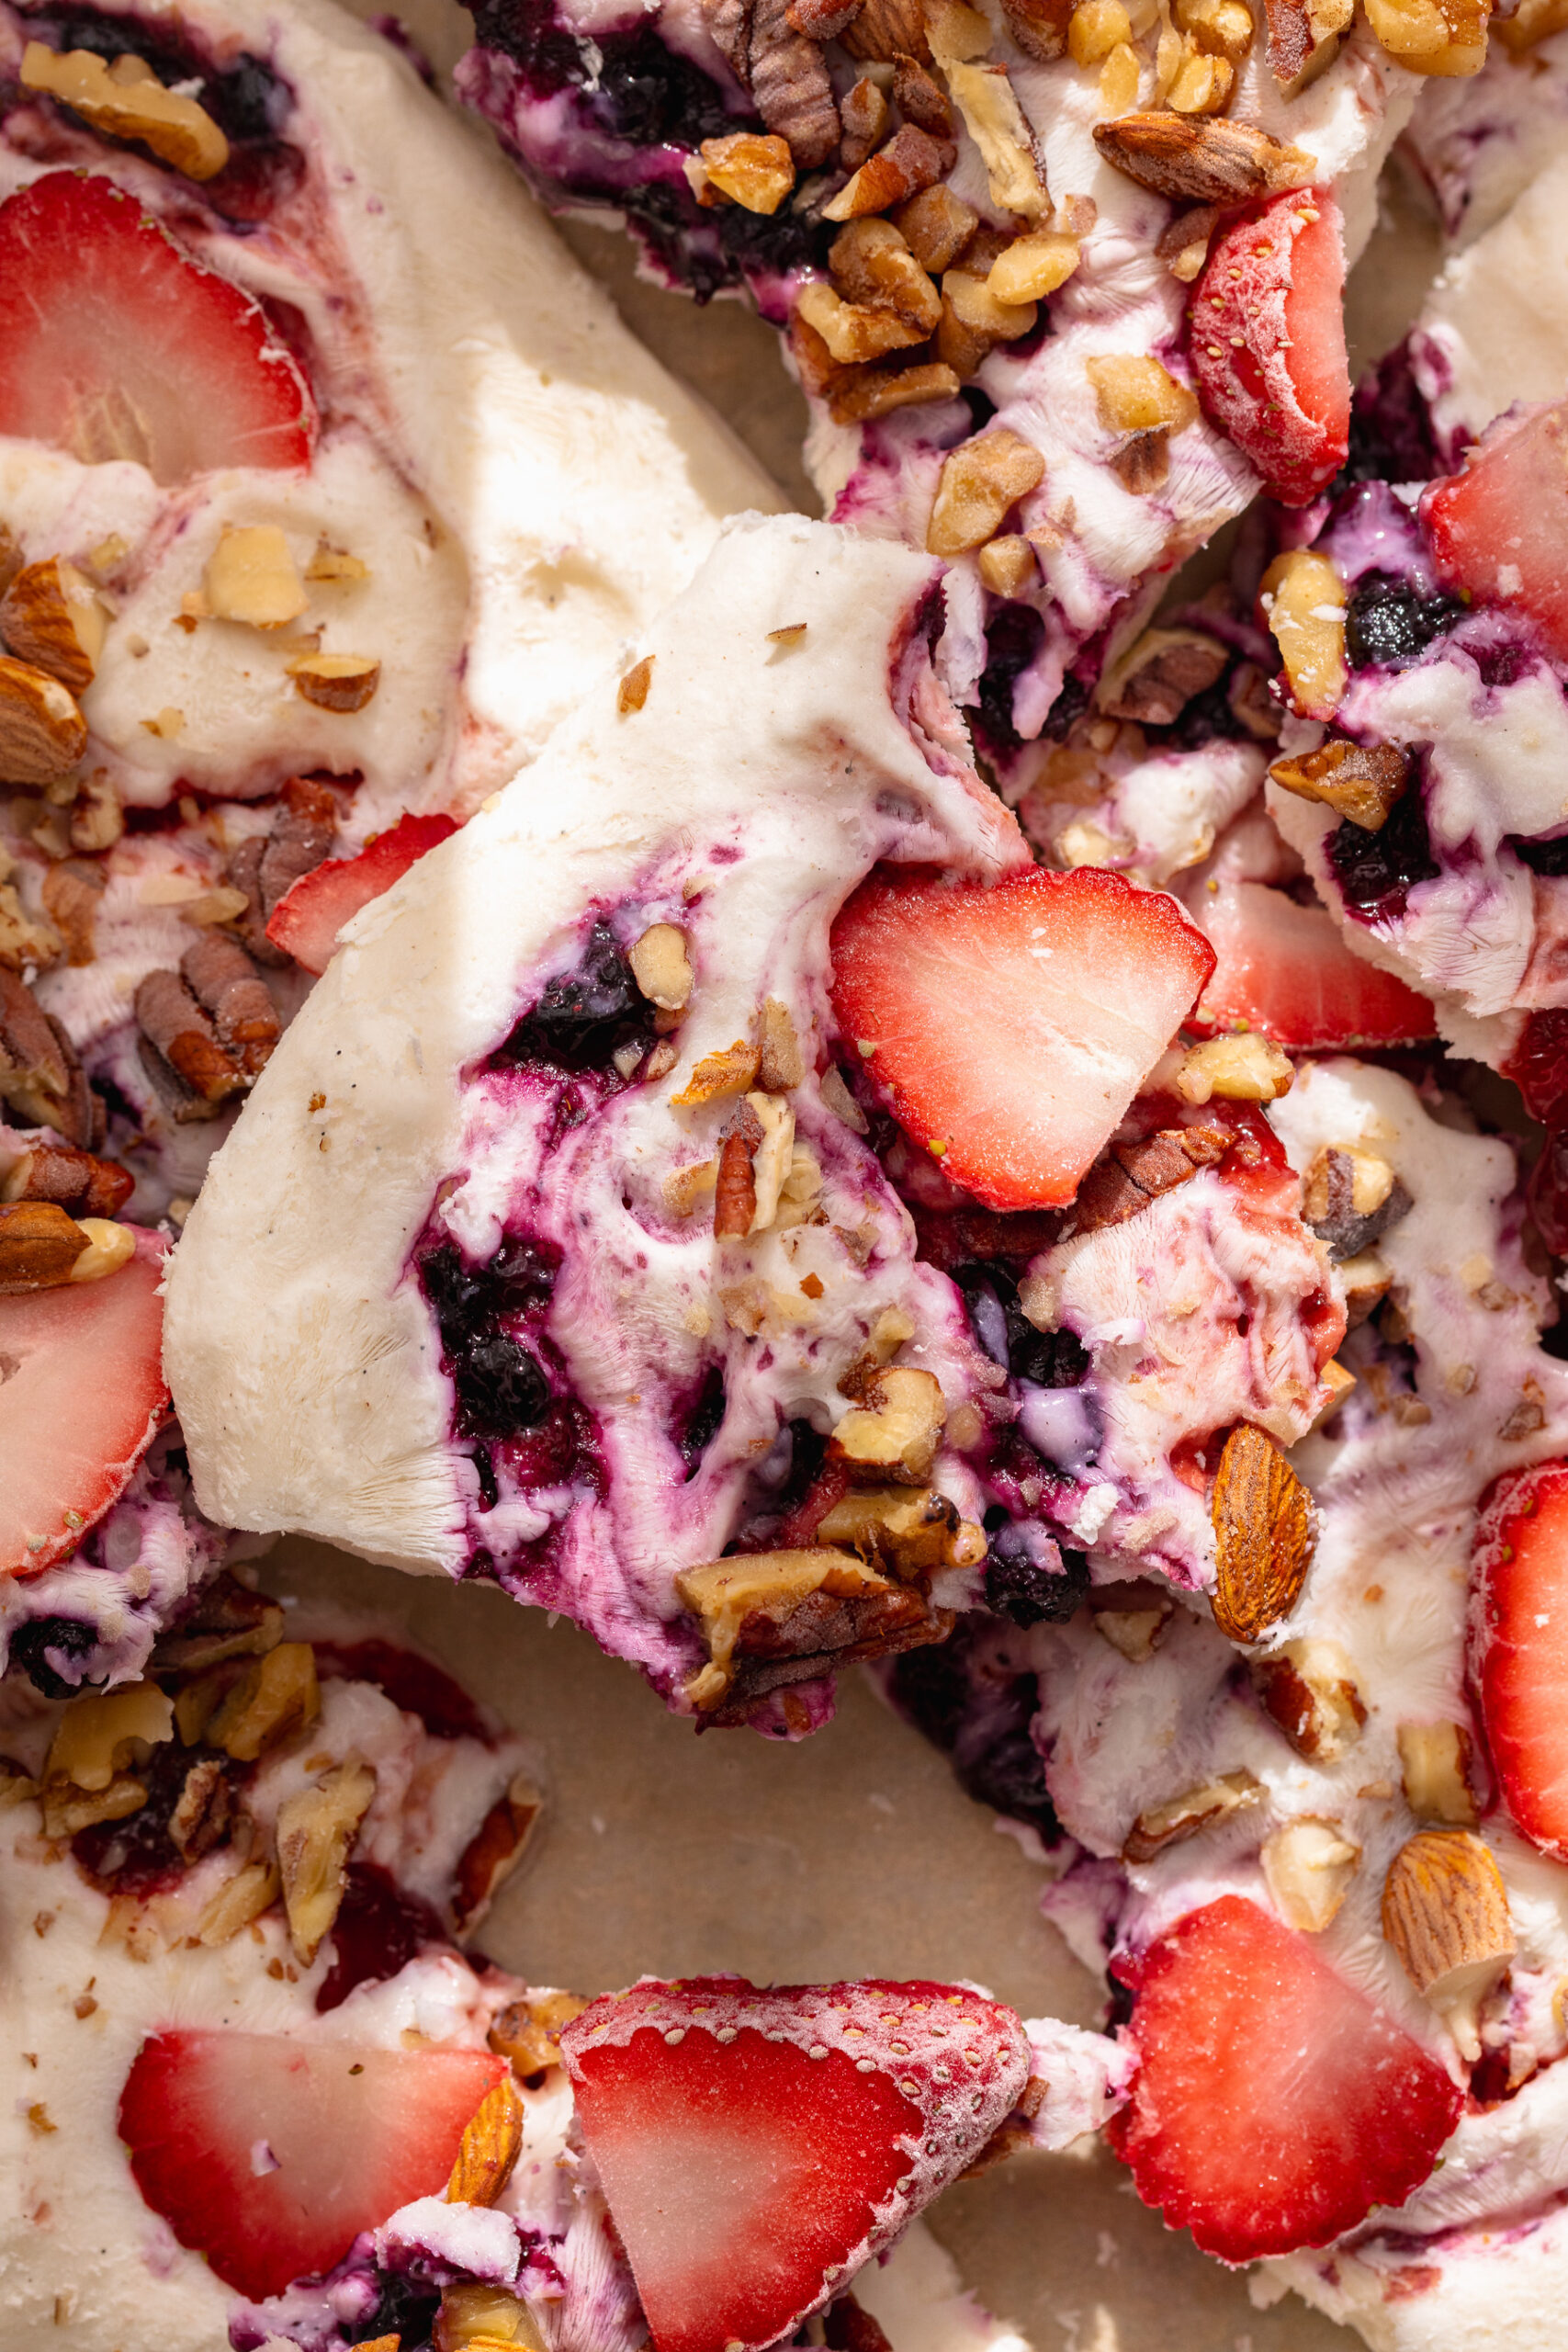
Tag

healthy dessert

Browsing

Ok, we need to talk about this healthy cookie pie for a second… because it might just be my new favorite thing I’ve ever made! Imagine a giant, warm, ooey gooey chocolate chip cookie that comes out of the oven with crispy edges, a fudgy center, and melty pools of chocolate in every single bite. Now imagine it’s made with just 6 wholesome ingredients, no refined sugar, and is totally gluten-free. That is exactly what this recipe is, and I am not exaggerating when I say that even healthy dessert skeptics will be going back for seconds (and thirds!!!).

This is the kind of recipe that proves that healthy eating doesn’t have to mean boring eating. It’s indulgent, deeply satisfying, and looks way more impressive than the effort it takes to make. If you like my 6-Ingredient Healthy Snickers or my 4-Ingredient Protein Brownies, then you’re going to LOVE this cookie pie!

Why You’ll Love This Healthy Cookie Pie

  • Only 6 ingredients! Almond butter, maple syrup, eggs, almond flour, baking soda, and chocolate chips. That’s the whole list – no pie crust, mixer, or complicated steps.
  • Ooey gooey and totally indulgent. 😍 This cookie pie bakes up with perfectly crispy edges and a soft, fudgy, pull-apart center that is genuinely irresistible. No one will believe it’s healthy.
  • Even healthy dessert skeptics will love it. I’ve made this for people who are convinced that healthy desserts are never as good as the real thing, and let me tell ya – they’ve eaten their words (see what I did there?? 😉).
  • Super easy to make! One bowl, one pie dish, 15 minutes in the oven. You can go from craving to eating in under 30 minutes.
  • Naturally gluten-free and dairy-free. Made with almond flour and naturally sweetened with maple syrup – no refined sugar, no gluten, no dairy.
  • Perfect for sharing. This cookie pie is the ultimate crowd-pleasing dessert. Serve it warm straight from the dish with a scoop of vanilla ice cream on top – YUM!
close up image of healthy cookie pie being scooped out of a skillet.

Recipe Variations and Substitutions

  • Almond Butter: Any creamy nut or seed butter works in this recipe. Peanut butter gives it a more classic cookie flavor, cashew butter is milder and slightly sweeter, and sunflower seed butter keeps it completely nut-free.
  • Maple Syrup: Honey is a perfect 1:1 swap. You can also use agave nectar or any other liquid sweetener you love.
  • Almond Flour: Oat flour works well as a substitute! Use the same amount. Just note that the texture will be slightly less dense and more cake-like.
  • Chocolate Chips: Swap for peanut butter chips, white chocolate chips, or cacao nibs for a different flavor twist. A mix of chocolate chips and chopped nuts is also incredible.
  • Add-Ins: Want to take it to the next level? Stir in ¼ cup of chopped walnuts or pecans for a nutty crunch, or swirl in a tablespoon of peanut butter over the top before baking.

Sam’s Recipe Tips

  • Don’t overbake it. I cannot stress this enough – the secret to the perfect ooey gooey cookie pie is pulling it from the oven when the center still looks slightly underdone. It will firm up as it cools, and you’ll be left with that dreamy soft, fudgy middle. If you bake until the center looks fully set, it’ll come out dry.
  • Use an oven-safe skillet for extra-crispy edges. A cast-iron skillet holds heat beautifully and gives you those perfect crispy, golden-brown edges with an extra gooey center. A standard 9-inch pie dish works great too!
  • Serve it warm. Cookie pie is 100% best served warm, straight from the dish. The chocolate chips stay melty and the center is soft and pull-apart perfect. Reheat individual slices in the microwave for 20–30 seconds if needed.
  • Storing leftovers: Store any leftover cookie pie covered at room temperature for up to 2 days, or in the fridge in an airtight container for up to 5 days. When you’re ready to eat, I recommend warming it back up in the oven for a minute or two!
overhead image of healthy cookie pie in a pie dish with ice cream on top.
4.80 from 5 votes

6-Ingredient Healthy Cookie Pie

This healthy cookie pie is a 6-ingredient, gluten-free dessert that bakes up with perfectly crispy edges, a soft fudgy center, and melty chocolate chips in every bite! Made with almond butter, maple syrup, and almond flour, it comes together in one bowl in under 30 minutes with barely any effort. If you're looking for an indulgent, crowd-pleasing dessert recipe that's actually healthy, this is it!
Print Pin Rate
Prep Time: 5 minutes
Cook Time: 12 minutes
Total Time: 17 minutes
Servings: 6 servings

Equipment

  • 1 9-inch pie dish
  • 1 large bowl

Ingredients

  • 1 cup creamy unsweetened almond butter or any nut/seed butter
  • 1/2 cup maple syrup or honey
  • 2 eggs
  • 1 cup almond flour
  • 1/2 teaspoon baking soda
  • 1/2 cup chocolate chips

Instructions

  • Preheat oven to 350°F and lightly grease a 9-inch pie dish or oven-safe skillet.
  • Whisk together the almond butter, maple syrup, and eggs in a large bowl until smooth and combined.
  • Stir in the almond flour and baking soda until a thick batter forms.
  • Fold in the chocolate chips, then pour into the prepared pie dish and spread evenly.
  • Bake for 12–15 minutes, until the edges are set and golden but the center still looks slightly underdone.
  • Let cool for at least 10 minutes before slicing. Serve warm with ice cream or whipped cream!

Notes

  • Don’t overbake! Pull from the oven when the center looks slightly underdone for the best gooey texture.
  • Store covered at room temperature for up to 2 days, or refrigerated for up to 5 days.
  • Freeze individual slices for up to 2 months.

Nutrition

Serving: 1serving | Calories: 320kcal | Carbohydrates: 24g | Protein: 9g | Fat: 22g | Fiber: 3g | Sugar: 16g

The protein craze has totally taken over. And I’ll admit, I’ve been fully indoctrinated. But when it comes to protein desserts, the one thing that’s lacking is a truly healthy high-protein ice cream. They’re all made with a zillion ingredients and additives, and for some reason most still don’t even resemble ice cream. That is, until I developed this 2-ingredient protein ice cream recipe. Just milk and protein powder – that’s it! Frozen, then churned in a Ninja Creami for a seriously delicious high-protein frozen treat. It’s also totally easy to customize with your favorite flavors and mix-ins. Next time I plan on mixing in some of my 4-ingredient protein brownie chunks for even more protein – YUM!

Why You’ll Love This Protein Ice Cream

  • Only 2 ingredients.
  • High-protein – 35 grams of protein, to be exact!
  • Healthy, low-calorie option – only 300 calories for the whole pint.
  • Creamy, soft, and tastes like classic vanilla ice cream. Best enjoyed on top of my single serve protein cookie skillet!
  • Super easy and quick to make with a Ninja Creami!
  • Perfect for post-workout recovery or a healthy, high-protein dessert.
2 ingredient protein ice cream just churned in a ninja creami container.

Recipe Variations and Substitutions

  • Different flavors: Use chocolate, strawberry, or any flavored protein powder
  • Dairy-free: Swap cow’s milk for almond, oat, or coconut milk
  • Mix-ins: Add dark chocolate chips, berries, or crushed cookies after spinning
  • Lower sugar: Use an unsweetened protein powder

Frequently Asked Questions

Can I make this in an ice cream maker?

Yes! You can make this protein ice cream in a standard ice cream maker by following the same ingredient ratios and churning according to your machine’s instructions until thick and creamy.

How much protein does this protein ice cream contain?

One serving contains 35 grams of protein and about 300 calories.

Can I make a different ice cream flavor?

Absolutely! Use any flavored protein powder—chocolate, cookies & cream, or strawberry all work perfectly.

What kind of protein powder did you use?

I used Be Well By Kelly Vanilla Protein Powder, purchased on Amazon, but any vanilla or unflavored protein powder works.

2 ingredient protein ice cream in a ninja creami cup with an ice cream scoop.
No ratings yet

2-Ingredient Protein Ice Cream Recipe (35g protein!)

This 2-ingredient protein ice cream is a creamy, high-protein treat with just milk and protein powder! Each serving contains 35 grams of protein and only 300 calories, making it perfect for a post-workout snack or healthy dessert. Super easy to make in a Ninja Creami, this healthy ice cream tastes just like classic vanilla ice cream!
Print Pin Rate
Prep Time: 5 minutes
Total Time: 5 minutes
Servings: 1 serving

Equipment

  • 1 Ninja Creami

Ingredients

  • 1 1/2 cups milk I used whole milk
  • 1 scoop/serving protein powder

Instructions

  • Add both ingredients to a blender and blend until smooth, or add both ingredients to the Ninja Creami container and blend them together with a milk frother.
  • Freeze the ice cream mixture for 24 hours, then remove it from the freezer and let it thaw slightly for about 10 minutes.
  • Place the container into your Ninja Creami and spin it on the light ice cream mode. Then, respin it two more times or until it’s thick but super creamy. Enjoy right away or transfer to a container and freeze for later on!

Nutrition

Serving: 1serving | Calories: 300kcal | Carbohydrates: 10g | Protein: 35g | Fat: 2g | Sugar: 5g

With a sweet tooth like mine, it’s no surprise I love a candy bar! And I’ve certainly made it my mission to make healthier versions of all of my favorites. It started with healthy twix bars, then healthy butterfingers, healthy peanut butter cups, date caramels, and now healthy snickers! These homemade candy bars are made with just 6 simple ingredients, lightly sweetened with maple syrup, and shockingly easy to make. They’re perfect to store in the fridge or freezer whenever your sweet cravings strike (which… if you’re anything like me, they strike daily)!

the inside of a healthy snickers bar.

What Makes This Recipe Healthy?

  • Naturally sweetened with maple syrup
  • Made with nutrient-dense almond flour
  • No refined sugar
  • Gluten-free, dairy-free, and vegan
  • Healthier fats from nuts and coconut oil
  • Homemade alternative to processed candy

These bars give you the same layered texture and flavor as a traditional snickers, but with better ingredients!

a close up bite shot of a healthy snickers bar.

Why You’ll Love These Healthy Snickers

These healthy snickers bars have everything you want in a dessert: sweet, salty, crunchy, and chocolatey layers that taste nostalgic but are made with better-for-you ingredients! They’re surprisingly easy to make, require no complicated baking skills, and are perfect for prepping ahead so you always have a sweet treat in the fridge or freezer. With just 6 simple ingredients, they deliver the classic candy bar experience while being gluten-free, dairy-free, vegan, and healthier than store-bought versions!

Storage Tips

Store the bars in an airtight container in the refrigerator for up to 1 week. For longer storage, freeze for up to 2 months. These bars taste amazing straight from the fridge or slightly thawed from frozen!

overhead image of healthy snickers bars on a table with flaky salt on top.
5 from 4 votes

6-Ingredient Healthy Snickers

These healthy Snickers bars are a homemade twist on the classic candy, made with just 6 simple ingredients! They’re gluten-free, dairy-free, vegan, and layered with shortbread, caramel, peanuts, and chocolate. Perfect for a healthier dessert, these homemade healthy snickers are easy to make and totally delicious!
Print Pin Rate
Prep Time: 10 minutes
Cook Time: 10 minutes
Chill Time: 29 minutes
Total Time: 49 minutes
Servings: 16 servings

Equipment

  • 1 large bowl
  • 1 9×9-inch baking pan
  • 1 small saucepan

Ingredients

For the shortbread layer:

  • 2 cups almond flour
  • 1/4 cup melted coconut oil
  • 1/4 cup maple syrup
  • 1 teaspoon vanilla extract optional

For the caramel layer:

  • 3/4 cup creamy peanut butter unsweetened (cashew butter or almond butter work too!)
  • 1/4 cup coconut oil
  • 1/4 cup maple syrup
  • 1 teaspoon vanilla extract optional

For the filling:

  • 1/2 cup roasted peanuts

For the chocolate layer:

  • 1 cup chocolate chips
  • 1 tablespoon coconut oil
  • flaky salt for topping (optional)

Instructions

  • Preheat oven to 350° Fahrenheit and line a 9×9-inch baking pan with parchment paper.
  • Add all shortbread ingredients to a large bowl and mix to combine. Then, transfer the crust to your prepared baking pan and press the crust down into an even layer over the base of the pan. Bake for 10minutes or until lightly golden brown around the edges. Leave the shortbread to cool for at least 10 minutes before adding the caramel.
  • Make the caramel layer by adding all caramel ingredients to a small saucepan over medium-low heat. Whisk the mixture together, and continue whisking as it heats up and starts to gently bubble.After 2 minutes, remove the caramel from the heat and pour over the cooled shortbread crust, then evenly sprinkle the peanuts over the caramel.
  • Transfer the baking pan to the fridge to allow the caramel to set for at least 30 minutes and up to one hour. Once the caramel is completely set and firm to the touch, make the chocolate layer.
  • To make the chocolate layer, melt together the chocolate chips and coconut oil in either the microwave or over a double boiler until completely smooth. Pour the melted chocolate over the caramel and gently spread into an even layer.
  • Transfer the pan back to the fridge to set one last time for about 30 minutes or until the chocolate has hardened. Remove the snickers bars from the fridge, then remove them from the pan and cut into 16 “full size”bars or 32 “mini” bars.

Nutrition

Serving: 1serving | Calories: 340kcal | Carbohydrates: 19g | Protein: 6.5g | Fat: 28g | Fiber: 4g | Sugar: 10g

If I’m completely honest, I’ve never been much of a cheesecake fan. When it comes to dessert, I prefer either my 4-ingredient protein brownies or healthy banana bread mug cake. However, my husband loves cheesecake. And in the spirit of it being the month of “love” (or whatever) I thought I’d make a little something just for him. Well, let me tell ya – this healthy cheesecake turned out SO good, I ate half of it. Now I don’t know what that says about me, or the kind of wife I am… but what I do know is that his cheesecake is DELICIOUS! And lucky for me/anyone who tries it, it’s also the easiest cheesecake you’ll ever make. So make this for your significant other, a friend, family member, or literally just yourself – I won’t judge!

5 ingredient healthy cheesecake slice on a plate with a fork.

What Makes This Cheesecake Healthy?

  • Made with protein-rich Greek yogurt
  • Naturally sweetened with maple syrup
  • NO refined sugar
  • Gluten-free
  • High protein dessert (10g+ per slice!)
  • Minimal ingredients, no crust required

Frequently Asked Questions

What kind of cream cheese should I use?

Full-fat cream cheese gives the richest texture, but reduced-fat cream cheese also works well. Use block-style cream cheese, not whipped.

Can I use a sugar-free sweetener?

Yes. Any liquid sugar-free sweetener can be used in place of maple syrup. Adjust to taste depending on sweetness level.

How do I store this healthy cheesecake?

Store slices in an airtight container in the refrigerator for up to 5 days. You can also freeze individual slices for up to 2 months and thaw in the fridge overnight.

Can I add a healthy cheesecake crust to this recipe?

Yes! You can absolutely add a crust if you prefer a more traditional cheesecake. A simple crust made from crushed graham crackers (or gluten-free graham crackers) mixed with melted butter works great – just press it into the pan and bake for 8–10 minutes before adding the filling. Let the crust cool slightly, then pour in the cheesecake batter and bake as directed.

Sam’s Recipe Tips

  • Blend until completely smooth for the creamiest texture!
  • Don’t overbake – the center should still have a slight jiggle.
  • Chill the cheesecake fully before slicing for nice and clean slices.
  • Add fresh berries or a drizzle of nut butter before serving – YUM!
  • For extra vanilla flavor, use vanilla bean paste.
5 ingredient healthy cheesecake slice on a plate with whipped cream and a strawberry on top.
5 from 2 votes

5-Ingredient Healthy Cheesecake

This healthy cheesecake is creamy, high in protein, and made with just 5 simple ingredients! It’s gluten-free, refined sugar-free, and each slice contains over 10 grams of protein. Perfect for a lighter dessert, this easy cheesecake delivers classic flavor with better-for-you ingredients!
Print Pin Rate
Prep Time: 5 minutes
Cook Time: 45 minutes
Total Time: 50 minutes
Servings: 8 servings

Equipment

  • 1 food processor or high speed blender
  • 1 8-inch springform pan

Ingredients

  • 2 cups plain Greek yogurt
  • 1 cup cream cheese
  • 4 eggs
  • 1/4 cup maple syrup or any liquid sweetener
  • 1 teaspoon vanilla extract or vanilla bean paste

Instructions

  • Preheat oven to 350° Fahrenheit and line the bottom of a 8-inch springform pan or baking dish with parchment paper and lightly grease the sides.
  • Add all ingredients to a blender and blend until completely smooth.
  • Pour the mixture into the pan, then bake for 45-50 minutes or until the cheesecake is just set in the middle.
  • Remove the pan from the oven and let the cheesecake cool at room temperature for 1 hour, then transfer it to the fridge to set for at least 2 hours. Remove the cheesecake from the fridge, then slice and serve!

Nutrition

Serving: 1serving | Calories: 230kcal | Carbohydrates: 7g | Protein: 11g | Fat: 17g | Sugar: 6g

Peanut butter + chocolate is the ultimate flavor combo if ya ask me. I really can’t get enough of it! I made my frozen banana and peanut butter bites all summer, and my healthy strawberry peanut butter cups were one of the most popular recipes I’ve ever shared. So when I was thinking up this recipe for a peanut butter and chocolate bar, loaded with cornflakes for extra crunch – I knew it’d be a huge hit! I actually tested this peanut butter cornflake bars recipe right before my family came over a few weeks ago, so they all got to be the first to try it and gave it raves reviews. After that, I wasted no time getting this recipe ready to share with you all! I just know you’ll love these crunchy, peanut butter-y, and extra chocolatey cornflake bars as much as they did!

peanut butter cornflake bars cut into squares with flaky sea salt on top.

Why You’ll Love These Peanut Butter Cornflake Bars

  • Simple & no-bake: Only four base ingredients and no oven – ideal for quick treats or busy days. They’re naturally gluten-free, dairy-free, vegan, and ready in no time at all!
  • Crunchy + chewy texture: Cornflakes give a satisfying crunch, peanut butter binds it all together, and the chocolate layer adds richness – a classic combo that hits sweet and salty just right!
  • Flexible & allergy-friendly: It’s easy to swap ingredients – use sunflower butter or almond butter instead of peanut butter, or gluten-free cornflakes – and still get delicious bars that work for vegan, dairy-free, or gluten-free diets.

How to Store These Bars

Once assembled and chilled until firm, store the bars in an airtight container in the fridge – they’ll stay good for up to 1 week. For longer storage, you can freeze individual bars for up to 2–3 months; just thaw for a few minutes before serving for best texture.

overhead image of peanut butter cornflake bars.

Sam’s Recipe Tips

  • Use gluten-free cornflakes like these ones, if you’re avoiding gluten – always double-check cereal packaging!
  • Press the cornflake-peanut butter mixture firmly into the pan so bars hold together well after chilling.
  • Melt chocolate gently (microwave or double-boiler), and pour while warm for a smooth top that sets evenly.
  • For extra crunch or festive flair: sprinkle sea salt, chopped nuts, or crushed candy over the chocolate before it sets!
overhead image of peanut butter cornflake bars with a bite taken out.
No ratings yet

4-Ingredient Peanut Butter Cornflake Bars

These 4-ingredient peanut butter cornflake bars are the ultimate no-bake treat – crunchy, chocolatey, and ready in minutes! Made with simple pantry staples, they’re naturally gluten-free, dairy-free, and even vegan. These peanut butter cornflake bars are delicious as an easy sweet snack or holiday treat!
Print Pin Rate
Servings: 16 servings

Ingredients

  • 1 cup creamy peanut butter unsweetened
  • 1/2 cup maple syrup or honey
  • 3 1/2 cups cornflakes

For the chocolate layer:

  • 1 cup chocolate chips
  • 1/4 cup creamy peanut butter unsweetened

Instructions

  • Mix together the peanut butter and maple syrup in a large bowl, then add in the cornflake and mix again until the cornflakes are coated in the peanut butter mixture.
  • Transfer the cornflake mixture to a 9×9-inch pan lined with parchment paper, and gently press it down into an even layer.
  • Make the chocolate layer by melting together the chocolate chips and peanut butter in either the microwave or over a double boiler until completely smooth and combined.
  • Pour the melted chocolate mixture over the cornflakes and smooth it into an even layer. Transfer the pan to the fridge for set for about 1 hour, then remove from the fridge and cut into squares.

Nutrition

Serving: 1serving | Calories: 230kcal | Carbohydrates: 18g | Protein: 6g | Fat: 14g | Fiber: 2g | Sugar: 11g