Tag

chocolate chips

Browsing

Why You’ll Love This Recipe

  • Easy and Fast: Made with minimal ingredients and no baking required, this recipe comes together in minutes.
  • Healthier Dessert: Sweetened with maple syrup and packed with healthy fats from peanut butter and almond flour, this bark satisfies your sweet tooth while keeping it wholesome.
  • Customizable: You can switch up the flavors, toppings, and even the type of nut butter for a bark that’s truly your own.
Close up image of 4 ingredient peanut butter cup cookie dough bark.

What You’ll Need to Make Peanut Butter Cup Cookie Dough Bark

For the Cookie Dough Base:

  1. Almond Flour: The foundation of the bark, almond flour provides a soft, cookie-dough-like texture and is naturally gluten-free.
  2. Unsweetened Peanut Butter: Adds richness and flavor while binding the ingredients together. Make sure to use a drippy, natural peanut butter for the best results.
  3. Maple Syrup: Acts as the natural sweetener, giving the cookie dough a perfect touch of sweetness.

For the Chocolate Layer:

  1. Chocolate Chips: Melted chocolate creates a decadent top layer. I use Guittard Extra Dark Chocolate Chips in most of my recipes because they’re dairy-free, but rich and not-too-sweet.
  2. Chopped Peanuts (Optional): Add a delightful crunch and extra peanut flavor to the bark.

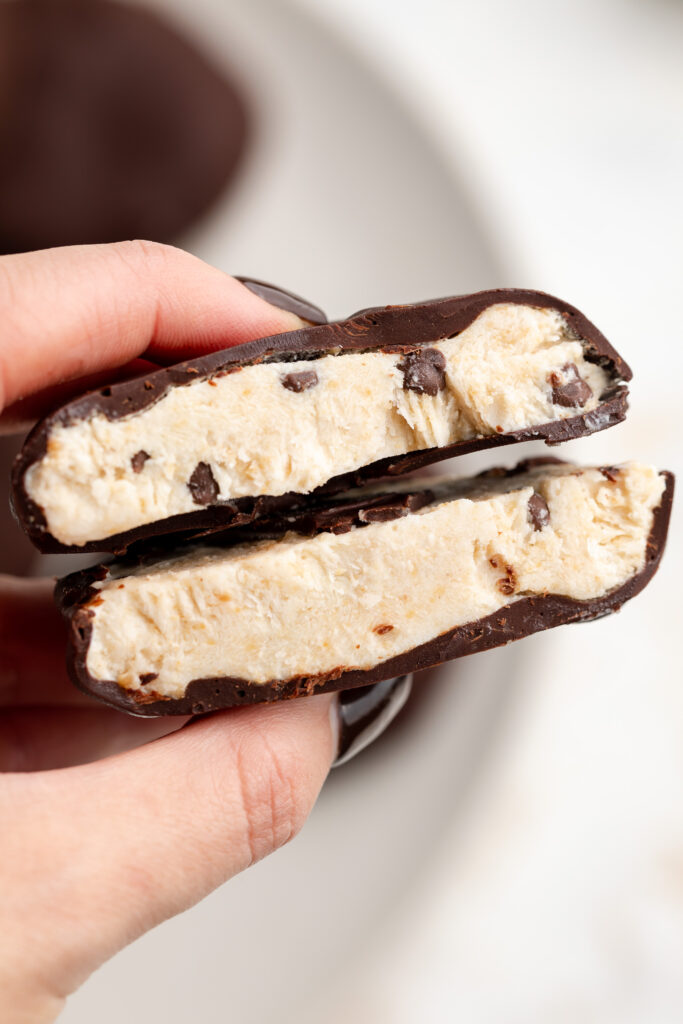
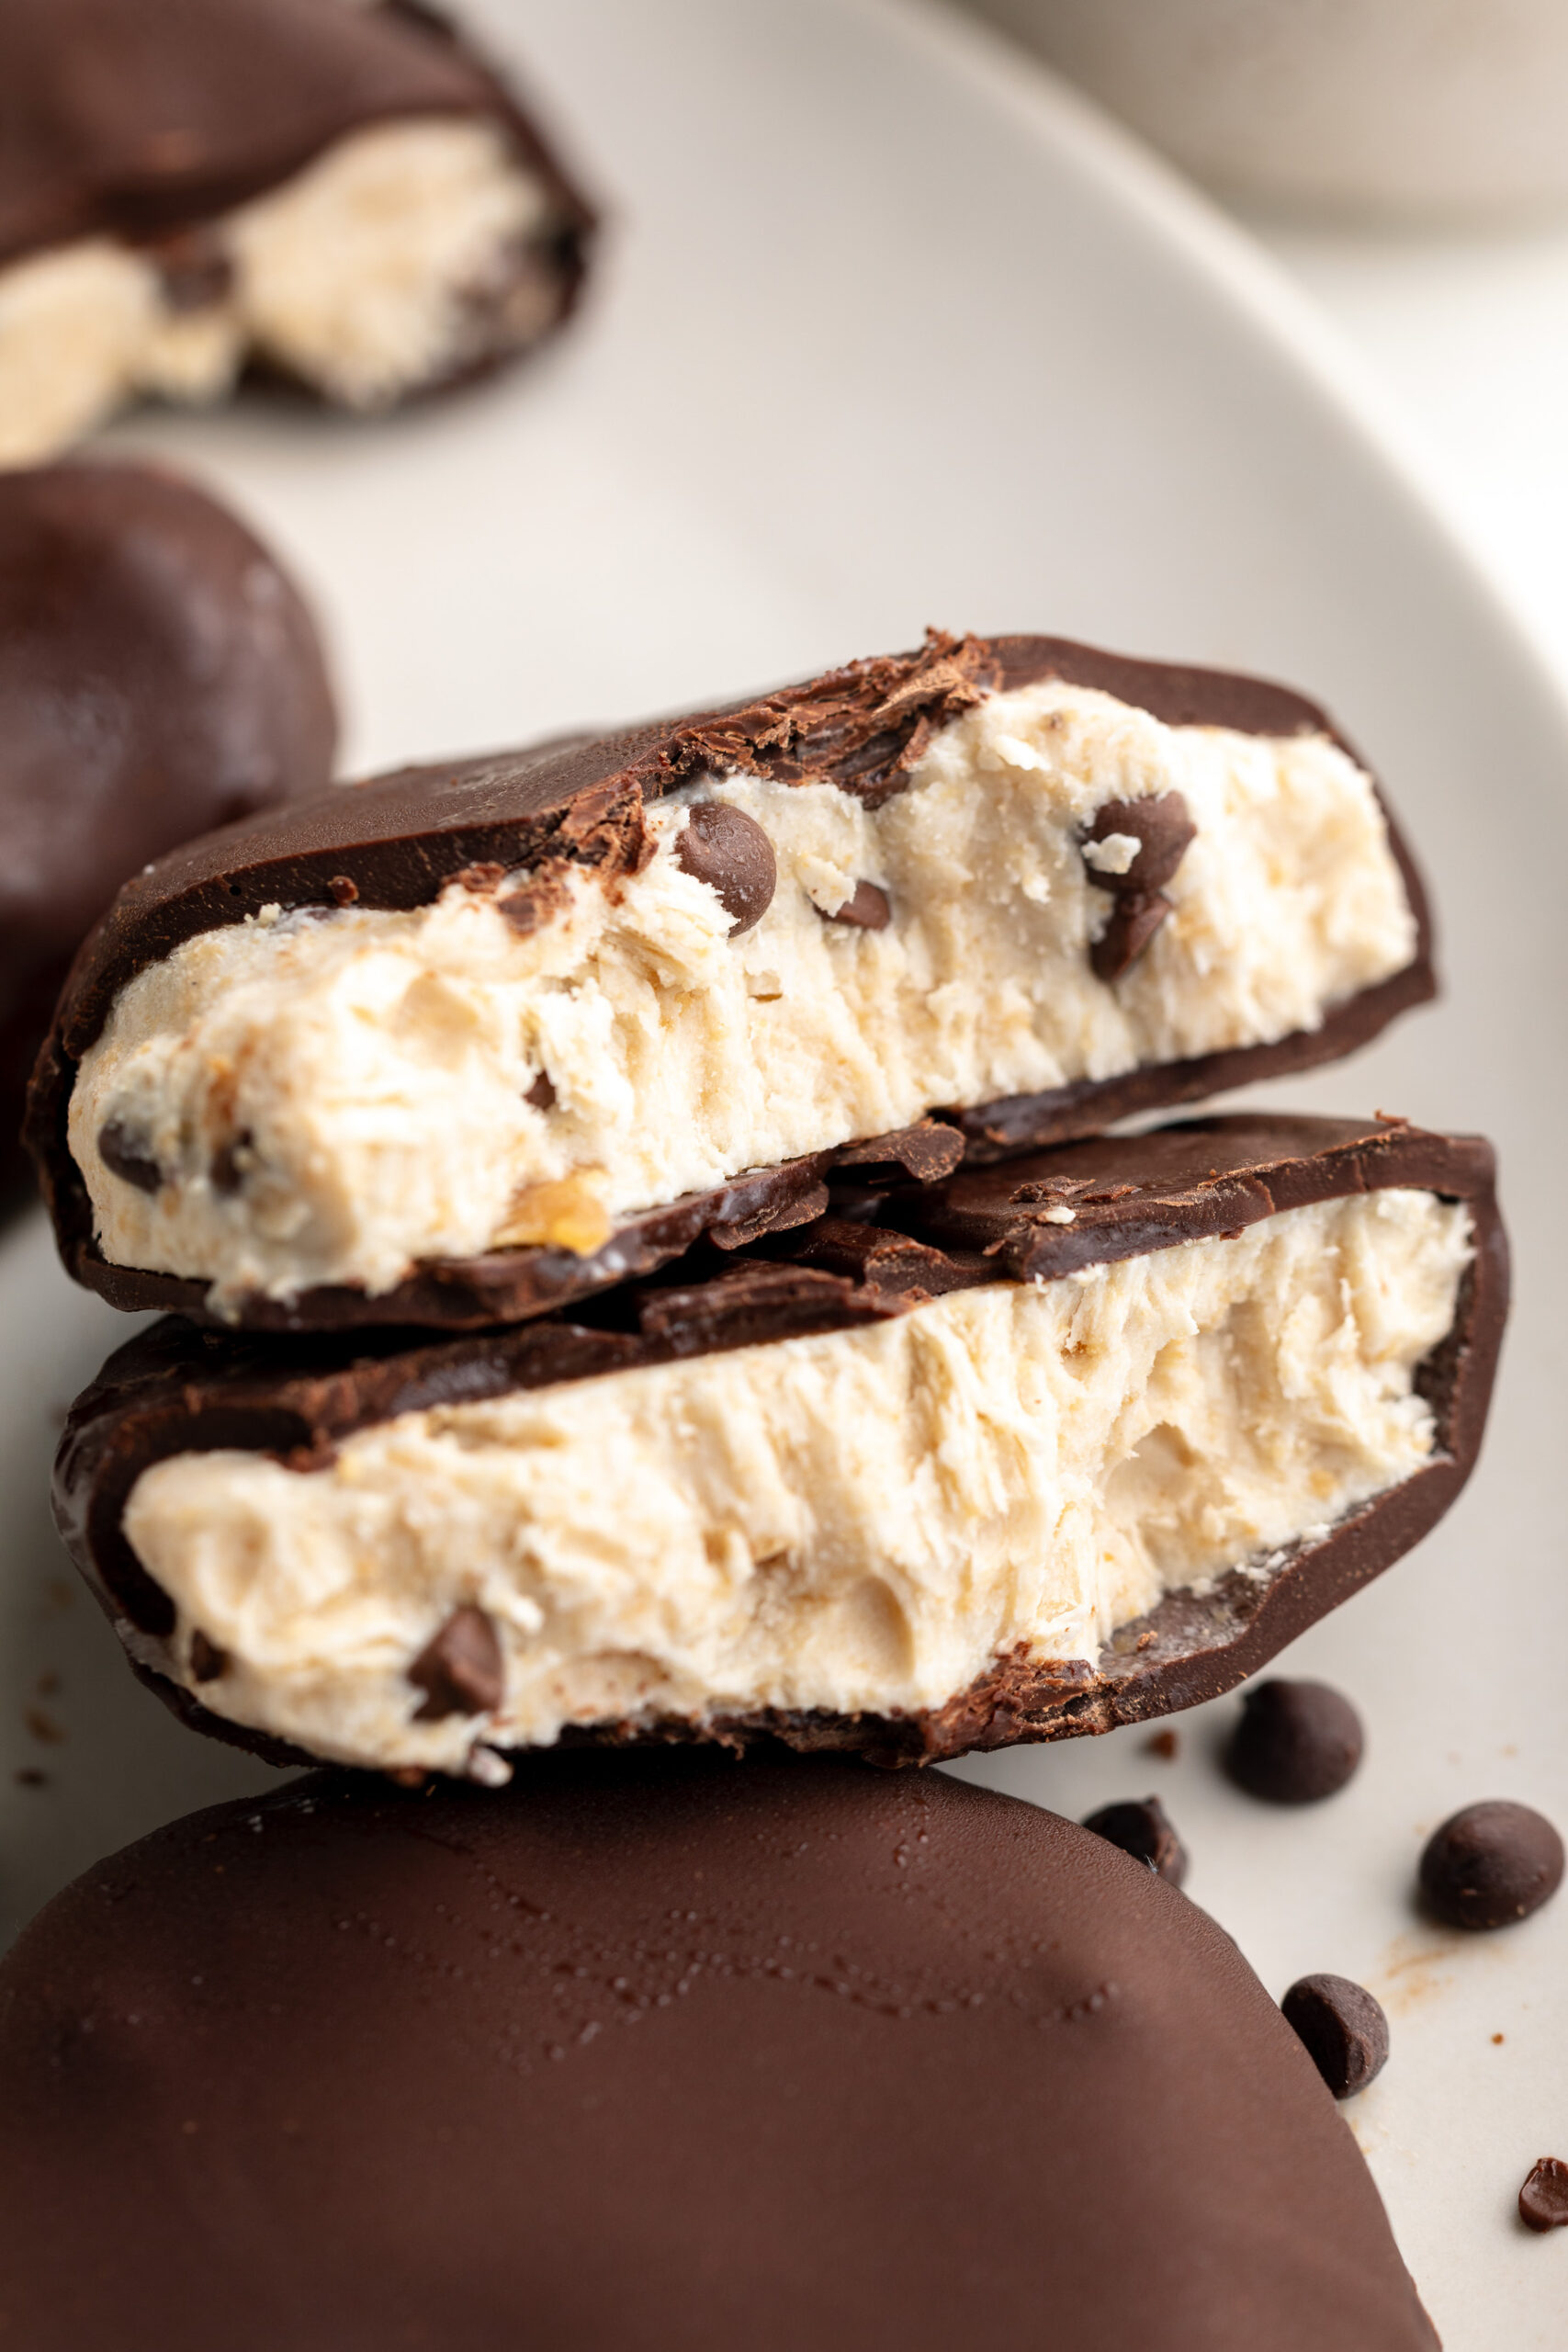
How to Make Peanut Butter Cup Cookie Dough Bark

  1. Prepare the Dough: In a medium bowl, mix together the almond flour, peanut butter, and maple syrup until a soft dough forms.
  2. Shape the Bark: Line a small baking sheet or large plate with parchment paper. Place the dough on the paper and spread it evenly with your hands to form a large, flat rectangle.
  3. Melt the Chocolate: Heat the chocolate chips in the microwave in 30-second intervals or over a double boiler, stirring until smooth.
  4. Assemble the Bark: Pour the melted chocolate over the dough, spreading it evenly to cover the entire surface. Sprinkle chopped peanuts on top, if desired.
  5. Freeze and Serve: Place the bark in the freezer for at least 1 hour. When ready to enjoy, remove from the freezer and break or cut into pieces.
Overhead image of 4 ingredient peanut butter cup cookie dough bark cut into large pieces.

Storage Tips

  • Refrigerator: Store the bark in an airtight container in the fridge for up to 1 week.
  • Freezer: Keep leftovers in the freezer for up to 1 month. Simply remove pieces as needed and let them sit at room temperature for 5-10 minutes before eating.

Switch Up the Flavors of This Recipe

  • Add a Drizzle: Drizzle melted peanut butter or caramel over the chocolate layer before freezing for added flavor.
  • Toppings Galore: Sprinkle with flaky sea salt (I love this Maldon Flaky Sea Salt), crushed pretzels, or cacao nibs for a fun twist.
  • Different Nut Butter: Swap peanut butter with almond or cashew butter for a subtle flavor variation.
5 from 1 vote

Peanut Butter Cup Cookie Dough Bark

This peanut butter cup cookie dough bark is a quick and easy treat that’s not only delicious but also healthy! Made with just 4 simple ingredients, it’s naturally gluten-free, dairy-free, and vegan, and sweetened with maple syrup. It’s perfect for when you’re craving something sweet and indulgent yet wholesome. Whether you’re making it for yourself, your family, or a special occasion, this bark is sure to be a hit!
Print Rate
Prep Time: 5 minutes
Freezing Time: 1 hour
Total Time: 1 hour 5 minutes
Servings: 6 servings

Equipment

  • 1 small bowl
  • 1 small baking sheet

Ingredients

  • 1 cup plus 2 tablespoons almond flour
  • 1/4 cup unsweetened creamy peanut butter
  • 3 tablespoons maple syrup
  • 3/4 cup chocolate chips melted
  • chopped peanuts (optional) for topping

Instructions

  • Mix together the almond flour, peanut butter, and maple syrup in a bowl.
  • Line a small baking sheet or large plate with parchment paper, then place the cookie dough mixture on top of the parchment paper. Spread and flatten the mixture with your hands to form a large piece of cookie dough bark.
  • Melt the chocolate chips, then pour the melted chocolate over the bark. Spread the chocolate into an even layer, then place the bark in the freezer for at least one hour.
  • When ready to eat, remove the peanut butter cup cookie dough bark from the freezer and either cut or break into large pieces. Enjoy right away or store leftover bark in the freezer for later!

Nutrition

Serving: 1serving | Calories: 293kcal | Carbohydrates: 21g | Protein: 8g | Fat: 21g | Sugar: 14g

Perfectly rich and chocolatey almond flour brownies! Super easy to make with just one bowl and 8 ingredients. These brownies are my all-time favorite grain-free, dairy-free, and healthy dessert recipe!

overhead image of almond flour brownies.

What You’ll Need to Make Almond Flour Brownies

Almond Flour – Duh! Almond flour is the star of this show. I highly recommend blanched super-fine almond flour for these gluten-free brownies. I use and love this Bob’s Red Mill Almond Flour in all of my almond flour recipes!

Sugar – I used coconut sugar in my almond flour brownies to make them refined sugar-free. Coconut sugar is just as sweet and tasty as regular sugar, but less processed! However, you can totally use whatever kind of sugar you have on-hand.

Chocolate Chips – Plenty of chocolate chips for these double chocolate brownies! You’ll melt one cup and beat them into the batter, then add 1/2 cup of whole chocolate chips in at the very end. The result is ultra rich and chocolatey brownies, YUM!

three almond flour brownies stacked on top of each other.

Tips and Tricks

  • Beat the eggs and sugar together until super light and fluffy. This is what gives us that crisp, crackly brownie top!
  • Serve these almond flour brownies warm with a scoop of cold vanilla ice cream! I just LOVE turning this dessert into brownie sundaes, such a delicious and decadent treat.
  • Go ahead, add a handful of chopped walnuts to these brownies if you’d like! I personally don’t see anything wrong with walnuts in brownies, so have fun and make these your own.
close-up overhead image of almond flour brownies.

Adjust This Recipe to Your Dietary Needs

Make it Vegan: Simply swap the eggs for your favorite vegan egg substitute. I haven’t tested this option myself just yet, so if you do let me know how it works in the comments!

Make it Paleo: For paleo brownies, use coconut sugar in this recipe, and use either paleo chocolate chips or a chopped paleo chocolate bar. I recommend Hu Kitchen Chocolate Baking Gems!

Don’t Forget to Try These Almond Flour Recipes!

close-up overhead image of almond flour brownies.
4.70 from 13 votes

Almond Flour Brownies

Perfectly rich and chocolatey almond flour brownies! Super easy to make with just one bowl and 8 ingredients. These brownies are my all-time favorite grain-free, dairy-free, and healthy dessert recipe!
Print Pin Rate
Prep Time: 5 minutes
Cook Time: 30 minutes
Total Time: 35 minutes
Servings: 16 brownies

Ingredients

  • 1 cup sugar, I used coconut sugar
  • 3 large eggs
  • 1 1/2 cups almond flour
  • 3 tablespoons unsweetened cocoa powder
  • 1 teaspoon vanilla extract
  • 1/4 teaspoon salt
  • 1 1/2 cups chocolate chips, divided
  • 1/2 cup olive oil, avocado oil or vegetable oil

Instructions

  • Preheat oven to 350° Fahrenheit and line an 8×8-inch pan with parchment paper.
  • In a large bowl, beat together the sugar and eggs with either a hand or stand mixer. Continue beating for 3-5 minutes, until super light and fluffy.
  • Add the almond flour, cocoa powder, vanilla extract, and salt. Stir until everything is just combined, careful not to over-mix.
  • In a separate small bowl, add the olive oil and 1 cup of chocolate chips. Microwave in 30-second intervals, stirring between each interval, until chocolate chips are fully melted.
  • Pour melted chocolate chips and olive oil into the brownie batter, and stir to combine. Then, fold in the remaining chocolate chips.
  • Pour brownie batter into prepared pan and bake for 30-35 minutes, or until the center is just barely set. Remove from oven and let cool completely before slicing into squares.

Notes

  • These almond flour brownies will stay fresh in an airtight container, at room temperature, for up to 1 week. That is… if they last that long!
  • Nutrition

    Serving: 1brownie | Calories: 264kcal | Carbohydrates: 28g | Protein: 4.5g | Fat: 16g | Sugar: 20g

    I’ve seen variations of these frozen yogurt bites all over social media. But I haven’t seen a cookie dough version yet! And because cookie dough is like kinda my thing (see: gluten-free edible cookie dough, healthy cookie dough bark, no-bake cookie dough bars) I figured I’d take it upon myself to develop one.

    cookie dough frozen yogurt bites on a plate.

    Why You’ll Love This Recipe

    These Cookie Dough Frozen Yogurt Bites are a perfect combination of creamy, rich coconut yogurt and crunchy chocolate chips, all wrapped in a smooth chocolate coating. They’re incredibly easy to make, gluten-free, dairy-free, and can even be made vegan! The perfect bite-sized treat to enjoy any time of day, whether you’re craving a sweet snack or a healthy dessert alternative.

    What You Need to Make These Cookie Dough Frozen Yogurt Bites

    Coconut Yogurt: A dairy-free alternative that provides a creamy base for the frozen bites. Rich in probiotics and perfect for those looking for a non-dairy option. I use and love Cocojune plain unsweetened coconut yogurt!

    Cashew Butter: Adds a subtle nutty flavor and a creamy, thick texture to the yogurt mixture. You can substitute it with almond butter or sunflower seed butter for a nut-free option.

    Maple Syrup: Naturally sweetens the yogurt mixture without refined sugar, keeping the recipe healthy and low-glycemic.

    Mini Chocolate Chips: Provide the “cookie dough” flavor with their slight crunch and delicious chocolate flavor. I recommend Enjoy Life’s dairy-free mini chocolate chips in this recipe!

    Chocolate Chips & Coconut Oil: The melted chocolate forms the crunchy outer shell, with coconut oil helping to make it silky and smooth for easy dipping.

    holding a cookie dough frozen yogurt bite sliced in half.

    Tips and Tricks For the Best Frozen Yogurt Bites

    • Make sure to freeze the yogurt bites completely before dipping them in the melted chocolate to prevent them from melting.
    • Use a cookie scoop to ensure evenly sized bites that are easy to dip and eat.
    • For a thicker chocolate coating, dip each bite twice, allowing the chocolate to harden between dips.

    Switch Up The Flavors

    • Try adding a tablespoon of peanut butter to the yogurt mixture for a peanut butter cookie dough twist.
    • Substitute the mini chocolate chips for white chocolate chips or chopped nuts for a different texture and flavor.
    • Add a pinch of sea salt on top of the dipped bites to balance the sweetness with a salty kick!

    Adjust This Recipe to Your Dietary Needs

    • Vegan Option: Ensure the yogurt and chocolate chips you use are dairy-free.
    • Nut-Free Option: Swap the cashew butter with sunflower seed butter or another nut-free alternative.
    cookie dough frozen yogurt bites cut in half
    5 from 1 vote

    Cookie Dough Frozen Yogurt Bites

    This cookie dough frozen yogurt bites recipe is made with just a few wholesome ingredients. It’s naturally gluten-free, dairy-free, vegan, and free of refined sugars, making it a healthy, delicious snack option!
    Print Pin Rate
    Prep Time: 5 minutes
    Freezing Time: 1 hour 30 minutes
    Total Time: 1 hour 35 minutes
    Servings: 8 servings

    Equipment

    • small bowl
    • baking sheet

    Ingredients

    For the frozen yogurt:

    • 1 cup non-dairy yogurt plain and unsweetened
    • 2 tablespoons protein powder optional
    • 1/4 cup cashew butter or any nut/seed butter
    • 1 teaspoon vanilla extract
    • 2 tablespoons maple syrup or honey

    For the chocolate coating:

    • 1 1/2 cups chocolate chips
    • 2 tablespoons coconut oil

    Instructions

    • Add all frozen yogurt ingredients except the mini chocolate chips to a bowl and mix until smooth and combined. Then, stir in the mini chocolate chips.
    • Line a baking sheet with parchment paper, and use either a medium-large cookie scoop to scoop dollops of the frozen yogurt mixture onto the making sheet, slightly spacing each one apart.
    • Transfer the baking sheet to the freezer and freeze for at least 1 hour, or until the yogurt is completely solid.
    • Melt together the chocolate chips and coconut oil in either the microwave or over a double boiler, until completely smooth. Remove the frozen yogurt bites from the freezer and dip each one into the melted chocolate to coat, then transfer back to the baking sheet.
    • Once all frozen yogurt bites have been dipped in chocolate, return to the freezer for at least another 30 minutes, or until chocolate has hardened. Either store in the freezer for enjoy later on, or take one out to enjoy right away!

    Nutrition

    Serving: 1serving | Calories: 185kcal | Carbohydrates: 16g | Protein: 3g | Fat: 14g | Sugar: 11g

    I took a walk down memory lane recently during my healthy candy series, where I recreated some of my favorite childhood candy. I started with healthy snickers, then homemade crunch bars, 4 ingredient date caramels, and healthy butterfingers. These candy recreations reminded me of all the packaged treats I was obsessed with as a kid, and at the top of my list was always (& forever <3) cosmic brownies!

    The quest to recreate a cosmic brownie seemed easy enough – make a gluten-free fudgy brownie base, top with dairy-free chocolate ganache, then rainbow coated chocolate chips! And I’m not going to lie, I managed to perfect the brownies on my second try, but the rainbow chips required some extra work. I scoured the internet for dayssss trying to find dye-free rainbow chips and OMG I finally did! On Amazon, too, of all places (linked here). So with that major score, my healthy gluten free cosmic brownies finally came together. And oh boy are they PERFECT!

    two healthy gluten free cosmic brownies stacked on top of each other.

    Why You’ll Love This Recipe

    These gluten-free cosmic brownies are rich, fudgy, and incredibly easy to make with just 7 ingredients. The one-bowl recipe keeps things simple while still delivering a decadent brownie base topped with a smooth chocolate ganache. They’re also dairy-free, gluten-free, and can easily be adjusted to suit various dietary needs—perfect for anyone craving a healthier, nostalgic treat!

    What You Need to Make Gluten-Free Cosmic Brownies

    • Almond Butter: Acts as the base for the brownies, adding richness and a boost of healthy fats while keeping the brownies naturally gluten-free.
    • Maple Syrup: Sweetens the brownies with a natural touch, adding moisture and flavor without the need for refined sugars.
    • Egg & Egg Yolk: Help to bind the ingredients and add structure to the brownie base, giving it that fudgy, chewy texture.
    • Vanilla Extract: Enhances the flavors of the brownies, adding a warm, comforting note to the overall taste.
    • Cocoa Powder: Provides the rich chocolate flavor, while also being gluten-free and dairy-free.
    • Chocolate Chips & Non-Dairy Milk: Create a smooth and creamy chocolate ganache topping that sets the brownies apart with its rich, melt-in-your-mouth finish.
    • Rainbow Sprinkles: For more authentic looking cosmic brownies, use rainbow coated chocolate chips on top. I found these dye-free rainbow chips on Amazon and they’re perfect!

    How to Make Gluten-Free Cosmic Brownies

    1. Preheat: Heat your oven to 350° Fahrenheit and line a 9×9-inch pan with parchment paper.
    2. Mix the Batter: In a large bowl, whisk together almond butter, maple syrup, eggs, and vanilla. Add cocoa powder and mix until the batter is smooth and well combined.
    3. Bake: Pour the batter into the prepared pan and bake for 20-25 minutes until a toothpick inserted in the center comes out mostly clean.
    4. Prepare Ganache: While the brownies cool, melt chocolate chips and non-dairy milk to create a silky ganache.
    5. Assemble: Once the brownies have cooled, pour the ganache over the top, and sprinkle with your favorite sprinkles for that iconic cosmic brownie look. Let them set in the fridge before slicing and enjoying.
    healthy gluten free cosmic brownies on parchment paper.

    Storage Tips

    Store these brownies in an airtight container in the fridge for up to 5 days. You can also freeze them for up to 2 months—just defrost in the fridge or at room temperature before eating.

    Adjust This Recipe to Your Dietary Needs

    • Make It Vegan: Replace the egg with a flax egg (1 tablespoon of flaxseed meal mixed with 3 tablespoons of water) and ensure your chocolate chips are dairy-free.
    • Lower Sugar: Use sugar-free chocolate chips and reduce the maple syrup, replacing part of it with a sugar-free sweetener if desired.
    • Nut-Free: Substitute almond butter with sunflower seed butter or another nut-free alternative for a nut-free version of these brownies.
    healthy gluten free cosmic brownie with a bite taken out
    No ratings yet

    Gluten Free Cosmic Brownies

    This recipe is an easy, one-bowl, 7-ingredient solution for gluten-free cosmic brownies! They're healthy, gluten-free, dairy-free, and can easily be made vegan or low-sugar. With its nostalgic appeal and rich chocolate flavor, it’s the perfect indulgent treat, still packed with better-for-you ingredients.
    Print Pin Rate
    Prep Time: 10 minutes
    Cook Time: 20 minutes
    Chilling Time: 1 hour
    Total Time: 1 hour 30 minutes
    Servings: 16 servings

    Equipment

    • 9×9-inch baking pan
    • large bowl
    • small bowl

    Ingredients

    • 1 cup almond butter
    • 1/2 cup maple syrup
    • 1 whole egg and 1 egg yolk
    • 1 teaspoon vanilla extract
    • 1/2 cup unsweetened cocoa powder

    For the chocolate ganache frosting:

    • 1 1/4 cups chocolate chips
    • 1/2 cup non-dairy milk
    • 1/2 cup rainbow sprinkles or rainbow coated chocolate chips

    Instructions

    • Preheat oven to 350° Fahrenheit and line a 9×9-inch baking pan with parchment paper.
    • Whisk together the almond butter, maple syrup, egg and egg yolk, and vanilla extract in a large bowl.
    • Add in the cocoa powder, then whisk again to fully combine the brownie batter.
    • Transfer the batter to your prepared baking pan and bake for 20-25 minutes, or until a toothpick inserted down the center of the brownies comes out mostly clean.
    • Remove the brownies from the oven and let them cool in the pan for at least 20 minutes.
    • Once brownies are slightly cool, make the chocolate ganache by melting together the chocolate chips and non-dairy milk in 30 second bursts in the microwave. Once the chocolate has melted, stir together the ganache until it’s smooth and combined.
    • Pour the ganache over the brownies and top with sprinkles. Then, transfer the brownies to the fridge for 1 hour, or until the ganache is firm.
    • Remove the brownies from the pan and cut into squares. Enjoy right away or store in the fridge for later on!

    Nutrition

    Serving: 1brownie | Calories: 230kcal | Carbohydrates: 23g | Protein: 5.2g | Fat: 15g | Sugar: 16.5g

    This healthy homemade butterfingers recipe is made with just 5 simple ingredients! They’re gluten-free, dairy-free, and naturally sweetened for a better-for-your treat. They join my healthy candy lineup, right alongside healthy snickers, 3 ingredient homemade crunch bars, and healthy date caramels. These homemade butterfingers are perfect for anyone looking for a healthier version of a favorite candy bar!

    healthy homemade butterfingers on parchment paper.

    Why You’ll Love This Recipe

    These healthy homemade butterfingers are a delicious and satisfying treat with just 5 simple ingredients. They’re a guilt-free version of the classic candy bar, made gluten-free, dairy-free, and with natural sweeteners like honey or maple syrup. Plus, they’re easy to make and perfect for storing in the freezer for a quick snack or dessert.

    What You Need to Make Healthy Butterfingers

    • Peanut Butter: The rich, creamy base that gives these bars their signature nutty flavor. Choose a natural variety with no added sugar for a healthier option.
    • Honey or Maple Syrup: These natural sweeteners bring the perfect touch of sweetness while keeping the recipe refined-sugar free.
    • Corn Flakes: Adds the necessary crunch to replicate the crispy texture found in classic butterfingers. Make sure to choose gluten-free corn flakes if needed. The Real Cereal Organic Corn Flakes are the best ones I’ve found, they’re unsweetened and made with just 2 ingredients!
    • Chocolate Chips: Melting the chocolate for coating gives that irresistible outer layer, while dark chocolate keeps the sugar content lower.
    • Coconut Oil: Helps melt the chocolate smoothly and adds a subtle flavor boost. I use and love Nutiva Organic Coconut Oil in many of my recipes!

    How to Make Healthy Homemade Butterfingers

    Start by crushing the corn flakes and mixing them with peanut butter and honey to form a crispy, sweet mixture. Press it into a loaf pan to set in the freezer before dipping each bar in melted chocolate. Freeze them again for a crunchy, chocolate-covered treat that’s perfect for a healthier snack or dessert.

    healthy homemade butterfingers stacked on top of each other,

    Storage Tips

    Once made, store your homemade butterfingers in an airtight container in the freezer for up to 3 months. This way, they’ll stay fresh and ready for whenever you need a sweet treat.

    Adjust This Recipe to Your Dietary Needs

    • Make it Vegan: Swap the honey for maple syrup and use dairy-free chocolate chips.
    • Low Carb: Choose a sugar-free chocolate alternative and use a low-carb cereal.
    • Make it Nut-Free: Substitute the peanut butter with sunflower seed butter for a nut-free version.
    close up image of healthy butterfingers cut in half.
    No ratings yet

    Healthy Homemade Butterfingers

    This healthy homemade butterfingers recipe is made with just 5 simple ingredients. They're gluten-free, dairy-free, and naturally sweetened for a better-for-your treat. These homemade butterfingers are perfect for anyone looking for a healthier version of a favorite candy bar!
    Print Pin Rate
    Prep Time: 5 minutes
    Freezing Time: 1 hour
    Total Time: 1 hour 5 minutes
    Servings: 12 servings

    Equipment

    • 1 large bowl
    • 1 9×4-inch loaf pan
    • 1 small bowl

    Ingredients

    • 1 cup peanut butter
    • 1/3 cup maple syrup or honey
    • 2 cups corn flakes
    • 1 cup chocolate chips
    • 2 teaspoons coconut oil

    Instructions

    • Add the corn flakes to a large zip-top bag, seal the bag and crush the cereal into small pieces.
    • Add the peanut butter and honey or maple syrup to a large bowl and mix together to combine. Add the crushed corn flakes to the bowl and mix again to fully combine.
    • Transfer the mixture to a loaf pan lined with parchment paper, and press the cereal down into the pan to create an even layer. Place in the freezer to harden for at least 1 hour.
    • Remove the pan from the freezer and carefully lift the corn flake mixture out of the pan. Place on a cutting board and cut into 12 bars.
    • Melt the chocolate chips and coconut oil together, whisk to combine, and then dip each bar into the melted chocolate to completely coat. Remove the bar from the chocolate and set on a parchment-lined plate. Repeat this process with all 12 butterfingers until all are coated in chocolate.
    • Transfer the butterfingers to the freezer for about 10 minutes, or until the chocolate has hardened. Then, enjoy right away or store in an airtight container in the freezer for up to 3 months (if they last that long!).

    Nutrition

    Serving: 1serving | Calories: 241kcal | Carbohydrates: 22g | Protein: 6g | Fat: 15g | Sugar: 12g