Tag

gluten-free

Browsing

Using two halved honeynut squashes, vegan butter, salt, cinnamon and maple syrup, this savory and sweet dish is a perfect Fall meal when you want something easy and healthy to make.

Honeynut Squash

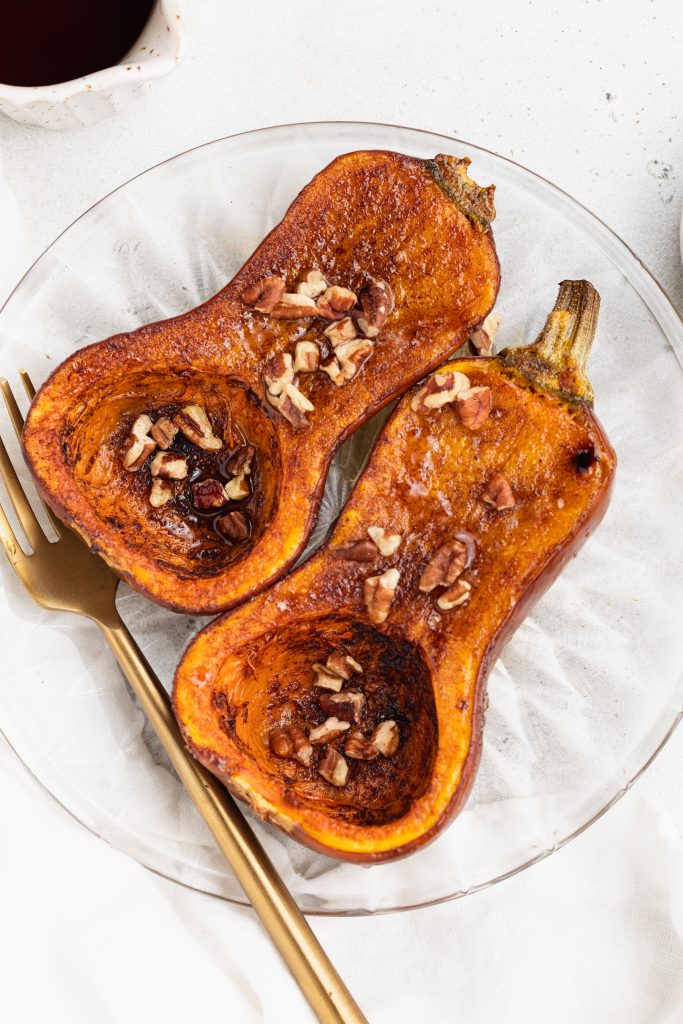
If you aren’t familiar with honeynut squash, it looks and tastes just like a baby version of butternut, but it’s sweeter and smaller. Both are perfect as a roasted treat and are easily interchangeable if you prefer one over the other. I love this dish because, not only is it delicious, but the size is perfect for individual servings. It’s also rich in nutrients, including a high amount of vitamin A and potassium, making it a healthy Fall dish. (Well…aside from the drizzle of maple syrup, but that’s OK, you can always grab a sugar-free version).

  • Honeynut Squash – The staple to this dish! Make sure to remove the seeds before cooking. You can also use butternut squash if you prefer.

  • Vegan Butter – If you want to keep it dairy-free, but want something other than butter, you can try using coconut oil.

  • Cinnamon – I find that cinnamon really adds a nice touch and compliments the maple syrup.

  • Maple Syrup – Add some sweetness to this dish by drizzling some maple syrup on it before serving.

  • Optional toppings: Pecans, walnuts, dried cranberries

Adjust this recipe to your diet

  • Dairy: Use regular butter instead of vegan butter.

  • Sugar-free: Use a sugar-free version of maple syrup like Lankantos.

TIPS FOR MAKING THIS Honeynut Squash Recipe

  • Sprinkle some pecans, walnuts or cranberries on top once the honeynut squash is roasted.

  • Swap the cinnamon for pumpkin pie spice.

Roasted Honeynut Squash With Maple Syrup & Cinnamon (Vegan, Gluten-Free)

0 from 0 votes
Recipe by Samantha Course: Snacks, Lunch, DinnerCuisine: AmericanDifficulty: Easy
Servings

1

servings
Prep time

5

minutes
Cooking time

35

minutes
Calories

300

kcal
Total time

40

minutes

My vegan roasted honeynut squash recipe with cinnamon and drizzled with maple syrup is utterly sweet and savory, making it the perfect Fall dish.

Ingredients

  • 2 honeynut squash, halved lengthwise and seeds removed

  • 1 tablespoon butter, melted (I used vegan butter)

  • ¼ teaspoon cinnamon

  • Maple syrup, for serving

Directions

  • Preheat oven to 425° Fahrenheit and place honeynut squash on a large baking sheet.
  • Mix melted butter, salt, and cinnamon together in a small bowl then brush over inside of honeynut squash.
  • Bake squash 35-40 minutes, then drizzle with maple syrup and enjoy.

Recipe Video

Notes

  • Honeynut Squash can be roasted up to 2 days in advance and stored in the refrigerator in an airtight container.
  • Uncooked squash can be frozen in an airtight container for up to 3 months.

Did you make this recipe?

Share it and tag @samdoesherbest on Instagram!

Like this recipe?

Follow us @samdoesherbest on Pinterest

Other Squash Recipes

Drizzled with creamy maple tahini dressing, this vegan and gluten-free autumn harvest bowl uses in-season produce like apples, sweet potatoes, dried cranberries, kale and pumpkin seeds. This makes it the perfect Fall meal for when you want something fresh and delicious that can be made under 30 minutes.

Don’t you just love Fall produce? I know I do, and I try to make the most of it while it’s still in-season. This healthy vegan salad features all the best Fall ingredients. Topped with maple tahini dressing, it’s a standout salad that’s always a hit!

MAIN INGREDIENTS NEEDED TO MAKE AUTUMN HARVEST BOWL

  • Sweet Potato – High in fiber and antioxidants, it’s one of my favorite Fall root veggies.

  • Apples – Any variety works but I recommend something nice and crisp like Fiji or Honeycrisp.

  • Chickpeas – This will give you some major protein to help keep your energy levels up.

  • Kale – This is one of the most nutrient-dense foods and a key ingredient to this dish. Any variety works!

  • Dried Cranberries -Adds a tart, natural taste to the bowl. When cranberries are dried, they lose most of their vitamins, but they hold on to other nutrients such as potassium and calcium.

  • Tahini -If you’re unfamiliar with what Tahini is, it’s a smooth paste made by grinding sesame seeds. It kinda looks like peanut butter, but it’s not as sweet. The nutty flavor is strong and earthy, and can be a little bitter.

  • Maple Syrup – Maple has a distinctly sweet flavor which helps balance the earthy flavor of the tahini.

ADJUST THIS RECIPE TO YOUR DIET

  • Nut option: Replace the pumpkin seeds with walnuts.

  • Gluten: You can sub the quinoa for something like freekeh (it has notably more fiber than brown rice and even quinoa!) 

TIPS FOR MAKING THIS VEGAN AUTUMN HARVEST BOWL

  • You could use any fruits and vegetables that you have one hand – be creative!

  • Store leftovers in the fridge in a sealed container for up to 3 days.

Autumn Harvest Bowl with Maple Tahini Dressing (Vegan, Gluten-Free)

0 from 0 votes
Recipe by Samantha Course: LunchCuisine: AmericanDifficulty: Easy
Servings

1

servings
Prep time

10

minutes
Cooking time

20

minutes
Calories

300

kcal
Total time

30

minutes

Drizzled with creamy maple tahini dressing, this vegan and gluten-free autumn harvest bowl uses in-season produce like apples, sweet potatoes, dried cranberries, kale and pumpkin seeds. This makes it the perfect Fall meal for when you want something fresh and delicious that can be made under 30 minutes.

Ingredients

  • For the bowl:
  • 1 sweet potato, peeled and cut into 1-inch cubes

  • ¼ cup chickpeas, drained and rinsed

  • 2 tablespoons avocado oil

  • Salt and pepper, to taste

  • 2 cups kale, chopped

  • ½ cup quinoa, cooked

  • ½ apple, sliced

  • 2 tablespoons dried cranberries

  • 2 tablespoons pumpkin seeds, raw or roasted

  • For the tahini dressing:
  • ¼ cup tahini

  • 2 tablespoons maple syrup

  • 1 tablespoon lemon juice

  • ¼ teaspoon salt

Directions

  • Preheat oven to 425° Fahrenheit and line a baking sheet with parchment paper.
  • Place sweet potatoes and chickpeas on baking sheet then drizzle with avocado oil and sprinkle with salt and black pepper. Toss potatoes and chickpeas to coat, then roast for 20 minutes, tossing halfway through.
  • While chickpeas and potatoes roast, add all tahini dressing ingredients to a bowl and whisk together until combined.
  • Place kale in a bowl and pour in half of the tahini dressing. Toss and massage the dressing into the kale with your hands.
  • Once chickpeas and potatoes are done, assemble harvest bowl by adding remaining ingredients to the bowl with the kale then drizzling with remaining tahini dressing.

Recipe Video

Notes

  • Storage: Store leftovers in the fridge in a sealed container for up to 3 days.
  • You could use any fruits and vegetables that you have one hand – be creative!

Did you make this recipe?

Share it and tag @samdoesherbest on Instagram!

Like this recipe?

Follow us @samdoesherbest on Pinterest

OTHER EASY SALAD RECIPES YOU’LL LOVE

Learn how to make this deliciously soft and buttery gluten-free coffee cake with a cinnamon filling and streusel crumb topping. This recipe also includes a dairy-free option, making it a treat something everyone can get excited about!  

Gluten-Free Cinnamon Streusel Coffee Cake

This gluten-free coffee cake recipe so easy to make and such a perfect breakfast or brunch recipe on the weekend. Serve a big slice with a hot cup of coffee for a breakfast treat!

While there are a few different parts to this recipe — the coffee cake, streusel, and filling — they are all very quick to make.

MAIN INGREDIENTS NEEDED TO MAKE Gluten-Free Cinnamon Streusel Coffee Cake

  • 1:1 Baking Flour – I used Bob’s Red Mill 1-to-1 Gluten Free Baking flour in this recipe.

  • Butter – I used non-dairy butter. Consider using unsalted butter to control the salt content in this recipe.

  • Eggs – A common pantry item, you only need 3 large eggs for this.

  • Milk – I used non-dairy, but any milk can work with this.

  • Vanilla Extract – I use this in almost all my baked goods recipes because it enhances all the other flavors in the recipe.

  • Cinnamon – This wouldn’t be a cinnamon streusel coffee cake without the cinnamon!

  • Brown Sugar – This will be used for the streusel topping.

ADJUST THIS RECIPE TO YOUR DIET

  • Add dairy: I used non-dairy butter and milk, but it’s totally fine to use regular dairy products too.

  • Add Gluten: You can try using all purpose flour instead of the gluten-free version. However, flours like almond flour or coconut flour have not been tested in this recipe.

TIPS FOR MAKING Gluten-Free Cinnamon Streusel Coffee Cake

  • I like to line my baking dish with parchment paper for easy removal of the coffee cake from the pan after baking. 

  • You can make the filling and streusel ahead of time. Just store in the refrigerator until ready to use.

Gluten-Free Cinnamon Streusel Coffee Cake (Dairy-Free)

5 from 2 votes
Recipe by Samantha Course: Breakfast, DessertCuisine: AmericanDifficulty: Easy
Servings

9

servings
Prep time

10

minutes
Cooking time

50

minutes
Calories

300

kcal
Total time

1

hour 

Learn how to make this deliciously soft and buttery gluten-free coffee cake with a cinnamon filling and streusel crumb topping. This recipe also includes a dairy-free option, making it a treat something everyone can get excited about!  

Ingredients

  • For the cake:
  • 3 cups gluten-free 1:1 baking flour

  • 2 teaspoons baking powder

  • ½ teaspoon salt

  • 1 ½ cups sugar

  • 1 cup butter, melted (I used non-dairy butter)

  • 3/4 cup milk (I used non-dairy milk)

  • 3 eggs

  • 1 tablespoon vanilla extract

  • For the filling:
  • ¼ cup sugar

  • 1 tablespoon gluten-free 1:1 baking flour

  • 1 teaspoon cinnamon

  • For the streusel topping:
  • 1 cup gluten-free 1:1 baking flour

  • 1 cup brown sugar

  • ½ cup butter, softened (I used non-dairy butter)

  • 1 teaspoon cinnamon

Directions

  • Preheat oven to 350° Fahrenheit and grease a 9×9-inch cake pan.
  • In a large bowl, mix together the gluten-free flour, baking powder, and salt.
  • In a separate bowl, whisk together the sugar, butter, milk, eggs, and vanilla extract.
  • Slowly pour the wet ingredients into the dry ingredients while stirring, then mix until just combined.
  • Add all filling ingredients to a bowl and mix together.,
  • Then, add all streusel topping ingredients to a bowl and mix together until crumbly.
  • Transfer half of the batter to the cake pan, then evenly pour the filling over the top.
  • Follow that layer with the remaining cake batter before topping the whole thing off with an even sprinkling of the streusel topping.
  • Bake for 45-50 minutes or until a toothpick inserted down the center of the cake comes out mostly clean. Remove from pan and cool on a wire rack before slicing and serving.

Recipe Video

Notes

  • Storage: Store cooled coffee cake covered at room temperature up to 2 days.
  • Be sure to cool this one at least 30 minutes to let it set and be easier to cut and serve.

Did you make this recipe?

Share it and tag @samdoesherbest on Instagram!

Like this recipe?

Follow us @samdoesherbest on Pinterest

OTHER GLUTEN-FREE DESSERTS

This vegan cashew queso dip recipe is super quick and easy to make, requiring just 9 ingredients, 5-10 minutes, and 1 blender. It’s comprised of raw cashews, nutritional yeast, spices, and jalapenos blended to creamy perfection. This queso (along with your choice of crunchy tortilla chips) is a perfect appetizer dish for Mexican night with your friends or fam!

If you need a delicious dip for a Mexican dinner night, a party, or even just for yourself, look no further than this vegan cashew queso! It’s made with just a few simple ingredients you probably already have on hand and is 100% healthy.

Although it differs from your traditional Mexican queso (excludes the cheese and meat), I promise you won’t even miss the cheese – the cashews and nutritional yeast take the place of it quite nicely! Super quick and easy to make, this queso is perfect for serving with nachos, burrito bowls, tacos, and more!

MAIN INGREDIENTS NEEDED TO MAKE VEGAN CASHEW QUESO

  • Cashews – This dip gets its creaminess from raw cashews. Not only do cashews have a lower fat content than most other nuts, they’re also loaded with iron and magnesium.

  • Nutritional Yeast – This is a deactivated yeast that contains B-complex vitamins and provides a “cheesy” flavor to vegan dishes.

  • Lemon Juice – Juice the lemons yourself for the best flavor, or use bottled if that’s what you have at home.

  • Jalapenos – Bring on the spice!

ADJUST THIS VEGAN CASHEW QUESO RECIPE TO YOUR DIET

  • Dairy: Sub the almond milk for regular milk.

TIPS FOR MAKING VEGAN QUESO

  • To make this easy vegan cashew queso, all you really need is a blender. I recommend soaking your cashews ahead of time if you have a standard blender. However, if you have a high-speed one, you can even skip that for a faster dip.

Vegan Cashew Queso (Gluten-Free)

0 from 0 votes
Recipe by Samantha Course: AppetizersCuisine: MexicanDifficulty: Easy
Servings

2

servings
Prep time

5

minutes
Cooking time

5

minutes
Calories

300

kcal
Total time

10

minutes

This vegan cashew queso dip recipe is super quick and easy to make, requiring just 9 ingredients5 minutes, and 1 blender. It’s comprised of raw cashews, nutritional yeast, spices, and jalapenos blended to creamy perfection. This queso (along with your choice of crunchy tortilla chips) is a perfect appetizer dish for Mexican night with your friends or fam!

Ingredients

  • 1 cup raw cashews, soaked in hot water for 5-10 minutes

  • ¾ cup almond milk or water

  • 3 tablespoons nutritional yeast

  • 1 tablespoon lemon juice

  • ½ teaspoon cumin

  • ½ teaspoon chili powder

  • 1 teaspoon salt

  • 1 (14 ounce) can fire roasted diced tomatoes, drained

  • 2 tablespoons pickled jalapenos, finely chopped

Directions

  • Soak the raw cashews in boiling hot water for 5-10 minutes, then rinse cashews and add to a blender.
  • Add all other ingredients to the blender except diced tomatoes and pickled jalapenos. Blend mixture until completely smooth.
  • Transfer vegan queso to a small saucepan over medium-low heat then stir in the fire roasted diced tomatoes and pickled jalapenos. Once warm, remove from the heat and serve.

Recipe Video

Notes

  • Storage: This can last up to 5 days in the fridge.
  • Pair this with a spicy margarita to round out this delicious appetizer. (Link below!)

Did you make this recipe?

Share it and tag @samdoesherbest on Instagram!

Like this recipe?

Follow us @samdoesherbest on Pinterest

OTHER VEGAN MEXICAN DISHES

This vegan peanut brittle recipe is a simple ingredient mix of sugar, maple syrup, water, peanuts and baking soda. The result? A deliciously crunchy, sweet, slightly salty, homemade peanut butter flavored candy that is a perfect for an afternoon snack or an after-dinner treat.

In case you’ve never had peanut brittle before, it’s a smooth, flat candy (similar to toffee), with peanuts in it, that is cooked on the stovetop and poured onto a sheet pan to cool. It’s definitely a family favorite during the holidays, but it can be enjoyed any time of year! The thing to keep in mind about making candy is that you need a good thermometer and to have all your ingredients ready ahead of time. 

WHAT YOU NEED TO MAKE VEGAN PEANUT BRITTLE

  • Roasted Peanuts & Peanut Butter – Not a peanut fan? You can substitute an equal amount of pecans or almonds for the peanuts.

  • Maple Syrup – Maple syrup is one of my favorite refined sugar-free sweeteners. It also contains a ton of antioxidant and a good dose of minerals. If you don’t have that, you can use agave nectar instead.

  • Baking Soda – This is a key ingredient! Without baking soda, the brittle will be hard and chewy.

  • Coconut Sugar – Coconut sugar is lower on the glycemic index than the usual white sugar. It also contains many more vitamins and minerals than most other sugars. If you don’t have coconut sugar, you can either use brown sugar, cane sugar, or white sugar instead.

Tips When Making Vegan Peanut Brittle

  • Baking soda causes the brittle to bubble up. Those little bubbles are the key to a lighter, crispy consistency, so you don’t want to touch the mixture when you spread it.

  • Be patient when waiting for the mixture to come to temperature. It may seem like it’ll never make it to 290°F, but trust me, it will!

  • I recommend checking the temperature of the brittle mixture about every 5 minutes. I like to use this time to wash dishes/cleanup my kitchen, as to not be too far from the stove. Once the thermometer reads 280° Fahrenheit, then stay very close by until the brittle finally reaches its required temperature.

Peanut Brittle Recipe (Vegan, Gluten-Free)

0 from 0 votes
Recipe by Samantha Course: DessertsCuisine: American
Servings

16

servings
Prep time

5

minutes
Cooking time

30

minutes
Calories

300

kcal
Total time

35

minutes

This vegan peanut brittle recipe is a simple ingredient mix of sugar, maple syrup, water, peanuts and baking soda. The result? A deliciously crunchy, sweet, slightly salty, homemade peanut butter flavored candy that is a perfect for an afternoon snack or an after-dinner treat.

Ingredients

  • 1 cup coconut sugar

  • ½ cup agave nectar or maple syrup

  • ½ cup water

  • 1 cup roasted salted peanuts

  • 1/4 cup smooth peanut butter

  • ¼ teaspoon baking soda

Directions

  • Line a baking sheet with aluminum foil or parchment paper, then grease with a small
    amount of oil.
  • Stir together the coconut sugar, maple syrup, and water in a small saucepan over
    medium heat. Bring mixture to a simmer then add the peanuts, stir to combine but do
    not stir beyond that.
  • Use a thermometer to monitor the temperature of the candy mixture until it reaches
    290° Fahrenheit, this will take about 30 minutes.
  • Remove saucepan from heat and stir in the peanut butter and baking soda.
  • Quickly transfer the mixture to prepared baking sheet and let cool at room temperature
    until hard. Once hard, break apart into pieces and enjoy.

Recipe Video

Notes

  • Storage: Wrap tightly and store in an airtight container at room temperature. Proper storage should keep brittle fresh for up to two months!

Did you make this recipe?

Share it and tag @samdoesherbest on Instagram!

Like this recipe?

Follow us @samdoesherbest on Pinterest

OTHER VEGAN AND GLUTEN-FREE DESSERTS