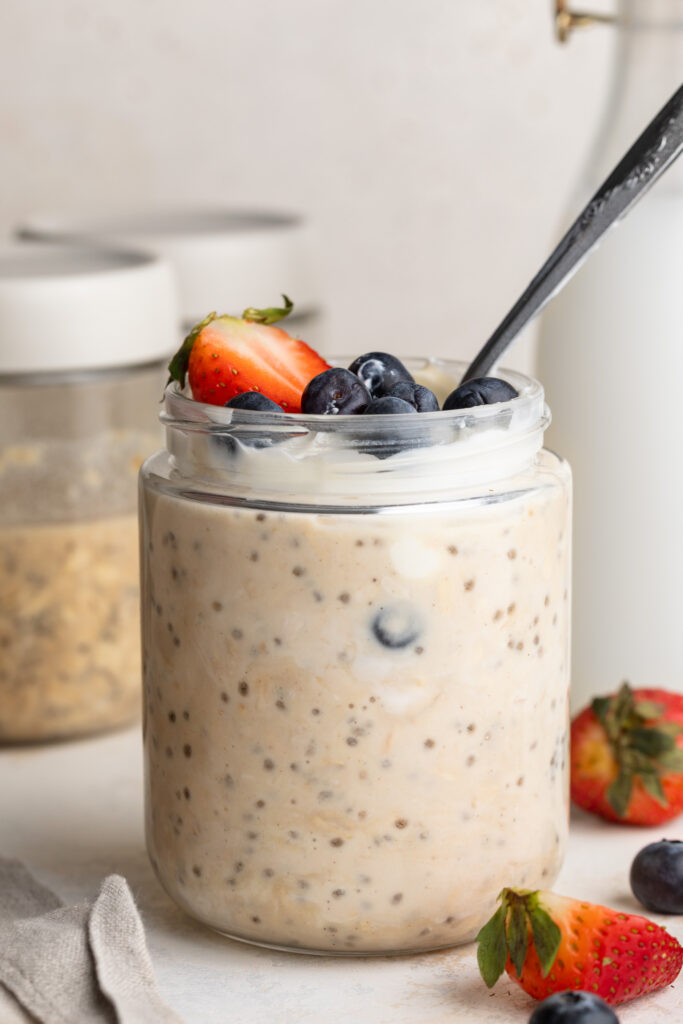
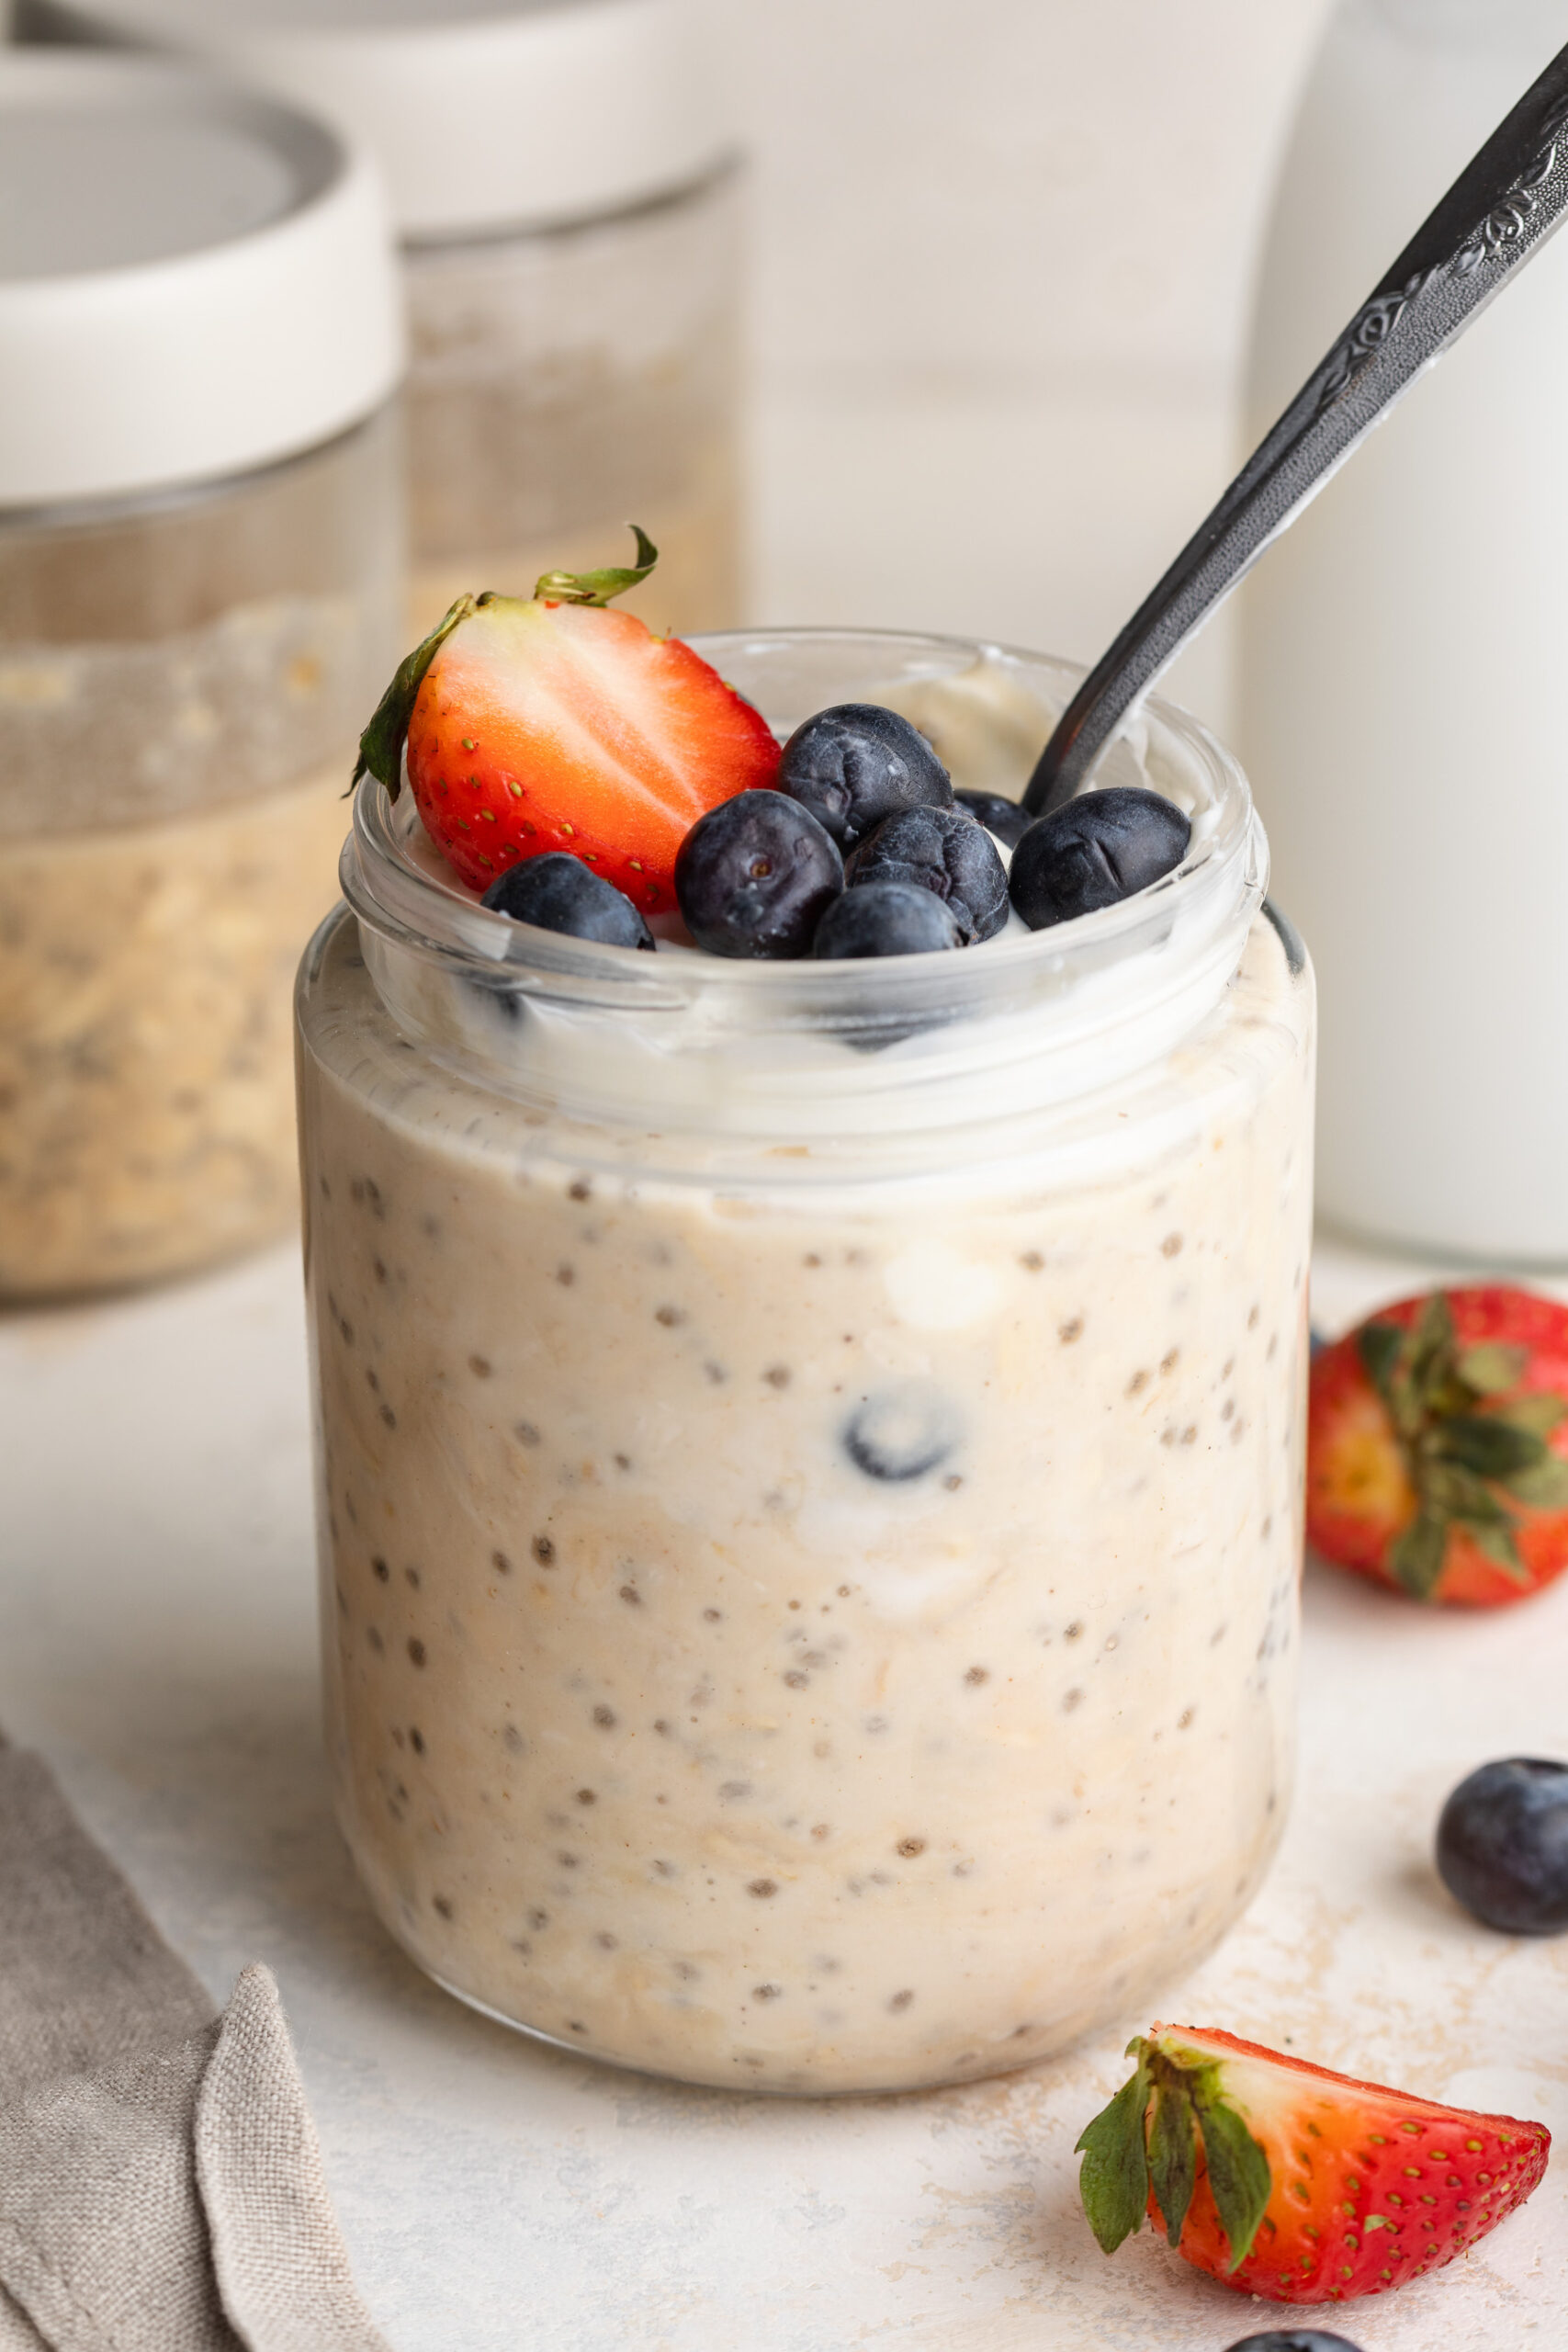
Tag

gluten-free

Browsing

These pecan pie brownies were entirely my Mom’s idea! She texted me last week and asked if I could make a pecan brownie recipe gluten-free and dairy-free for thanksgiving this year. And I, of course, immediately said YES! It didn’t take me long to realize that all I needed to do was take the sticky pecans from my gluten-free pecan cinnamon rolls recipe and combine them with my famous almond flour brownie recipe to make this seriously unique and decadent dessert. I seriously can’t wait to bake these for thanksgiving this year, I just know everyone’s gonna love ’em!

three sticky pecan pie brownies stacked on top of each other.

Why You’ll Love These Sticky Pecan Pie Brownies

These brownies deliver that perfect bite — chewy, nutty, sweet, and deeply chocolatey — yet totally gluten-free and dairy-free! Made with wholesome ingredients like almond flour, coconut oil, and coconut sugar, they’re a better-for-you take on a beloved Southern dessert. Plus, they’re surprisingly simple: no mixers, no complicated layers, just pure sticky-sweet goodness baked into every square.

What Makes This Recipe Healthy?

Unlike traditional pecan pie brownies loaded with butter, corn syrup, and white flour, this version is made with nutrient-dense swaps:

  • Almond flour for a gluten-free, protein-rich base.
  • Coconut oil in place of butter for healthy fats.
  • Coconut sugar as a natural, lower-glycemic sweetener.
  • Non-dairy milk to keep the recipe 100% dairy-free.

These swaps make each brownie rich and satisfying — with less processed sugar and more whole food ingredients!

close up image of a sticky pecan pie brownie with a bite taken out.

Frequently Asked Questions

Can I use all-purpose flour instead of almond flour?
Yes! You can swap the almond flour for an equal amount of all-purpose flour (regular or gluten-free). The texture will be a bit more cake-like, but still delicious.

What can I use instead of coconut sugar?
Brown sugar or maple sugar both work beautifully in this recipe, if you don’t have coconut sugar on hand. They’ll keep that same caramelized flavor in the pecan layer.

Can I use a different nut other than pecans?
Absolutely — walnuts, hazelnuts, or even cashews would work well here. Pecans give the most traditional flavor, but feel free to mix it up based on what you have!

Sam’s Recipe Tips

  • Don’t skip the parchment paper! It makes flipping the brownies out of the pan so much easier.
  • Use room temperature eggs – it helps them whip up light and fluffy.
  • For extra indulgence, drizzle with melted chocolate or a sprinkle of flaky sea salt before serving.
  • Storage tip: Keep leftovers in an airtight container at room temp for up to 3 days, or refrigerate for up to a week.

These Sticky Pecan Pie Brownies are the perfect healthier dessert to impress guests during the holidays – rich, gooey, and full of delicious flavor!

overhead image of a healthy sticky pecan pie brownie.
5 from 1 vote

Sticky Pecan Pie Brownies

These Sticky Pecan Pie Brownies are the ultimate mashup of gooey pecan pie and rich, fudgy chocolate brownies – all made gluten-free, dairy-free, and refined sugar-free. With a sticky caramel pecan topping and a decadent almond flour brownie base, they’re the perfect healthier dessert for Thanksgiving or any holiday. Easy to make and irresistibly delicious, these brownies will quickly become your new favorite sweet treat!
Print Pin Rate
Prep Time: 10 minutes
Cook Time: 30 minutes
Total Time: 40 minutes
Servings: 16 servings

Equipment

  • 1 small saucepan
  • 1 large bowl
  • 1 small bowl
  • 1 8×8-inch baking pan

Ingredients

For the pecan layer:

  • 2 tablespoons coconut oil or butter
  • 1/2 cup coconut sugar or brown sugar
  • 2 tablespoons non-dairy milk
  • 1 teaspoon vanilla extract
  • 1 1/2 cups unsalted pecans chopped

For the brownie layer:

  • 1 cup coconut sugar or regular sugar
  • 3 large eggs at room temperature
  • 1 1/2 cups almond flour
  • 3 tablespoons unsweetened cocoa powder
  • 1 teaspoon vanilla extract
  • 1/4 teaspoon salt
  • 1 cup chocolate chips
  • 1/2 cup coconut oil

Instructions

  • Preheat the oven to 350° Fahrenheit and line then grease an 8×8-inch baking pan with parchment paper.
  • Prepare the pecan layer by melting the coconut oil in a small saucepan over low-medium heat. Add in the coconut sugar and non-dairy milk, bring to a gentle simmer and stir constantly for about 2 minutes.
  • Remove the saucepan from the heat, add in the vanilla extract and stir in the pecans, then transfer the mixture to your prepared baking pan. Spread the pecans into an even layer to coat the bottom of the pan.
  • Next, make the cake layer by beating the coconut sugar and eggs in a large bowl with either a hand of stand mixer until light and fluffy (about 2 minutes).
  • Add in the almond flour, cocoa powder, vanilla extract, and salt. Stir until everything is just combined, careful not to over-mix.
  • In a separate bowl, add the coconut oil and 1 cup of chocolate chips. Microwave in 30-second intervals, stirring between each interval, until chocolate chips are fully melted.
  • Pour the melted chocolate chips and coconut oil into the cake batter, and stir to combine. Then, pour the cake batter on top of the pecans in your baking dish. Bake for 30-35 minutes, or until a toothpick inserted down the center of the cake comes out mostly clean.
  • Remove the cake from the oven and let it sit at room temperature for about 10 minutes. Then, carefully turn the cake over onto a wire cooling rack and peel away the parchment paper. Let the cake cool completely before slicing and serving!

Nutrition

Serving: 1serving | Calories: 295kcal | Carbohydrates: 17g | Protein: 5g | Fat: 23g | Fiber: 3g | Sugar: 13g

Why You’ll Love These Protein Hostess Cupcakes

These gluten-free, dairy-free cupcakes capture the nostalgic taste of classic Hostess treats but with a healthier twist—packed with about 10 grams of protein per cupcake. Made with almond flour, chocolate protein powder, and a rich ganache topping, they deliver indulgent flavor without compromise. Perfect for a treat that satisfies both your sweet tooth and your macro goals.

protein hostess cupcakes on a table.

Recipe Variations & Sugar-Free Option

Can I make these sugar-free? Yes! Swap the maple syrup for a sugar-free liquid sweetener like monk fruit syrup or stevia-sweetened syrup, and choose sugar-free chocolate chips for the ganache and decoration.
What kind of protein powder should I use? A vanilla or chocolate whey or plant-based protein works well—just make sure it blends smoothly and is not overly thick or gritty.
Other variations: Use a white chocolate or caramel drizzle for the topping, or add shredded coconut or chopped nuts under the ganache for extra texture.

the inside of a protein hostess cupcake.

Sam’s Recipe Tips

  • Cool completely before filling and topping so the ganache or filling doesn’t melt.
  • Use a piping bag with a round tip for neat filling and precise letter decoration.
  • If your batter seems thick, add a tablespoon of extra non-dairy milk to loosen it slightly – especially when using dense protein powders.
  • Store in an airtight container in the fridge – first 24 hours are best for texture; let them sit at room temperature 10 minutes before eating.
overhead image of protein hostess cupcakes.
No ratings yet

Protein Hostess Cupcakes (gluten-free & dairy-free!)

These Protein Hostess Cupcakes are a healthier twist on the nostalgic classic – rich, chocolatey, and totally delicious! Made with almond flour, chocolate protein powder, and a silky chocolate ganache, each cupcake packs 10 grams of protein. It’s the perfect healthier dessert that satisfies your sweet tooth and packs in protein!
Print Pin Rate
Prep Time: 10 minutes
Cook Time: 20 minutes
Total Time: 30 minutes
Servings: 12 cupcakes

Equipment

  • 1 cupcake tin
  • 1 large bowl
  • 1 small bowl

Ingredients

For the cupcakes:

  • 1 cup almond flour
  • 1 cup chocolate protein powder
  • 1 teaspoon baking powder
  • 1/2 cup non-dairy milk
  • 1/2 cup maple syrup
  • 2 eggs at room temperature
  • 3 tablespoons melted coconut oil or any vegetable oil

For the filling

  • Cocowhip, marshmallow creme, or homemade whipped cream

For the chocolate ganache:

  • 1/2 cup chocolate chips
  • 1/4 cup coconut milk

For the decoration:

  • 1/2 cup melted white chocolate chips
  • OR
  • 1/2 cup powdered sugar
  • 2 tablespoons butter softened
  • 1/2 tablespoon milk

Instructions

  • Preheat oven to 350° Fahrenheit and line a cupcake tin with cupcake liners.
  • In a large bowl, mix together the non-dairy milk, maple syrup, eggs, melted coconut oil, and vanilla extract.
  • Add in the almond flour, chocolate protein powder, and baking powder. Mix until everything is just combined.
  • Pour ¼ cup of batter into each individual cupcake tin and bake for 20-25 minutes, or until a toothpick inserted down the center of one cupcake comes out clean.
  • Remove cupcakes from oven and transfer to a wire rack to cool completely.
  • Once the cupcakes are completely cool, make the ganache by melting together the chocolate chips and coconut milk in either the microwave or over a double boiler until completely smooth.
  • Then, place the Cocowhip or marshmallow crème into a piping bag with a medium round tip, press the piping bag into the center of each cupcake and squeeze the filling unto the cupcake.
  • Once all cupcakes are filled, spoon about a tablespoon of the chocolate ganache over each cupcake, spreading it so that it completely covers the top of the cupcake.
  • Leave the ganache to set with you make the white icing by adding all ingredients to a bowl and beating/whisking until completely smooth. Transfer the icing to a piping bag with a small tip and carefully pipe the signature cursive L’s over the top of each cupcake. 

Nutrition

Serving: 1cupcake | Calories: 195kcal | Carbohydrates: 18g | Protein: 10g | Fat: 10g | Fiber: 2g | Sugar: 11g

Like most of my recipes, this cinnamon sugar pretzel bites recipe started with a craving. Specifically a craving for a cup of warm cinnamon sugar pretzel bites from the mall… yup, you know the kind. The pretzels you smell as soon as you enter the mall and crave the entire time you shop. (No but really, they should seriously make a candle out of them because they smell so good!) Unfortunately though, those mall pretzel bites are made with regular flour and I’m sure a bunch of other ingredients that aren’t great for us. So I figured, why not make them myself?! Though if you look up pretzel bite recipes, you’ll find a bunch of very complicated ones that require kneading, rising, and a ton of steps I simply don’t have the time for. So, I came up with this 6 ingredient pretzels bites recipe that requires just 6 ingredients (!!!) and there’s no kneading, rising, or confusing steps required. Simply mix the dough, roll them into balls, quickly boil, then bake! And if cinnamon sugar really isn’t your thing, you can sprinkle these with salt instead. Either way, I just know you’re gonna love ’em!

And if you love these 6-ingredient cinnamon sugar pretzel bites, you’ll also go crazy for my 5-ingredient single serve cinnamon roll and 3-ingredient gluten-free bagel bites. They even all use the same set of ingredients!

cinnamon sugar pretzel bites on a plate.

Why You’ll Love These Cinnamon Sugar Pretzel Bites

  • Gluten-free & 6 ingredients – just one bowl, no yeast required!
  • Quick prep + deep flavor – From mixing the dough to baking and coating, you’ll be done in about 30 minutes.
  • Versatile & crowd-friendly – Enjoy plain, with dips, or coated in cinnamon sugar for a delicious sweet treat!

Frequently Asked Questions

Can I make this recipe vegan?
Yes – use dairy-free yogurt (for the dough) and replace melted butter with a plant-based butter or coconut oil for the topping.

How do I store these pretzel bites?
Store in an airtight container at room temperature for up to 2 days. Reheat briefly in the oven or air fryer to restore texture.

Recipe variations?
Try topping with chocolate drizzle, sea salt instead of sugar, or adding shredded coconut. You could even roll in pumpkin spice for a seasonal twist.

close up image of cinnamon sugar pretzel bites on a plate.

Sam’s Recipe Tips

  • Dust your work surface generously with gluten-free flour to prevent sticking – gluten-free dough tends to be a bit softer.
  • After brushing or dipping in the baking soda wash, place the bites on parchment to avoid sticking and allow the coating to set properly.
  • Shake the warm finished bites in a large bowl with melted butter and cinnamon sugar to ensure even coating.
  • Serve warm for the best texture – if they cool down, pop them into a warm oven (350°F) for 2-3 minutes.
cinnamon sugar pretzel bites on a plate, one with a bite taken out.
No ratings yet

6-Ingredient Cinnamon Sugar Pretzel Bites (gluten-free!)

These 6-ingredient Cinnamon Sugar Pretzel Bites are soft, chewy, and coated in delicious cinnamon sugar! Made with gluten-free flour and Greek yogurt, this no-knead recipe comes together in just 30 minutes for a quick and easy treat. You’ll love how easy these pretzel bites are to make – no yeast, no rising, just mix, bake, and enjoy!
Print Pin Rate
Prep Time: 10 minutes
Cook Time: 20 minutes
Total Time: 30 minutes
Servings: 4 servings

Equipment

  • 1 large bowl
  • 1 small bowl
  • 1 large baking sheet

Ingredients

  • 1 cup gluten-free all purpose flour
  • 1 teaspoon baking powder
  • 1 cup plain Greek yogurt

For the baking soda wash:

  • 1 cup water
  • 1 tablespoon baking soda

For topping:

  • 3 tablespoons melted butter
  • 1/3 cup sugar
  • 1 teaspoon cinnamon

Instructions

  • Preheat oven to 425° Fahrenheit and line a baking sheet with parchment paper.
  • Mix together the gluten-free all purpose flour and baking powder in a large bowl. Then, add in the plain Greek yogurt and mix until a dough comes together (you may need to use your hands to help bring the dough together). If the dough seems dry and won’t come together in a ball, try adding an additional 1-3 tablespoons of Greek yogurt to the dough.
  • Scoop about 1 tablespoon of dough and roll it between the palms of your hands to form it into an oval nugget shape. Place each pretzel bite onto your prepared baking sheet.
  • Make the baking soda wash by whisking together the water and baking soda in a small bowl, then either brush or dip each pretzel bite into the wash.
  • Bake the pretzel bites for 15-20 minutes, or until deep golden brown. While the pretzel bites bake, make your cinnamon-sugar coating by mixing together the sugar and cinnamon in a small bowl.
  • Remove the pretzel bites from the oven and while they’re still warm, toss them in the melted butter then either toss or sprinkle them with the cinnamon sugar.

Nutrition

Serving: 1serving | Calories: 240kcal | Carbohydrates: 30g | Protein: 9g | Fat: 10g | Fiber: 1g | Sugar: 10g

If there’s one thing about my boys, it’s that they love anything and everything pumpkin! My gluten-free pumpkin coffee cake is always a huge hit this time of year, and for a healthier treat my husband and son love my pumpkin protein balls. We pretty much always have a pumpkin snack on-hand when those seasonal cravings strike, and I’m so excited to add these healthy pumpkin muffins to the mix! They’re gluten-free, dairy-free, lightly sweetened with maple syrup, and made in just ONE bowl. My idea of a perfect fall morning is one of these healthy pumpkin muffins in one hand, and a healthy pumpkin spice latte in the other. So cozy and SO delicious!

close up image of a healthy pumpkin muffin with chocolate chips on top.

🧡 What Makes This Recipe Healthy?

Unlike traditional pumpkin muffins loaded with refined sugar and flour, these are made with simple, nourishing ingredients you can feel good about. The oat flour provides whole-grain fiber, while pumpkin puree adds natural sweetness, moisture, and a boost of vitamins A and C. They’re also lightly sweetened with maple syrup, keeping them just sweet enough without going overboard. Plus, no butter or dairy means these muffins are naturally dairy-free and gluten-free!

🍂 Why You’ll Love These Healthy Pumpkin Muffins

  • Made with real pumpkin and warming fall spices for that cozy flavor you crave.
  • Naturally gluten-free, dairy-free, and nut-free, so everyone can enjoy them.
  • Lightly sweetened, moist, and fluffy – and made in just one bowl for easy cleanup!
  • Perfect for breakfast, meal prep, or healthy snacks throughout the week.
overhead image of healthy pumpkin muffins.

Frequently Asked Questions

Can I make these pumpkin muffins vegan?
Yes! Swap the eggs for two flax eggs (2 tablespoons ground flaxseed + 5 tablespoons water). Let the mixture sit for 5–10 minutes before adding it to the batter.

How do I store these muffins?
Store your muffins in an airtight container at room temperature for up to 3 days, or in the fridge for up to a week. You can also freeze them for up to 3 months – just thaw overnight or reheat in the microwave for 20 seconds.

What can I add to this recipe?
Feel free to mix in chocolate chips, chopped walnuts, or pumpkin seeds for a fun twist! You can also top them with a sprinkle of oats or cinnamon sugar before baking for extra texture.

healthy pumpkin muffins on a table with a small pumpkin.

👩‍🍳 Sam’s Recipe Tips

  • Don’t overmix the batter! Stir until the dry and wet ingredients are just combined for fluffy muffins.
  • Use room temperature eggs and milk for a smoother, more even batter.
  • If you love extra spice, add a pinch of nutmeg or cloves for a stronger fall flavor.
  • These muffins make a great freezer-friendly snack – just pop one out when you need a quick breakfast or healthy snack on the go!
three healthy pumpkin muffins on parchment paper.
4.50 from 2 votes

One-Bowl Healthy Pumpkin Muffins

These healthy pumpkin muffins are soft, fluffy, and perfectly spiced! Made in one bowl with oat flour, pumpkin puree, and maple syrup, they’re a wholesome and cozy fall treat you’ll want on repeat. Gluten-free, dairy-free, and naturally sweetened, these muffins are perfect for breakfast, snacks, or meal prep all week long!
Print Pin Rate
Prep Time: 10 minutes
Cook Time: 25 minutes
Total Time: 35 minutes
Servings: 12 muffins

Equipment

  • 1 large bowl
  • 1 muffin pan

Ingredients

  • 1 cup pumpkin puree
  • 1/2 cup oil either melted coconut oil, avocado oil, olive oil, or vegetable oil
  • 1/3 cup maple syrup
  • 1/4 cup milk I used almond milk
  • 2 eggs at room temperature
  • 1 teaspoon vanilla extract
  • 1 1/2 cups oat flour
  • 2 teaspoons pumpkin pie spice
  • 1 teaspoon baking powder
  • 1/2 teaspoon baking soda

Instructions

  • Preheat oven to 350° Fahrenheit and line a 12 cup muffin pan with muffin liners.
  • Mix together the pumpkin puree, oil, maple syrup, milk, eggs, and vanilla extract in a large bowl.
  • Add in the oat flour, pumpkin pie spice, baking powder, and baking soda and mix until everything is fully combined.
  • Scoop ¼ cup of muffin batter into each muffin liner, then sprinkle with either chocolate chips, pumpkin seeds, chopped nuts, or leave plain. Bake the muffins for 22-25 minutes, or until a toothpick inserted down the center of a muffin comes out clean.
  • Remove the muffins from the oven and transfer them to a wire cooling rack to cool completely before serving or storing.

Nutrition

Serving: 1muffin | Calories: 190kcal | Carbohydrates: 18g | Protein: 3g | Fat: 12g | Fiber: 1g | Sugar: 7g

Why You’ll Love These Gluten-Free and Dairy-Free Pecan Cinnamon Rolls

  • All the flavor, yet totally gluten-free and dairy-free — enjoy classic cinnamon rolls without the diet restrictions.
  • Sticky pecan topping turns them into a decadent treat that still feels homemade and delicious!
  • Surprisingly manageable — while they seem fancy, the method is clear, steps are simple, and you don’t need expert baking skills.
  • Perfect for gatherings — these rolls make a beautiful breakfast or brunch centerpiece that accommodates dietary restrictions!
overhead image of gluten free dairy free pecan cinnamon rolls in a baking dish.

Frequently Asked Questions

Can I use gluten-free all-purpose flour instead of gluten-free bread flour?
Yes, in many cases you can substitute a high-quality 1:1 gluten-free all-purpose flour blend for the bread flour. Just make sure it contains xanthan gum or another binder (unless your mix is already pre-blended). You may need to adjust moisture slightly.

How do I prep these cinnamon rolls ahead of time?
You can assemble the rolls, cover, and refrigerate overnight. When ready to bake, let them come to room temperature, rise if needed, then bake as directed. You can also freeze the unbaked rolls and bake from frozen (adding a few extra minutes).

Can I make this recipe vegan?
Yes — use a flax o “egg” (e.g. 1 Tbsp flax + 3 Tbsp water per egg) and a plant-based non-dairy milk (like almond, oat, or soy) in the sticky topping. Be sure your gluten-free flour blend and protein sources are vegan.

close up overhead image of gluten free dairy free pecan cinnamon rolls in a baking dish.

Sam’s Recipe Tips

  • Warm your non-dairy milk carefully — 110°F is ideal for activating yeast without killing it.
  • Don’t skip the rise — even gluten-free dough benefits from a good proofing if possible.
  • Roll gently but firmly — keep your log tight so the layers stay defined.
  • Coat pecans thoroughly — the sticky glaze is what makes the topping sing, so ensure even coverage.
  • Cool slightly before slicing — let the rolls set so the glaze doesn’t run off.
gluten free dairy free pecan cinnamon rolls in a baking dish.
No ratings yet

Gluten-Free and Dairy-Free Cinnamon Rolls (with sticky pecans!)

These Gluten-Free Pecan Cinnamon Rolls are soft, fluffy, and topped with a gooey caramelized pecan glaze that makes every bite irresistible! Made completely dairy-free with coconut oil and gluten-free flour, they’re a cozy homemade treat that everyone can enjoy. Perfect for brunch, holidays, or weekend baking, this easy recipe proves that gluten-free cinnamon rolls can be just as rich and delicious as the classic kind!
Print Pin Rate
Prep Time: 30 minutes
Cook Time: 30 minutes
Rising Time: 1 hour
Servings: 9 servings

Equipment

  • 1 stand mixer with dough hook attachment
  • 1 9-inch baking dish

Ingredients

For the cinnamon rolls:

  • 1 cup non-dairy milk warmed to 110 degrees Fahrenheit (I used canned light coconut milk)
  • 2 1/4 teaspoons active dry yeast
  • 1/4 cup sugar
  • 1 egg plus 1 egg yolk at room temperature
  • 1/4 cup coconut oil melted
  • 3 cups gluten-free bread flour plus more for rolling
  • 2 teaspoons baking powder
  • 1/2 teaspoon baking soda
  • 1/4 teaspoon salt

For the filling:

  • 1/4 cup coconut oil melted
  • 3/4 cup brown sugar
  • 2 tablespoons cinnamon
  • 1 teaspoon nutmeg
  • 1/2 teaspoon ground cloves

For the sticky pecan topping:

  • 1/4 cup coconut oil
  • 1 cup brown sugar
  • 1/4 cup non-dairy milk
  • 1 teaspoon vanilla extract
  • 1/4 teaspoons salt
  • 1 1/2 cups pecans roughly chopped

Instructions

  • Start by warming your milk in a medium bowl to about 110° Fahrenheit. Do this in either the microwave for about 30-40 seconds, or over low heat on the stove for 2 minutes.
  • Once milk is warm, add the active dry yeast, sugar, and melted coconut oil. Give it a gently whisk to combine, then let that sit for a couple minutes while you continue on with the recipe.
  • To the bowl of an electric mixer fitted with the dough hook attachment, add the gluten-free bread flour, baking powder, baking soda, and salt. Turn the mixer on low until the dry ingredients are combined.
  • With the electric mixer running on medium speed, slowly add the milk mixture into the flour mixture. Once the wet and dry ingredients are almost completely combined, add in the egg and egg yolk. Continue mixing to incorporate the eggs into the dough.
  • Once the eggs are incorporated, turn the mixer onto high speed and mix the dough for 5 minutes, until the dough is smooth and comes together in a ball.
  • Generously flour a work surface with the gluten-free bread flour, then press the dough on top of the flour and press/roll into a 13×19-inch rectangle. Add the filling by brushing the melted Nutiva Organic Coconut Oil over the dough in an even layer. Mix together the brown sugar, cinnamon, nutmeg, and cloves in a small bowl, then evenly sprinkle that on top of the coconut oil.
  • Carefully take the long end and roll the dough up into a tight log. Slice the log into 7-8 cinnamon rolls, each about 3 inches thick.
  • Then, place the cinnamon rolls in a greased 9×9-inch baking dish and tightly cover the dish with plastic wrap. Place the rolls in a warm place (by a window, in a proving drawer, in the oven with the light on, etc.) to rise for about 1 hour.
  • After the hour is up, remove the plastic wrap from the baking dish and preheat your oven to 350° Fahrenheit. Once the oven is hot, bake the cinnamon rolls for 25-30 minutes or until they’re golden brown on top.
  • Remove the rolls from the oven and let them cool while you make the sticky pecan topping.
  • To make the sticky pecan topping, melt the coconut oil in a small saucepan over medium heat. Then, add in the brown sugar, non-dairy milk, vanilla extract, and salt. Whisk everything together until the sugar has dissolved and the mixture starts to bubble, about 2 minutes.
  • Add the pecans into the saucepan and stir to coat the pecans in the sticky brown sugar mixture. Pour the sticky pecans on top of the cinnamon rolls, then let then cool completely before serving.