Tag

cucumber

Browsing

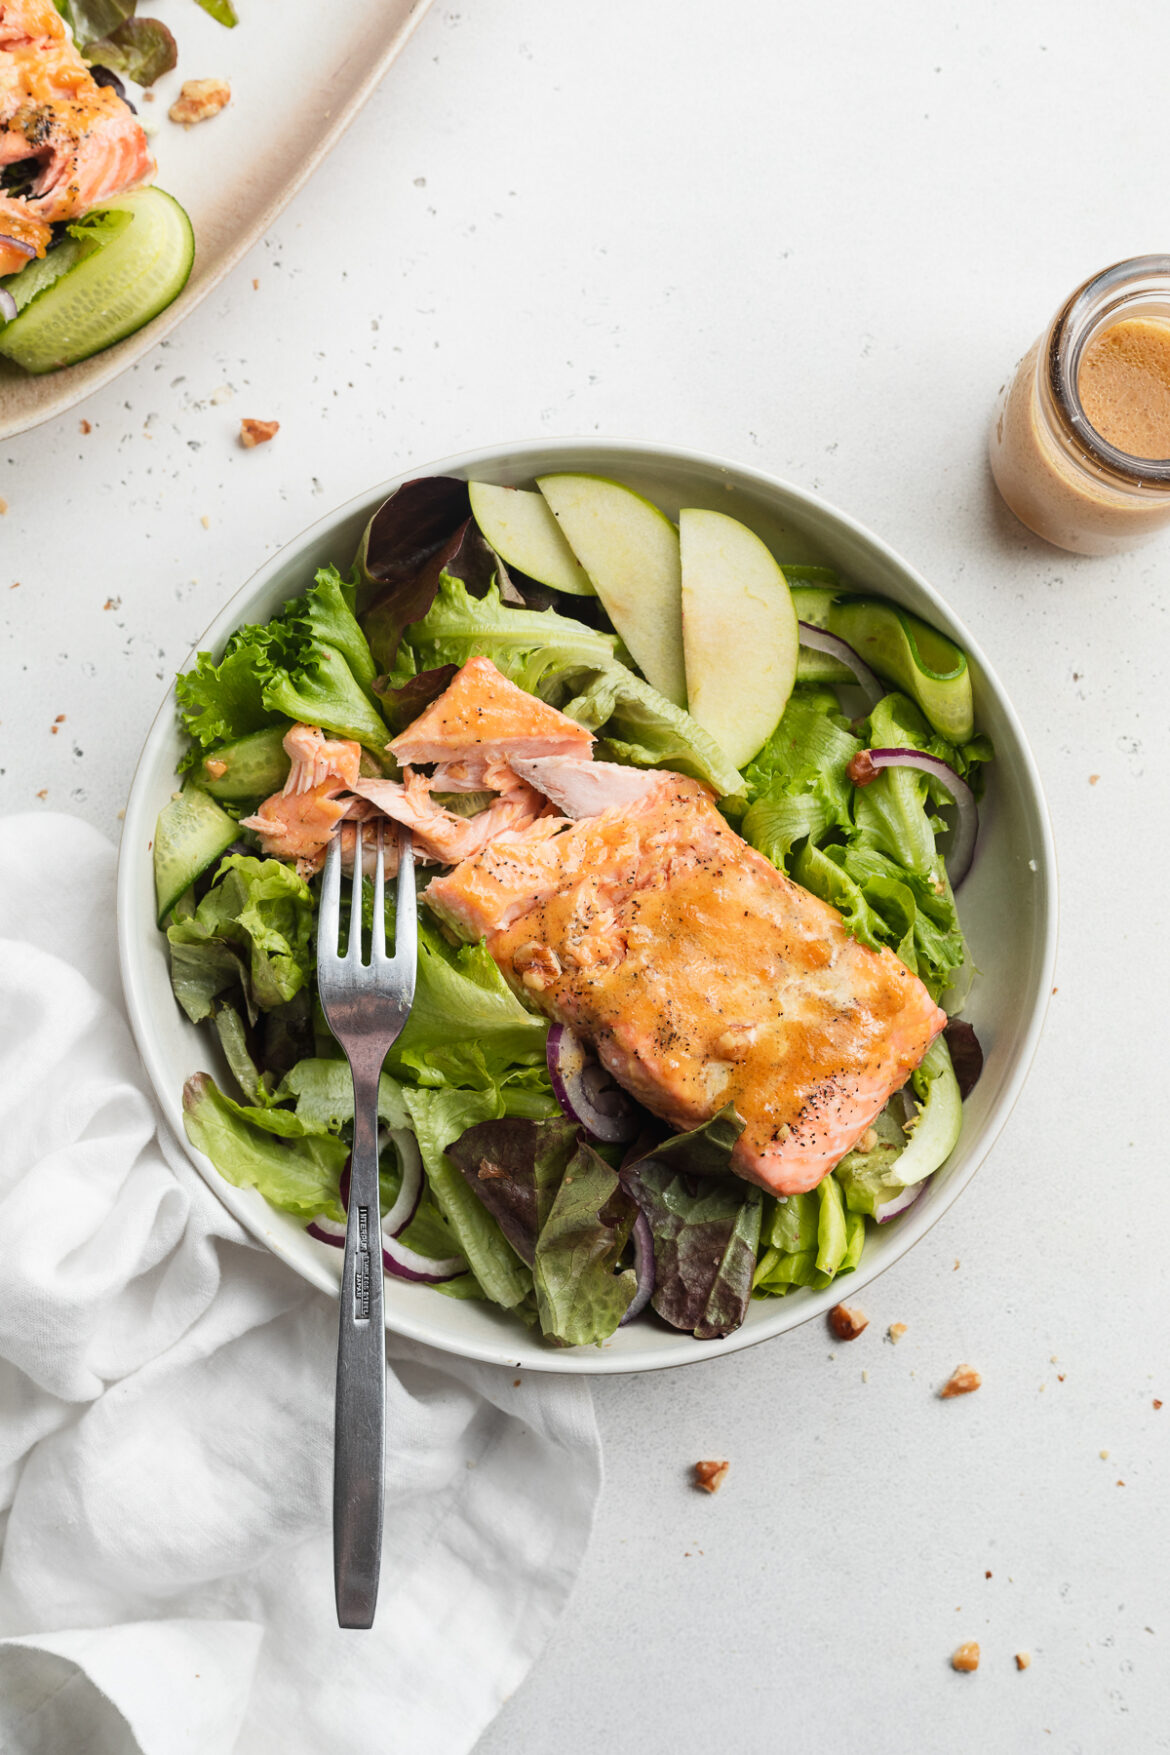
Buttery, flaky salmon atop a simply dressed maple dijon salad! This quick and easy recipe yields perfectly seasoned, and cooked salmon every time. A complete meal, loaded with fresh veggies, then finished off with a tangy maple dijon dressing, ready in under 20 minutes!

close-up overhead image of maple dijon salmon salad on a plate with a fork

What You’ll Need To Make This Maple Dijon Salmon Salad

Dijon Mustard – We do NOT use this ingredient sparingly in our maple dijon dressing! An entire 1/4 cup gives this entire meal tons of tangy, delicious flavor. In case you’re not familiar with this French ingredient, dijon mustard is creamier, spicier, and has less vinegar than yellow mustard. It’s a favorite in my home, for everything from sandwiches to salad dressings. It’s among one of the healthiest condiments you can use, with no added-sugar or preservatives!

Maple Syrup – A touch of maple syrup is necessary to balance out the intensely savory flavors in this salmon salad recipe. And if you don’t have any maple syrup on-hand, you can use an equal amount of honey instead.

Salmon Fillets – Feel free to use any variety of salmon fillets you’d like! Sockeye salmon and atlantic salmon are the two most common types, and are only slightly different from each other. Sockeye salmon is a bit more lean, and has a stronger fish flavor, while atlantic salmon is fattier, with a more mild flavor. I personally love atlantic salmon for it’s ultra-soft, buttery, and flaky qualities. Though again, you can use any type of salmon fillets you’d like for this lunch or dinner recipe!

Green Apple – I know, not all of us are fans of fruit in our salads. However, green apple is much more tart than sweet in this salmon salad. Also, remember we have a bit of sweetness in our dressing – so the little bit of natural sweetness from a thinly sliced green apple works to compliment that. If you don’t have any green apples, you can easily leave them out or use a red apple in its place.

Pecans or Walnuts – I have just one rule when it comes to salads, they all must include a crunchy component. A little bit of crunch goes a long way in rounding out the textures in this dish. Roughly chopped pecans and/or walnuts are a healthy alternative to standard croutons. Loaded with vitamins, minerals, and plenty of healthy fats!

maple dijon dressing being poured over salmon salad.

Tips and Tricks

  • Feel free to add or remove any salad ingredients you’d like! Not a fan of nuts? Simple leave them out. Prefer a certain type of lettuce? Then definitely use it! This super simple salad recipe is incredibly easy to customize.
  • For anyone who cooks meat or fish regularly, I highly recommend investing in a kitchen thermometer. This is the thermometer I use on pretty much a daily basis. It’s the easiest way to ensure perfectly cooked salmon every time!
  • This salmon salad can be enjoyed hot or cold! Salmon’s one of those things that tastes delicious at just about any temperature. I often double this recipe for easy grab-and-go lunches all week long – no need to reheat!
Maple dijon salmon salad on a serving platter.

Adjust This Recipe To Your Dietary Needs

Make it Sugar-Free: For an entirely sugar-free recipe, use Lankanto Maple Flavored Syrup in place of the maple syrup.

Make it Nut-Free: Simply replace the nuts with sunflower seeds to make this a nut-free lunch or dinner recipe.

5 from 1 vote

Maple Dijon Salmon Salad

Buttery, flaky salmon atop a simply dressed maple dijon salad! This quick and easy recipe yields perfectly seasoned, and cooked salmon every time. A complete meal, loaded with fresh veggies, then finished off with a tangy maple dijon dressing, ready in under 20 minutes!
Print Rate
Prep Time: 5 minutes
Cook Time: 12 minutes
Total Time: 17 minutes
Servings: 4 servings

Ingredients

For the dressing:

  • 1/4 cup olive oil
  • 1/4 cup Dijon mustard
  • 3 tablespoons maple syrup
  • juice from 1 lemon, see Notes
  • 3 garlic cloves, minced
  • 1 teaspoon salt

For the salmon:

  • 4 salmon fillets, boneless
  • salt and black pepper, to taste

For the salad:

  • 4 cups lettuce, see Notes
  • 1 cucumber, sliced
  • 1/2 red onion, thinly sliced
  • 1 green apple, thinly sliced
  • 1/2 cup pecans or walnuts, roughly chopped

Instructions

  • Preheat oven to 400° Fahrenheit.
  • Whisk together all dressing ingredients in a small bowl.
  • Place salmon fillets on a baking sheet and pat dry with a paper towel. Season filets with salt and black pepper, then drizzle half the maple Dijon dressing evenly over top of the salmon.
  • Bake salmon for 10-12 minutes, or until a thermometer inserted into thickest end of the salmon read 125° Fahrenheit.
  • While salmon cooks, place all salad ingredients in a large bowl and toss to combine. Once salmon is done, divide salad between four plates, top each plate with a salmon filet and serve with remaining dressing.

Notes

  • Lemon Juice: If you don’t have any fresh lemons, you can use 1 tablespoon of apple cider vinegar or white wine vinegar in place of the lemon juice in this recipe.
  • Lettuce: Use any type of lettuce you like, I used mesclun!
  • Nutrition

    Calories: 300kcal

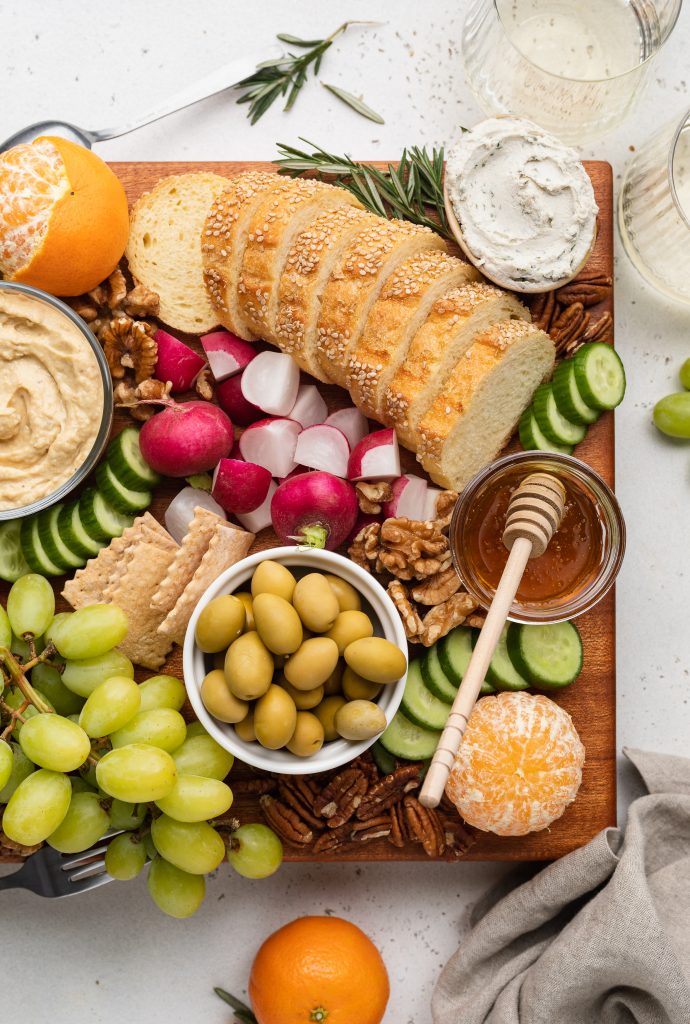
    A flawless vegan charcuterie board, perfect for any occasion! An assortment of fresh fruits, veggies, crackers, bread, and vegan cheeses create the perfect spread. Have fun with this vegan charcuterie board, feel free to switch things up and make it your own!

    half a vegan charcuterie board with glasses of white wine on the side

    What You’ll Need

    • Hummus – Either homemade or store bought hummus will work on your charcuterie board! As much as I love a homemade hummus, I usually prefer to save myself a bit of time by buying pre-packaged hummus from the store. Whole Foods make a delicious hummus, as does Trader Joe’s and Hope Hummus!

    • Crackers – Any and all crackers are welcome on this snack board! I typically use gluten-free crackers to keep my spread gluten-free friendly. Though feel free to use whatever crackers you like best.

    • Nuts – Nuts are always an exciting, crunchy addition! You can get fancy here and purchase marcona almonds or flavored nuts for your board. Though I kept things simple with raw walnuts and pecans. I love using nuts on any charcuterie board, as they’re the perfect item to fill any empty space. Nuts are especially amazing on this vegan charcuterie board thanks to their high protein content and nutritional value, keeping things hearty yet healthy!

    • Vegan Cheese – This is a totally optional addition, but I have a few vegan cheese brands I love featuring on my charcuterie board! I’m pretty picky when it comes to non-dairy cheese though, and avoid any that taste too fake and/or are overly processed. Spero Foods make some of my all-time favorite vegan soft cheeses. Their herb cream cheese and goat cheese are perfect for this recipe! They’re all deliciously tangy, smooth, and incredible on crackers or toast. Though my runner-ups for this charcuterie board are Kite Hill vegan cheeses, and a handful of Myoko vegan cheese flavors.

    How to Make a Vegan Charcuterie Board

    1. Begin every charcuterie board by prepping the ingredients you’ll be placing on your board. This includes washing fresh fruit, cutting bread, slicing cheese, etc. Once prepped, you’ll be able to see every element of your board and decide in which order you’d like to place them.


    2. Pick a large board or surface to lay everything on, then place small bowls around the board. These bowls don’t have to be in any particular pattern or order, so simply evenly space them around your board.


    3. Fill those small bowl with things like hummus, soft cheese, dips, olives, or really anything that would make a mess if placed directly on your board/surface.


    4. Now that your bowls are all filled, go in with remaining larger items such as crackers, sliced bread, and fruit – working with one ingredient at a time.


    5. Once the vegan charcuterie board looks mostly complete, then fill in any gaps with your small items (in this case, I used nuts). Continue doing this until your board is fully loaded and ready to be served!

    Optional Add-Ons

    There really is no wrong way to jazz up a charcuterie board, so any of the following would make delicious additions to your vegan board:

    • Pickles
    • Strawberries
    • Chocolate Squares
    • Dried Fruit
    • Jelly/Jam
    • Mustard
    • Sweet Peppers
    • Cherry Tomatoes
    • Apple Slices
    • Carrots
    close-up image of vegan charcuterie board
    5 from 1 vote

    Vegan Charcuterie Board

    A flawless vegan charcuterie board, perfect for any occasion! An assortment of fresh fruits, veggies, crackers, bread, and vegan cheeses create the perfect spread. Have fun with this vegan charcuterie board, feel free to switch things up and make it your own!
    Print Pin Rate
    Prep Time: 10 minutes
    Total Time: 10 minutes
    Servings: 12 servings

    Ingredients

    • cucumber, sliced
    • olives
    • hummus
    • baguette, sliced
    • grapes
    • mandarin oranges, partially peeled
    • nuts (almonds, cashews, pecans, or walnuts)
    • radishes, sliced
    • vegan cheese, see Notes

    Instructions

    • Prep all ingredients – wash fruits and veggies, slice or chop items, etc.
    • Lay down the surface you’ll be arranging your items on, then start by placing small bowls evenly throughout the surface. You’ll need about 3-4 bowls for your olives, hummus, and vegan cheese.
    • Fill the bowls, then begin arranging items on your surface, leaving smaller items like nuts for the end. Finish by filling any gaps on your charcuterie boards with nuts or any other ingredients that may fit.

    Notes

  • Vegan Cheese: Vegan cheese brands I love are Spero Foods, Myoko, and Kite Hill!
  • Nutrition

    Calories: 300kcal

    More Vegan Recipes

    For a quick, easy, and delicious dinner – make these perfect bang bang shrimp bowls! Crispy cooked shrimp is tossed in a spicy, tangy bang bang sauce, then spooned over rice and a variety of veggies. Whip together this restaurant-quality meal in under 15 minutes, I promise you won’t regret it!

    bang bang shrimp bowl with shrimp, cucumber, edamame, and pickled red onion

    What You’ll Need To Make This Recipe

    Shrimp – Do yourself a favor and purchase peeled and deveined shrimp for this recipe. Then, if the tails haven’t already been removed, go ahead and remove them before cooking the shrimp. If left one, the shrimp tails are a nightmare to remove once covered in bang bang sauce. So, make life a little easier and strip those shrimp before cooking!

    Harissa Paste – Harissa is chili paste commonly used in Middle Eastern cooking. It’s delightfully spicy and loaded with delicious flavor. You should be able to find harissa paste at your local grocery store in either the spice aisle or ethnic food aisle. Though if you can’t find harissa paste available for purchase, there are a few homemade recipes floating around on the internet, such as this one.

    Soy Sauce or Coconut Aminos – A touch of soy sauce adds a bit of tang to our bang bang shrimp sauce. It’s the perfect addition to help round out the savory flavors! Though if you’re paleo or currently on Whole30, feel free to use coconut aminos in place of the soy sauce in this recipe. It’ll provide that same irresistible briny flavor!

    Cooked Rice – Use whatever kind of rice you’d like! White rice, brown rice, cauliflower rice… you get the idea. The use of cauliflower rice makes for a great low-carb, paleo, and Whole30 option!

    Top Tips

    • Get the avocado oil in your skillet hot before adding in the shrimp. We want a nice, golden brown and crispy crust on our shrimp, and can only achieve this by cooking them in very hot oil. And thanks to the use of high heat, the shrimp will only take a few minutes per side to cook!
    • You can make this bang bang shrimp recipe in the air fryer if you’d like! To do this, simply add your shrimp to an air fryer basket, drizzle with oil and sprinkle with salt, then cook at 400° Fahrenheit for 5 minutes. Once shrimp is fully cooked, toss in the bang bang sauce and continue with the recipe as normal.
    • Ditch the bowls and serve this easy seafood dish however you’d like! Poke each shrimp with a toothpick to serve as a delicious appetizer. Or, place in lettuce wraps for super healthy bang bang shrimp tacos!

    Adjust This Recipe To Your Dietary Needs

    Make it Paleo/Whole30 – For a paleo or Whole30 meal, be sure to use compliant mayo, coconut aminos instead of soy sauce, and cauliflower rice in place of white or brown rice.

    Make it Gluten-Free – The only ingredient in this dish which contains trace amounts of gluten is the soy sauce. Therefore, use tamari in place of the soy sauce to make this recipe gluten-free, I promise you won’t be able to taste the difference!

    Make it Vegan – Fry up some cubed tofu in a bit of avocado oil (similar to how you would the shrimp) then use a vegan mayo for your sauce. Once the tofu’s crispy, add it to your sauce and serve it over bowls of rice and veggies!

    close-up overhead image of bang bang shrimp bowl with cucumber, edamame, pickled red onion, and white rice
    5 from 1 vote

    Bang Bang Shrimp Bowls

    For a quick, easy, and delicious dinner – make these perfect bang bang shrimp bowls! Crispy cooked shrimp is tossed in a spicy, tangy bang bang sauce, then spooned over rice and a variety of veggies. Whip together this restaurant-quality meal in under 15 minutes, I promise you won’t regret it!
    Print Pin Rate
    Prep Time: 5 minutes
    Cook Time: 10 minutes
    Total Time: 15 minutes
    Servings: 4 servings

    Ingredients

    For the shrimp:

    • 1 pound peeled and deveined shrimp, tails removed
    • 1 tablespoon avocado oil, or any neutral vegetable oil
    • pinch of salt

    For the bang bang sauce:

    • 1/2 cup mayonnaise
    • 1 tablespoon harissa paste
    • 1 teaspoon soy sauce or coconut aminos
    • 1 teaspoon lime juice

    For the bowls:

    • Cooked white or brown rice
    • Scallions, chopped
    • Pickled veggies
    • Sesame seeds
    • Cucumber, thinly sliced
    • Edamame

    Instructions

    • Heat avocado oil in a large skillet over medium-high heat. Pat shrimp dry with a paper towel, season with a pinch of salt, then place in skillet and cook about 3-4 minutes per side or until opaque and slightly crispy.
    • Mix together all bang bang sauce ingredients in a large bowl. Add cooked shrimp to bowl and toss to coat in sauce.
    • Place bang bang shrimp over bowls of rice, and finish off with whatever other toppings you’d like.

    Nutrition

    Calories: 300kcal

    More 30 Minute Dinner Recipes

    The quickest and easiest way to make your own green juice in a blender – no juicer necessary! A refreshing blend of green veggies, a touch of ginger, and a hint of green apple make this homemade juice not only palatable, but actually delicious. No fancy equipment or juicer is needed for this simple and super healthy recipe!

    green blender juice being poured into a glass, garnished with a lemon slice

    What You’ll Need For This Recipe

    Blender – I used my for this green juice recipe. It’s certainly an investment, but my gosh is it powerful! The is a total work horse and if you ask me, worth EVERY penny. I even purchased mine “reconditioned,” which is just a fancy way of saying “used,” and it’s so far lasted me four years and three moves! However, if you don’t have a Vitamix and don’t feel like investing in one at the moment (I get it), you can simply use whatever blender you have. And if your blender isn’t large enough to fit all the fruit and veggies at once, simply split the recipe up into two batches.

    Nut Milk Bag or Fine Mesh Strainer – I purchased my very inexpensive nut milk strainer bag off Amazon 5+ years ago. If you don’t own a nut milk bag, you have two options. You can either buy one, which happens to be my recommended option, since it’s also an important tool in my dairy-free coffee creamer recipe! Or, you can use a fine mesh metal strainer instead. Though beware, a metal strainer won’t catch nearly as much pulp as a nut milk bag will, resulting in a grainier green juice.

    Fresh Vegetables – Any and all fresh vegetables are welcome to this green blender juice party! The specific ones we use are cucumber, celery, kale, fresh ginger, lemon, and some green apple for a hint of sweetness. I highly recommend purchasing organic produce for this recipe, since there’s no cooking involved to kill off any gnarly chemicals. Also, since everything’s being blended together – simply give the vegetables a couple quick chops, nothing too precise.

    Top Tips

    • Store the fresh fruits and vegetables in the fridge before making your juice. This’ll ensure it blends up extra cold and refreshing! Warm green juice is OK, but definitely not nearly as enjoyable as cold green juice.

    • Get innovative with the pulp from your green blender juice! Add it to smoothies, popsicles, or I’ve even seen people use it in baked goods. It’s always a goal of mine to be as low-waste as possible in the kitchen, so if all else fails, I’ll simply add my leftover pulp to the compost pile.

    • Any fresh, homemade juice is best enjoyed immediately after making! This is when the most vitamins and minerals are available, leading to more nutrients to fuel your body and leave you feeling amazing. However, you can store any leftover green juice in an airtight container in the fridge for up to two days.

    Other Tasty Additions

    Feel free to add or substitute your favorite fruits or veggies, such as:

    • Carrots
    • Beets
    • Oranges
    • Pineapple
    • Lime Juice
    • Strawberries
    • Blueberries
    • Pears
    • Turmeric
    two glasses of blender green juice with lemon slices
    No ratings yet

    Green Blender Juice (How to Make Juice Without a Juicer)

    The quickest and easiest way to make your own green juice in a blender – no juicer necessary! A refreshing blend of green veggies, a touch of ginger, and a hint of green apple make this homemade juice not only palatable, but actually delicious. No fancy equipment or juicer is needed for this simple and super healthy recipe!
    Print Pin Rate
    Prep Time: 5 minutes
    Cook Time: 40 minutes
    Total Time: 10 minutes
    Servings: 2 servings

    Ingredients

    • 1 large cucumber, chopped
    • 1 bunch celery, chopped
    • 2 green apples, chopped
    • 1 bunch kale, chopped
    • 1-inch piece ginger, peeled
    • 1 lemon, juiced
    • 1 cup water

    Instructions

    • Add all ingredients to blender and blend until smooth.
    • Place a nut milk bag or fine mesh strainer over a large bowl and pour juice through bag or strainer. Squeeze out as much juice as possible and discard pulp.
    • Store in an airtight container in the fridge for up to 2 days.

    Notes

  • No need to remove any seeds or stems from your fresh fruits and vegetables! Simply run a knife through everything, making it just small enough to blend.
  • Nutrition

    Calories: 300kcal

    More Super Healthy Recipes to Feel Your Best

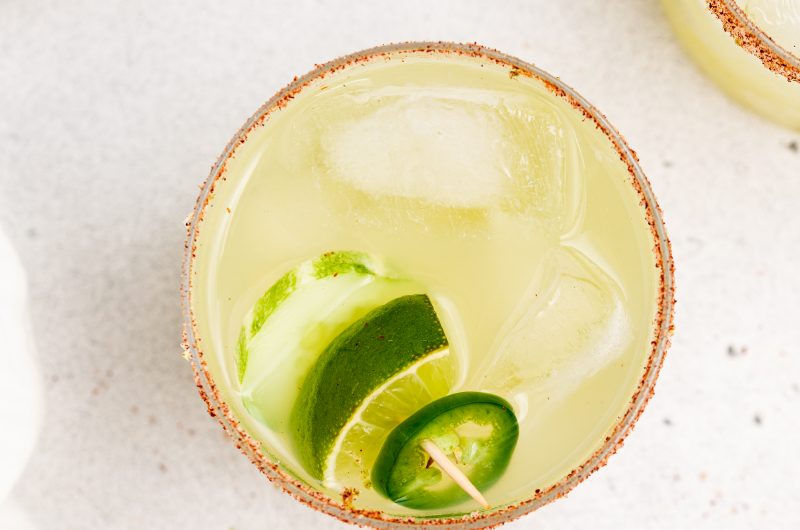
    These spicy cucumber margaritas are tangy, smoky, and perfectly sweet! This refreshing cocktail features a spicy rim along with fresh muddled cucumbers. Shake together a batch of these healthier homemade margaritas for your next dinner party or summer barbecue!

    two spicy cucumber margaritas with spicy salt rim on the side

    What You Need To Make Spicy Cucumber Margaritas

    Lime Zest – The lime zest in the spicy rim is my very own secret ingredient. It adds a touch of brightness that will have people asking, “what is that?!” Just a teaspoon of fresh lime zest brings these drinks together. They’re ideally salty, sweet, and savory!

    Agave – This natural sweetener makes these margaritas that much more healthy. I personally like the taste of agave better than simple syrup. Agave is darker in both color and flavor. Though if you’re looking for an even healthier cocktail – use honey instead!

    Cucumber – This crisp, fresh vegetable is 96% water! Therefore, I like to look at this cocktail as a way to hydrate while I dehydrate. Ok ok gigs up. I can’t confidently say these margaritas are actually healthy just because they contain a vegetable. But I can say the cucumber perfectly balances out the spice. There’s just something about the combination of the two that is *chef’s kiss* perfect!

    Make It A Mocktail

    • Use 2 ounces of tonic or sparkling water in place of the tequila. Also, use orange juice instead of triple sec for a virgin spicy cucumber margarita!

    Tips For Making Spicy Cucumber Margaritas

    • The longer you shake these margaritas, the spicier they’ll be! Tossing the sliced jalapeños in your cocktail shaker will encourage them to release their spicy oils. So the longer they have to release those oils, the spicier your drinks will be.
    • For a skinny margarita, use orange juice instead of triple sec. The use of agave falls under the “skinny” label. Though if you want to make this a true skinny spicy cucumber margarita (wow that’s a mouthful) make sure you use fresh-squeezed orange juice instead of triple sec.
    • If you don’t like a salty rim, use sugar instead! Replace the salt with the same amount of sugar. Enjoy a slightly sweeter, yet still spicy and delicious cocktail.

    Spicy Cucumber Margaritas

    5 from 1 vote
    Recipe by Samantha Russo Course: DrinksCuisine: MexicanDifficulty: Easy
    Servings

    2

    servings
    Prep time

    5

    minutes
    Total time

    5

    minutes

    These spicy cucumber margaritas are tangy, smoky, and perfectly sweet! This refreshing cocktail features a spicy rim along with fresh muddled cucumbers. Shake together a batch of these healthier homemade margaritas for your next dinner party or summer barbecue!

    Ingredients

    • For the spicy rim:
    • 3 tablespoons salt

    • 1 tablespoon chili powder

    • 1 teaspoon lime zest

    • 4 ounces tequila

    • 2 ounces lime juice

    • 1 ounce triple sec, see Notes

    • 1 tablespoon agave, see Notes

    • 1 cup cucumber, sliced

    • 3-4 jalapeño slices

    Directions

    • Mix together all spicy rim ingredients together on a small plate. Then run a lime wedge along the rim of both glasses before dipping in the salt mixture. Set glasses aside.
    • Place the tequila, lime juice, triple sec, agave, and cucumber in a cocktail shaker. Muddle together, squashing the cucumbers in the process.
    • Fill the shaker with ice, add in jalapeño slices. Then secure with lid and shake for about 1 minute.
    • Fill both glasses with ice, then pour over ice.

    Recipe Video

    Notes

    • Triple Sec: For a lower calorie drink, you can sub the triple sec for 1 ounce of fresh-squeezed orange juice instead!
    • Agave: Simple syrup or honey would both work in place of the agave in this recipe.

    Did you make this recipe?

    Share it and tag @samdoesherbest on Instagram!

    Like this recipe?

    Follow us @samdoesherbest on Pinterest

    Other Fun and Easy Cocktail Recipes