
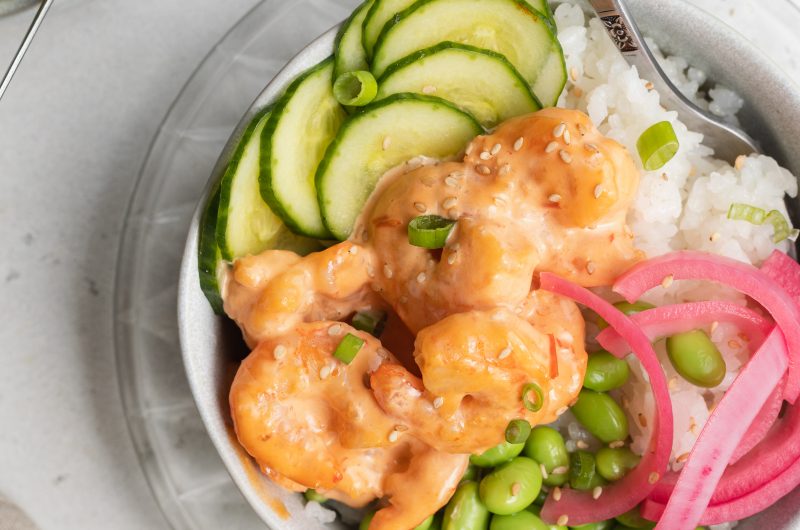
For a quick, easy, and delicious dinner – make these perfect bang bang shrimp bowls! Crispy cooked shrimp is tossed in a spicy, tangy bang bang sauce, then spooned over rice and a variety of veggies. Whip together this restaurant-quality meal in under 15 minutes, I promise you won’t regret it!

What You’ll Need To Make This Recipe
Shrimp – Do yourself a favor and purchase peeled and deveined shrimp for this recipe. Then, if the tails haven’t already been removed, go ahead and remove them before cooking the shrimp. If left one, the shrimp tails are a nightmare to remove once covered in bang bang sauce. So, make life a little easier and strip those shrimp before cooking!
Harissa Paste – Harissa is chili paste commonly used in Middle Eastern cooking. It’s delightfully spicy and loaded with delicious flavor. You should be able to find harissa paste at your local grocery store in either the spice aisle or ethnic food aisle. Though if you can’t find harissa paste available for purchase, there are a few homemade recipes floating around on the internet, such as this one.
Soy Sauce or Coconut Aminos – A touch of soy sauce adds a bit of tang to our bang bang shrimp sauce. It’s the perfect addition to help round out the savory flavors! Though if you’re paleo or currently on Whole30, feel free to use coconut aminos in place of the soy sauce in this recipe. It’ll provide that same irresistible briny flavor!
Cooked Rice – Use whatever kind of rice you’d like! White rice, brown rice, cauliflower rice… you get the idea. The use of cauliflower rice makes for a great low-carb, paleo, and Whole30 option!
Top Tips
- Get the avocado oil in your skillet hot before adding in the shrimp. We want a nice, golden brown and crispy crust on our shrimp, and can only achieve this by cooking them in very hot oil. And thanks to the use of high heat, the shrimp will only take a few minutes per side to cook!
- You can make this bang bang shrimp recipe in the air fryer if you’d like! To do this, simply add your shrimp to an air fryer basket, drizzle with oil and sprinkle with salt, then cook at 400° Fahrenheit for 5 minutes. Once shrimp is fully cooked, toss in the bang bang sauce and continue with the recipe as normal.
- Ditch the bowls and serve this easy seafood dish however you’d like! Poke each shrimp with a toothpick to serve as a delicious appetizer. Or, place in lettuce wraps for super healthy bang bang shrimp tacos!
Adjust This Recipe To Your Dietary Needs
Make it Paleo/Whole30 – For a paleo or Whole30 meal, be sure to use compliant mayo, coconut aminos instead of soy sauce, and cauliflower rice in place of white or brown rice.
Make it Gluten-Free – The only ingredient in this dish which contains trace amounts of gluten is the soy sauce. Therefore, use tamari in place of the soy sauce to make this recipe gluten-free, I promise you won’t be able to taste the difference!
Make it Vegan – Fry up some cubed tofu in a bit of avocado oil (similar to how you would the shrimp) then use a vegan mayo for your sauce. Once the tofu’s crispy, add it to your sauce and serve it over bowls of rice and veggies!
Bang Bang Shrimp Bowls
Course: Main, AppetizersDifficulty: Easy4
servings5
minutes10
minutes15
minutesFor a quick, easy, and delicious dinner – make these perfect bang bang shrimp bowls! Crispy cooked shrimp is tossed in a spicy, tangy bang bang sauce, then spooned over rice and a variety of veggies. Whip together this restaurant-quality meal in under 15 minutes, I promise you won’t regret it!
Ingredients
- For the shrimp:
1 pound peeled and deveined shrimp, tails removed
1 tablespoon avocado oil, or any neutral vegetable oil
pinch of salt
- For the bang bang sauce:
1/2 cup mayonnaise
1 tablespoon harissa paste
1 teaspoon soy sauce or coconut aminos
1 teaspoon lime juice
- For the bowls:
Cooked white or brown rice
Scallions, chopped
Pickled veggies
Sesame seeds
Cucumber, thinly sliced
Edamame
Directions
- Heat avocado oil in a large skillet over medium-high heat. Pat shrimp dry with a paper towel, season with a pinch of salt, then place in skillet and cook about 3-4 minutes per side or until opaque and slightly crispy.
- Mix together all bang bang sauce ingredients in a large bowl. Add cooked shrimp to bowl and toss to coat in sauce.
- Place bang bang shrimp over bowls of rice, and finish off with whatever other toppings you’d like.
Recipe Video
Did you make this recipe?
Share it and tag @samdoesherbest on Instagram!
Like this recipe?
Follow us @samdoesherbest on Pinterest


")

