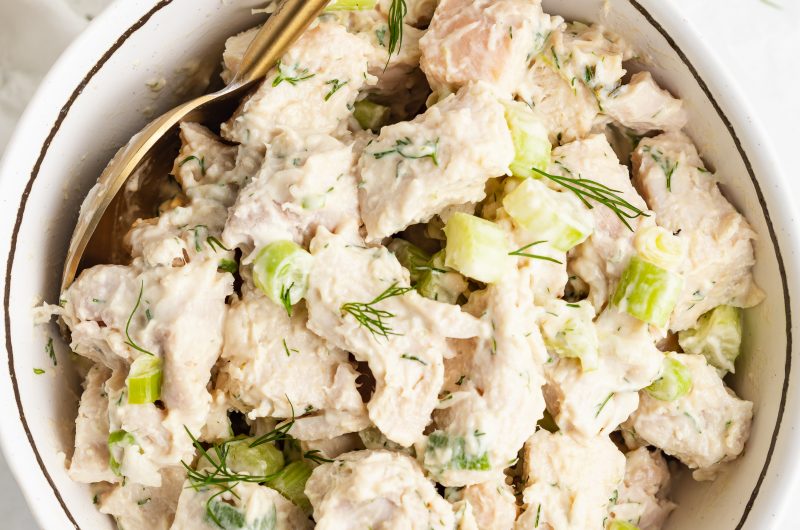
Tag

healthy

Browsing

Skip the delivery and try this vegan and gluten-free version of the classic Indian dish known as tikka masala that uses tofu in place of meat! Serve over freshly steamed basmati rice and garlic naan for a complete Indian spiced dish.

Tofu Tikka Masala

Tikka masala is surprisingly easy to make vegan! Instead of meat, I used tofu, which works perfectly in this dish since it soaks up all the delicious spices and flavors in this recipe. The sauce is creamy, tangy and spicy, but not hot or overbearing.

And what’s an Indian meal without spice?! You’ll notice my list of ingredients have a handful of them. So, if you enjoy spicy foods, your taste buds are definitely going to enjoy the turmeric, garam masala, cumin, cayenne pepper and paprika found in this dish.

Tikka Masala Overview

Just in case you’ve never come across Tikka Masala before, I wanted to give a quick overview of what it means.

Tikka masala is an Indian dish consisting of roasted marinated chicken chunks in spiced curry sauce.

  • The “tikka” refers to the protein. The most common ingredient used is chicken, but it varies. Some people like to use lamb instead. For my recipe, we skip the meat altogether and replace it with tofu.

  • The “masala” translates as “spice mix” and refers to the sauce. Most include a tomato base, garam masala and a creamy element like yogurt or, in this case, coconut milk.

MAIN INGREDIENTS NEEDED TO MAKE Vegan Tofu Tikka Masala

  • Tofu – Make sure to buy the extra firm kind.

  • Olive Oil

  • Ginger

  • Garam Masala, Cumin, Tumeric & Cayenne Pepper – Mix these with a few other spices in the recipe to create a spicy and tangy flavor.

  • Tomato Sauce – A common pantry item, this is going to be the base for the sauce.

  • Coconut Milk – I use full-fat coconut milk for the sauce, which makes this dish super rich and creamy without needing to rely on any dairy.

ADJUST THIS RECIPE TO YOUR DIET

  • Need a little less spice? You can adjust the amount of spices to suit your heat preference, or leave it out all together for a non-spicy tikka masala dish.

  • Dairy: You can try using yogurt, a heavy creamer or regular milk in place of the coconut milk.

TIPS FOR MAKING THIS Tofu Tikka Masala Recipe

  • Serve with basmati rice and naan (a popular Indian flatbread) for a complete meal.

Vegan Tofu Tikka Masala (Gluten-Free)

0 from 0 votes
Recipe by Samantha Course: DinnerCuisine: IndianDifficulty: Medium
Servings

4

servings
Prep time

15

minutes
Cooking time

25

minutes
Calories

300

kcal
Total time

40

minutes

Skip the delivery and try this vegan and gluten-free version of Tikka Masala that uses tofu in place of meat with flavorful spices that is bound to give your taste buds something to look forward to!

Ingredients

  • For the tofu:
  • 2 tablespoons olive oil

  • 2 (16-ounce) blocks extra firm tofu, pressed dry with a dish towel then cut into cubes

  • ½ teaspoon salt

  • For the sauce:
  • 2 tablespoons olive oil

  • 1 onion, finely chopped

  • 4 garlic cloves, grated

  • 2-inch piece fresh ginger, grated

  • 2 teaspoons garam masala

  • 1 ½ teaspoon cumin

  • 1 teaspoon turmeric

  • 1 teaspoon ground coriander

  • 1 teaspoon salt

  • Pinch of cayenne pepper

  • 1 (14-ounce) can tomato sauce

  • 1 (13.5-ounce) can full fat coconut milk

Directions

  • Heat olive oil in a large skillet over medium-high heat, then add in the tofu in an even layer and sprinkle evenly with salt.
  • Cook tofu 4-5 minutes per side or until golden brown and crispy. Remove tofu from skillet and set aside.
  • Heat olive oil for sauce in the same skillet and cook onions for about 3 minutes or until slightly soft.
  • Add in the garlic and ginger, cook for one minute before adding in the garam masala, cumin, turmeric, ground coriander, salt, and cayenne pepper.
  • Cook spices for about 30 seconds before pouring in the tomato sauce and coconut milk. Reducing heat and simmer for 15 minutes.
  • Add tofu back into the skillet and simmer for 5 minutes.

Recipe Video

Notes

  • Storage: Place leftovers in an airtight storage container in the refrigerator for up to 5 days.
  • Reheat: Gently rewarm leftovers in an oven over medium-low heat. You can also reheat leftovers in the microwave until hot.

Did you make this recipe?

Share it and tag @samdoesherbest on Instagram!

Like this recipe?

Follow us @samdoesherbest on Pinterest

More “Better Than Takeout” Healthy Recipes

Using two halved honeynut squashes, vegan butter, salt, cinnamon and maple syrup, this savory and sweet dish is a perfect Fall meal when you want something easy and healthy to make.

Honeynut Squash

If you aren’t familiar with honeynut squash, it looks and tastes just like a baby version of butternut, but it’s sweeter and smaller. Both are perfect as a roasted treat and are easily interchangeable if you prefer one over the other. I love this dish because, not only is it delicious, but the size is perfect for individual servings. It’s also rich in nutrients, including a high amount of vitamin A and potassium, making it a healthy Fall dish. (Well…aside from the drizzle of maple syrup, but that’s OK, you can always grab a sugar-free version).

  • Honeynut Squash – The staple to this dish! Make sure to remove the seeds before cooking. You can also use butternut squash if you prefer.

  • Vegan Butter – If you want to keep it dairy-free, but want something other than butter, you can try using coconut oil.

  • Cinnamon – I find that cinnamon really adds a nice touch and compliments the maple syrup.

  • Maple Syrup – Add some sweetness to this dish by drizzling some maple syrup on it before serving.

  • Optional toppings: Pecans, walnuts, dried cranberries

Adjust this recipe to your diet

  • Dairy: Use regular butter instead of vegan butter.

  • Sugar-free: Use a sugar-free version of maple syrup like Lankantos.

TIPS FOR MAKING THIS Honeynut Squash Recipe

  • Sprinkle some pecans, walnuts or cranberries on top once the honeynut squash is roasted.

  • Swap the cinnamon for pumpkin pie spice.

Roasted Honeynut Squash With Maple Syrup & Cinnamon (Vegan, Gluten-Free)

0 from 0 votes
Recipe by Samantha Course: Snacks, Lunch, DinnerCuisine: AmericanDifficulty: Easy
Servings

1

servings
Prep time

5

minutes
Cooking time

35

minutes
Calories

300

kcal
Total time

40

minutes

My vegan roasted honeynut squash recipe with cinnamon and drizzled with maple syrup is utterly sweet and savory, making it the perfect Fall dish.

Ingredients

  • 2 honeynut squash, halved lengthwise and seeds removed

  • 1 tablespoon butter, melted (I used vegan butter)

  • ¼ teaspoon cinnamon

  • Maple syrup, for serving

Directions

  • Preheat oven to 425° Fahrenheit and place honeynut squash on a large baking sheet.
  • Mix melted butter, salt, and cinnamon together in a small bowl then brush over inside of honeynut squash.
  • Bake squash 35-40 minutes, then drizzle with maple syrup and enjoy.

Recipe Video

Notes

  • Honeynut Squash can be roasted up to 2 days in advance and stored in the refrigerator in an airtight container.
  • Uncooked squash can be frozen in an airtight container for up to 3 months.

Did you make this recipe?

Share it and tag @samdoesherbest on Instagram!

Like this recipe?

Follow us @samdoesherbest on Pinterest

Other Squash Recipes

Drizzled with creamy maple tahini dressing, this vegan and gluten-free autumn harvest bowl uses in-season produce like apples, sweet potatoes, dried cranberries, kale and pumpkin seeds. This makes it the perfect Fall meal for when you want something fresh and delicious that can be made under 30 minutes.

Don’t you just love Fall produce? I know I do, and I try to make the most of it while it’s still in-season. This healthy vegan salad features all the best Fall ingredients. Topped with maple tahini dressing, it’s a standout salad that’s always a hit!

MAIN INGREDIENTS NEEDED TO MAKE AUTUMN HARVEST BOWL

  • Sweet Potato – High in fiber and antioxidants, it’s one of my favorite Fall root veggies.

  • Apples – Any variety works but I recommend something nice and crisp like Fiji or Honeycrisp.

  • Chickpeas – This will give you some major protein to help keep your energy levels up.

  • Kale – This is one of the most nutrient-dense foods and a key ingredient to this dish. Any variety works!

  • Dried Cranberries -Adds a tart, natural taste to the bowl. When cranberries are dried, they lose most of their vitamins, but they hold on to other nutrients such as potassium and calcium.

  • Tahini -If you’re unfamiliar with what Tahini is, it’s a smooth paste made by grinding sesame seeds. It kinda looks like peanut butter, but it’s not as sweet. The nutty flavor is strong and earthy, and can be a little bitter.

  • Maple Syrup – Maple has a distinctly sweet flavor which helps balance the earthy flavor of the tahini.

ADJUST THIS RECIPE TO YOUR DIET

  • Nut option: Replace the pumpkin seeds with walnuts.

  • Gluten: You can sub the quinoa for something like freekeh (it has notably more fiber than brown rice and even quinoa!) 

TIPS FOR MAKING THIS VEGAN AUTUMN HARVEST BOWL

  • You could use any fruits and vegetables that you have one hand – be creative!

  • Store leftovers in the fridge in a sealed container for up to 3 days.

Autumn Harvest Bowl with Maple Tahini Dressing (Vegan, Gluten-Free)

0 from 0 votes
Recipe by Samantha Course: LunchCuisine: AmericanDifficulty: Easy
Servings

1

servings
Prep time

10

minutes
Cooking time

20

minutes
Calories

300

kcal
Total time

30

minutes

Drizzled with creamy maple tahini dressing, this vegan and gluten-free autumn harvest bowl uses in-season produce like apples, sweet potatoes, dried cranberries, kale and pumpkin seeds. This makes it the perfect Fall meal for when you want something fresh and delicious that can be made under 30 minutes.

Ingredients

  • For the bowl:
  • 1 sweet potato, peeled and cut into 1-inch cubes

  • ¼ cup chickpeas, drained and rinsed

  • 2 tablespoons avocado oil

  • Salt and pepper, to taste

  • 2 cups kale, chopped

  • ½ cup quinoa, cooked

  • ½ apple, sliced

  • 2 tablespoons dried cranberries

  • 2 tablespoons pumpkin seeds, raw or roasted

  • For the tahini dressing:
  • ¼ cup tahini

  • 2 tablespoons maple syrup

  • 1 tablespoon lemon juice

  • ¼ teaspoon salt

Directions

  • Preheat oven to 425° Fahrenheit and line a baking sheet with parchment paper.
  • Place sweet potatoes and chickpeas on baking sheet then drizzle with avocado oil and sprinkle with salt and black pepper. Toss potatoes and chickpeas to coat, then roast for 20 minutes, tossing halfway through.
  • While chickpeas and potatoes roast, add all tahini dressing ingredients to a bowl and whisk together until combined.
  • Place kale in a bowl and pour in half of the tahini dressing. Toss and massage the dressing into the kale with your hands.
  • Once chickpeas and potatoes are done, assemble harvest bowl by adding remaining ingredients to the bowl with the kale then drizzling with remaining tahini dressing.

Recipe Video

Notes

  • Storage: Store leftovers in the fridge in a sealed container for up to 3 days.
  • You could use any fruits and vegetables that you have one hand – be creative!

Did you make this recipe?

Share it and tag @samdoesherbest on Instagram!

Like this recipe?

Follow us @samdoesherbest on Pinterest

OTHER EASY SALAD RECIPES YOU’LL LOVE

This vegan cashew queso dip recipe is super quick and easy to make, requiring just 9 ingredients, 5-10 minutes, and 1 blender. It’s comprised of raw cashews, nutritional yeast, spices, and jalapenos blended to creamy perfection. This queso (along with your choice of crunchy tortilla chips) is a perfect appetizer dish for Mexican night with your friends or fam!

If you need a delicious dip for a Mexican dinner night, a party, or even just for yourself, look no further than this vegan cashew queso! It’s made with just a few simple ingredients you probably already have on hand and is 100% healthy.

Although it differs from your traditional Mexican queso (excludes the cheese and meat), I promise you won’t even miss the cheese – the cashews and nutritional yeast take the place of it quite nicely! Super quick and easy to make, this queso is perfect for serving with nachos, burrito bowls, tacos, and more!

MAIN INGREDIENTS NEEDED TO MAKE VEGAN CASHEW QUESO

  • Cashews – This dip gets its creaminess from raw cashews. Not only do cashews have a lower fat content than most other nuts, they’re also loaded with iron and magnesium.

  • Nutritional Yeast – This is a deactivated yeast that contains B-complex vitamins and provides a “cheesy” flavor to vegan dishes.

  • Lemon Juice – Juice the lemons yourself for the best flavor, or use bottled if that’s what you have at home.

  • Jalapenos – Bring on the spice!

ADJUST THIS VEGAN CASHEW QUESO RECIPE TO YOUR DIET

  • Dairy: Sub the almond milk for regular milk.

TIPS FOR MAKING VEGAN QUESO

  • To make this easy vegan cashew queso, all you really need is a blender. I recommend soaking your cashews ahead of time if you have a standard blender. However, if you have a high-speed one, you can even skip that for a faster dip.

Vegan Cashew Queso (Gluten-Free)

0 from 0 votes
Recipe by Samantha Course: AppetizersCuisine: MexicanDifficulty: Easy
Servings

2

servings
Prep time

5

minutes
Cooking time

5

minutes
Calories

300

kcal
Total time

10

minutes

This vegan cashew queso dip recipe is super quick and easy to make, requiring just 9 ingredients5 minutes, and 1 blender. It’s comprised of raw cashews, nutritional yeast, spices, and jalapenos blended to creamy perfection. This queso (along with your choice of crunchy tortilla chips) is a perfect appetizer dish for Mexican night with your friends or fam!

Ingredients

  • 1 cup raw cashews, soaked in hot water for 5-10 minutes

  • ¾ cup almond milk or water

  • 3 tablespoons nutritional yeast

  • 1 tablespoon lemon juice

  • ½ teaspoon cumin

  • ½ teaspoon chili powder

  • 1 teaspoon salt

  • 1 (14 ounce) can fire roasted diced tomatoes, drained

  • 2 tablespoons pickled jalapenos, finely chopped

Directions

  • Soak the raw cashews in boiling hot water for 5-10 minutes, then rinse cashews and add to a blender.
  • Add all other ingredients to the blender except diced tomatoes and pickled jalapenos. Blend mixture until completely smooth.
  • Transfer vegan queso to a small saucepan over medium-low heat then stir in the fire roasted diced tomatoes and pickled jalapenos. Once warm, remove from the heat and serve.

Recipe Video

Notes

  • Storage: This can last up to 5 days in the fridge.
  • Pair this with a spicy margarita to round out this delicious appetizer. (Link below!)

Did you make this recipe?

Share it and tag @samdoesherbest on Instagram!

Like this recipe?

Follow us @samdoesherbest on Pinterest

OTHER VEGAN MEXICAN DISHES

If your only experience with fried rice is Chinese take-out, you’ll love this fresher-tasting, gluten-free version.

One of my favorite parts of hibachi is the fried rice! Whether you want it as a full meal or a side dish, you can’t go wrong with this hibachi fried rice recipe. Made with gluten-free soy sauce, and full of good-for-you vegetables, it is quick and easy to make, and is sure to be a big hit.

What You Need To Make Hibachi Fried Rice

  • Rice – Jasmine, calrose, short-grain rice, and long-grain rice are some of my favs to use when cooking hibachi fried rice. 
  • Vegetables – I’ve used onions, corn and carrots, but you can also add in other veggies of your choice. If all you have is a bag of frozen vegetables, that’ll work just fine!
  • Grated Ginger – Just two teaspoons of fresh grated ginger goes a long way in making this hibachi fried rice. The next time you’re at the store, pick up a knob of fresh ginger in the produce section. Once home, store it in the freezer to make it last longer.
  • Soy Sauce & Toasted Sesame Oil – Along with the delicious taste, soy sauce also adds a nice brown color in the recipe.  Although optional, the toasted sesame oil brings tons of nutty flavor to this hibachi fried rice.
  • Avocado oil – When compared to traditional olive oil used in a lot of recipes, avocado oil will perform better when heated to high temperatures.

Adjust This Hibachi Fried Rice Recipe To Your Diet

  • Make it Vegan: Use vegan butter and omit the egg.
  • Make it Grain-Free: Substitute the rice for some cauliflower rice (the dish won’t get as crispy and “fried,” but will still taste delicious!)
  • Make it Paleo: Use cauliflower rice, coconut aminos instead of soy sauce, and avocado oil instead of butter.

Tips For Making Hibachi Fried Rice

  • Use rice you’ve made ahead of time instead of freshly cooked rice. Freshly cooked rice tends to clump together and does not crisp up as easily.
  • For more protein, add some cooked shrimp or cubes of tofu!
  • Consider varying the veggies like snow peas, broccoli florets and chopped zucchini for delicious additions.

Hibachi Fried Rice Recipe (Gluten-Free, Dairy-Free, Vegan Option)

3 from 13 votes
Recipe by Samantha Course: Main, SidesCuisine: AsianDifficulty: Easy
Servings

4

servings
Prep time

5

minutes
Cooking time

10

minutes
Total time

15

minutes

One of my favorite parts of hibachi is the fried rice! Whether you want it as a full meal or a side dish, you can’t go wrong with this hibachi fried rice recipe. Made with gluten-free soy sauce, ginger and full of good-for-you vegetables, it is quick and easy to make, and is sure to be a big hit.

Ingredients

  • 2 tablespoons avocado oil

  • ½ onion, chopped

  • 1 cup frozen mixed vegetables

  • 2 teaspoons grated ginger

  • 2 eggs, whisked

  • 2 tablespoons butter, I used non-dairy butter

  • 3 cups cooked rice, cooled

  • 3 tablespoons soy sauce

  • 1 teaspoon toasted sesame oil, optional

Directions

  • Heat avocado oil in a large skillet over medium-high heat, add in onion, frozen vegetables, and ginger – sauté for 2-3 minutes.
  • Move vegetables to the side of the skillet and pour whisked eggs into the center. Scramble eggs in pan until fully cooked, then toss with the veggies.
  • Add in the rice and butter, cook for 5 minutes stirring every 30 seconds.
  • Pour in soy sauce and sesame oil, toss to coat rice in sauce then pack into bowls and serve.

Recipe Video

Notes

  • Serve it with Gluten-Free Dumplings for an Asian-inspired meal.
  • Store it away: divide this recipe into meal prep containers to grab-and-go throughout the week or refrigerate it in one big container to reheat for dinner.

Did you make this recipe?

Share it and tag @samdoesherbest on Instagram!

Like this recipe?

Follow us @samdoesherbest on Pinterest

Other Recipes You’ll Love